

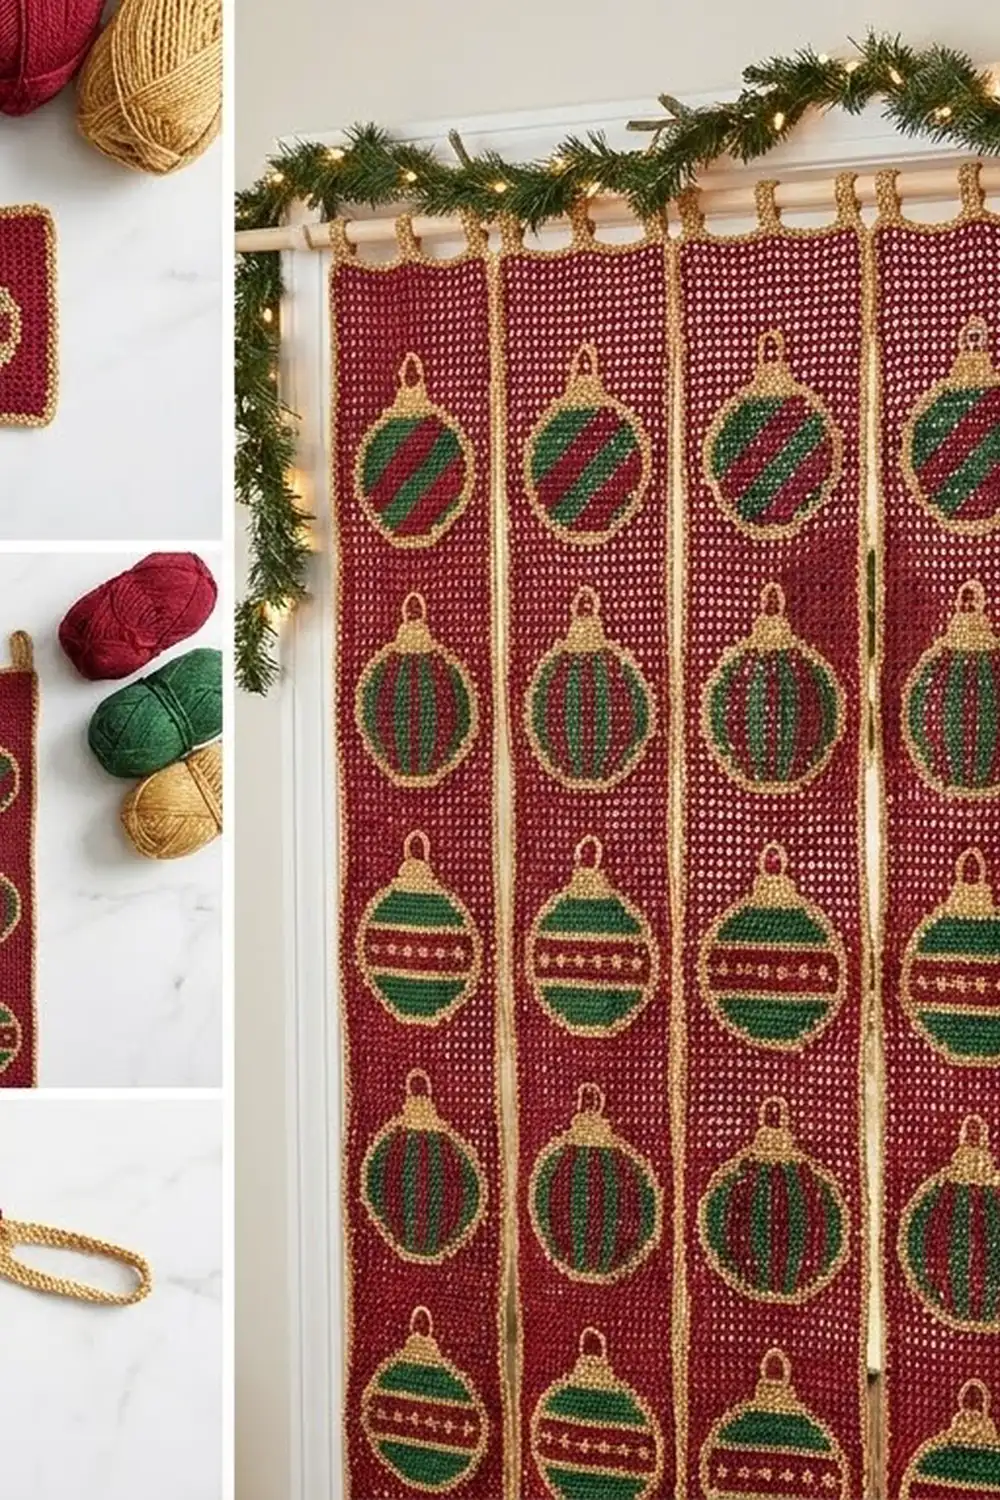
Bauble Lane is a festive doorway curtain made of six slim filet mesh strips. Each strip carries a column of striped Christmas ornaments. The open cranberry grid lets light through, and the round baubles add bold color and texture in rich green and gold.
Each ornament has a round body in cranberry and forest-green vertical stripes. Two raised gold lines flank the center stripe, and a gold rope outline frames the circle. A small bobble-textured gold cap with a tiny loop sits on top. The look is classic and cozy, much like a row of vintage glass baubles.
This pattern uses US crochet terms. Each finished strip measures 6.6 in wide x 78.4 in long (16.8 cm x 199.1 cm) without its tabs. With the 2 in (5.1 cm) hanging loops, it hangs 80.4 in (204.2 cm).
Construction is simple and modular. You crochet each strip in filet mesh rows, make the ornament bodies sideways in rows so the stripes run vertically, and add gold caps. Then you sew the appliqués on, work a single crochet border around each strip, and add two tabs. The strips stay separate so people can walk through them.
Finished Size and Construction
- Finished strip size: 6.6 in x 78.4 in (16.8 cm x 199.1 cm), plus 2 in (5.1 cm) tabs
- Skill level: Intermediate
- Terminology: US
- Yarn weight: DK / light worsted (#3) cotton
- Hook: 4.5 mm (US 7)
- Number of pieces: 6 strips, 84 ornament bodies, 84 caps
- Layout: 6 strips hung side by side, 14 ornaments per strip
- Strip size before border: 6.2 in x 78 in (15.7 cm x 198.1 cm)
- Ornament size: 4 in (10.2 cm) body including outline; total height including cap and loop about 5.2 in (13.2 cm)
- Border depth: 0.2 in (0.5 cm) per side
- Total strip width: 39.6 in (100.6 cm) before spacing on the rod
Materials
Choose a smooth mercerized or matte cotton in DK weight, about 115 m per 50 g. Cotton keeps the mesh crisp and holds its shape when it hangs. Avoid fuzzy or very stretchy fibers, which blur the grid and grow in length.
- Cranberry (A): 1,100 g / 2,530 m (strips, borders, tabs, red stripes)
- Forest Green (B): 230 g / 529 m
- Golden Straw (C): 350 g / 805 m
All quantities include a margin of about 10% for gauge swatches and tension differences.
Tools:
– 4.5 mm (US 7) hook
– Tapestry needle
– Stitch markers
– Rust-proof pins
– Measuring tape
– Blocking mats
– Spray bottle
– Curtain rod up to 1 in (2.5 cm) in diameter
Abbreviations (US Terms)
- ch – chain
- sl st – slip stitch
- sc – single crochet
- dc – double crochet
- sk – skip
- sp – space
- st(s) – stitch(es)
- inc – 2 sc in the same st
- RS / WS – right side / wrong side
- tch – turning chain
Bobble: (Yarn over, insert hook in st, yarn over, pull up a loop, yarn over, pull through 2 loops) 3 times in the same st. Then yarn over and pull through all 4 loops on the hook.
Surface slip stitch: Hold the yarn behind the work. Insert the hook from front to back between two stitches, pull up a loop, and draw it through the loop on the hook.
Gauge and Checkpoints
- Mesh gauge: 5 meshes (15 sts) = 3 in (7.6 cm) wide; 1 mesh row = 0.5 in (1.3 cm) tall
- Sc gauge: 20 sc x 22 rows = 4 in x 4 in (10.2 cm x 10.2 cm)
Test one piece first. Before starting the full strips, make one ornament body and the first 23 rows of a strip (the foundation row plus 22 mesh rows).
Checkpoints:
– After the strip foundation row: 31 sts = 6.2 in (15.7 cm).
– After 23 rows: 11.5 in (29.2 cm) tall.
– Ornament body after Row 20: about 3.6 in x 3.6 in (9.1 cm x 9.1 cm).
– Body after the outline: 4 in (10.2 cm) across.
– Cap: 1.4 in x 0.75 in (3.6 cm x 1.9 cm).
If your piece is too big, go down a hook size. If it is too small, go up a hook size. Mesh row height matters most, because 156 rows multiply any error. A difference of only 0.05 in (0.1 cm) per row changes the strip by 7.8 in (19.8 cm).

Strip (Make 6)
Use Cranberry (A).
Foundation: Ch 33.
Row 1 (solid): Dc in the 4th ch from hook and in each ch across. The skipped 3 ch count as the first dc. Turn. (31 sts)
Row 2 (mesh): Ch 3 (counts as dc). *Ch 2, sk 2 sts, dc in next st; rep from * across, working the last dc in the top of the tch. Turn. (11 dc and 10 ch-2 sps = 31 sts; 10 meshes)
Rows 3–155: Ch 3 (counts as dc). *Ch 2, sk ch-2 sp, dc in next dc; rep from * across, working the last dc in the 3rd ch of the tch. Turn. (31 sts; 10 meshes per row)
Row 156 (solid): Ch 3 (counts as dc). *2 dc in next ch-2 sp, dc in next dc; rep from * across. (31 sts)
Fasten off. Rows 2–155 give 154 mesh rows, which is 14 ornament blocks of 11 rows each. The strip measures 6.2 in x 78 in (15.7 cm x 198.1 cm).
Ornament Body (Make 84)
Work sideways in sc rows. When you turn the finished piece 90 degrees, each row becomes a vertical stripe. To change color, use the new color for the last yarn over of the final st of the previous row. Carry nothing; cut and weave in ends.
Color sequence:
– Rows 1–3: A
– Rows 4–6: B
– Rows 7–8: A
– Rows 9–12: B (center stripe)
– Rows 13–14: A
– Rows 15–17: B
– Rows 18–20: A
Rows:
– Row 1: With A, ch 11. Sc in the 2nd ch from hook and in each ch across. Turn. (10 sc)
– Row 2: Ch 1, inc in first st, sc in each st to last st, inc in last st. Turn. (12 sc)
– Row 3: Work as Row 2. (14 sc)
– Row 4: Work as Row 2. (16 sc)
– Row 5: Work as Row 2. (18 sc)
– Rows 6–16: Ch 1, sc in each st across. Turn. (18 sc)
– Row 17: Ch 1, sc2tog, sc to last 2 sts, sc2tog. Turn. (16 sc)
– Row 18: Work as Row 17. (14 sc)
– Row 19: Work as Row 17. (12 sc)
– Row 20: Work as Row 17. (10 sc)
Do not fasten off; keep A ready for weaving ends later. Fasten off.
Gold lines: With C and the RS facing, work surface slip stitches along the color change between Rows 8 and 9: 18 surface sl sts. Repeat along the change between Rows 12 and 13: 18 surface sl sts. These raised lines frame the center green stripe.
Outline Rnd 1: With C, join with sc at any corner and sc evenly around:
– 10 sc across the Row 1 edge
– 20 sc down the side (1 per row end)
– 10 sc across the Row 20 edge
– 20 sc up the other side
Join with sl st to the first sc. (60 sc)
Outline Rnd 2: Sl st loosely in each sc around. Join. (60 sl sts) Fasten off, leaving a 24 in (61.0 cm) tail for sewing.
The body now measures 4 in (10.2 cm) across. The sl st round sits on top of the sc round as a raised gold rope.
Cap (Make 84)
Use Golden Straw (C).
- Row 1 (RS): Ch 8. Sc in the 2nd ch from hook and in each ch across. Turn. (7 sc)
- Row 2 (WS): Ch 1, sc in first st, *bobble in next st, sc in next st; rep from * 2 more times. Turn. (7 sts: 4 sc and 3 bobbles, which pop to the RS)
- Row 3: Ch 1, sc in each st across. Turn. (7 sc)
- Row 4: Ch 1, sc in each of the first 3 sts. In the 4th st, work (sc, ch 10, sl st in the same st) to make the loop. Sc in each of the last 3 sts. (7 sc and 1 ch-10 loop)
Fasten off, leaving a 12 in (30.5 cm) tail. The cap measures 1.4 in x 0.75 in (3.6 cm x 1.9 cm), and the loop stands about 0.6 in (1.5 cm) tall.
Make All Pieces
Totals:
– 6 strips (A)
– 84 bodies (A and B, with C trim)
– 84 caps (C)
That is 14 bodies and 14 caps per strip. Assemble each ornament before placing it: sew the cap’s Row 1 edge over the top center of the body outline, overlapping about 0.15 in (0.4 cm).
Layout grid (front view, tabs at the top, “O” = ornament):
 S1   S2   S3   S4   S5   S6
[O]  [O]  [O]  [O]  [O]  [O]   block 14 (top)
[O]  [O]  [O]  [O]  [O]  [O]   block 13
 :    :    :    :    :    :
[O]  [O]  [O]  [O]  [O]  [O]   block 2
[O]  [O]  [O]  [O]  [O]  [O]   block 1 (bottom)
Each column is one separate strip with 14 ornaments.
Joining
The strips are not joined to each other. Joining here means sewing the ornaments onto each strip.
Placement: Lay the strip flat with Row 156 at the top. Rows 2–12 form block 1, Rows 13–23 form block 2, and so on up to block 14 (Rows 145–155). Each block is 11 rows, which is 5.5 in (14.0 cm).
Center each ornament in its block with the cap loop toward the top. The cap and loop should end about 0.15 in (0.4 cm) below the block’s top edge. The body’s vertical center line sits on the 6th dc of the mesh, which is the strip’s center. That leaves about 1.1 in (2.8 cm) of open mesh on each side.
Stitch-to-stitch logic: With the C tail, whipstitch through the back loop of each Outline Rnd 1 sc and catch the nearest mesh dc or chain beneath it. That is 60 sewing stitches per body, one per sc, so the outline stays round and even. Tack the cap’s side edges and the base of the loop with 4–6 stitches. Leave the loop itself free.
Tension: Sew loosely enough that the mesh under the ornament stays flat. If the squares behind a bauble pinch inward, the stitches are too tight.
Checkpoint: After all 14 ornaments, the strip must still lie flat at 6.2 in x 78 in (15.7 cm x 198.1 cm).
Border and Tabs
Border gauge: 5 sc = 1 in (2.5 cm). This matches the dc stitch gauge of 5 sts per inch, so the short edges take 1 sc per st. Mesh rows are 0.5 in (1.3 cm) tall, so each row end needs 2.5 sc on average.
Border Rnd: With A and RS facing, join with sc in the top right corner st and work around the strip as follows.
- Each corner: Work 3 sc in the corner st. That is 4 corners x 3 = 12 sc.
- Top edge: 1 sc in each of the 29 sts between the corners (29 sc).
- Long sides: *2 sc in the next row end, 3 sc in the next row end; rep from * 78 times across the 156 row ends (390 sc per side).
- Bottom edge: 1 sc in each of the 29 sts between the corners (29 sc).
Join with sl st. Total: 12 + (2 x 29) + (2 x 390) = 850 sc.
Why the math works: On the long sides, 390 sc at 5 sc per inch = 78 in, which equals 156 rows x 0.5 in. On the short sides, 29 sc plus the 2 corner center sts = 31 sc, which equals the 31 foundation sts at 6.2 in. The edge neither ruffles nor pulls in. The finished strip is 6.6 in x 78.4 in (16.8 cm x 199.1 cm).
Tabs (make 2 per strip): Each top-edge corner group is 3 sc, which gives 35 sts across the top: 3 corner sc + 29 sc + 3 corner sc. Place markers so each tab starts 2 sts in from its corner’s center sc.
- Row 1: Join A in the marked st and sc in it and in the next 4 sts. Turn. (5 sc)
- Rows 2–22: Ch 1, sc in each st across. Turn. (5 sc)
Each tab measures 1 in x 4 in (2.5 cm x 10.2 cm). Fold the tab to the WS and whipstitch the last row to the base of Row 1, 5 sts to 5 sts. This makes a 2 in (5.1 cm) loop for rods up to 1 in (2.5 cm) in diameter.
Final Blocking
- Weave in all ends along mesh bars or inside the ornament outlines.
- Lay the strip flat on mats, folding it in thirds if needed.
- Pin the long edges straight at 6.6 in (16.8 cm) apart.
- Pin the length to 78.4 in (199.1 cm), working one fold at a time.
- Square every mesh: run a ruler down the columns so the dc posts line up.
- Spray with water until damp but not dripping.
- Gently press each ornament round and flat with your palm.
- Let the strip dry completely before unpinning.
- Hang each strip for 24 hours, then re-measure the length.
Final Quality-Control Checklist
- Every strip has 31 sts, 10 meshes, and 156 rows.
- Every body has a center green stripe, 2 gold lines, and a 60-st outline.
- Every cap has 3 bobbles on the RS and a free loop.
- There are 14 ornaments per strip, centered, all with caps up.
- Each border has exactly 850 sc.
- All strips are the same length within 0.5 in (1.3 cm).
- Tabs are sewn closed and sit 2 sts in from each corner.
Troubleshooting
- Strip is too long: Mesh rows are too tall. Change hook size or tighten your dc.
- Long border ruffles: Use the 2-sc/3-sc sequence exactly. Do not work 3 sc in every row end.
- Ornament looks square: Place the outline sts evenly and press the body round during blocking.
- Gold lines are wavy: Work the surface sl sts looser and keep them in the exact color-change line.
- Mesh puckers behind an ornament: Remove the sewing and re-sew with a looser tension.
- Strips twist when hung: Block again, and check that both tabs are the same length.
Care
Hand wash in cool water with mild soap. Press out the water in a towel, reshape, and dry flat before hanging again.
Final Notes
The measurement chain is:
- 31 sts = 6.2 in (15.7 cm)
- 156 rows at 0.5 in (1.3 cm) = 78 in (198.1 cm)
- 14 blocks of 5.5 in (14.0 cm) hold 14 ornaments of 4 in (10.2 cm)
- An 850-st border adds 0.2 in (0.5 cm) per side for 6.6 in x 78.4 in (16.8 cm x 199.1 cm)
- Six strips give 39.6 in (100.6 cm) of combined width
Check each link in the chain as you go, and the curtain will hang straight and even.
Happy crocheting!