

Waddles is a flat penguin wall hanging that keeps your charging cables tidy. A navy body with stubby wings holds a cream oval belly, two big cream eyes, and a little orange beak. A navy strap with five sliding bands runs down the center, and each coiled cable tucks behind the strap so it stays in its own spot.
The colors are deep navy, warm cream, soft light blue, and bright orange. The corded light blue edge gives it a clean outline and makes the panel firm enough to hang flat on a wall peg.
This pattern uses US crochet terms. The finished organizer measures 10.25 in (26.0 cm) wide across the wings and 13.25 in (33.7 cm) tall, or 14.75 in (37.5 cm) including the hanging loop.
Construction is simple. You work the body flat in rows from the bottom up, then add a navy edging round. You crochet the belly, eyes, beak, strap, and bands separately and sew them on. A two-round light blue border and the hanging loop finish the piece.
Finished Size and Construction
- Finished size: 10.25 in × 13.25 in (26.0 cm × 33.7 cm); 14.75 in (37.5 cm) tall including the loop
- Skill level: Easy–Intermediate
- Terminology: US
- Yarn weight: Worsted (#4) cotton
- Hook: 4.0 mm (G-6)
- Number of pieces: 1 finished organizer, built from 1 body panel plus appliqués (1 belly, 2 eyes, 1 beak, 1 strap, 5 bands)
- Layout: Single panel; appliqués centered on the front
- Body size before edging: 9 in × 12 in (22.9 cm × 30.5 cm)
- Size before light blue border: 9.5 in × 12.5 in (24.1 cm × 31.8 cm)
- Border depth: 0.375 in (1.0 cm) per side
Materials
Use a smooth worsted-weight cotton or cotton blend. Cotton keeps its shape when cables are pulled in and out, and it shows the stitch rows clearly. The amounts below assume about 85 m per 50 g.
- Navy: 75 g / 128 m (body, edging, strap, bands)
- Cream: 35 g / 60 m (belly, eyes)
- Light blue: 20 g / 34 m (border, hanging loop)
- Orange: 5 g / 9 m (beak)
Tools:
– 4.0 mm (G-6) crochet hook
– Two 10 mm black safety eyes (or flat black buttons)
– Tapestry needle
– Stitch markers
– Rust-proof pins
– Measuring tape
– Wall peg or hook for hanging (optional)
All quantities include a small safety margin.
Abbreviations (US Terms)
- ch – chain
- sc – single crochet
- sl st – slip stitch
- MR – magic ring
- inc – 2 sc in the same stitch
- sc2tog – single crochet 2 together (decreases by 1)
- sc3tog – single crochet 3 together (decreases by 2)
- st(s) – stitch(es)
- rev sc – reverse single crochet (crab stitch)
Special stitch – reverse sc: Work from left to right (right-handed). Insert the hook into the next stitch to the right, yarn over, pull up a loop, yarn over, and pull through both loops. This makes a twisted, corded edge.
Note: In all row work, ch 1 at the start of each row. The ch 1 does not count as a stitch.
Gauge and Checkpoints
Gauge: 16 sc and 18 rows = 4 in (10.2 cm) in sc worked in rows.
Test one piece first. Make one eye (four rounds). It should measure about 1.9 in (4.8 cm) across. If it does, your gauge matches and you can start the body.
Body checkpoints:
– Row 1 (18 sts): 4.5 in (11.4 cm) wide
– Row 8 (30 sts): 7.5 in (19.1 cm) wide
– Row 31 (36 sts): 9 in (22.9 cm) across the wings
– Row 38 (26 sts): 6.5 in (16.5 cm) wide
– Row 54: 12 in (30.5 cm) tall
If the piece is too big: Go down a hook size (3.75 mm). If it is too small: Go up a hook size (4.5 mm). Small differences only change the final size slightly, but large differences will make the belly and strap fit badly. Check again at Row 8.
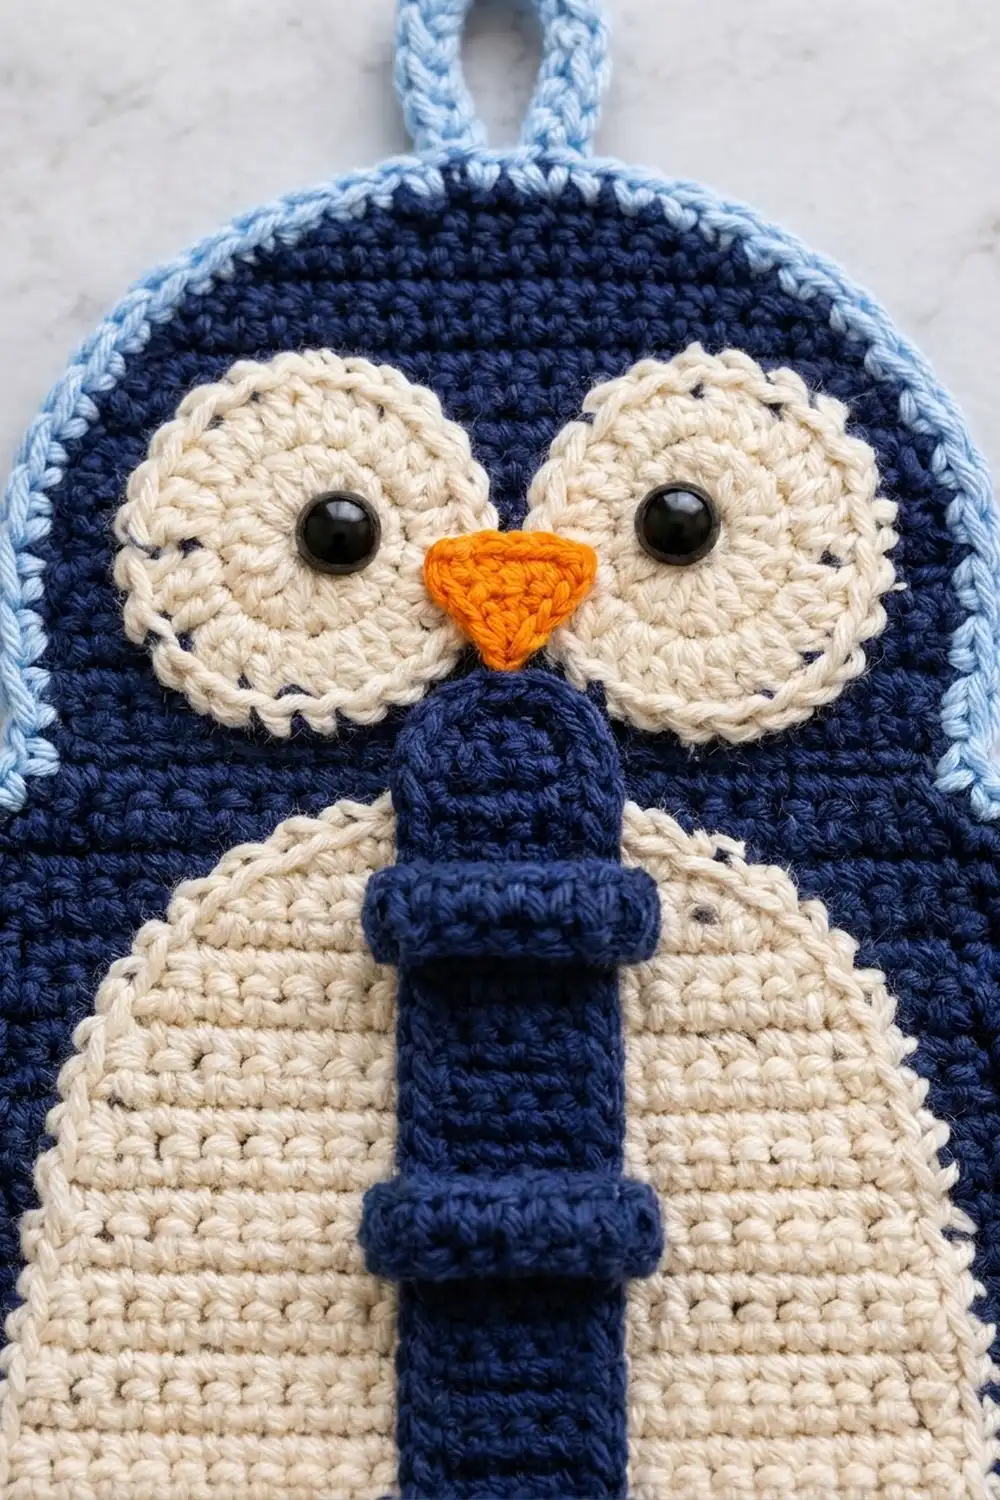
Body (Navy)
Ch 19.
Row 1: Sc in 2nd ch from hook and in each ch across. Turn. (18)
Row 2: Ch 1, inc in first st, sc in next 16, inc in last st. Turn. (20)
Row 3: Ch 1, inc, sc 18, inc. Turn. (22)
Row 4: Ch 1, inc, sc 20, inc. Turn. (24)
Row 5: Ch 1, inc, sc 22, inc. Turn. (26)
Row 6: Ch 1, inc, sc 24, inc. Turn. (28)
Row 7: Ch 1, sc in each st across. Turn. (28)
Row 8: Ch 1, inc, sc 26, inc. Turn. (30)
Checkpoint: 7.5 in (19.1 cm) wide.
Rows 9–24: Ch 1, sc in each st across. Turn. (30 in each row; 16 rows)
Row 25: Ch 1, sc2tog, sc 26, sc2tog. Turn. (28)
Row 26: Ch 1, sc across. Turn. (28)
Row 27: Ch 1, sc2tog, sc 24, sc2tog. Turn. (26)
Row 28: Ch 1, sc across. Turn. (26)
Wings
The wings grow out quickly, stay straight for four rows, then step back in. This makes the rounded flippers on each side.
Row 29: Ch 1, inc in each of first 2 sts, sc 22, inc in each of last 2 sts. Turn. (30)
Row 30: Ch 1, inc in each of first 2 sts, sc 26, inc in each of last 2 sts. Turn. (34)
Row 31: Ch 1, inc, sc 34, inc. Turn. (36)
Checkpoint: 9 in (22.9 cm) across the wings.
Rows 32–35: Ch 1, sc across. Turn. (36 in each row; 4 rows)
Row 36: Ch 1, sc3tog, sc 30, sc3tog. Turn. (32)
Row 37: Ch 1, sc3tog, sc 26, sc3tog. Turn. (28)
Row 38: Ch 1, sc2tog, sc 24, sc2tog. Turn. (26)
Head
Rows 39–46: Ch 1, sc across. Turn. (26 in each row; 8 rows)
Row 47: Ch 1, sc2tog, sc 22, sc2tog. Turn. (24)
Row 48: Ch 1, sc across. Turn. (24)
Row 49: Ch 1, sc2tog, sc 20, sc2tog. Turn. (22)
Row 50: Ch 1, sc2tog, sc 18, sc2tog. Turn. (20)
Row 51: Ch 1, sc2tog, sc 16, sc2tog. Turn. (18)
Row 52: Ch 1, sc2tog, sc 14, sc2tog. Turn. (16)
Row 53: Ch 1, sc2tog, sc 12, sc2tog. Turn. (14)
Row 54: Ch 1, sc2tog, sc 10, sc2tog. (12)
Checkpoint: 12 in (30.5 cm) tall, with a 3 in (7.6 cm) flat top.
Do not fasten off. Continue with the navy edging.
Navy Edging Round
This round smooths out the stepped edges. Each corner is a group of 3 sc worked into one stitch. The corner stitches are counted only in the top and bottom edge counts.
Rnd 1: Ch 1. Work 3 sc in the first st of Row 54. Sc in the next 10 sts, then 3 sc in the last st. Top edge: 16 sts.
Work down the side, 1 sc in each row end. In the row ends of Rows 37, 36, 30, and 29, work 2 sc instead of 1. Side: 58 sts (54 row ends + 4 extra).
At the bottom, work along the foundation chain: 3 sc in the first ch, sc in the next 16 ch, 3 sc in the last ch. Bottom edge: 22 sts.
Work up the second side the same way. Side: 58 sts.
Sl st to the first sc. Fasten off. (154 sts total: 16 + 58 + 22 + 58)
Checkpoint: 9.5 in × 12.5 in (24.1 cm × 31.8 cm).
Belly (Cream)
Ch 15.
Row 1: Sc in 2nd ch from hook and in each ch across. Turn. (14)
Row 2: Ch 1, inc, sc 12, inc. Turn. (16)
Row 3: Ch 1, inc, sc 14, inc. Turn. (18)
Row 4: Ch 1, inc, sc 16, inc. Turn. (20)
Row 5: Ch 1, sc across. Turn. (20)
Row 6: Ch 1, inc, sc 18, inc. Turn. (22)
Rows 7–28: Ch 1, sc across. Turn. (22 in each row; 22 rows)
Row 29: Ch 1, sc2tog, sc 18, sc2tog. Turn. (20)
Row 30: Ch 1, sc across. Turn. (20)
Row 31: Ch 1, sc2tog, sc 16, sc2tog. Turn. (18)
Row 32: Ch 1, sc across. Turn. (18)
Row 33: Ch 1, sc2tog, sc 14, sc2tog. Turn. (16)
Row 34: Ch 1, sc2tog, sc 12, sc2tog. Turn. (14)
Row 35: Ch 1, sc2tog, sc 10, sc2tog. Turn. (12)
Row 36: Ch 1, sc2tog, sc 8, sc2tog. (10)
Fasten off and leave a 30 in (76.2 cm) tail for sewing.
Checkpoint: 5.5 in (14.0 cm) wide × 8 in (20.3 cm) tall.
Eyes (Cream, make 2)
Rnd 1: 6 sc in MR. (6)
Rnd 2: Inc in each st around. (12)
Rnd 3: (Sc 1, inc) 6 times. (18)
Rnd 4: (Sc 2, inc) 6 times. (24)
Sl st to the next st and fasten off. Leave a 12 in (30.5 cm) tail.
Checkpoint: about 1.9 in (4.8 cm) across.
Beak (Orange)
Ch 6.
Row 1: Sc in 2nd ch from hook and in each ch across. Turn. (5)
Row 2: Ch 1, sc2tog, sc 1, sc2tog. Turn. (3)
Row 3: Ch 1, sc3tog. (1)
Fasten off and leave a 10 in (25.4 cm) tail. The beak is 1.25 in (3.2 cm) across the top.
Cable Strap (Navy)
Ch 35.
Rnd 1: Sc in 2nd ch from hook (the first stitch of the end group). Sc in the next 32 ch. Work 3 sc in the last ch. Rotate and work along the other side of the chain: sc in the next 32 ch, then 2 sc in the same ch as the first sc. Sl st to the first sc. (70: 32 + 3 + 32 + 3)
Rnd 2: Ch 1. Inc in each of the first 2 sts, sc 32, inc in each of the next 3 sts, sc 32, inc in the last st. Sl st to the first sc. (76: 32 + 6 + 32 + 6)
Fasten off and leave a 12 in (30.5 cm) tail.
Checkpoint: about 9 in (22.9 cm) long × 1 in (2.5 cm) wide, with rounded ends.
Bands (Navy, make 5)
Ch 13.
Row 1: Sc in 2nd ch from hook and in each ch across. Turn. (12)
Row 2: Ch 1, sc across. (12)
Fasten off and leave an 8 in (20.3 cm) tail.
Each band is 3 in (7.6 cm) long and about 0.5 in (1.3 cm) tall. Wrap a band around the strap and sew its short ends together at the back. The band should be snug but able to slide.
Place the band centers 1.5 in (3.8 cm), 3 in (7.6 cm), 4.5 in (11.4 cm), 6 in (15.2 cm), and 7.5 in (19.1 cm) from the top end of the strap. Tack each band to the back of the strap with two small stitches so it stays in place.
Assembly
- Belly: Center the belly with its Row 1 on body Row 3. Its top (Row 36) will sit on body Row 38, level with the tops of the wings. You should see about 1 in (2.5 cm) of navy on each side at the widest point. Pin it, then whipstitch the edge down with the cream tail.
- Eyes: Center each eye on body Row 45, 1 in (2.5 cm) to the left or right of the center line, so the two eyes touch in the middle. Push a safety eye through the center of each eye and through the body, then fit the washer on the back. Whipstitch around the eye.
- Strap: Place the top end on body Row 43, on the center line. The bottom end will sit close to body Row 3, about 0.6 in (1.5 cm) above the foundation edge. Sew down only the top 0.5 in (1.3 cm) and the bottom 0.5 in (1.3 cm). Leave the middle unattached so cables can slide behind it.
- Beak: Center the beak with its top edge on body Row 44 and the point facing down. It should cover the top end of the strap and overlap the lower inner edges of the eyes. Sew it on all the way around.
Weave in all ends on the back.
Light Blue Border
Border gauge: Each light blue round adds about 0.19 in (0.5 cm) per side. The two rounds together add 0.375 in (1.0 cm) per side.
Rnd 2: Join light blue in any stitch of the navy edging. Sc in each st around. In the center sc of each of the four 3-sc corner groups, work 2 sc. Sl st to the first sc. (158 total)
– Top: 18 (16 + 2)
– Sides: 58 each
– Bottom: 24 (22 + 2)
Rnd 3: Ch 1. Rev sc in each st around. Sl st to the first st. (158 total)
– Top: 18
– Sides: 58 each
– Bottom: 24
Fasten off.
Hanging loop: Count the 18 top-edge stitches and find the center two (sts 9 and 10). Join light blue with a sl st in st 9. Ch 16, then sl st in st 10. Turn and work 24 sc over the chain loop, then sl st in st 9. Fasten off. The loop stands about 1.5 in (3.8 cm) tall.
Why the math works: Each side has 4.5 stitches per inch (1 per row end) against a gauge of 4. That small amount of extra fullness covers the curves. The 2 extra stitches at each wing step keep the edge from pulling in at the flippers. Each round you add makes the outline a little longer. The 4 extra stitches in Rnd 2 cover that growth at the turning points. Rnd 3 works 1 rev sc in each stitch, so the count stays at 158 and the corded edge lies flat without ruffling.
Checkpoint: 10.25 in × 13.25 in (26.0 cm × 33.7 cm).
Final Blocking
- Lay the organizer face down on a blocking mat or folded towel.
- Pin it to 10.25 in (26.0 cm) across the wings and 13.25 in (33.7 cm) tall.
- Shape the wing tips and the rounded bottom with extra pins.
- Mist it lightly with water until it is damp but not soaked.
- Gently flatten the appliqués with your palm.
- Let it dry completely, 12–24 hours.
- Unpin it and check that it hangs straight from the loop.
Final Quality-Control Checklist
- The body measures 9 in × 12 in (22.9 cm × 30.5 cm) before edging.
- The navy edging round has 154 sts and the light blue rounds have 158 sts each.
- The belly is centered with even navy margins.
- The eyes touch at the center and the safety eye washers are tight.
- The beak covers the top end of the strap.
- The strap is sewn only at its ends, and all five bands are evenly spaced.
- The hanging loop is centered and sewn on firmly.
- All ends are woven in on the back.
Troubleshooting
- The wings flare or ripple: Your increases are too tight compared to your sc. Work Rows 29–31 a little more loosely.
- The edge cups inward: Check that you worked the 4 extra stitches at the wing row ends.
- The border ruffles: Your rev sc is too loose. Go down to a 3.75 mm hook for Rnd 3.
- The belly is too wide: Your gauge is loose. Rework the belly with a smaller hook so its widest rows measure 5.5 in (14.0 cm).
- The bands won’t slide: Rework them with 13 sts instead of 12.
- Cables slip out: Tighten the bands with a couple of stitches at the back seam.
Care
Hand wash in cool water, press out the water in a towel, and dry flat. Remove the cables before washing.
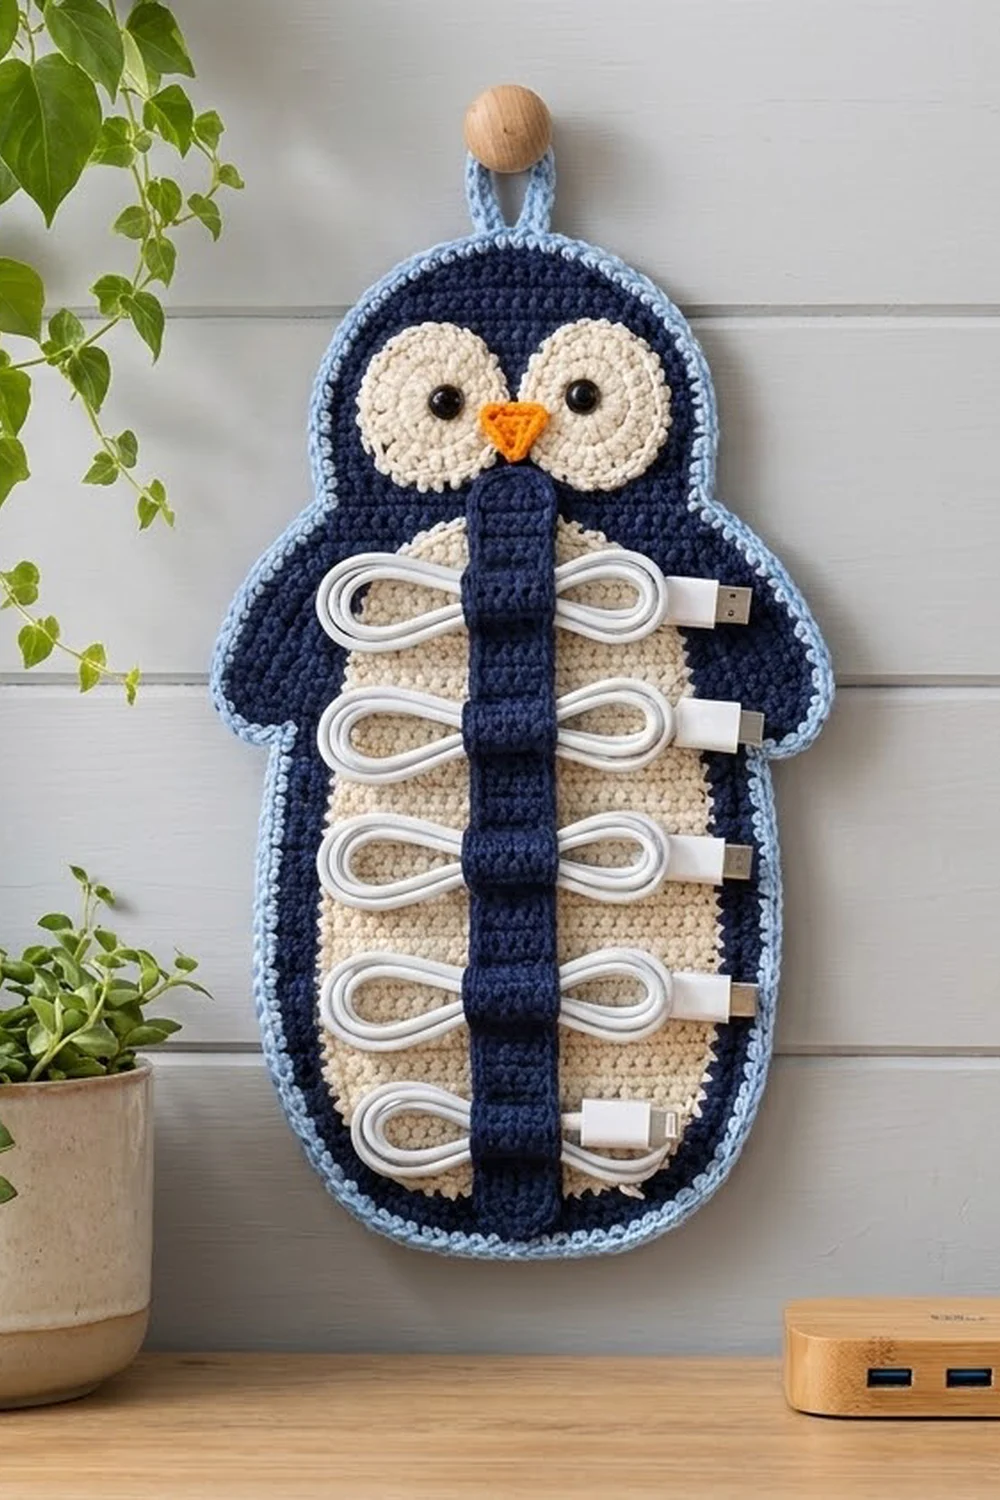
Final Notes
Every measurement builds on the one before it:
- Gauge of 16 sc × 18 rows = 4 in (10.2 cm)
- Body of 9 in × 12 in (22.9 cm × 30.5 cm)
- Navy edging brings it to 9.5 in × 12.5 in (24.1 cm × 31.8 cm)
- Light blue border brings it to 10.25 in × 13.25 in (26.0 cm × 33.7 cm)
- The hanging loop brings the total height to 14.75 in (37.5 cm)
Check your size at each checkpoint, and Waddles will hang flat and keep your cables neatly organized.
Happy crocheting!