

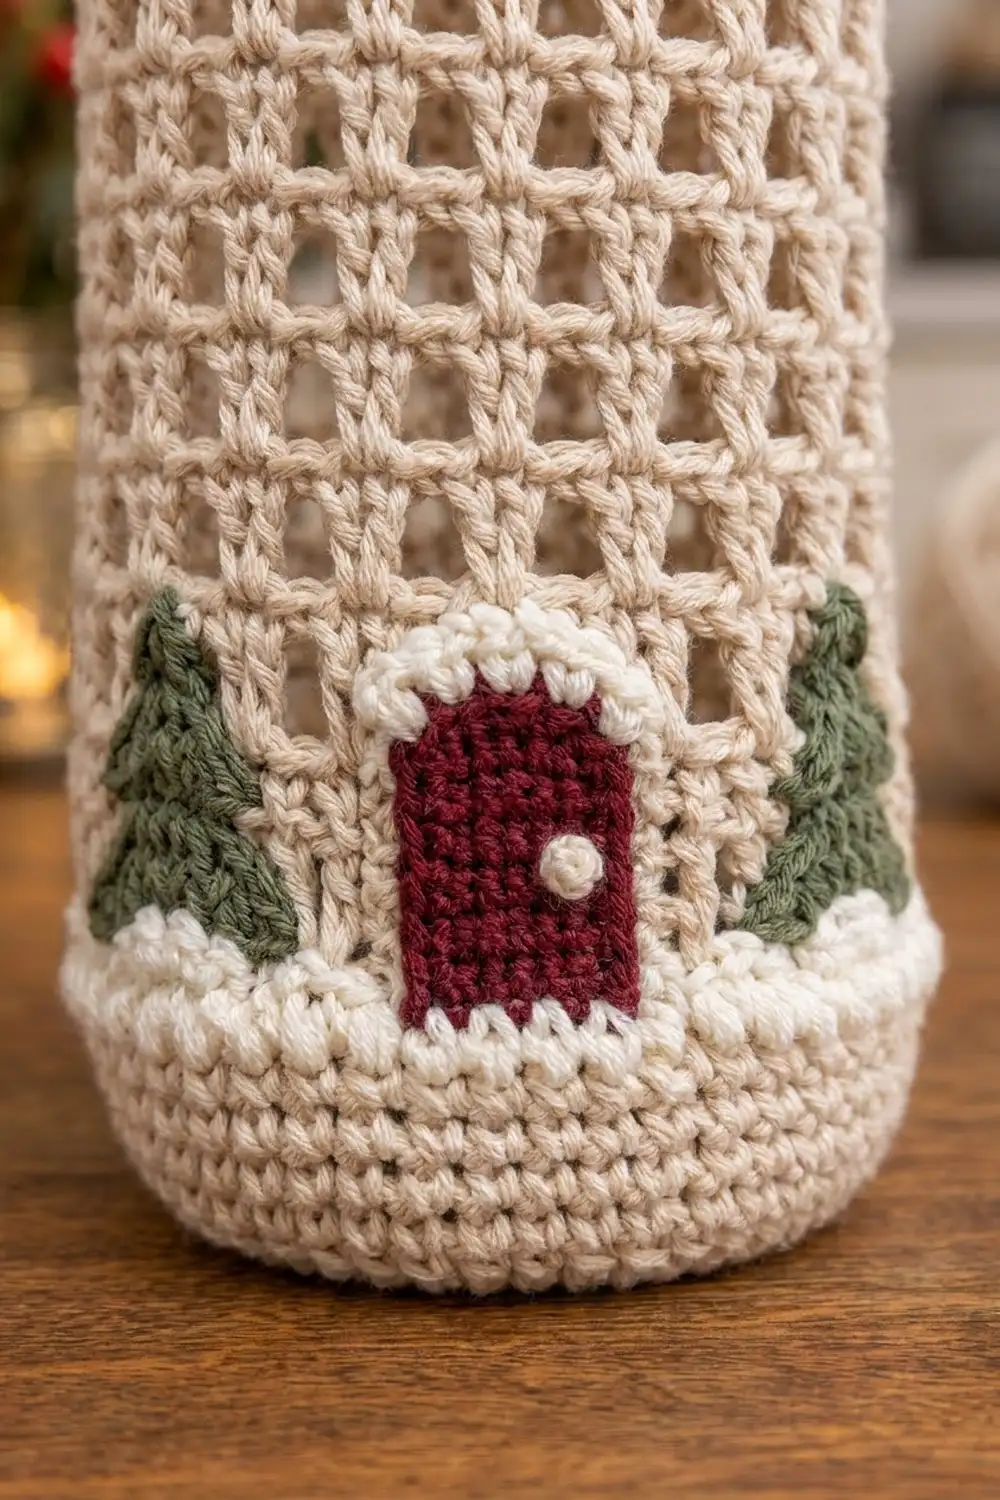
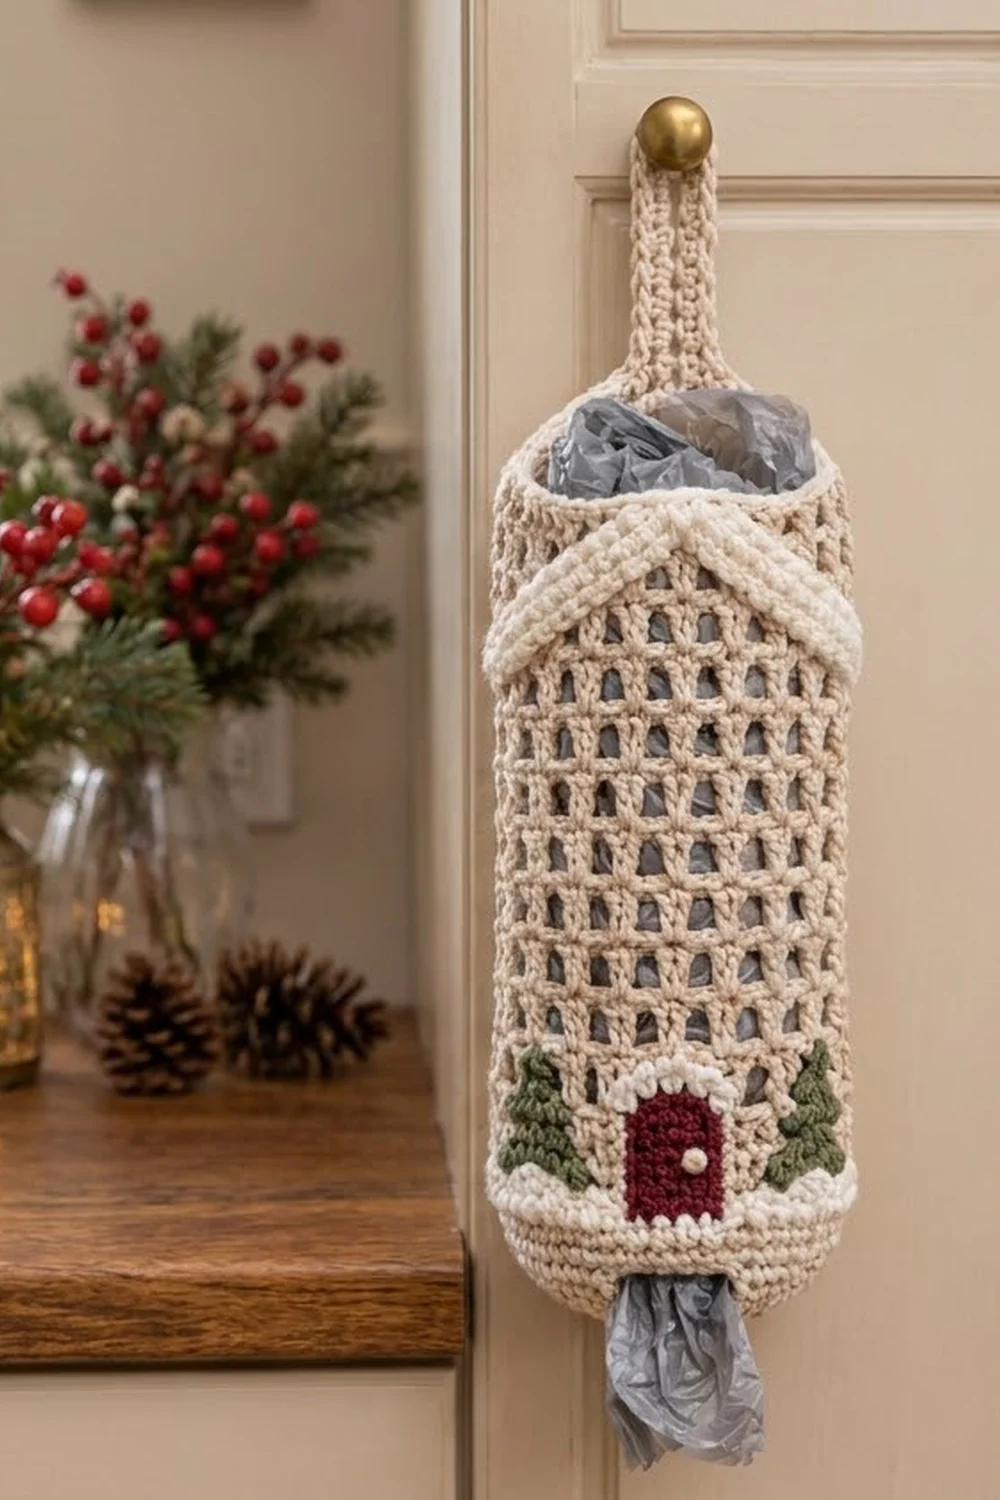
This Snowy Cottage Bag Holder turns a pile of grocery bags into a small winter cottage that hangs on a cabinet knob. The body is an open mesh, so you can see how full it is. The bottom has a little winter scene: a burgundy door, two green trees, and a band of bumpy popcorn snow.
The colors are warm cream for the body, ivory for the snow and roof, burgundy for the door, and sage green for the trees. The style is cozy farmhouse Christmas, but in a gray main color it works all winter.
This pattern uses US crochet terms. The finished holder measures 13.5 in (34.3 cm) around, which is 6.75 in (17.1 cm) wide when flat, and 12.75 in (32.4 cm) tall. The strap and loop add 6 in (15.2 cm), for a total hanging length of 18.75 in (47.6 cm).
You make it in one piece from the bottom up. First you crochet a flat round base around an open ring, then the solid scene band, then the mesh, then the top rim and strap. The door, trees, snow mounds, and roof trim are small flat appliqués that you sew on.
Finished Size and Construction
- Finished size: 13.5 in (34.3 cm) around, 6.75 in (17.1 cm) flat width, 12.75 in (32.4 cm) tall body
- Hanging length: 18.75 in (47.6 cm) including strap and loop
- Skill level: Easy to intermediate
- Terminology: US
- Yarn weight: Worsted (#4), cotton or cotton blend
- Hook: 5.0 mm (H-8)
- Number of pieces: 1 body, plus 7 small appliqués (1 door, 2 trees, 2 snow mounds, 2 roof strips)
- Layout: Single hanging cylinder, appliqué scene centered on the front
- Piece size before border: 11.75 in (29.8 cm) tall through the last mesh round
- Border (top rim) depth: 1 in (2.5 cm), plus the strap
- Base opening: about 1.4 in (3.6 cm) across
Materials
Cotton or a cotton blend works best. It holds its shape and does not stretch out when the holder is full. The amounts below are based on a worsted cotton of about 170 m per 100 g.
- Cream (main color): 110 g, about 187 m
- Ivory (snow and roof): 25 g, about 43 m
- Burgundy (door): 5 g, about 9 m
- Sage green (trees): 5 g, about 9 m
All amounts include a small extra margin for your gauge swatch and for weaving in ends.
Tools:
– 5.0 mm (H-8) crochet hook
– Tapestry needle
– 2 stitch markers
– Scissors
– Measuring tape
– Pins for placing the appliqués
Abbreviations (US Terms)
- ch – chain
- sl st – slip stitch
- sc – single crochet
- hdc – half double crochet
- dc – double crochet
- sc2tog – single crochet 2 together
- sc3tog – single crochet 3 together
- BLO – back loop only
- sp – space
- st(s) – stitch(es)
- inc – 2 sc in the same st
- rep – repeat
Popcorn (pc): Work 4 dc in the same st. Take your hook out of the loop. Insert the hook from front to back into the top of the first dc of the group, pick up the dropped loop, and pull it through. One popcorn counts as 1 st.
Gauge and Checkpoints
- Solid gauge: 16 sc and 16 rounds = 4 in (10.2 cm), so 4 sts and 4 rounds per inch
- Mesh gauge: 8 ch-1 spaces and 8 rounds = 4 in (10.2 cm), so 2 spaces and 2 rounds per inch
Before you start, crochet a small test square of sc. Then make the base (Rnds 1–7) as your real gauge test. It is quick and shows whether your tension is right.
Checkpoints:
– After Rnd 7: the base is 4.3 in (10.9 cm) across and lies flat.
– After Rnd 22: the wall is 3.75 in (9.5 cm) tall from the base edge.
– After Rnd 38: the wall is 11.75 in (29.8 cm) tall.
– After Rnd 42: the wall is 12.75 in (32.4 cm) tall and 6.75 in (17.1 cm) wide when flat.
If your base is too big, go down one hook size. If it is too small, go up one hook size. If the base cups like a bowl, your tension is tight. If it ruffles, your tension is loose. Change the hook, not the stitch counts.
Body Pattern
Work in joined rounds. At the end of each round, sl st to the first st, then ch 1 (this ch does not count as a st). The joins line up at the center back, which is where the strap goes later. Place a marker in the first st of each round.
Base (Cream)
Foundation: Ch 18, sl st in the first ch to form a ring. This ring is the dispensing opening, so do not pull it closed.
Rnd 1: Ch 1, 18 sc into the ring, sl st to the first sc. (18 sts)
Rnd 2: Ch 1, sc in next 2 sts, inc in next st; rep from * 5 more times. (24 sts)
Rnd 3: Ch 1, sc in next 3 sts, inc; rep 6 times total. (30 sts)
Rnd 4: Ch 1, sc in next 4 sts, inc; rep 6 times total. (36 sts)
Rnd 5: Ch 1, sc in next 5 sts, inc; rep 6 times total. (42 sts)
Rnd 6: Ch 1, sc in next 6 sts, inc; rep 6 times total. (48 sts)
Rnd 7: Ch 1, sc in next 7 sts, inc; rep 6 times total. (54 sts)
Check: the base should be 4.3 in (10.9 cm) across. At 4 sts per inch, 54 sts gives 13.5 in (34.3 cm) around.
Lower Wall (Cream)
Rnd 8: Ch 1, sc in BLO of each st around. (54 sts) This makes a neat ridge where the base turns up into the wall.
Rnds 9–11: Ch 1, sc in each st around. (54 sts)
Fasten off Cream.
Snow Band (Ivory)
Rnd 12: Join Ivory at the center back. Ch 1, sc in each st around. (54 sts)
Rnd 13: Ch 1, sc in next 2 sts, pc in next st; rep from * 17 more times. (36 sc + 18 pc = 54 sts)
Rnd 14: Ch 1, sc in each sc and in the top of each pc around. (54 sts)
Fasten off Ivory.
Scene Band (Cream)
Rnds 15–22: Join Cream at the center back. Ch 1, sc in each st around. (54 sts each round)
This solid band is 8 rounds, or 2 in (5.1 cm) tall. It gives the door and trees a firm surface to sit on.
Mesh (Cream)
Rnd 23: Ch 4 (counts as dc + ch 1), skip next st, dc in next st, ch 1, skip next st; rep from * 25 more times, sl st in 3rd ch of beg ch-4. (27 dc + 27 ch-1 sps = 54 sts)
Rnds 24–38: Ch 4 (counts as dc + ch 1), skip the ch-1 sp, dc in next dc, ch 1; rep from * 25 more times, sl st in 3rd ch of beg ch-4. (27 dc + 27 ch-1 sps each round)
Each dc sits on top of the dc below, so the spaces stack into straight columns of small square windows. The mesh is 16 rounds, or 8 in (20.3 cm) tall. Do not fasten off yet. Place your loop on a marker while you make and sew on the appliqués.
Appliqués
Work all appliqués in rows. The ch 1 at the start of each row does not count as a st.
Door (Burgundy, make 1)
Row 1: Ch 6, sc in 2nd ch from hook and in each ch across. (5 sts)
Rows 2–6: Ch 1, turn, sc in each st across. (5 sts)
Row 7: Ch 1, turn, sc2tog, sc in next st, sc2tog. (3 sts)
Row 8: Ch 1, turn, sc in each st across. (3 sts)
Fasten off, leaving a long tail. The door is 1.25 in (3.2 cm) wide and 2 in (5.1 cm) tall, with a rounded top. With Ivory, make a French knot on the right side at Row 4 for the knob.
Trees (Sage Green, make 2)
Row 1: Ch 6, sc in 2nd ch from hook and in each ch across. (5 sts)
Row 2: Ch 1, turn, sc in each st. (5 sts)
Row 3: Ch 1, turn, sc2tog, sc in next st, sc2tog. (3 sts)
Row 4: Ch 1, turn, sc in each st. (3 sts)
Row 5: Ch 1, turn, sc3tog. (1 st)
Row 6: Ch 1, turn, sc in the st. (1 st)
Fasten off with a long tail. Each tree is 1.25 in (3.2 cm) wide and 1.5 in (3.8 cm) tall.
Snow Mounds (Ivory, make 2)
Ch 2, then work 6 hdc in the 2nd ch from hook. Do not join. This makes a small half circle about 1 in (2.5 cm) wide. Fasten off with a long tail.
Roof Strips (Ivory, make 2)
Row 1: Ch 21, sc in 2nd ch from hook and in each ch across. (20 sts)
Rows 2–3: Ch 1, turn, sc in BLO of each st across. (20 sts)
Fasten off with a long tail. Each strip is 5 in (12.7 cm) long and 0.75 in (1.9 cm) wide, with raised ridges along its length.
Sewing On the Scene
- Flatten the holder with the round joins at the center back. The center front is opposite the joins.
- Pin the door at the center front so its bottom edge sits on Rnd 15 and its top reaches Rnd 22.
- Pin one tree on each side, 1.5 in (3.8 cm) from the door edge, with its bottom on Rnd 16.
- Pin a snow mound under each tree, flat side down on Rnd 15, so it overlaps the base of the tree.
- Pin the roof strips into an upward V. The peak meets at the center front on Rnd 37, with one strip lapping over the other. The lower ends sit about 2 in (5.1 cm) below the peak and wrap slightly onto the sides.
- Whipstitch each piece in place with its own tail. In the mesh area, sew through the dc posts. Stitch through the outer layer only.
Border: Top Rim and Strap
Border gauge: same as the solid gauge, 4 sc and 4 rounds per inch.
Rnd 39 (conversion round): Pick up the live loop. Ch 1, sc in each dc and in each ch-1 sp around. (27 sc in dc + 27 sc in sps = 54 sts)
Rnds 40–42: Ch 1, sc in each st around. (54 sts)
When the holder lies flat, each side (front and back) has 27 sts. The rim is 4 rounds, or 1 in (2.5 cm) deep.
Why the math works: The mesh has 27 dc and 27 spaces, the same 54 sts as the base and scene band. Working 1 sc into each one keeps exactly 54 sts, so the rim is the same 13.5 in (34.3 cm) around as the base. The tube stays straight, with no flare or pull-in at the top.
Strap
Flatten the holder with the round joins at the center back. Count 6 sts to the right of the join and place a marker. Join Cream in that marked st.
Row 1: Ch 1, sc in the next 12 sts across the center back. (12 sts)
Row 2: Ch 1, turn, sc2tog, sc in next 8 sts, sc2tog. (10 sts)
Row 3: Ch 1, turn, sc2tog, sc in next 6 sts, sc2tog. (8 sts)
Row 4: Ch 1, turn, sc2tog, sc in next 4 sts, sc2tog. (6 sts)
Rows 5–20: Ch 1, turn, sc in each st across. (6 sts)
Row 21 (loop): Ch 1, turn, sc in each of 6 sts, ch 12, sl st in the first sc of this row. (6 sc + ch-12 loop)
Row 22: Ch 1, work 16 sc into the ch-12 loop, sl st in the first sc of Row 21. Fasten off.
The strap is 1.5 in (3.8 cm) wide and 5 in (12.7 cm) long. The loop adds about 1 in (2.5 cm), for 6 in (15.2 cm) in total.
Final Blocking
- Wet the holder in cool water and gently press out the extra water in a towel.
- Stuff it loosely with a rolled towel to make a smooth tube.
- Pat it to 12.75 in (32.4 cm) tall and 6.75 in (17.1 cm) wide when flat.
- Square up the mesh windows with your fingers so the columns are straight.
- Lay the strap flat and straight.
- Let it dry fully before you take out the towel.
Final Quality-Control Checklist
- The base is 4.3 in (10.9 cm) across, and the opening stays open at about 1.4 in (3.6 cm).
- Every solid round has 54 sts, and every mesh round has 27 dc and 27 spaces.
- All popcorns pop to the outside.
- The mesh columns are straight, not twisted.
- The door is centered on the front, with the trees evenly spaced.
- The roof peak is centered over the door.
- The strap is centered at the back, and the loop fits your knob or hook.
- All ends are woven in securely.
Troubleshooting
- Base cups or ruffles: Check the counts for each round, then change the hook size.
- Mesh spirals: Make sure each dc goes into the dc below, not into the space.
- Popcorns sink inward: Insert the hook from front to back when you close them.
- Top flares: You may have added sts in Rnd 39. Recount to 54.
- Strap stretches: Use a smaller hook for the strap, or sew a strip of cotton tape behind it.
- Appliqués pucker: Pin first with the holder flat, then sew more loosely.
Care
Hand wash in cool water and lay flat to dry. Reshape while damp and keep it out of the dryer.
Final Notes
The measurement chain is simple. A gauge of 4 sts per inch gives a 54-st base that is 4.3 in (10.9 cm) across and 13.5 in (34.3 cm) around. The same 54 sts carry through the snow band, the scene band, the 27-space mesh, and the rim, so the tube stays 6.75 in (17.1 cm) wide when flat. The heights are 1 in (2.5 cm) of lower wall, 0.75 in (1.9 cm) of snow, 2 in (5.1 cm) of scene, 8 in (20.3 cm) of mesh, and 1 in (2.5 cm) of rim, for a body 12.75 in (32.4 cm) tall. The 6 in (15.2 cm) strap and loop bring the total hanging length to 18.75 in (47.6 cm).
Happy crocheting!