

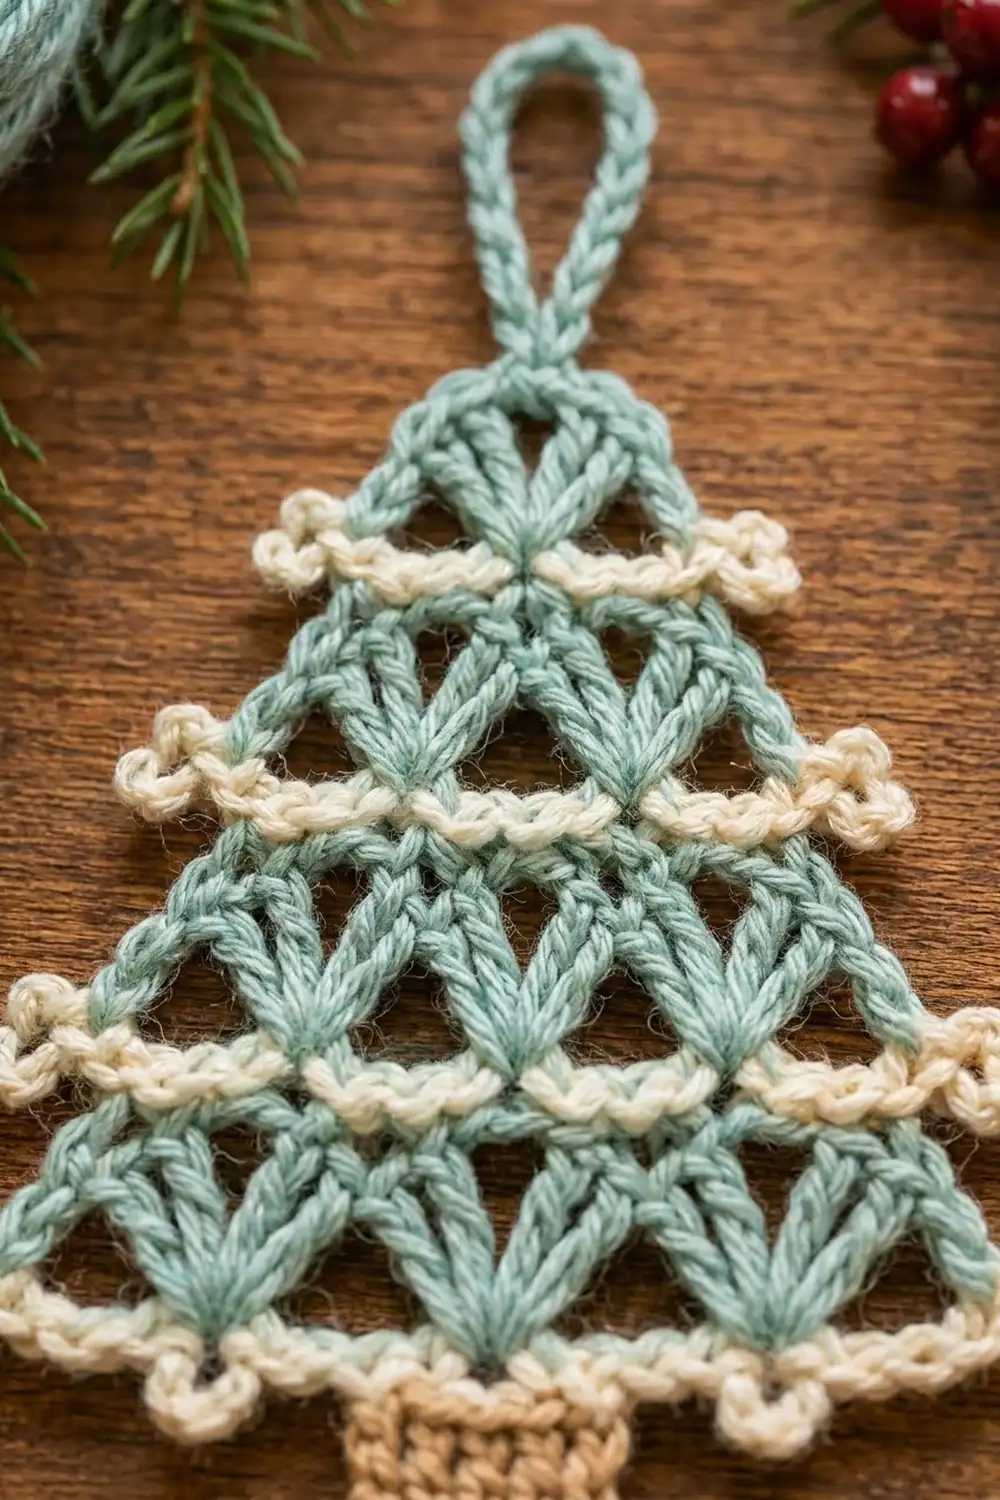
The Frosted Pine ornament is a small, lacy Christmas tree made in one flat piece. Five tiers of soft seafoam-green clusters form open V-shapes. A cream band runs under each tier and ends in a little picot curl on both sides, like snow caught on the branch tips. A short tan trunk sits below, and a green chain loop at the top lets the ornament hang straight.
The look is airy and vintage, with just three colors: seafoam green, cream and tan. Light shows through the open triangles between the clusters, so the ornament stands out on a branch or on a gift.
This pattern uses US crochet terms. The finished ornament is about 4 3/4 in (12.1 cm) wide across the bottom picots. It is 5 in (12.7 cm) tall from the top of the tree to the bottom of the trunk, not counting the hanging loop. With the loop, it is about 6 1/4 in (15.9 cm) tall.
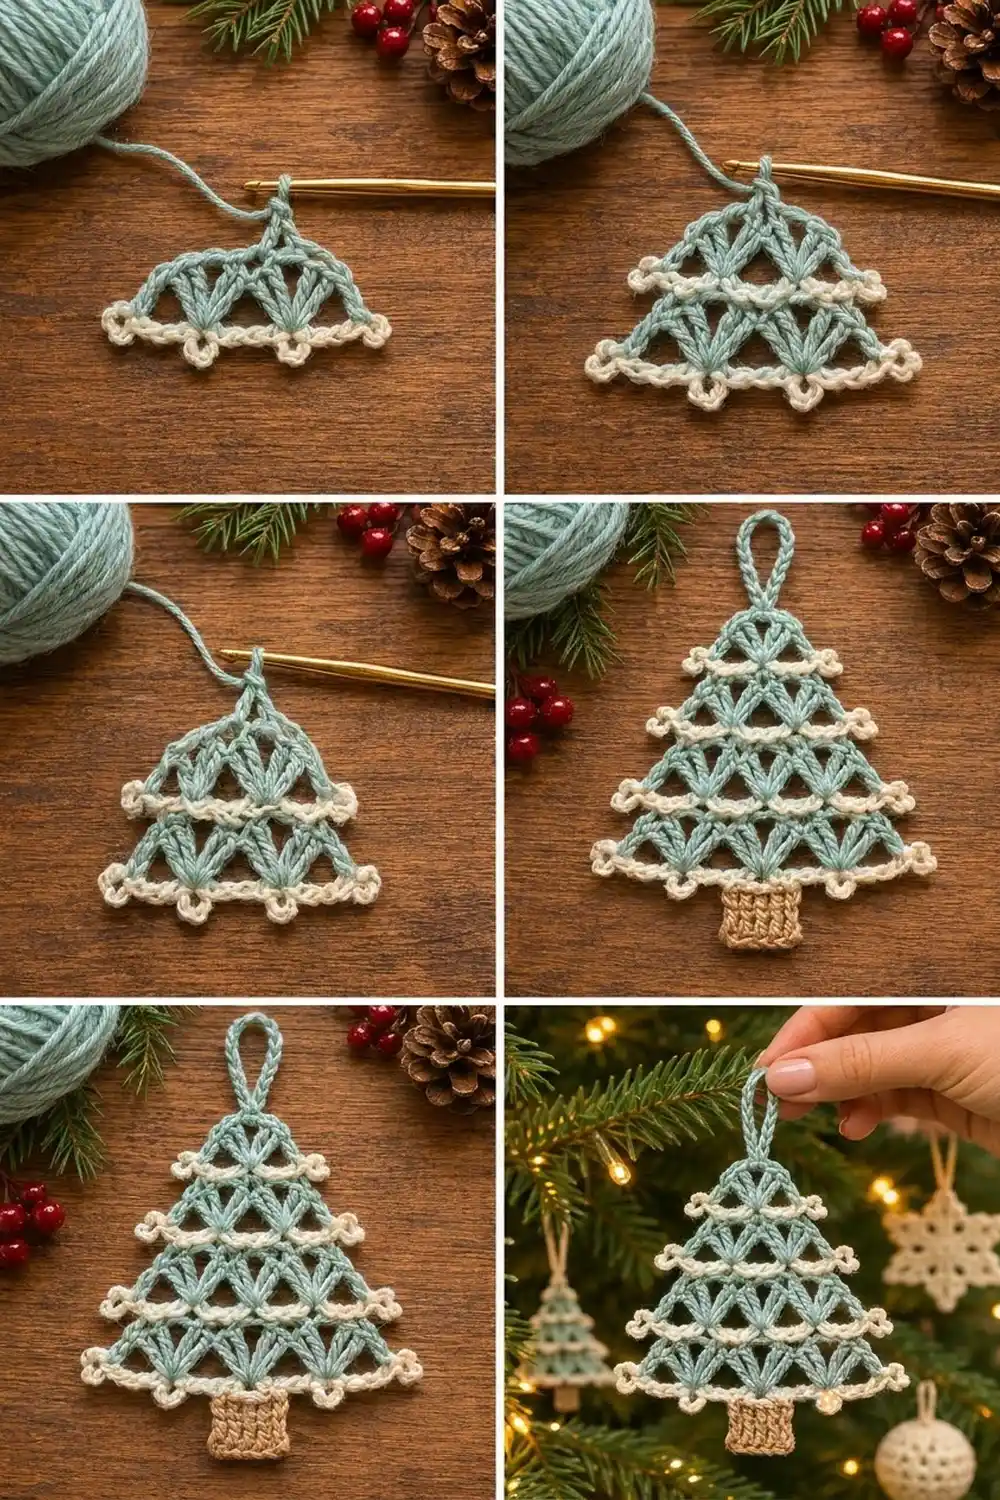
You start at the narrow top and work down. Each green row is a row of tall clusters. Each cream row sits under those clusters and makes a wider base for the next tier. The trunk is worked onto the last cream row, and the hanging loop goes on last.
Finished Size and Construction
- Finished size: 4 3/4 in (12.1 cm) wide x 5 in (12.7 cm) tall, plus a 1 1/4 in (3.2 cm) hanging loop
- Skill level: Intermediate (clusters, foundation single crochet, color changes)
- Terminology: US
- Yarn weight: DK (3) cotton or cotton blend
- Hook: 3.5 mm (E/4)
- Number of pieces: 1 (the trunk and loop are worked onto the tree)
- Layout: one tree shape, 5 tiers, worked from the top down in rows
- Size before border: about 3 1/2 in (8.9 cm) wide x 3 1/4 in (8.3 cm) tall after Row 9
- Border depth: the bottom picot row adds about 1/4 in (0.6 cm) of height, plus the picots
Materials
Use a smooth DK-weight cotton, either mercerized or soft matte. Cotton shows the cluster legs clearly and keeps the open triangles crisp after blocking. A typical DK cotton has about 112 m in a 50 g ball.
- Seafoam green (Color A): 8 g / 18 m
- Cream (Color B): 5 g / 11 m
- Tan (Color C): 2 g / 4 m
These amounts include extra for your swatch and for the 4 in (10.2 cm) tails you leave at every color change.
Tools
- 3.5 mm (E/4) crochet hook
- Tapestry needle
- Scissors
- Stitch marker (optional, for the trunk)
- Blocking mat, rust-proof pins and a spray bottle
Abbreviations (US terms)
- ch – chain
- sl st – slip stitch
- sc – single crochet
- tr – treble crochet
- st(s) – stitch(es)
- sp – space
- RS – right side
- fsc – foundation single crochet
- rep – repeat
Special stitches
- Cluster (cl): *Yo twice, insert hook in next st, yo and pull up a loop, [yo, pull through 2 loops] twice; rep from * 4 more times, once in each of the next sts (6 loops on hook). Yo and pull through all 6 loops. One cl uses 5 sts.
- Beginning cluster (beg-cl): Ch 4 (counts as the first leg). Then work the * to * step of the cl once in each of the next 4 sts (5 loops on hook). Yo and pull through all 5 loops. One beg-cl also uses 5 sts.
- Shared leg: Every cl after the first starts in the same st as the last leg of the cluster before it. This shared st forms the point of each open triangle.
- Picot: Ch 3, sl st in the 3rd ch from hook.
- Foundation single crochet (fsc): Insert hook in the base of the last st made, yo and pull up a loop. Yo and pull through 1 loop (this makes the “chain” at the base). Yo and pull through 2 loops. Each fsc extends the row outward by 1 st.
Gauge and Checkpoints
Gauge: 12 sc and 12 rows = 2 in (5.1 cm) in sc with Color A. One tier (one cluster row plus one cream row) is about 3/4 in (1.9 cm) tall.
Make a small sc swatch first. Then work Rows 1–3 of the tree and measure before you go further.
| After row | Width (sc row) | Height from top |
|---|---|---|
| Row 1 | 5 sts, about 7/8 in (2.2 cm) | — |
| Row 3 | 9 sts, about 1 1/2 in (3.8 cm) | about 1 in (2.5 cm) |
| Row 5 | 13 sts, about 2 1/4 in (5.7 cm) | about 1 3/4 in (4.4 cm) |
| Row 7 | 17 sts, about 2 3/4 in (7.0 cm) | about 2 1/2 in (6.4 cm) |
| Row 9 | 21 sts, about 3 1/2 in (8.9 cm) | about 3 1/4 in (8.3 cm) |
| Row 11 | 25 sts, about 4 1/4 in (10.8 cm) | about 4 in (10.2 cm) |
Measure the width along the sc only. The end picots add about 1/4 in (0.6 cm) on each side.
If your piece is too big: go down to a 3.25 mm hook, and make sure you are not pulling the cluster legs extra tall. If your piece is too small: go up to a 3.75 mm hook. The tree grows by 4 sts with every tier, so a small gauge error repeats five times. Fix it at Row 3, not at Row 11.
Pattern
Work all cream rows, and all green rows after Row 2, with the RS facing. Work them from right to left (left to right if you crochet left-handed). Fasten off at the end of each of these rows and leave 4 in (10.2 cm) tails. Working every row from the same side makes the cluster fronts and cream bands look the same on every tier.
The tier formula: a green row with n clusters uses 4n + 1 sts. The cream row under it has 4n + 5 sts, which is exactly the base needed for n + 1 clusters.
Top of the Tree
Row 1 (Color A): Ch 6, sc in 2nd ch from hook and in each ch across. (5 sc)
Keep the base chain neat, because the hanging loop is attached to it later.
Row 2 – Tier 1 (Color A): Turn. Work a beg-cl over the 5 sts. Fasten off. (1 cl)
The side now facing you is the RS. The cluster spreads across the 5 sts above and comes together in one point at the bottom, making the first V.
Cream Band Row (used for Rows 3, 5, 7 and 9)
With RS facing, join Color B with a sl st in the top of the first (rightmost) cluster.
- Right extension: Ch 8, sl st in 4th ch from hook (end picot made). Sc in each of the next 4 ch, working back toward the tree. (4 sc)
- Center: Sc in the top of the cluster where you joined. [3 sc in next ch-3 sp, sc in top of next cl] across.
- Left extension: Work 4 fsc, starting from the last sc. (4 sc)
- End picot: Picot. Fasten off.
The count is 4 + n + 3(n – 1) + 4 = 4n + 5 sts. Picots are not counted.
Cluster Tier Row (used for Rows 4, 6, 8 and 10)
With RS facing, join Color A with a sl st in the first (rightmost) sc of the cream row, just inside the picot.
Work a beg-cl over the first 5 sts. *Ch 3, work a cl over the next 5 sts, starting in the same st as the last leg of the previous cluster (shared leg). Rep from * until the last leg lands in the last sc. Fasten off.
Each tier has n clusters and n – 1 ch-3 sps. The shared legs form the narrow tops of the open triangles, and the ch-3 sps form their wide bottoms.
Row by Row
Row 3 (Color B): Work the Cream Band Row over 1 cl: 4 sc, sc in cl top, 4 fsc. (4 + 1 + 4 = 9 sc)
Row 4 – Tier 2 (Color A): Beg-cl, ch 3, cl. (2 cl, 1 ch-3 sp; uses 9 sts)
Row 5 (Color B): 4 sc, sc in cl top, 3 sc in ch-3 sp, sc in cl top, 4 fsc. (4 + 2 + 3 + 4 = 13 sc)
Row 6 – Tier 3 (Color A): Beg-cl, [ch 3, cl] twice. (3 cl, 2 ch-3 sps; uses 13 sts)
Row 7 (Color B): 4 sc, 3 sc in cl tops, 6 sc in ch-3 sps, 4 fsc. (4 + 3 + 6 + 4 = 17 sc)
Row 8 – Tier 4 (Color A): Beg-cl, [ch 3, cl] 3 times. (4 cl, 3 ch-3 sps; uses 17 sts)
Row 9 (Color B): 4 sc, 4 sc in cl tops, 9 sc in ch-3 sps, 4 fsc. (4 + 4 + 9 + 4 = 21 sc)
Row 10 – Tier 5 (Color A): Beg-cl, [ch 3, cl] 4 times. (5 cl, 4 ch-3 sps; uses 21 sts)
Check: because the legs are shared, 5 clusters use 4 x 5 + 1 = 21 sts, exactly the Row 9 count.
Border: Bottom Picot Row
The last cream row is the border. It follows the Cream Band Row, but it adds picots that hang under the cluster points, so the bottom edge has picot tips like the side edges.
Border gauge: the same as the body, 6 sc per 1 in (2.5 cm). The 25 border sts should measure about 4 1/4 in (10.8 cm) before the end picots.
Row 11 (Color B): With RS facing, join Color B in the top of the first cl.
- Right edge: Ch 8, sl st in 4th ch from hook (end picot), sc in each of the next 4 ch. (4 sc)
- Across the bottom: Sc in top of cl 1, picot. 3 sc in ch-3 sp. Sc in top of cl 2, picot. 3 sc in ch-3 sp. Sc in top of cl 3 (no picot here, because the trunk goes here). 3 sc in ch-3 sp. Sc in top of cl 4, picot. 3 sc in ch-3 sp. Sc in top of cl 5, picot. (5 + 12 = 17 sc, 4 picots)
- Left edge: 4 fsc, picot. Fasten off. (4 sc)
Total: 4 + 17 + 4 = 25 sc, plus 2 end picots and 4 bottom picots.
Why the math works: Row 10 has 5 cluster tops and 4 ch-3 sps. One sc in each top (5) plus 3 sc in each space (12) gives 17. The 4-st extensions on each side add 8, so 17 + 8 = 25 = 4(5) + 5, the same formula as every cream row. The picots sit on top of existing sc and do not change the count, so the trunk stays centered.
Number the Row 11 sts from right to left. Sts 1–4 are the right edge. The cluster tops are sts 5, 9, 13, 17 and 21. Sts 22–25 are the left edge. St 13 is the exact center.
Trunk
Row 1 (Color C): With RS facing, join Color C in st 10 of Row 11. Ch 1, sc in the same st and in each of the next 6 sts (sts 10–16). (7 sc)
Rows 2–6: Ch 1, turn, sc in each st across. (7 sc)
Fasten off and weave in the ends. The trunk is about 1 1/8 in (2.9 cm) wide and 1 in (2.5 cm) tall. It sits between the picots at sts 9 and 17.
Hanging Loop
With Color A, join with a sl st in the free loop of the 3rd ch of the Row 1 base chain (the center of the tree top). Ch 16, sl st in the same ch. Fasten off and weave the tails into the top cluster. The loop is about 1 1/4 in (3.2 cm) tall.
Final Blocking
- Weave in each tail along stitches of the same color: green tails up the cluster legs, cream tails inside the cream band and tan tails inside the trunk.
- Lay the ornament RS up on a blocking mat.
- Pin the top center and the trunk center first, so the tree is 5 in (12.7 cm) tall.
- Pin the two bottom end picots so the width is 4 3/4 in (12.1 cm).
- Pin each pair of tier-end picots level with each other, working from the bottom tier up.
- Gently open each triangle with a pin so the clusters form clean V-shapes.
- Spray until damp, not soaked. Let the ornament dry completely before you unpin it.
- Optional: a light spray starch on the cream bands keeps the picots curled outward.
Final Quality-Control Checklist
- 5 green tiers with 1, 2, 3, 4 and 5 clusters from top to bottom
- Cream rows have 9, 13, 17, 21 and 25 sc
- 2 end picots on every cream row, 10 in total
- 4 bottom picots on Row 11, with none at the center cluster
- Trunk is 7 sts wide and 6 rows tall, centered on sts 10–16
- Width is 4 3/4 in (12.1 cm) across the bottom picots
- Height is 5 in (12.7 cm) without the loop
- Loop sits at the exact center of the top
- Tree hangs straight without leaning
Troubleshooting
The tree leans to one side. One cream extension is tighter than the other. The fsc side is often looser, so pull a little firmer there, or block the tree evenly.
A tier has a stitch left over or comes up short. A shared leg was skipped or doubled. Each cluster after the first must start in the same st as the last leg of the cluster before it.
The clusters look like solid blocks, not V-shapes. Your ch-3 sps are too tight. Make those chains looser, or use a hook 0.25 mm larger for the chains only.
The cream bands ruffle. Your sc are looser than your clusters. Work the cream rows with a 3.25 mm hook.
The picots flop instead of curling. Make the picot chains snug and use spray starch when blocking.
The trunk pulls the bottom row in. Check that the trunk starts in st 10 and has 7 sc, not 8.
Care
Hand wash in cool water with mild soap, press the water out in a towel and dry flat, pinned to shape. Store the ornament flat or hanging, away from heavy ornaments that could crush the picots.
Final Notes
Every measurement in this ornament comes from your gauge. At 6 sc per 1 in (2.5 cm), the 5-st top is about 7/8 in (2.2 cm) wide. Each tier adds 4 sts, so the cream rows grow from 9 to 13, 17, 21 and 25 sts, reaching about 4 1/4 in (10.8 cm) across the sc. The end picots bring the width to 4 3/4 in (12.1 cm). Five tiers of about 3/4 in (1.9 cm) each, plus the top row, give about 4 in (10.2 cm) of tree. The 1 in (2.5 cm) trunk brings the total to 5 in (12.7 cm). Check your gauge at Row 3, count every cream row, and the rest will fall into place.
Happy crocheting!