

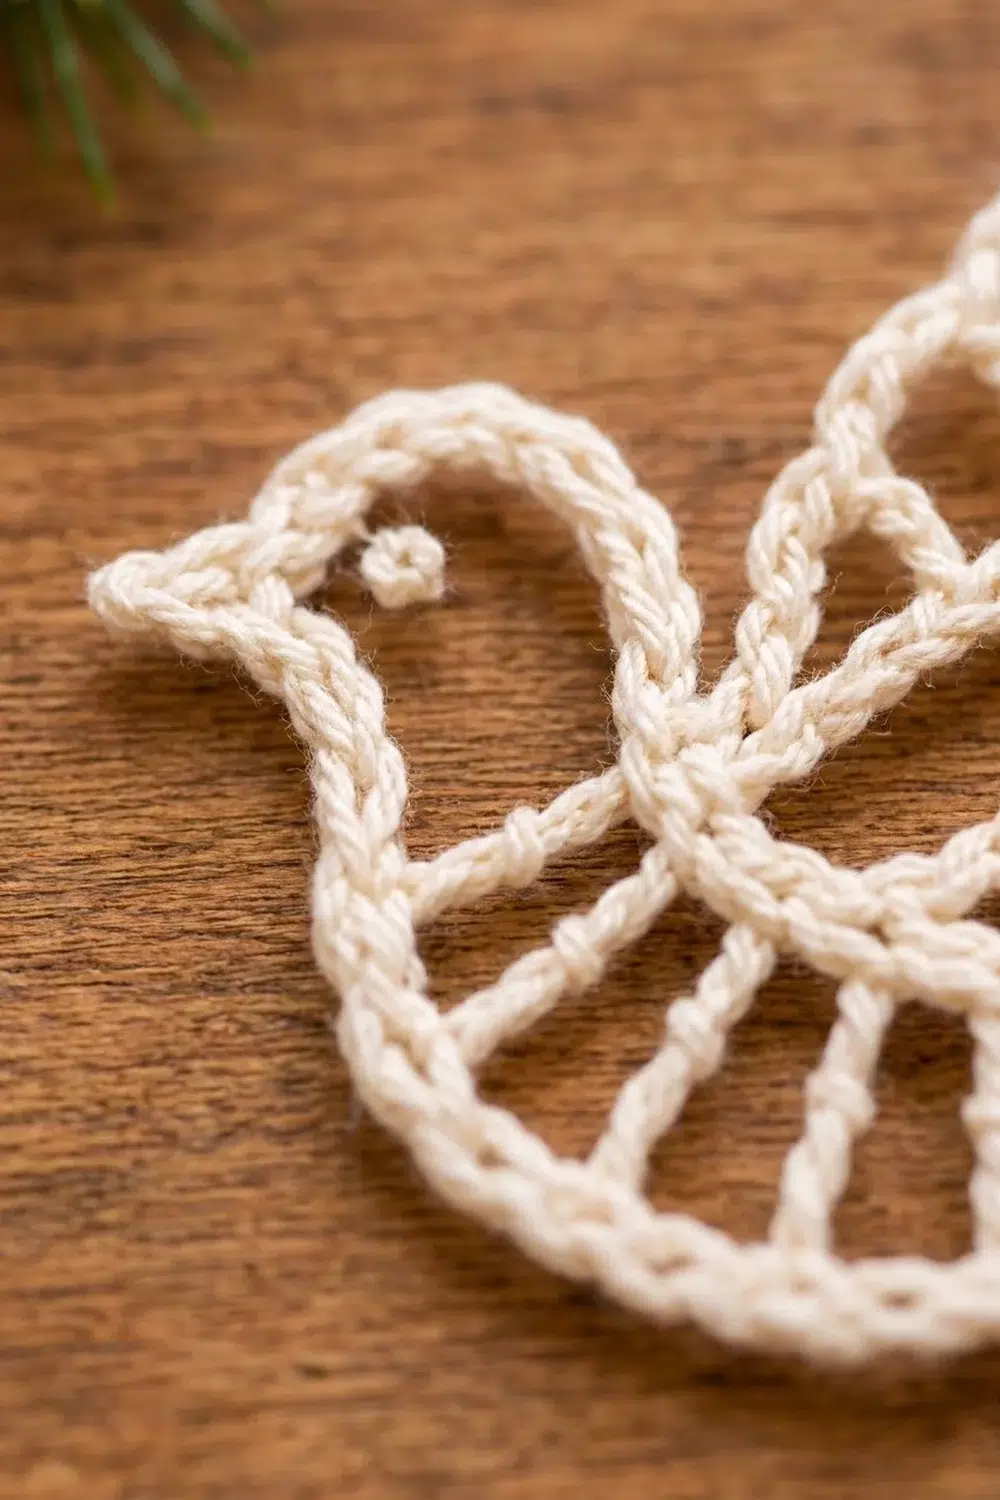
This little dove is all outline and air. Thick corded lines trace the head, back, belly, wing, and tail, and slim spokes cross the open spaces between them. Hung on a tree, the lights show through it, and it looks almost like a paper cut.
The sample is worked in cream cotton thread, a classic for winter decorations. It also works beautifully in soft pastels: pink, lavender, and mint doves make a gentle, vintage-style set. Each dove is worked in one color only.
The pattern uses US crochet terms. The finished dove measures about 5 in (12.7 cm) wide and 3.25 in (8.3 cm) tall, plus a hanging loop about 1.75 in (4.4 cm) tall.
Construction is simple and logical. You start with the head and beak, chain out the back line, then hang belly spokes below it. The tail fan is added at the end of the back line, and the two-tier wing grows upward from the other side of that same back line. The hanging loop is built into the last row of the wing tip.
Finished Size and Construction
- Finished size: 5 in (12.7 cm) wide x 3.25 in (8.3 cm) tall, without the loop
- Hanging loop: about 1.75 in (4.4 cm) tall
- Skill level: Easy-intermediate (tall stitches, working into free loops)
- Terminology: US
- Yarn weight: Size 3 cotton crochet thread
- Hook: 2.25 mm (US B-1)
- Number of pieces: 1
- Layout: Single motif, no joining
- Piece size: 5 x 3.25 in (12.7 x 8.3 cm)
- Size before outline rows (the “border”): about 4.75 x 3 in (12.1 x 7.6 cm)
- Outline (border) depth: one row of sc, about 0.125 in (0.3 cm)
Materials
Choose a smooth, mercerized cotton thread in size 3. Mercerized cotton holds a crisp line, takes starch well, and shows each spoke clearly. Avoid fuzzy or very soft yarns, because they blur the lace.
Yarn (per dove):
- Main color, Cream: 6 g, about 15 m
Optional colorways (one color per dove):
- Pink: 6 g, about 15 m
- Lavender: 6 g, about 15 m
- Mint: 6 g, about 15 m
Tools:
- 2.25 mm (US B-1) crochet hook
- Tapestry needle
- Scissors
- Blocking mat or folded towel
- Rust-proof pins
- Spray starch or fabric stiffener
- Ruler or tape measure
The yarn quantities include a margin of about 20% for testing your gauge and weaving in ends.
Abbreviations (US Terms)
- ch – chain
- sl st – slip stitch
- sc – single crochet
- hdc – half double crochet
- dc – double crochet
- tr – treble crochet
- dtr – double treble crochet
- trtr – triple treble crochet
- sp(s) – space(s)
- st(s) – stitch(es)
- rep – repeat
Special stitches:
- Triple treble (trtr): Yarn over 4 times, insert hook in st, yarn over and pull up a loop (6 loops on hook), [yarn over, pull through 2 loops] 5 times.
- Ch-3 point: (sc, ch 3, sc) in the same st. This makes the small pointed tips on the tail.
- Free loop: the single strand left on the underside of a foundation chain after you have worked sc into it.
Gauge and Checkpoints
Gauge: 16 sc = 2 in (5.1 cm), worked in a row over a foundation chain. That is 8 sc per 1 in (2.5 cm).
Make one test dove before you commit to a full set. Because there is only one piece, the dove itself is your swatch. Check it at each stage:
- After the back line: 24 sc should measure 3 in (7.6 cm).
- After the belly outline: at its deepest point, the belly should hang about 1 in (2.5 cm) below the back line.
- After the tail: the tail fan should extend about 1 in (2.5 cm) beyond the end of the back line.
- After Wing Row 2: the inner wing should rise about 1 in (2.5 cm) above the back line.
- After Wing Row 4: the wing should rise about 1.5 in (3.8 cm).
- After the tip arch: the wing should rise about 2 in (5.1 cm).
Too big? Go down to a 2 mm hook, or tighten your tension on the tall spokes. Too small? Go up to a 2.5 mm hook. Small differences are fine for an ornament, but keep all doves in a set at the same gauge so they match on the tree.
The Pattern
Hold the work with the beak pointing to your left. The belly hangs below the back line and the wing rises above it.
Part 1: Head and Beak
Ch 4, sl st in first ch to form a ring.
Rnd 1: Ch 1, 10 sc in ring, sl st in first sc to join. (10 sc) The small center hole is the eye.
Rnd 2: Ch 1, 2 sc in each sc around, sl st in first sc to join. (20 sc)
Beak: Sl st in next sc, ch 4, sc in 2nd ch from hook, hdc in next ch, dc in next ch, skip 1 sc of the head, sl st in next sc. (1 small triangle)
Head checkpoint: about 0.75 in (1.9 cm) across, plus a beak of about 0.25 in (0.6 cm).
Part 2: Back Line
Sl st in next 7 sc of the head. You are now at the back of the head, opposite the beak and slightly below it.
Row 1: Ch 25, sc in 2nd ch from hook and in each ch across, sl st in next sc of the head. (24 sc)
This is the corded back line, worked from the tail end back to the neck. Number the sc 1 to 24, starting from the head end. The underside of the foundation chain now has 24 free loops, which you will use for the wing. Checkpoint: 3 in (7.6 cm).
Part 3: Belly
Row 2 (belly spokes): Turn. Ch 1, sc in sc 1, [ch 3, skip 2 sc, spoke in next sc] 7 times, ch 2, skip 1 sc, sc in sc 24.
Work the seven spokes in this order, from head to tail:
| Spoke | Into sc | Stitch |
|---|---|---|
| 1 | 4 | dc |
| 2 | 7 | tr |
| 3 | 10 | dtr |
| 4 | 13 | dtr |
| 5 | 16 | dtr |
| 6 | 19 | tr |
| 7 | 22 | dc |
(2 sc + 7 spokes = 9 sts, 7 ch-3 sps, 1 ch-2 sp)
The different spoke heights make the curved belly: short near the neck and tail, deepest in the middle.
Row 3 (belly outline): Turn. Ch 1, sc in first sc, 2 sc in ch-2 sp, [sc in next spoke, 3 sc in next ch-3 sp] 7 times, sc in last sc. Sl st into the head. Fasten off.
(9 sts worked 1-per-stitch + 21 sc in ch-3 sps + 2 sc in ch-2 sp = 32 sc)
Part 4: Tail Fan
Join thread with sl st at the tail tip, where the end of the back line meets the end of the belly outline.
Row 1 (tail spokes): Ch 5 (counts as dtr), [ch 2, dtr] 6 times in the same st. (7 dtr, 6 ch-2 sps)
Spread the spokes into a fan as you go.
Row 2 (tail outline): Turn. Ch 1, sc in first dtr, 3 sc in next ch-2 sp, ch-3 point in next dtr, 3 sc in next ch-2 sp, sc in next dtr; rep from * 2 more times (the last sc goes into the top of the beginning ch-5). Work 5 sc evenly down the beginning ch-5 to the base, sl st at the base. Fasten off.
(1 sc + 3 repeats of 9 sc = 28 sc across the fan, + 5 sc down the side = 33 sc, plus 3 ch-3 points)
Checkpoint: the tail extends about 1 in (2.5 cm) beyond the back line.
Part 5: Two-Tier Wing
Turn the dove so the free loops of the back line face up. Count the free loops 1 to 24 from the head end.
Wing Row 1 (inner spokes): Join thread with sl st in free loop 6. Ch 1, sc in same loop, [ch 3, skip 2 loops, spoke in next loop] 4 times, ch 3, skip 2 loops, sc in loop 21.
Spokes: tr in loop 9, dtr in loop 12, trtr in loop 15, dtr in loop 18.
(2 sc + 4 spokes = 6 sts, 5 ch-3 sps)
Wing Row 2 (inner outline): Turn. Ch 1, sc in each st and 3 sc in each ch-3 sp across.
(6 sts worked 1-per-stitch + 15 sc in ch-3 sps = 21 sc)
Checkpoint: about 1 in (2.5 cm) above the back line.
Wing Row 3 (outer spokes): Turn. Ch 1, sc in sc 1, [ch 3, skip 3 sc, spoke in next sc] 4 times, ch 3, skip 3 sc, sc in sc 21.
Spokes: dc in sc 5, tr in sc 9, dtr in sc 13, tr in sc 17.
(2 sc + 4 spokes = 6 sts, 5 ch-3 sps)
Wing Row 4 (outer outline): Turn. Ch 1, sc in each st and 3 sc in each ch-3 sp across.
(6 sts worked 1-per-stitch + 15 sc in ch-3 sps = 21 sc)
Checkpoint: about 1.5 in (3.8 cm) above the back line.
Wing Row 5 (tip arch): Ch 14, skip the next 11 sc of Row 4 (counting back from the last sc made), sl st in next sc (sc 9 of Row 4). (1 ch-14 arch)
This arch becomes the open rounded loop at the wing tip.
Wing Row 6 (arch outline and hanging loop): Turn. Work 9 sc in the ch-14 arch, ch 30, sl st in last sc made, work 9 more sc in the same arch, sl st in the last sc of Row 4. Fasten off.
(18 sc over the arch + 1 ch-30 hanging loop)
Checkpoint: about 2 in (5.1 cm) above the back line, with the hanging loop about 1.75 in (4.4 cm) tall.
Border (Outline Rows)
This dove has no separate border round. The sc outline rows you worked in each section are the border. They turn bare chains and spokes into the thick corded edges you see on the finished piece.
Border gauge: 8 sc = 1 in (2.5 cm), the same as the main gauge.
Outline counts, section by section:
- Belly outline (Part 3, Row 3): 32 sc
- Tail outline (Part 4, Row 2): 33 sc + 3 ch-3 points
- Inner wing outline (Wing Row 2): 21 sc
- Outer wing outline (Wing Row 4): 21 sc
- Tip arch outline (Wing Row 6): 18 sc
Why the math works: At this gauge, a ch-3 sp is about as wide as 3 sc. Working 3 sc into each ch-3 sp keeps the outline flat, so it doesn’t ruffle or pull the spokes together. The belly’s ch-2 sp gets 2 sc. The tail’s ch-2 sps get 3 sc, because the fan spreads at the tips and that outline needs a little extra length. The tip arch gets 18 sc over 14 ch because it curves outward and needs extra stitches to stay round. Each outline row adds about 0.125 in (0.3 cm). Together they take the frame from about 4.75 x 3 in (12.1 x 7.6 cm) to the finished 5 x 3.25 in (12.7 x 8.3 cm).
Final Blocking
Thread lace needs blocking. Without it, the dove will curl and the spokes will lean.
- Weave in all ends along the outlines, never across an open space.
- Wet the dove completely in cool water and gently press the water out in a towel.
- Lay it on the blocking mat with the beak to the left.
- Pin the back line straight to 3 in (7.6 cm).
- Pin the belly into a smooth curve, 1 in (2.5 cm) deep at the center.
- Open the tail into an even fan and pin each of the 3 ch-3 points.
- Pin the wing so each spoke is straight and the tip arch is round, 2 in (5.1 cm) above the back line.
- Check the overall size: 5 x 3.25 in (12.7 x 8.3 cm).
- Spray with starch or brush on fabric stiffener. Let it dry fully before unpinning.
Final Quality-Control Checklist
- Back line: 24 sc, 3 in (7.6 cm)
- Belly: 7 spokes, outline of 32 sc
- Tail: 7 dtr spokes, outline of 33 sc with 3 points
- Wing: 4 + 4 spokes, outlines of 21 sc each
- Tip arch: 18 sc, round and open
- Hanging loop: ch 30, secured at the top of the arch
- Eye hole visible and beak pointed
- All ends woven in along solid outlines
- Finished size 5 x 3.25 in (12.7 x 8.3 cm)
- Dove lies flat and is stiff enough to hold its shape
Troubleshooting
Outline ruffles: Your chains are loose. Work 2 sc instead of 3 in a few ch-3 sps, or use a smaller hook.
Spokes bunch together: The outline is too tight. Check that you worked 3 sc in every ch-3 sp.
Spokes lean or twist: Block again, pin each spoke straight, then re-starch.
Tail fan won’t open: Your ch-2 sps are tight. Make the chains a little looser, or pin more firmly while blocking.
Wing sits off-center: Recount the free loops. The wing must start in loop 6 and end in loop 21.
Beak disappears: Pull the beak dc firmly and pin the tip out to a point.
Hanging loop leans to one side: Make sure it starts after exactly 9 sc of the arch outline.
Care
Hand wash in cool water, reshape, and re-starch if needed. Store flat in tissue paper so the wing and tail are not crushed.

Final Notes
The whole dove grows from one measurement: the 24-sc back line at 3 in (7.6 cm). From there, the belly drops 1 in (2.5 cm), the tail adds 1 in (2.5 cm), and the wing rises 1 in, then 1.5 in, then 2 in (2.5, 3.8, and 5.1 cm). Outline rows of 3 sc per ch-3 sp keep every edge flat and take the frame from 4.75 x 3 in (12.1 x 7.6 cm) to a finished 5 x 3.25 in (12.7 x 8.3 cm). Check each stage, block carefully, and make one in every color you love.
Happy crocheting!