

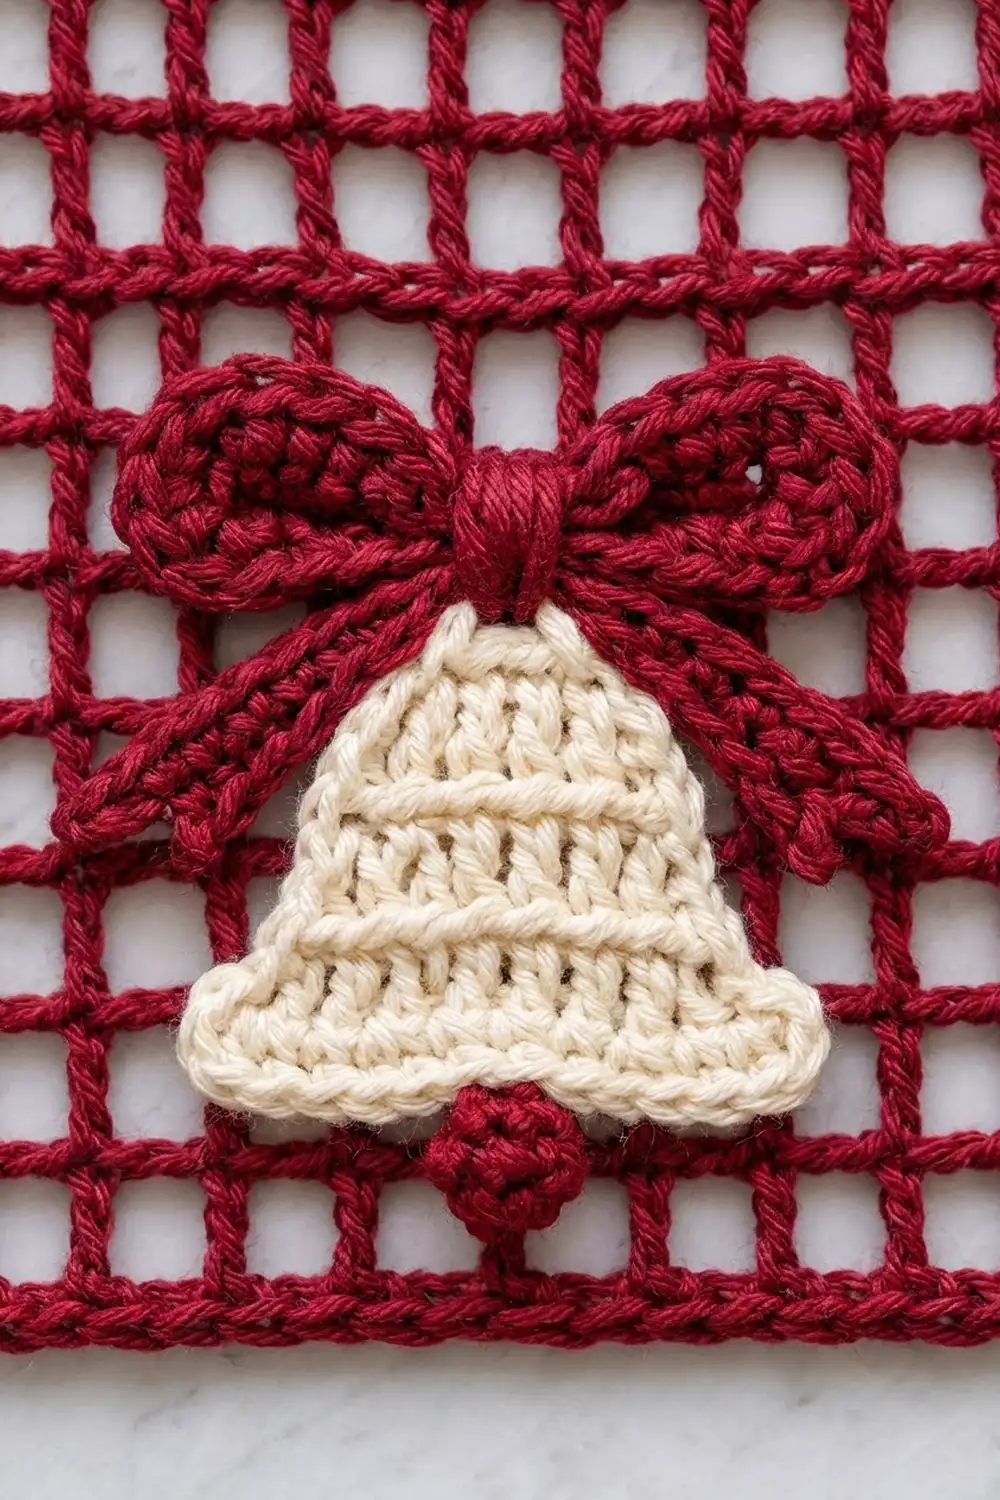
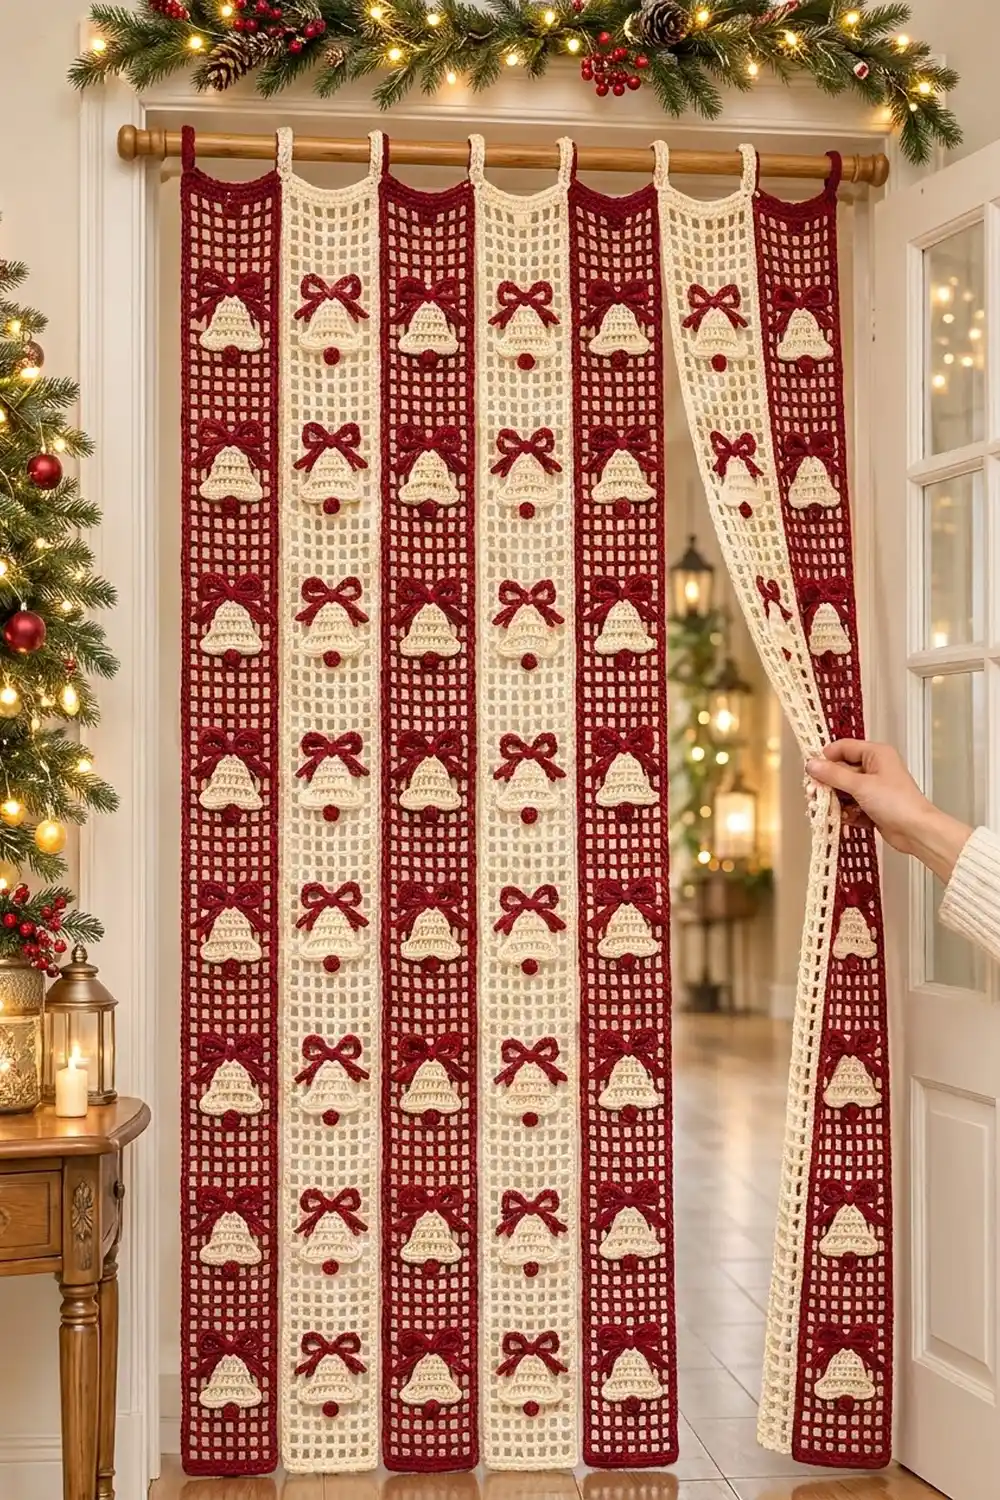
This curtain turns a plain doorway into a festive entrance. It is made of seven long filet mesh strips that alternate cranberry red and cream. A column of cream bells runs down the center of each strip, and every bell has a red bow over its crown and a small red bobble clapper underneath.
The look is classic Christmas cottage. Light comes through the open mesh, while the solid bells and textured bows add depth. On the red strips the bells stand out clearly. On the cream strips the bells blend in softly, so the red bows and clappers become the focus.
This pattern uses US crochet terms. Each finished strip measures 5.5 in (14.0 cm) wide and 75 in (190.5 cm) long, not counting the hanging loops. With all seven strips side by side, the curtain measures 38.5 in (97.8 cm) wide.
The construction is simple. First you crochet each strip as a long rectangle of filet mesh, then add a two-round edging and two hanging loops. Next you make the bells, bows and clappers separately and sew them on. The strips are never sewn to each other.
Finished Size and Construction
- Strip size: 5.5 in x 75 in (14.0 cm x 190.5 cm)
- Hanging length with loops: about 76.75 in (194.9 cm)
- Curtain width: 38.5 in (97.8 cm)
- Skill level: Easy-Intermediate
- Terminology: US
- Yarn weight: Worsted (medium #4)
- Hook: 5.0 mm (H-8)
- Number of pieces: 7 strips, plus 56 bells, 56 bows and 56 clappers
- Layout: 7 strips in one row, alternating red and cream, starting and ending with red
- Mesh size before border: 4.5 in x 74 in (11.4 cm x 188.0 cm)
- Border depth: 0.5 in (1.3 cm) per side
- Bell size: 3 in x 2.25 in (7.6 cm x 5.7 cm)
Materials
Choose a smooth worsted-weight yarn with good stitch definition. Acrylic or an acrylic-cotton blend works best. These yarns are light, keep their shape over a long drop, and hold up well in a busy doorway. Avoid fuzzy yarns, which blur the mesh squares.
- Color A, cranberry red: about 750 g / 1,500 m (4 strips, all bows, all clappers)
- Color B, cream: about 625 g / 1,250 m (3 strips, all bells)
These quantities include a margin of about 15% for swatching, sewing tails and differences in tension.
Tools:
– 5.0 mm (H-8) crochet hook
– Tapestry needle
– Stitch markers
– Measuring tape
– Rust-proof pins and blocking mats
– Spray bottle
– Curtain rod, up to 1.25 in (3.2 cm) thick
Abbreviations (US Terms)
- ch – chain
- sl st – slip stitch
- sc – single crochet
- dc – double crochet
- sc2tog – single crochet 2 together
- BLO – back loop only
- sp – space
- st(s) – stitch(es)
- RS – right side
Bobble (special stitch): Yarn over, insert the hook into the stitch, yarn over and pull up a loop, then yarn over and pull through 2 loops. Repeat in the same stitch 4 more times, for 6 loops on the hook. Yarn over and pull through all 6 loops.
Gauge and Checkpoints
- Mesh gauge: 8 mesh squares and 8 rows = 4 in (10.2 cm). Each square is 0.5 in (1.3 cm).
- Sc gauge: 16 sc and 18 rows = 4 in (10.2 cm).
Test one piece first. Work 20 rows of one strip and make one complete bell, then measure both.
Checkpoints:
1. After Row 1, the strip measures 4.5 in (11.4 cm) wide.
2. After Row 20, the strip measures 10 in (25.4 cm) long.
3. After Row 148, the mesh measures 4.5 in x 74 in (11.4 cm x 188.0 cm).
4. After the border, the strip measures 5.5 in x 75 in (14.0 cm x 190.5 cm).
5. After Row 1, the bell measures 2.5 in (6.4 cm) wide. The finished bell measures 3 in x 2.25 in (7.6 cm x 5.7 cm).
If your piece is too big, go down half a hook size. If it is too small, go up half a hook size. Row height matters most, because any small error is repeated over 148 rows.
Strip (Make 7)
Make 4 strips in Color A and 3 strips in Color B. Each mesh row has 10 dc and 9 ch-1 sps, for 19 sts in total.
Foundation: Ch 22.
Row 1: Dc in the 6th ch from the hook. The 5 skipped ch count as the first dc and the first ch-1 sp. Ch 1, skip 1 ch, dc in the next ch. Repeat from * to * 7 more times. Turn. (10 dc and 9 ch-1 sps = 19 sts; 9 mesh squares)
Row 2: Ch 4 (counts as dc and ch 1). Skip the first ch-1 sp and dc in the next dc. Ch 1, dc in the next dc. Repeat from * to * across, working the last dc into the top ch of the skipped chains from Row 1. Turn. (19 sts)
Rows 3–148: Repeat Row 2, but work the last dc of each row into the 3rd ch of the turning ch-4. (19 sts in every row)
Do not fasten off. Go straight on to the border.
Motif sections: Rows 1–2 form the bottom margin. Rows 3–146 form 8 motif sections of 18 rows each, and each section is 9 in (22.9 cm) tall. Rows 147–148 form the top margin. Place a stitch marker at the start of Rows 3, 21, 39, 57, 75, 93, 111 and 129.
Bell Appliqué (Make 56, Color B)
The bell is worked from the rim upward. The rows worked in the BLO form the horizontal ridges.
Foundation: Ch 11.
Row 1 (rim): Sc in the 2nd ch from the hook and in each ch across. Turn. (10 sc)
Row 2: Ch 1, sc2tog, sc in the next 6 sts, sc2tog. Turn. (8 sc) This step in from the rim creates the flared lip.
Rows 3–4: Ch 1, sc in the BLO of each st across. Turn. (8 sc)
Row 5: Ch 1, sc2tog in the BLO, sc in the BLO of the next 4 sts, sc2tog in the BLO. Turn. (6 sc)
Rows 6–7: Ch 1, sc in the BLO of each st across. Turn. (6 sc)
Row 8 (crown): Ch 1, sc2tog, sc in the next 2 sts, sc2tog. Do not turn. (4 sc)
Edging: Ch 1. Work the edging in this order:
– 4 sc across the top
– 8 sc down the side
– 3 sc in the corner ch
– 8 sc across the foundation
– 3 sc in the last corner ch
– 8 sc up the other side
Sl st to the first sc. (4 + 8 + 3 + 8 + 3 + 8 = 34 sc) Fasten off and leave a 12 in (30.5 cm) tail.
Bow (Make 56, Color A)
Wings: Ch 25. Sc in the 2nd ch from the hook and in each ch across. (24 sc, about 6 in / 15.2 cm long) Fasten off.
Tails: Ch 13. Sc in the 2nd ch from the hook and in each ch across. (12 sc, about 3 in / 7.6 cm long) Fasten off and leave a 12 in (30.5 cm) tail.
Assembly: Fold both ends of the wings strip in to the center, overlapping them by 0.25 in (0.6 cm), to form two loops. Fold the tails strip into an upside-down V and place it behind the center. Wrap the long tail tightly around the center 8 times to form a round knot, then secure it at the back. The finished bow measures about 3 in (7.6 cm) wide and 2 in (5.1 cm) tall.
Clapper (Make 56, Color A)
Ch 3. Work 1 bobble in the 3rd ch from the hook, then ch 1 to close. Fasten off and leave an 8 in (20.3 cm) tail. The clapper is about 0.5 in (1.3 cm) across.
Make All Pieces
- Color A: 4 strips, 56 bows, 56 clappers
- Color B: 3 strips, 56 bells
Each strip gets 8 bells, 8 bows and 8 clappers. Arrange the strips from left to right like this:
| A | B | A | B | A | B | A |
| 1 | 2 | 3 | 4 | 5 | 6 | 7 |
Placement: Center each motif on the 5th (middle) mesh square. Measure each position from the first row of its 18-row section:
– Clapper: centered at 1.5 in (3.8 cm).
– Bell: rim at 2 in (5.1 cm), crown at about 4.25 in (10.8 cm).
– Bow: knot centered on the bell crown.
Joining: Hanging the Strips
The strips are not sewn together, so each one moves freely when someone walks through. The only joining is sewing the appliqués onto the mesh.
Stitch-to-mesh logic: Pin each bell in place. Whipstitch once through each edging sc and around the nearest dc post or ch-1 bar underneath, for 34 stitches per bell. Sew each bow through its knot and both tail tips. Sew each clapper through its base, just below the rim.
Tension advice: Sew firmly, but don’t pull. Tight sewing puckers the mesh and makes the strip hang crooked. After each bell, check that the mesh squares around it are still square.
Size checkpoint: Lay the seven strips side by side with their edges touching. The total width should be 38.5 in (97.8 cm), which covers a standard 36 in (91.4 cm) door with slight fullness.
Border
Border gauge: 4 sc per 1 in (2.5 cm). Each mesh row is 0.5 in (1.3 cm) tall and gets 2 sc.
Round 1: Ch 1 and do not turn. Work 3 sc in the last dc made (corner). Then:
– Work 2 sc around each row-end post down the long side (296 sc).
– Work 3 sc in the corner foundation ch, sc in the next 17 foundation sts, and 3 sc in the last foundation ch (corner).
– Work 2 sc around each row-end post up the second long side (296 sc).
– Work 3 sc in the first st of Row 148 (corner) and sc in the next 17 sts.
Sl st to the first sc.
- Short side: 21 sc, including both corner center sts
- Long side: 300 sc, including both corner center sts
- Total: 2 x 21 + 2 x 300 − 4 shared corners = 638 sc
Round 2: Ch 1. Sc in each sc around, working 3 sc in each corner center sc. Sl st to the first sc. (638 sts worked 1 per st + 8 corner extras = 646 sc)
- Short side: 23 sc
- Long side: 302 sc
Hanging loops: Hold the strip RS up with the top edge facing you. Number the 23 top sc from right to left.
– Right loop: Join yarn in sc 2. Ch 14, skip sc 3–5, and sl st in sc 6. Turn, work 18 sc into the ch-14 loop, and sl st in sc 2. Fasten off.
– Left loop: Join yarn in sc 18. Ch 14, skip sc 19–21, and sl st in sc 22. Turn, work 18 sc into the loop, and sl st in sc 18. Fasten off.
Each loop stands about 1.75 in (4.4 cm) tall. The two loops sit in mirrored positions.
Why the math works: The mesh is 74 in (188.0 cm) long, and 74 x 4 = 296 sc, which is exactly 2 per row. The 4.5 in (11.4 cm) width at 4 sc per inch needs 18 sc, and the 17 middle sts plus the corner sts fill that edge without cupping. Two sc rounds add 0.5 in (1.3 cm) per side, so the strip finishes at 5.5 in x 75 in (14.0 cm x 190.5 cm).
Final Blocking
- Weave in all ends.
- Lay one strip flat, working in sections if your surface is shorter than the strip.
- Pin both long edges straight at 5.5 in (14.0 cm) wide.
- Pin the short edges so the corners are square.
- Ease the mesh into even 0.5 in (1.3 cm) squares.
- Spray until damp but not soaked.
- Flatten the bell rims and spread the bow loops evenly.
- Let dry completely, then unpin.
- Repeat for each strip, then hang them for 24 hours to settle.
Final Quality-Control Checklist
- 148 rows and 19 sts per row on every strip
- Each strip measures 5.5 in x 75 in (14.0 cm x 190.5 cm)
- 646 sc after border Round 2, with flat corners
- Hanging loops matching and symmetrical
- 8 motifs per strip, centered on the middle square
- Motifs aligned at the same heights across all 7 strips
- No puckering around the appliqués
- Colors in A, B, A, B, A, B, A order
Troubleshooting
The strip slants. A dc was skipped or added. Count 10 dc in every row.
The strip is too long. Go down half a hook size, or snug up your turning chains.
The squares are rectangles. Adjust your ch-1 sps until each square measures 0.5 in (1.3 cm).
The border ruffles. Use 2 sc per row end, never 3. Check for 296 sc between the corners on each long side.
The border cups. Go up half a hook size for the border only.
The bell curls. Steam it face down before sewing it on.
The bow droops. Add 2 extra wraps around the center and tack each loop to the mesh.
Care
Hand wash in cool water and dry flat, because a heavy wet strip can stretch if it hangs. Store the strips rolled rather than folded.
Final Notes
Here’s how the measurements build on each other:
– 8 squares = 4 in (10.2 cm), so 9 squares = 4.5 in (11.4 cm).
– 148 rows = 74 in (188.0 cm).
– The 0.5 in (1.3 cm) border brings each strip to 5.5 in x 75 in (14.0 cm x 190.5 cm).
– Seven strips cover 38.5 in (97.8 cm).
Check your gauge early and count your stitches at every stage, and your curtain will hang straight and even all season.
Happy crocheting!