
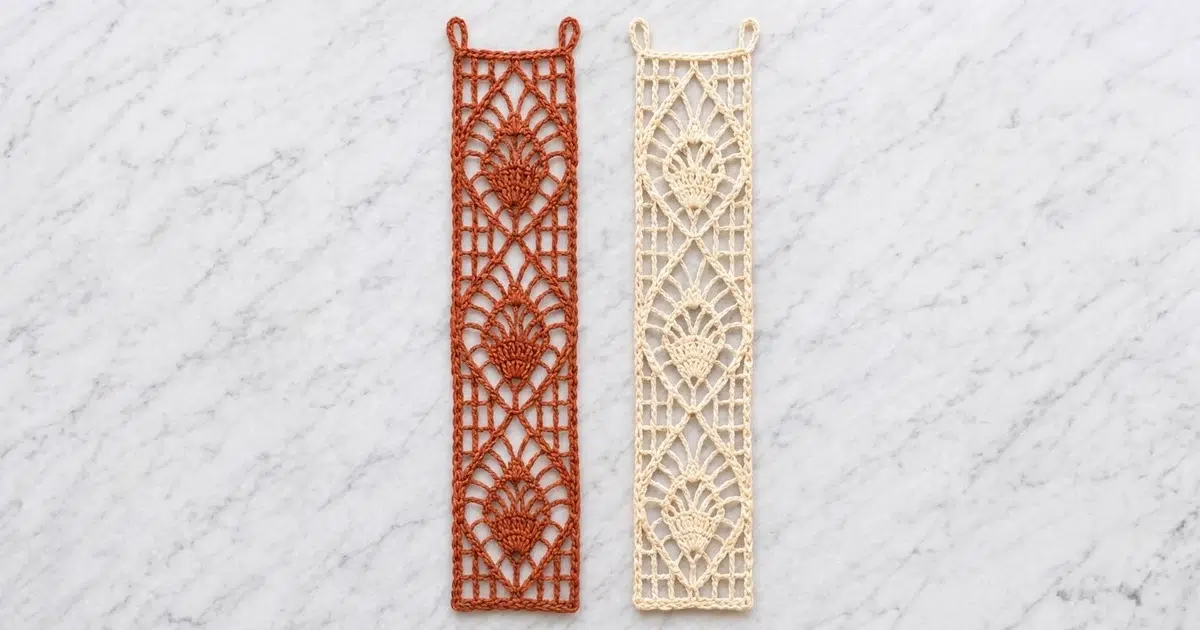
This long, airy lace strip has three stacked diamonds down the center. Each diamond starts as a small solid fan and opens into a pineapple-style group of chain arches. Open ladder columns run up both long sides, a neat single-crochet outline frames the strip, and two small loops at the top let it hang from a rod.
The sample is worked in warm terracotta, and the design looks just as good in soft cream. Each strip is one piece in one color. Hang a single strip as a wall accent, or make several and hang them side by side, unjoined, as a doorway curtain.
The pattern uses US crochet terms. The finished strip measures 5 in (12.7 cm) wide by 18.5 in (47.0 cm) long. The loops add 1.75 in (4.4 cm) above the top edge, so the overall height is 20.25 in (51.4 cm).
You work the strip in rows from the bottom up: a solid foundation row, a mesh row, three 11-row diamond repeats, and a solid top row. Then you add a two-round border and attach the two hanging loops.
Finished Size and Construction
- Finished size: 5 in (12.7 cm) wide × 18.5 in (47.0 cm) long, plus 1.75 in (4.4 cm) loops
- Skill level: Intermediate
- Terminology: US crochet terms
- Yarn weight: DK (#3) cotton
- Hook: 4 mm (G-6)
- Number of pieces: 1
- Layout: one vertical strip with 3 diamond motifs
- Size before border: 4.5 in (11.4 cm) × 18 in (45.7 cm)
- Border depth: 0.25 in (0.6 cm) on each side
Materials
Use a smooth mercerized or combed cotton in DK weight. Cotton gives crisp stitch definition and holds its shape after blocking. Avoid fuzzy or very stretchy yarn, because the chain arches will lose their shape.
Yarn (choose one color per strip):
– Terracotta: 35 g (80 m), or
– Cream: 35 g (80 m)
These quantities include about a 20% safety margin. If you plan a multi-strip curtain, allow 35 g (80 m) for each strip.
Tools:
– 4 mm (G-6) crochet hook
– Tapestry needle
– Scissors
– 4 stitch markers
– Measuring tape
– Blocking mat, rustproof pins and a spray bottle
Abbreviations (US Terms)
- ch – chain
- sl st – slip stitch
- sc – single crochet
- dc – double crochet
- sk – skip
- sp(s) – space(s)
- st(s) – stitch(es)
- tch – turning chain
- RS – right side
Special terms:
– Mesh: ch 2, then dc in the next dc. In Row 2, skip 2 dc instead of a space.
– Bar dc: the dc at the inner edge of each side ladder (the 2nd dc and the second-to-last dc of every row).
– Arch: a ch-3 or ch-4 loop anchored by sc at both ends.
Edge rule for Rows 3–35: begin every row with “Ch 5 (counts as dc and ch 2), dc in next dc (left bar)”. End every row with “ch 2, dc in 3rd ch of tch”. The row instructions below only describe what you work between those two edges.
Gauge and Checkpoints
Gauge: 22 dc = 4.5 in (11.4 cm), and 10 rows of dc = 4 in (10.2 cm).
Make a test swatch first. Ch 24, work 10 rows of dc (22 sts per row), and measure it lightly blocked. Then work the strip itself and check these measurements, taken pinned flat:
- After Row 2: 4.5 in (11.4 cm) wide, 0.8 in (2.0 cm) tall
- One diamond repeat: 5.6 in (14.2 cm) tall
- After Row 13: 6.4 in (16.3 cm)
- After Row 24: 12.0 in (30.5 cm)
- After Row 35: 17.6 in (44.7 cm)
- After Row 36: 18.0 in (45.7 cm)
Too big? Go down to a 3.75 mm hook. Too small? Go up to a 4.5 mm hook.
If your width is right but the repeats are short, keep your chains looser. Arches pulled tight shorten each diamond.
Strip Pattern
Foundation
Row 1: Ch 24. Dc in 4th ch from hook (the skipped ch count as a dc) and in each ch across. Turn. (22 sts)
Row 2 (mesh row): Ch 5 (counts as dc and ch 2), sk next 2 dc, dc in next dc. [Ch 2, sk next 2 dc, dc in next dc] 6 times, placing the last dc in the top of the tch. Turn. (8 dc, 7 ch-2 sps)
Place a marker in the 2nd dc and in the 7th dc. These are the bar dc. Move the markers up as you work.
Diamond Repeat (Rows 3–13)
Remember the edge rule: every row opens with ch 5 and a dc in the left bar, and closes with ch 2 and a dc in the 3rd ch of the tch.
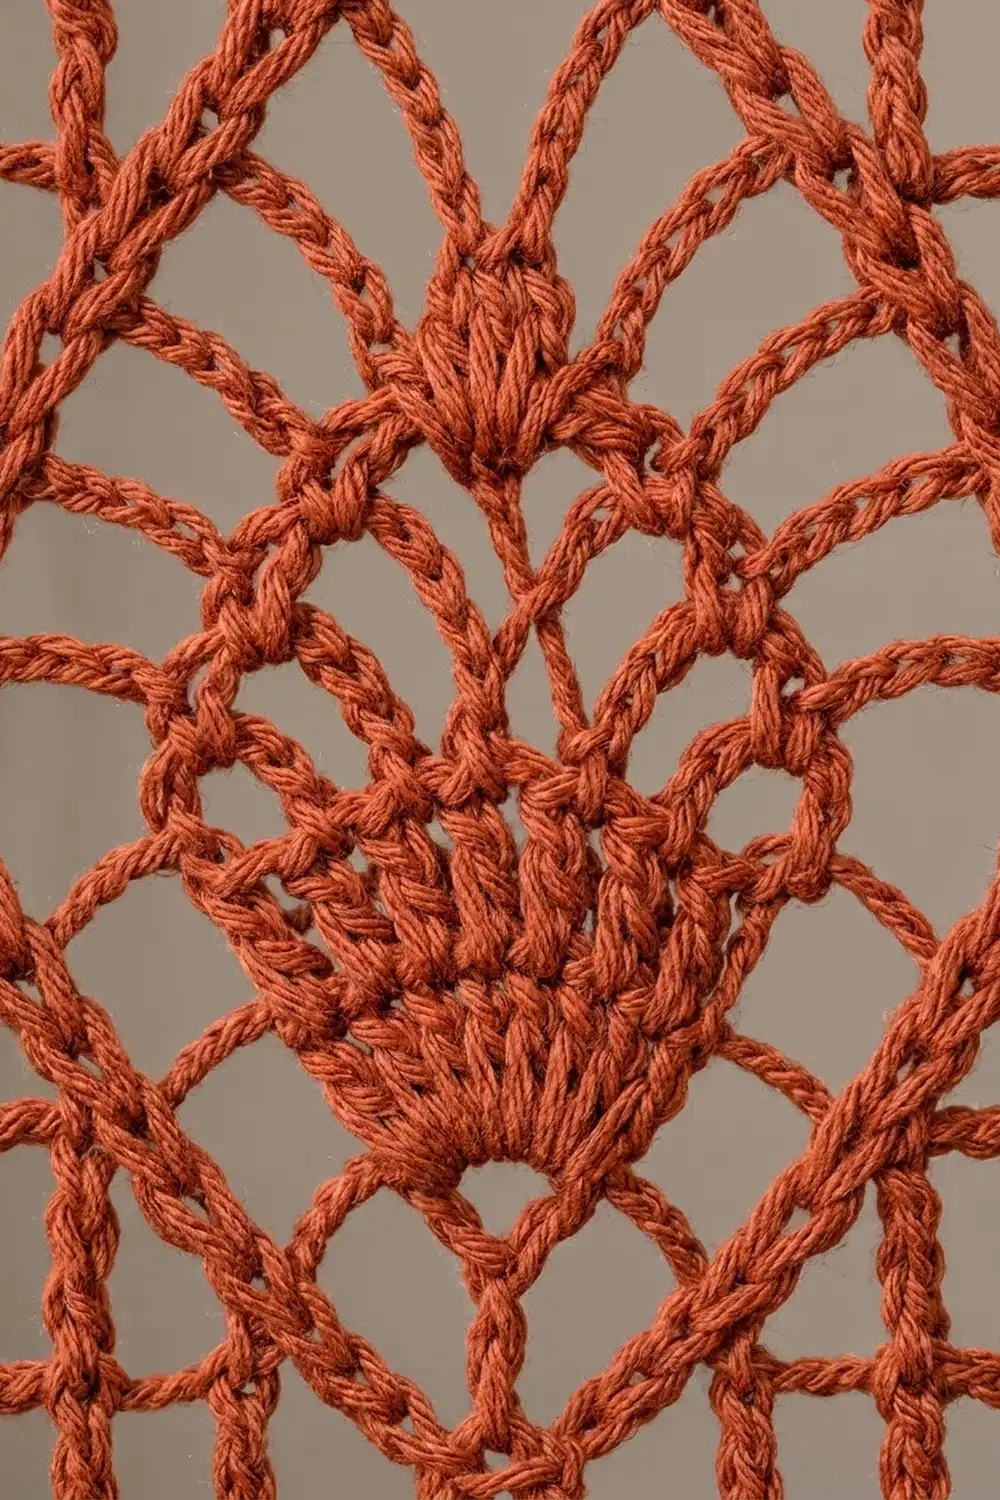
Row 3 (fan base): [Ch 2, dc in next dc] twice. Work 7 dc in the next ch-2 sp (the center sp). Dc in next dc. [Ch 2, dc in next dc] twice, ending in the right bar. (15 dc, 6 ch-2 sps)
Row 4 (rays): [Ch 2, dc in next dc] twice. [Ch 1, dc in next dc] 8 times (7 fan dc plus the dc after the fan). [Ch 2, dc in next dc] twice. (15 dc, 6 ch-2 sps, 8 ch-1 sps)
Row 5 (first arches): Ch 2, dc in next dc. Ch 3, sk next ch-2 sp and next dc, sc in next ch-1 sp. [Ch 3, sc in next ch-1 sp] 7 times. Ch 3, sk next dc and next ch-2 sp, dc in next dc. Ch 2, dc in right bar. (6 dc, 8 sc, 9 ch-3 sps, 4 ch-2 sps)
Row 6 (full width): Ch 4, sk next ch-2 sp, next dc and next ch-3 sp, then sc in the first arch. [Ch 4, sc in next arch] 6 times. Ch 4, sk next ch-3 sp, next dc and next ch-2 sp, dc in right bar. (4 dc, 7 sc, 8 ch-4 sps: 6 arches + 2 side sps; 2 ch-2 sps)
The diamond now touches both bars at its widest point.
Row 7: Ch 4, sk side ch-4 sp, sc in first arch. [Ch 4, sc in next arch] 5 times. Ch 4, sk side ch-4 sp, dc in right bar. (4 dc, 6 sc, 7 ch-4 sps: 5 arches + 2 side sps; 2 ch-2 sps)
Row 8: Ch 2, dc in side ch-4 sp (new post). Ch 3, sc in first arch. [Ch 4, sc in next arch] 4 times. Ch 3, dc in side ch-4 sp (new post). Ch 2, dc in right bar. (6 dc, 5 sc, 4 ch-4 arches, 2 ch-3 sps, 4 ch-2 sps)
Row 9: Ch 2, dc in next dc. Ch 2, dc in next ch-3 sp (new post). Ch 3, sc in first arch. [Ch 4, sc in next arch] 3 times. Ch 3, dc in next ch-3 sp (new post). Ch 2, dc in next dc. Ch 2, dc in right bar. (8 dc, 4 sc, 3 ch-4 arches, 2 ch-3 sps, 6 ch-2 sps)
Each corner now holds two mesh squares again.
Row 10: [Ch 2, dc in next dc] twice. Ch 3, sc in first arch. [Ch 4, sc in next arch] twice. Ch 3, dc in next dc. [Ch 2, dc in next dc] twice. (8 dc, 3 sc, 2 ch-4 arches, 2 ch-3 sps, 6 ch-2 sps)
Row 11: [Ch 2, dc in next dc] twice. Ch 3, sc in first arch, ch 4, sc in next arch. Ch 3, dc in next dc. [Ch 2, dc in next dc] twice. (8 dc, 2 sc, 1 ch-4 arch, 2 ch-3 sps, 6 ch-2 sps)
Row 12 (top point): [Ch 2, dc in next dc] twice. Ch 3, sc in the ch-4 arch, ch 3, dc in next dc. [Ch 2, dc in next dc] twice. (8 dc, 1 sc, 2 ch-3 sps, 6 ch-2 sps)
Row 13 (mesh): [Ch 2, dc in next dc] twice. Ch 2, sk ch-3 sp, sc and ch-3 sp, dc in next dc. [Ch 2, dc in next dc] twice. (8 dc, 7 ch-2 sps)
Row 13 matches Row 2 exactly, so the next fan sits in the center sp again.
Remaining Repeats
Rows 14–24: Repeat Rows 3–13.
Rows 25–35: Repeat Rows 3–13. (Row 35: 8 dc, 7 ch-2 sps)
Top Row
Row 36 (conversion row): Ch 3 (counts as dc). [2 dc in next ch-2 sp, dc in next dc] 7 times, placing the last dc in the 3rd ch of the tch. Do not fasten off. (22 sts = 8 dc worked 1-per-dc + 14 dc worked into spaces)
Border
Border gauge: 1 sc per st along the top and bottom (22 sts across 4.5 in / 11.4 cm), and 2 sc per row end along the sides (72 sc across 18 in / 45.7 cm, or 4 sc per inch).
Round 1: With RS facing, ch 1.
- Top: 3 sc in first st (corner), sc in next 20 sts, 3 sc in last st (corner).
- First long side: working down the row ends, 2 sc in the side of each row (72 sc).
- Bottom: working into the free loops of the foundation ch, 3 sc in first ch (corner), sc in next 20 ch, 3 sc in last ch (corner).
- Second long side: 2 sc in the side of each row (72 sc).
- Sl st to the first sc.
Count: top 26, bottom 26, each long side 72, for 196 sc. Counted between the corner centers, that is 20 + 20 + 72 + 72 sc plus 4 corner groups of 3 (12 sc) = 196.
Round 2: Ch 1. Sl st loosely in each sc around, then join. (196 sl st)
This round firms the edge without adding stitches or noticeable width.
Why the math works: The top and bottom take one stitch per existing stitch, so they keep the 4.5 in (11.4 cm) width. The 36 rows × 2 sc = 72 sc spread at 4 sc per inch matches the 18 in (45.7 cm) length, so the long edges neither ruffle nor pull in. The extra 2 sc at each corner let the corners turn flat. The border adds 0.25 in (0.6 cm) per side: 4.5 + 0.5 = 5.0 in (12.7 cm), and 18 + 0.5 = 18.5 in (47.0 cm).
Hanging Loops
Count the 26 stitches across the top edge from left to right.
Left loop: Join yarn with a sl st in st 3. Ch 16, sk sts 4–6, sl st in st 7. Turn. Ch 1, work 24 sc into the ch-16 loop, sl st in st 3, and fasten off. (24 sc)
Right loop: Join in st 20. Ch 16, sk sts 21–23, sl st in st 24. Turn. Ch 1, work 24 sc into the loop, sl st in st 20, and fasten off. (24 sc)
Each loop sits above a side ladder column, rises about 1.75 in (4.4 cm), and fits a rod up to 1.25 in (3.2 cm) across. Weave in all ends along solid stitches.
Final Blocking
- Soak the strip in cool water for 10 minutes, then press out the water in a towel. Do not wring it.
- Lay it RS up on the blocking mat.
- Pin the four corners to a 5 in × 18.5 in (12.7 × 47.0 cm) rectangle.
- Pin along both long edges every 1 in (2.5 cm), keeping the side ladders straight.
- Pin each diamond’s bottom and top points on the center line so all three diamonds stack in a straight column.
- Open each fan and set of arches gently with your fingers.
- Pin each loop into a round arch.
- Let the strip dry completely before you unpin it.
Final Quality-Control Checklist
- The strip measures 5 in (12.7 cm) × 18.5 in (47.0 cm).
- There are three complete diamonds, each 5.6 in (14.2 cm) tall.
- Every fan has 7 dc and 8 rays.
- Rows 2, 13, 24 and 35 each have 8 dc and 7 ch-2 sps.
- Row 36 has 22 sts.
- Border Round 1 has 196 sc.
- Both loops have 24 sc and match in height.
- All ends are woven in invisibly.
Troubleshooting
- Diamonds lean to one side: check that you skipped the same elements on both sides in Rows 5 and 6.
- Arch count is off: count the arches before each row. Rows 6–12 should give 6, 5, 4, 3, 2, 1, 0.
- The strip narrows mid-diamond: Rows 6 and 7 have no corner posts, so work the side ch-4 loosely.
- Fan cups or bulges: work the 7 dc more loosely, or use 6 dc and 7 rays, and adjust Rows 4–5 to match.
- Side edges ruffle: use 3 sc per 2 rows and take the same number off both sides so they still match.
- Loops twist: pin them flat during blocking.
Care
Hand wash in cool water with mild soap and dry flat, re-pinning if needed. Cotton strips hanging in sunlight may fade over time, so rotate them every few months.

Final Notes
The measurement chain is:
- Gauge: 22 dc = 4.5 in (11.4 cm).
- Rows 1–2 measure 0.8 in (2.0 cm).
- Three repeats add 16.8 in (42.7 cm).
- Row 36 adds 0.4 in (1.0 cm), for 18 in (45.7 cm) before the border.
- The border brings the strip to 5 in × 18.5 in (12.7 × 47.0 cm).
- The loops bring the overall height to 20.25 in (51.4 cm).
Check each stage and the finished strip will hang straight. Happy crocheting!