

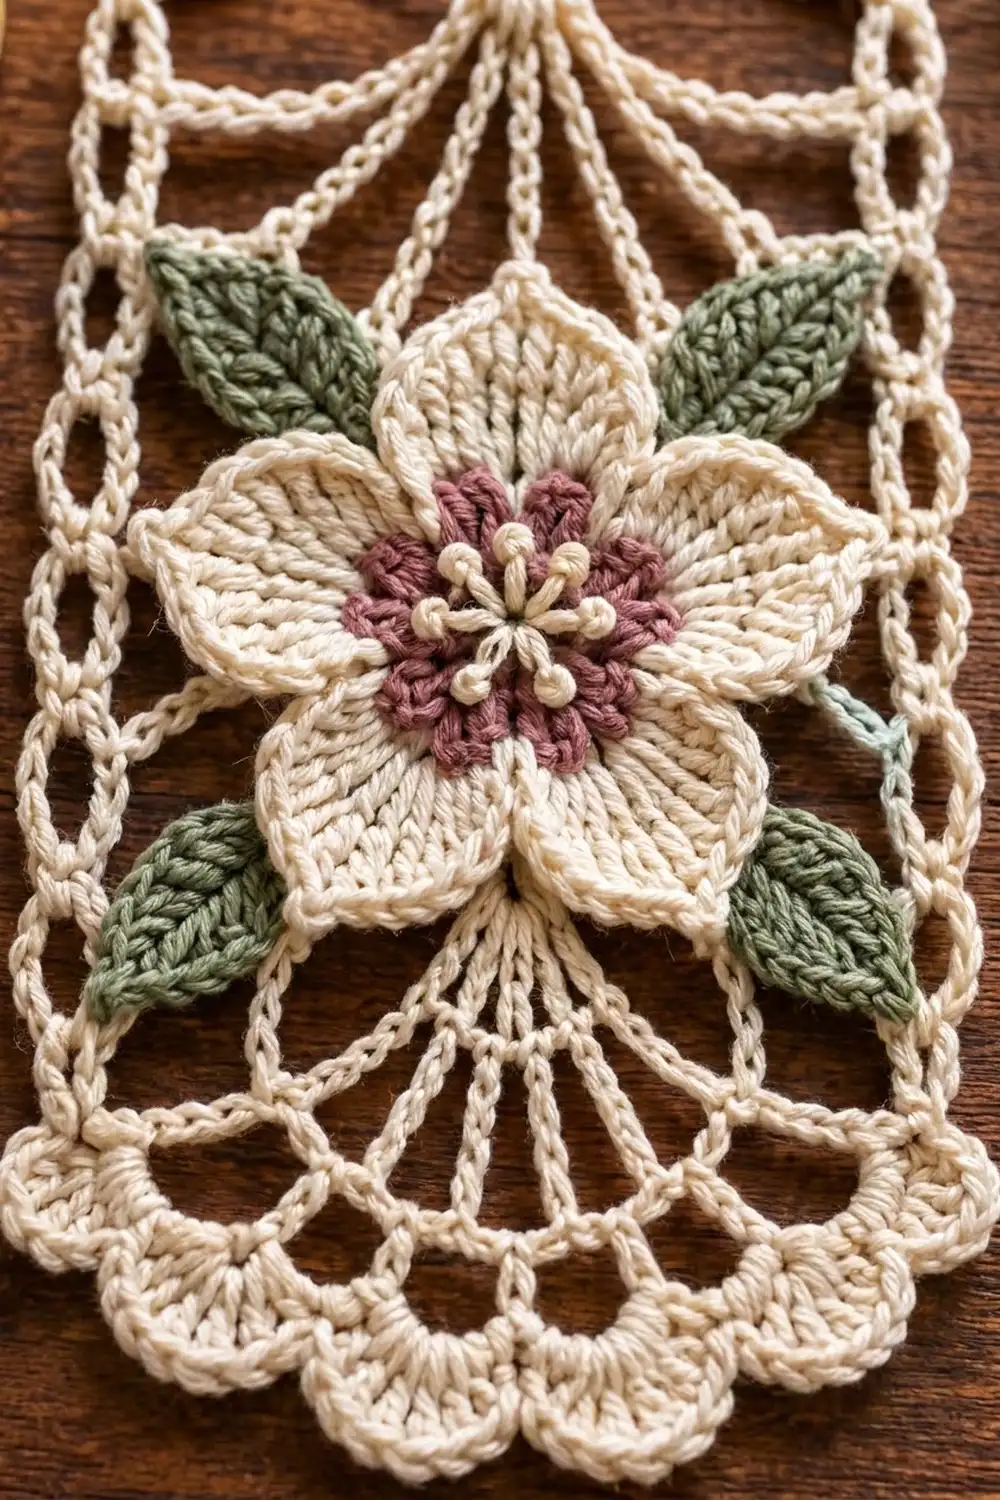
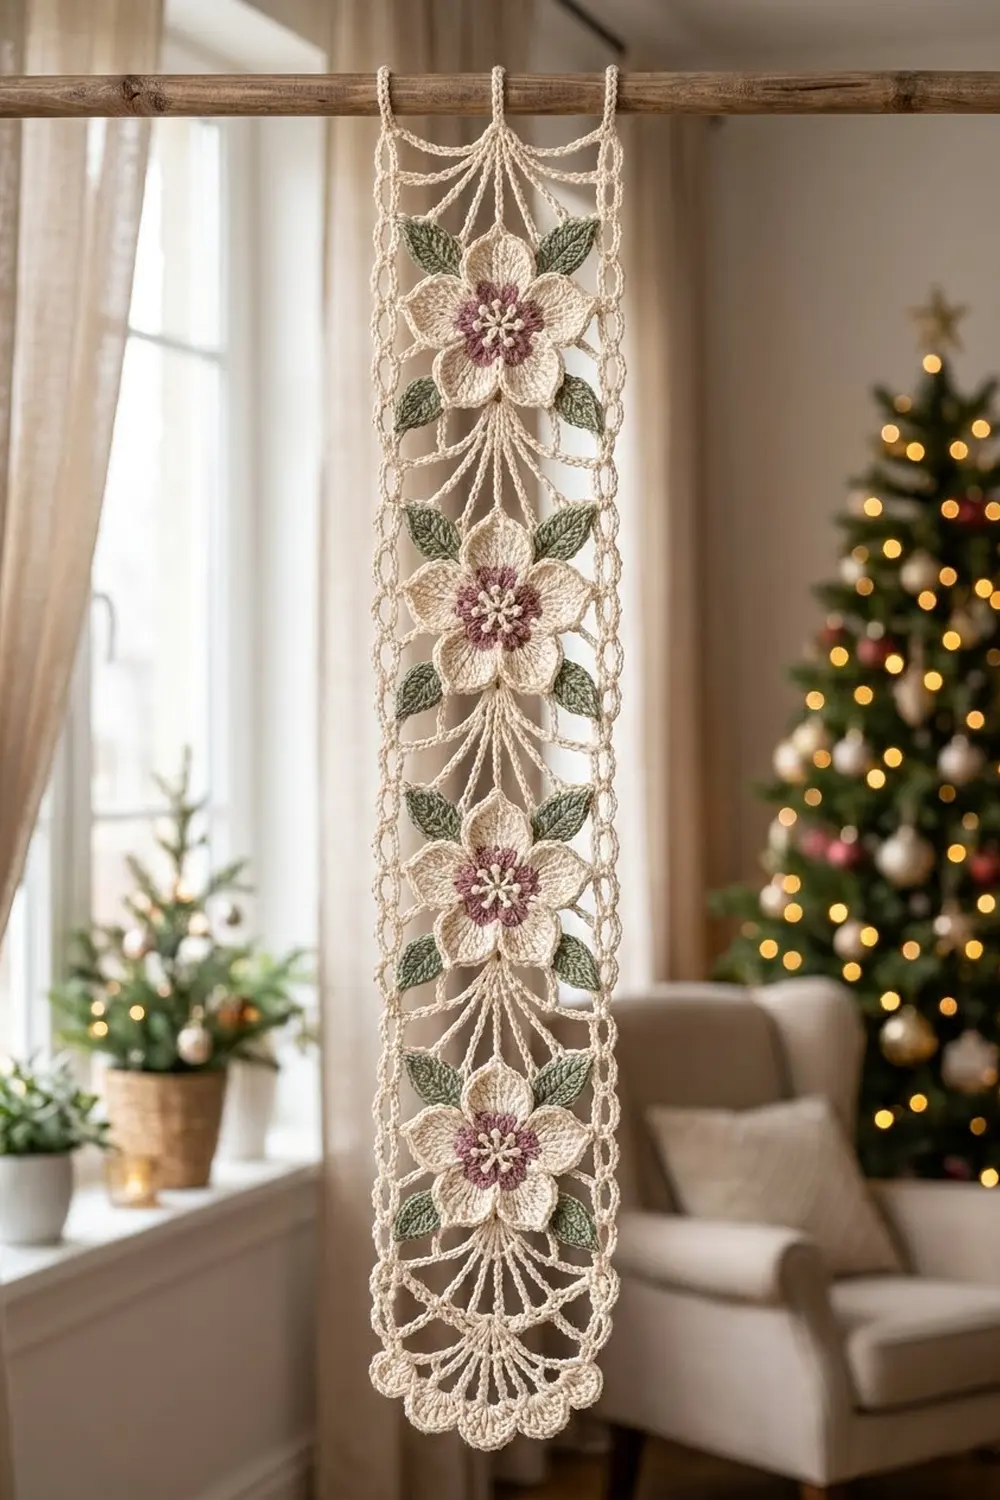
The Christmas Rose Lace Curtain Strip is one long, narrow lace panel in creamy ivory. Four raised flowers run down the center. Each has a dusty mauve ruffled center and cream stamens, and two small sage-green leaves sit above each flower with two more below it.
The strip has an open, vintage look. Ladder-like rails run down both long edges. Above and below each flower, chain spokes fan out from the flower toward the rails. Three hanging loops finish the top edge, and a row of deep shell scallops finishes the bottom. This pattern uses US crochet terms throughout.
The finished strip measures 5 in x 21.8 in (12.7 cm x 55.4 cm). The hanging loops add about 1 in (2.5 cm), for 22.8 in (57.9 cm) overall. Hang a single strip on a slim rod, a hook or a window latch. If you make several, they can hang side by side as a curtain without being joined. The cream, mauve and sage palette suits the holidays, but it also works all year round.
Construction is simple. You work the lace strip in flat rows from top to bottom, then add a two-round border with the loops and scallops. You make the flowers and leaves separately and sew them on, so they stay slightly raised above the lace.
Finished Size and Construction
- Finished size: 5 in x 21.8 in (12.7 cm x 55.4 cm), not counting the loops
- Skill level: Intermediate
- Terminology: US
- Yarn weight: Sport (#2) mercerized cotton
- Hook: 3.0 mm
- Number of pieces: 1 lace strip, plus 4 flower and 16 leaf appliqués sewn on
- Layout: 4 flower sections stacked vertically in one strip
- Section size: 4.5 in x 4.8 in (11.4 cm x 12.2 cm)
- Size before border: 4.5 in x 20.8 in (11.4 cm x 52.8 cm)
- Border depth: 0.25 in (0.6 cm) at the top and sides, 0.75 in (1.9 cm) at the bottom scallops
Materials
Choose a smooth mercerized cotton or cotton blend in sport weight. Mercerized cotton shows each stitch clearly, blocks flat and holds its shape while hanging. Avoid fuzzy or very stretchy yarn, which blurs the spokes.
- Cream: 55 g (about 165 m) for the strip, border, petals and stamens
- Dusty mauve: 8 g (about 24 m) for the flower centers
- Sage green: 10 g (about 30 m) for the leaves
Tools:
- 3.0 mm crochet hook
- Tapestry needle
- Stitch markers
- Rust-proof pins and a blocking mat
- Spray bottle
- Measuring tape
These quantities include a margin of about 15 percent for swatching and weaving in ends.
Abbreviations (US Terms)
- ch – chain
- sl st – slip stitch
- sc – single crochet
- hdc – half double crochet
- dc – double crochet
- tr – treble crochet
- sk – skip
- st(s) – stitch(es)
- sp – space
- MR – magic ring
- FLO / BLO – front loop only / back loop only
- RS / WS – right side / wrong side
- pos – position
Special stitch: Shell – 7 dc in the same stitch.
Position counting: Every body row is 25 positions wide. Each dc counts as 1 position and each chain counts as 1 position. “Dc in pos 9” means work a dc into the stitch or chain at position 9 of the row below. When that position is a chain, insert your hook under the chain.
Rail start: Ch 5 (counts as a dc in pos 1 plus ch 2 over pos 2–3), sk 2, dc in pos 4.
Rail end: Dc in pos 22, ch 2, sk 2 (pos 23–24), dc in top of turning ch (pos 25).
Gauge and Checkpoints
Gauge in pattern is 25 sts = 4.5 in (11.4 cm) and 5 rows = 2 in (5.1 cm). Each row is 0.4 in (1.0 cm) tall.
Test the strip before making the whole piece. Work Rows 1–14, which are the top band and one flower section, then pin the swatch flat and measure it. If it matches, keep going, because the swatch is also the start of your strip.
- After Row 1: 4.5 in (11.4 cm) wide
- After Row 14: 5.6 in (14.2 cm) long
- After Row 26: 10.4 in (26.4 cm) long
- After Row 38: 15.2 in (38.6 cm) long
- After Row 52: 20.8 in (52.8 cm) long
- Each flower: 2.5 in (6.4 cm) across
- Each leaf: 1 in (2.5 cm) long
If your swatch is too big, go down 0.25 mm in hook size. If it is too small, go up 0.25 mm. Width matters more than length, because each flower has to fit between the rails.
Lace Strip
Use cream. Turn at the end of every row.
Row 1 (RS): Ch 27. Dc in the 4th ch from the hook (the skipped ch count as the first dc) and in each ch across. (25 dc)
Mesh Row: Rail start, ch 1, sk 1, dc in next pos 8 times (pos 5–20), ch 1, sk 1 (pos 21), rail end. (12 dc + 13 ch = 25 positions)
Row 2: Work the Mesh Row.
Flower Section (12 rows)
S1 – Wide Fan: Rail start, ch 1, sk 1, dc in pos 6, ch 2, sk 2, dc in pos 9, ch 3, sk 3, dc in pos 13, ch 3, sk 3, dc in pos 17, ch 2, sk 2, dc in pos 20, ch 1, sk 1, rail end. (9 dc + 16 ch = 25 positions)
S2 – Narrowing Fan: Rail start, ch 3, sk 3, dc in pos 8, ch 2, sk 2, dc in pos 11, ch 1, sk 1, dc in pos 13, ch 1, sk 1, dc in pos 15, ch 2, sk 2, dc in pos 18, ch 3, sk 3, rail end. (9 dc + 16 ch = 25 positions)
S3 – Fan Point: Rail start, ch 6, sk 6, dc in pos 11–15, ch 6, sk 6, rail end. (9 dc + 16 ch = 25 positions)
Over S1–S3, the five spokes move inward and meet in the 5-dc block of S3. This makes the fan that narrows toward the top of the flower.
S4–S9: Work the Mesh Row 6 times. This 2.4 in (6.1 cm) mesh band is where the flower sits.
S10: Work as S3.
S11: Work as S2.
S12: Work as S1.
S10–S12 reverse the fan, so the spokes open outward below the flower.
Complete the Strip
Rows 3–50: Work S1–S12 four times. The four sections are Rows 3–14, 15–26, 27–38 and 39–50.
Row 51: Work the Mesh Row.
Row 52: Ch 3 (counts as dc), dc in each st and ch across. (25 dc) Fasten off.
Checkpoint: the strip measures 4.5 in x 20.8 in (11.4 cm x 52.8 cm) before the border.
Flower Appliqué (Make 4)
Rnd 1 (mauve): MR, ch 1, 10 sc in ring, sl st to first sc. (10 sc)
Rnd 2 (mauve): Working in FLO, ch 1, (sc, ch 3, sc) in each st around, sl st to first sc. (20 sc + 10 ch-3 loops) Fasten off. This round makes the ruffled center.
Rnd 3 (cream): Join cream in the free back loop of any Rnd 1 st. Ch 1, 2 sc in each back loop around, sl st to first sc. (20 sc) Checkpoint: about 1.25 in (3.2 cm) across.
Rnd 4: Ch 1, sc in next st, (hdc, dc) in next st, (2 tr, ch 2, 2 tr) in next st, (dc, hdc) in next st 5 times, sl st to first sc. (45 sts + 5 ch-2 tips; 9 sts per petal)
Rnd 5 (trim round): Ch 1, sc in each st, working (sc, ch 2, sc) in each ch-2 tip, sl st to first sc. (45 sc worked 1 per st + 10 extra sc at the tips = 55 sc, plus 5 ch-2 tips) Fasten off, leaving a 12 in (30.5 cm) tail.
Stamens: Thread cream yarn on a tapestry needle. Work 7 straight stitches, each 0.25 in (0.6 cm) long, radiating from the middle of the mauve center. Finish the outer end of each one with a French knot.
Checkpoint: the flower measures 2.5 in (6.4 cm) across.
Leaf Appliqué (Make 16)
Leaf (sage green): Ch 7. Sc in the 2nd ch from the hook, hdc in next ch, dc in next 2 ch, hdc in next ch, then (sc, ch 2, sc) in the last ch for the tip. Now work along the other side of the foundation chain: hdc in next ch, dc in next 2 ch, hdc in next ch, sc in last ch, sl st to first sc. (12 sts + 1 ch-2 tip) Fasten off, leaving an 8 in (20.3 cm) tail.
Checkpoint: each leaf is 1 in (2.5 cm) long and 0.5 in (1.3 cm) wide.
Attaching the Appliqués
Steam the flowers and leaves flat before sewing them on.
- Center one flower on each mesh band, with the middle of the flower over pos 13. The top and bottom petals should just touch the fan points in S3 and S10.
- Tuck the base of four leaves under the petals at 10, 2, 4 and 8 o’clock. Point each leaf tip toward a rail.
- Sew each leaf down with its tail, using small running stitches along its center.
- Sew each flower down with its cream tail. Stitch around Rnd 3 first, then tack down each petal tip. Leave the rest of each petal free so it stays slightly raised.
Border
Border gauge is 2 sc per row-end, which gives 5 sc per 1 in (2.5 cm) along the sides. The corner ch-1 spaces are counted separately and are not part of the per-side counts.
Rnd 1 (RS): Join cream in the first foundation ch at a top corner. Ch 1.
– Top: sc in each of 25 foundation ch (25 sc), ch 1.
– Side: 2 sc in each of 52 row-ends (104 sc), ch 1.
– Bottom: sc in each st of Row 52 (25 sc), ch 1.
– Side: 2 sc in each of 52 row-ends (104 sc), ch 1.
– Sl st to first sc. (258 sc + 4 corner ch-1 sps)
Rnd 2: Ch 1.
– Top: (sc, ch 14, sc) in first sc, sc in next 11 sc, (sc, ch 14, sc) in next sc, sc in next 11 sc, (sc, ch 14, sc) in last sc. (25 sc worked 1 per st + 3 extra sc = 28 sc, plus 3 hanging loops)
– Corner: sc in ch-1 sp.
– Side: sc in each sc (104 sc).
– Corner: sc in ch-1 sp.
– Bottom: sc in first sc, sk 2, Shell in next sc, sk 2, sc in next sc 4 times. (5 sc + 4 shells)
– Corner: sc in ch-1 sp.
– Side: sc in each sc (104 sc).
– Corner: sc in ch-1 sp, sl st to first sc. Fasten off.
Why the math works: A dc row is about twice as tall as an sc, so 2 sc per row-end keeps the sides flat. On the 52-row sides that gives 104 sc. The three loops fall on sts 1, 13 and 25, with 11 sc in each gap, and 3 + 22 = 25. Each scallop repeat uses 6 sts, and 1 + (4 x 6) = 25, so the scallops start and end exactly at the corners.
Final Blocking
- Weave in all ends along the rails or behind the appliqués.
- Soak the strip in cool water for 10 minutes, then roll it in a towel to press out the water.
- Pin the strip to 5 in x 21.8 in (12.7 cm x 55.4 cm).
- Pin the rails in straight lines, then pin the end of each fan spoke.
- Open each scallop and pin the shells into even curves.
- Lift the petals with your fingers so they stay raised. Do not pin through the flowers.
- Let the strip dry completely before unpinning it.
Final Quality-Control Checklist
- The strip measures 5 in x 21.8 in (12.7 cm x 55.4 cm).
- Both rails are straight, with even ch-2 openings.
- Every body row has 25 positions.
- There are four flower sections, each 4.8 in (12.2 cm) tall.
- All 4 flowers are 2.5 in (6.4 cm) across and centered.
- There are 16 leaves, four per flower, all pointing toward the rails.
- The three hanging loops are the same length.
- The four bottom scallops are even.
- No ends show on the right side.
Troubleshooting
The spokes lean or look crooked: You probably worked into the wrong position. Count positions from the rail on every fan row.
The strip narrows along its length: Your turning chains are too tight, or you missed the dc in pos 25. Check the rail end on every row.
The sides ripple after the border: Work fewer sc per row-end, or go down a hook size for the border only.
The flower cups instead of lying flat: Rnd 4 is too tight. Go up 0.25 mm for Rnds 4 and 5.
The flower is too big for its mesh band: Leave out Rnd 5, or work the petals with a smaller hook.
The loops stretch unevenly: Count the ch 14 in each loop, then sew a reinforcing stitch at the base of each one.
The mauve center looks flat: Make sure you worked Rnd 2 in front loops only, so the ruffle stands up.
Care
Hand wash in cool water with a mild detergent. Reshape the strip and dry it flat, pinning it again if the rails or scallops need straightening.
Final Notes
Every measurement builds on the one before it. Row 1 sets the width at 4.5 in (11.4 cm). Each 12-row flower section adds 4.8 in (12.2 cm), and four sections plus the four band rows bring the length to 20.8 in (52.8 cm). The border brings the strip to 5 in x 21.8 in (12.7 cm x 55.4 cm), and the loops add 1 in (2.5 cm). If each of those measurements is right, the flowers will sit neatly between the rails.
Happy crocheting!