

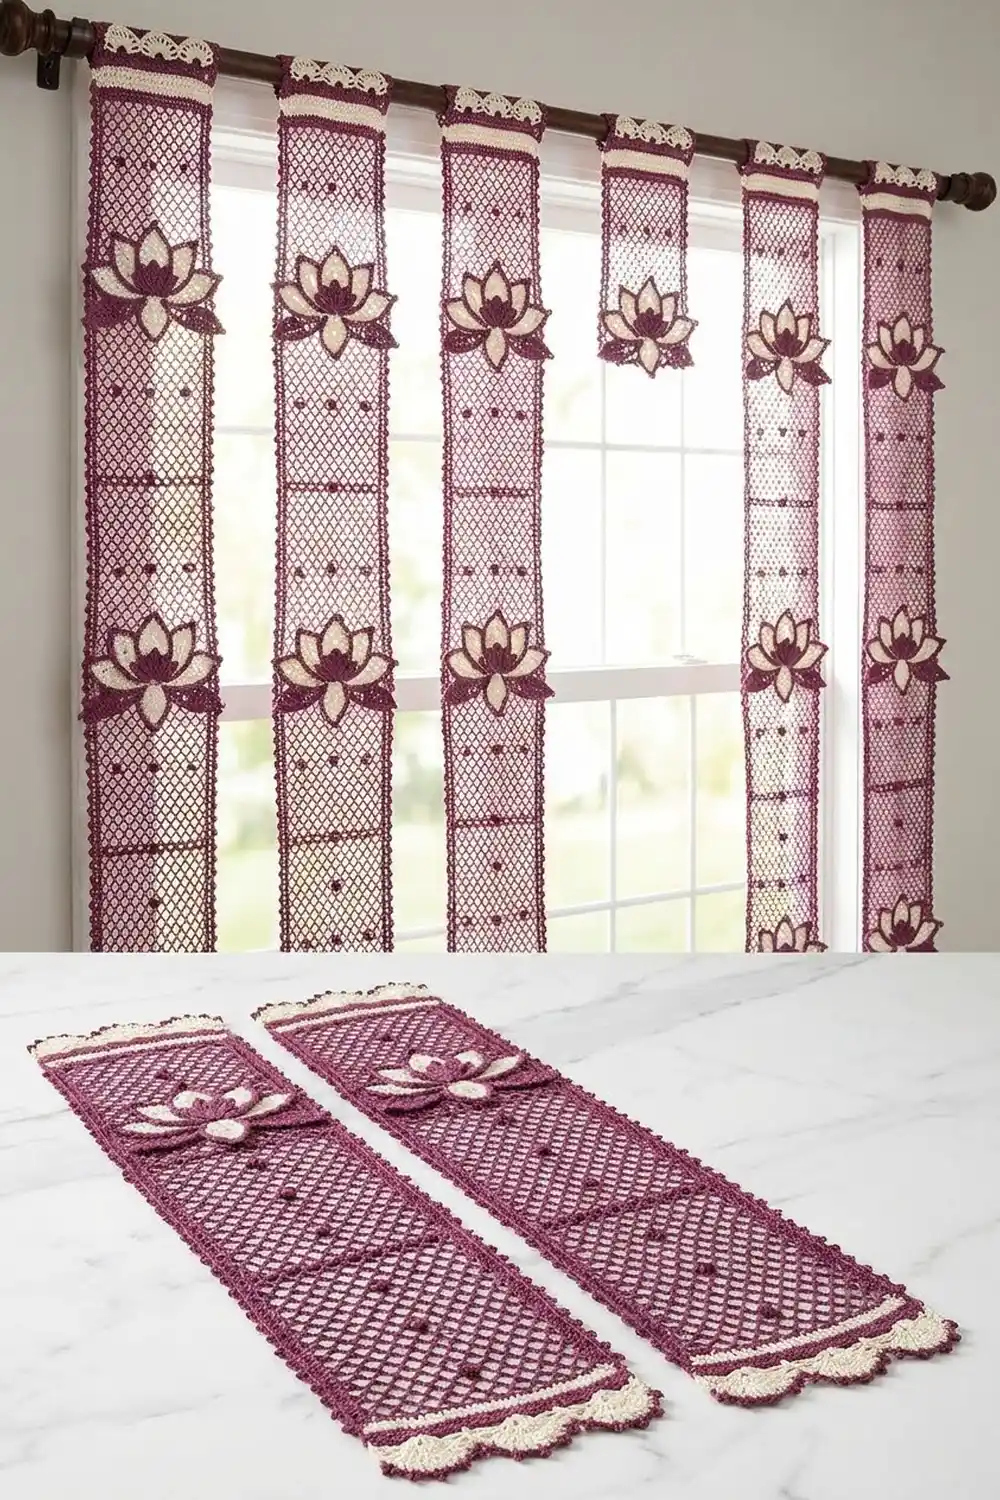
This curtain strip is a narrow lace panel. Three plum diamond-mesh blocks each carry a layered lotus, with small plum petals in the center, pointed cream petals behind them, and an outer ring of openwork plum petals with picot tips. A cream shell header runs across the top and a fan edge with picot tips runs across the bottom. Hang a single strip as a window accent, or hang several side by side as a lace curtain.
There are two colors: deep plum for the mesh, the frame and most of the lotus, and soft cream for the middle petals and the shell bands. The look is vintage filet lace with a slightly bohemian feel.
This pattern uses US crochet terms. One finished strip measures 7 in × 24.5 in (17.8 cm × 62.2 cm).
You make three mesh blocks and three lotus appliqués. You edge each block, sew a lotus onto each one, and join the blocks end to end. The border is added last: a plum foundation round, the cream header, the fan edge, and the picot edging along the long sides. The photo shows two finished strips; make as many as your window needs.
Finished Size and Construction
- Finished size (one strip): 7 in × 24.5 in (17.8 cm × 62.2 cm)
- Skill level: Intermediate
- Terminology: US
- Yarn weight: Fingering (#1) mercerized cotton
- Hook: 2.75 mm (C-2)
- Pieces per strip: 3 mesh blocks + 3 lotus appliqués
- Layout: 1 block wide × 3 blocks tall
- Block size (edged): 6.25 in × 7.25 in (15.9 cm × 18.4 cm)
- Size before border: 6.25 in × 21.75 in (15.9 cm × 55.2 cm)
- Border depth: 0.375 in (1.0 cm) on each long side, 1.625 in (4.1 cm) at the top, 1.125 in (2.9 cm) at the bottom
Materials
Use a smooth mercerized cotton. It gives crisp picots and clear lace lines, and it holds its shape when blocked.
Yarn (per strip):
– Plum: 50 g (about 170 m)
– Cream: 15 g (about 51 m)
For the pair shown: Plum 100 g (about 340 m), Cream 30 g (about 102 m).
The quantities include a margin of about 15% for gauge swatches and differences in tension.
Tools:
– 2.75 mm (C-2) crochet hook
– Tapestry needle
– Rust-proof pins and a blocking mat
– Measuring tape
– Spray bottle
– Clip rings or a slim curtain rod for hanging
Abbreviations (US Terms)
- ch – chain
- sl st – slip stitch
- sc – single crochet
- hdc – half double crochet
- dc – double crochet
- tr – treble crochet
- sk – skip
- sp – space
- st(s) – stitch(es)
- RS – right side
Special stitch:
– Picot: ch 3, sl st in 3rd ch from hook.
Gauge and Checkpoints
Make one complete block, lotus included, before you start the rest.
- Mesh gauge: 8 ch-5 loops = 6 in (15.2 cm) wide; 13 rows = 7 in (17.8 cm) tall.
- Edging gauge: 35 sc = 6.25 in (15.9 cm).
Checkpoints:
– Mesh after Row 13: 6 in × 7 in (15.2 cm × 17.8 cm)
– Block after edging: 6.25 in × 7.25 in (15.9 cm × 18.4 cm)
– Lotus after Row 7: 4 in (10.2 cm) wide
– Finished lotus: 5 in × 3.25 in (12.7 cm × 8.3 cm)
If your block is too big, go down 0.25 mm in hook size. If it is too small, go up 0.25 mm. Fix the mesh first, because every later measurement depends on it.
Mesh Block (make 3, Plum)
Row 1: Ch 34. Sc in 2nd ch from hook, ch 5, sk 3 ch, sc in next ch; repeat from * 7 more times. Turn. (9 sc, 8 ch-5 loops)
Row 2: Ch 5 (counts as dc + ch 2), sc in first ch-5 loop, ch 5, sc in next loop; repeat from * 6 more times, ch 2, dc in last sc. Turn. (8 sc, 7 ch-5 loops, 2 half loops)
Row 3 (picot row): Ch 1, sc in first dc, ch 5, (sc, picot) in next ch-5 loop; repeat from * 6 more times, ch 5, sc in 3rd ch of turning ch. Turn. (9 sc, 8 ch-5 loops, 7 picots)
Rows 4–12: Repeat Rows 2 and 3 four times, then work Row 2 once more. Rows 5, 7, 9 and 11 are picot rows.
Row 13 (plain): Ch 1, sc in first dc, ch 5, sc in next ch-5 loop; repeat from * 6 more times, ch 5, sc in 3rd ch of turning ch. Do not turn. (9 sc, 8 ch-5 loops)
Row 13 has no picots, so the edging has a clean edge to work into.
Checkpoint: 6 in × 7 in (15.2 cm × 17.8 cm).
Block Edging (Plum)
Each corner gets 3 sc. The middle sc of each group is the corner stitch, and it counts on both sides it touches.
Rnd 1:
1. Top: Work 3 sc in the first sc of Row 13, 3 sc in next loop, sc in next sc; repeat from * 6 more times, 3 sc in last loop, 3 sc in last sc.
2. Long side: Work down the row-ends. Work 2 sc in the Row 13 row-end, 3 sc in each row-end of Rows 12 through 2 (33 sc), and 2 sc in the Row 1 row-end.
3. Bottom: Work along the underside of the foundation chain. Work 3 sc in the first ch, sc in each of the next 31 ch, and 3 sc in the last used ch.
4. Second long side: Work as for the first long side. Sl st to the first sc to join.
Counts:
– Short sides: 1 corner + 1 + 31 + 1 + 1 corner = 35 sts each
– Long sides: 1 corner + 1 + 37 + 1 + 1 corner = 41 sts each
– Round total: 2 × 35 + 2 × 41 − 4 shared corners = 148 sts
Fasten off. Checkpoint: 6.25 in × 7.25 in (15.9 cm × 18.4 cm).
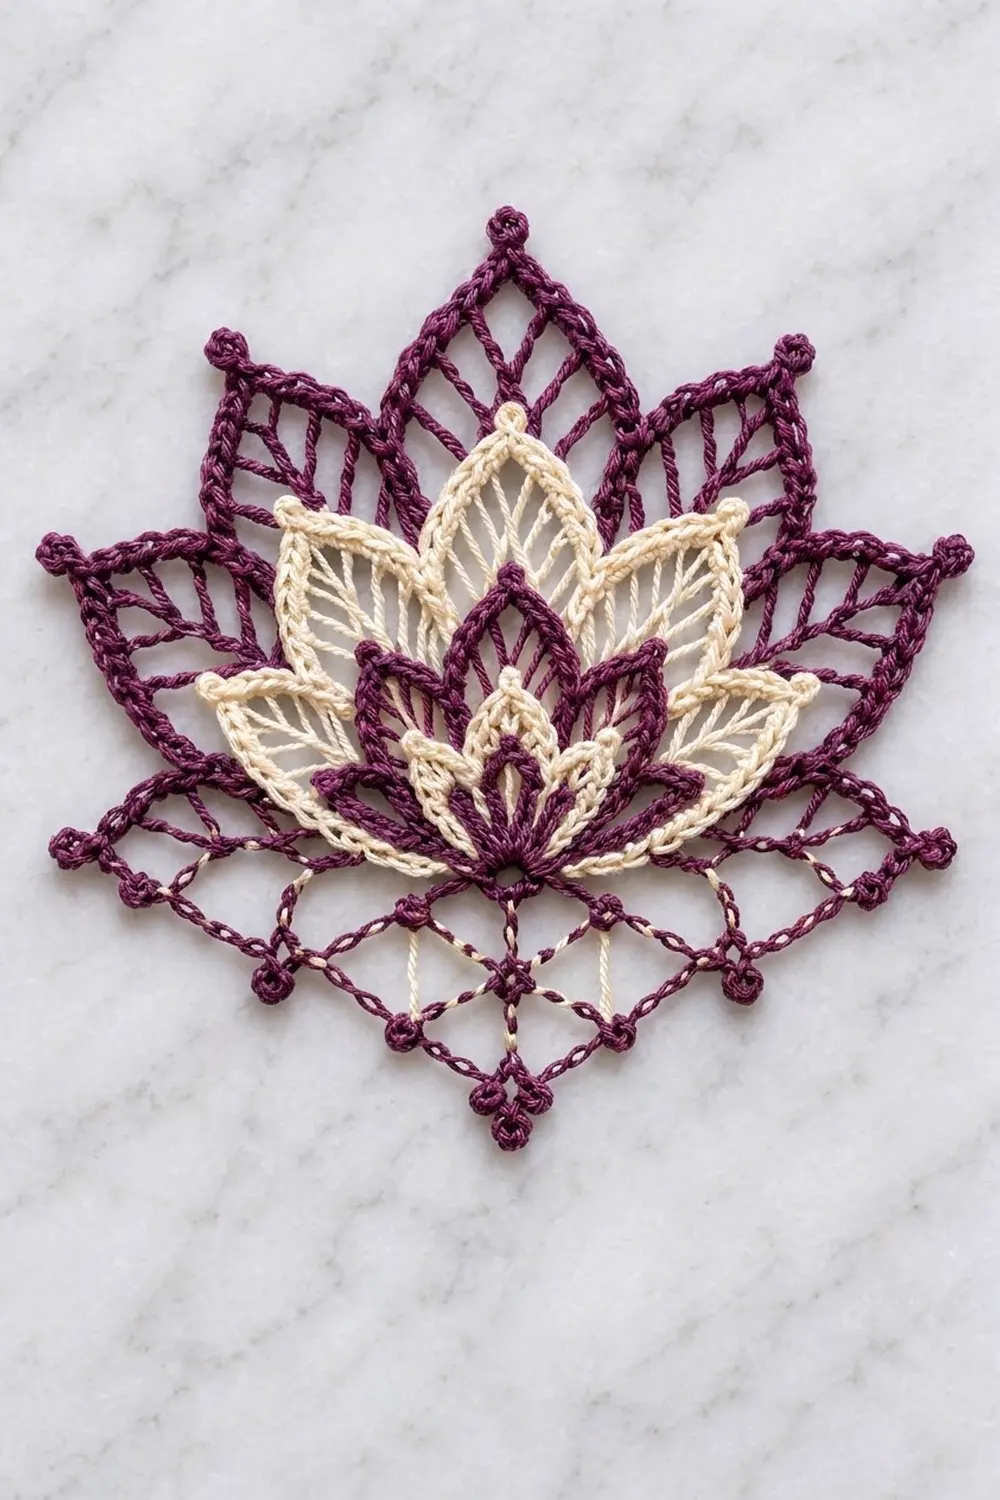
Lotus Appliqué (make 3)
The lotus is worked flat as a half circle, growing outward in layers. The straight base edge is worked last.
Row 1 (Plum): Ch 4, sl st in first ch to form a ring. Ch 3 (counts as dc), 8 dc in ring. Turn. (9 dc)
Row 2 (Plum): Ch 3 (counts as dc), 2 dc in the same st (3 sts in the first dc). Work 2 dc in each of the next 3 dc, 3 dc in the next (center) dc, 2 dc in each of the next 3 dc, and 3 dc in the last dc. Turn. (21 dc: 3 + 6 + 3 + 6 + 3)
Row 3 (Plum, inner petals): Ch 1, sc in first dc, sk 1 dc, (dc, tr, ch 2, tr, dc) in next dc, sk 1 dc, sc in next dc; repeat from * 4 more times. Fasten off. (5 petals, 6 sc, 26 sts total)
Checkpoint: about 2 in (5.1 cm) wide.
Row 4 (Cream): With the RS facing, join cream with a sl st in the first sc. Ch 1, sc in the same sc, ch 6, sc in the ch-2 tip of the next petal, ch 6, sc in the next sc; repeat from * 4 more times. Turn. (11 sc, 10 ch-6 loops)
Row 5 (Cream, middle petals): Ch 1, sc in first sc, (sc, hdc, 2 dc, tr) in next ch-6 loop, (tr, ch 3, tr) in tip sc, (tr, 2 dc, hdc, sc) in next ch-6 loop, sc in next valley sc; repeat from * 4 more times. Fasten off. (66 sts: 1 + 5 × 13; 5 ch-3 tips)
Each cream petal frames the plum petal in front of it and stands about 0.5 in (1.3 cm) taller.
Checkpoint: about 3.25 in (8.3 cm) wide.
Row 6 (Plum): Join plum in the first valley sc. Ch 1, sc in the same st, ch 7, sc in the ch-3 tip, ch 7, sc in the next valley sc; repeat from * 4 more times. Turn. (11 sc, 10 ch-7 loops)
Row 7 (Plum, outer openwork petals): Ch 1, sc in first sc. Then:
1. Work (sc, hdc, dc, ch 1, dc, ch 1, tr) in the next ch-7 loop.
2. Work (tr, ch 1, picot, ch 1, tr) in the tip sc.
3. Work (tr, ch 1, dc, ch 1, dc, hdc, sc) in the next ch-7 loop.
4. Sc in the next valley sc.
Repeat steps 1–4 four more times. Do not fasten off. (66 sts: 1 + 5 × 13; 5 picots)
The ch-1 spaces open up the petals and give them their vein lines.
Checkpoint: 4 in (10.2 cm) wide and 2.75 in (7.0 cm) tall.
Base Row (Plum, scallops and side leaves): Turn so the straight edge is at the top. Work along it as follows:
1. First side leaf: Ch 8, picot, then work in the remaining 5 ch: sc, hdc, dc, hdc, sc.
2. Sc in the row-end of Row 7.
3. Ch 4 and sc in each of these row-ends in turn: Row 5, Row 3, Row 1, the ring center, Row 1, Row 3, Row 5, Row 7.
4. Second side leaf: Make it the same way as the first, then sl st in the last sc.
Fasten off. (9 sc, 8 ch-4 scallops, 2 side leaves)
Checkpoint: 5 in × 3.25 in (12.7 cm × 8.3 cm).
Attach the Lotus
Pin the lotus to the center of the edged block. Place the scallop base 2.5 in (6.4 cm) above the lower edge of the mesh, so the center petal tip sits about 1.25 in (3.2 cm) below the top of the mesh. With plum yarn, whipstitch each base scallop, each side leaf, and each outer petal tip to the mesh strands underneath. Keep the stitches small so they disappear into the plum lines.
Make All Pieces
Per strip:
– Mesh blocks: 3 (plum)
– Lotus appliqués: 3 (plum and cream)
Layout (1 column × 3 rows):
[ Block 1 – Lotus ]   ← top
[ Block 2 – Lotus ]
[ Block 3 – Lotus ]   ← bottom
Turn every lotus so its petals point toward the top of the strip.
Joining
Use plum yarn and whipstitch through the back loops only.
- Place Block 1 and Block 2 RS up, with the bottom edge of Block 1 touching the top edge of Block 2.
- Match the corners first. Each short edge has 35 sts, including both corners.
- Whipstitch one stitch to one stitch: the corner to the corner, then each of the 31 middle sts to its partner, then the far corner to the far corner. That is 35 pairs.
- Join Block 3 to the bottom of Block 2 the same way.
Keep the tension even and fairly loose. The seam should be the same length as the block edges and lie flat, without puckering or gaping. Weave in the ends along the seam.
Checkpoint: 6.25 in × 21.75 in (15.9 cm × 55.2 cm). That is 3 × 7.25 in = 21.75 in long.
Border
Border gauge: same as the edging, 35 sc = 6.25 in (15.9 cm).
Starting counts on the joined strip:
– Long sides: 3 blocks × 41 sts = 123 sts each. Both corner sts of every block are already in that 41, and no stitches are added at the seams.
– Short sides: 35 sts each
Rnd 1 (Plum, foundation)
Join plum in any st on a long side. Work 1 sc in each st around and 3 sc in each of the 4 strip corner sts. Sl st to the first sc to join. Fasten off.
This is a conversion round:
– Long sides: 123 worked one per st + 2 extra = 125 sts each, corners included
– Short sides: 35 worked one per st + 2 extra = 37 sts each, corners included
– Round total: 312 + 8 = 320 sts
Checkpoint: 6.5 in × 22 in (16.5 cm × 55.9 cm).
Header (top short edge, 37 sts)
Row H1 (Cream): Join in the top-right corner st. Ch 1, sc in the same st, sk 2 sts, 7 dc in next st, sk 2 sts, sc in next st; repeat from * 5 more times. Turn. (6 shells, 49 sts: 1 + 6 × 8)
Row H2 (Cream): Ch 4 (counts as tr), ch 3, sc in center dc of shell, ch 3, tr in next sc; repeat from * 5 more times. Fasten off cream. (7 tr, 6 sc, 12 ch-3 sps)
Row H3 (Plum): Join plum in the last tr made. Ch 1, sc in the same st, 2 sc in ch-3 sp, sc in sc, 2 sc in ch-3 sp, sc in next tr; repeat from * 5 more times, working the last sc in the top of the turning ch. Turn. (37 sc: 1 + 6 × 6)
Row H4 (Plum): Ch 1, sc in each st across. Fasten off. (37 sc)
Checkpoint: 23.5 in (59.7 cm) long. The header adds 1.5 in (3.8 cm).
Bottom Fan Edge (bottom short edge, 37 sts)
Row B1 (Cream): Work as for Row H1. (6 shells, 49 sts)
Row B2 (Plum): Ch 1, sc in first sc, sc in next 3 dc, (sc, picot, sc) in center dc, sc in next 3 dc, sc in next sc; repeat from * 5 more times. Fasten off.
This is a trim row: 49 sts worked one per st + 6 extra sc = 55 sc, plus 6 picots.
Side Picot Edging (each long side, 125 sts)
Row S (Plum): Join in the Rnd 1 corner st at one end of a long side. This corner st is shared with the header or the fan edge. Ch 1, sc in the same st, picot, sc in next 4 sts; repeat from * 30 more times. Fasten off. (125 sc: 1 + 31 × 4; 31 picots) Repeat on the other long side.
Why the math works: 125 = 1 + 31 × 4, so the picots are spaced evenly and land on both corners. Every long-side stitch is worked once, so the sides neither ruffle nor tighten. The header grows to 49 sts in Row H1 and comes back to 37 in Row H3, which keeps the top exactly as wide as the strip. The fans are only a trim, so they flare slightly as scallops without changing the strip’s width.
Final size: 6.5 in + 2 × 0.25 in (0.6 cm) picot edge = 7 in (17.8 cm) wide. 22 + 1.5 + 1 = 24.5 in (62.2 cm) long.
Final Blocking
- Weave in all remaining ends through the solid stitches, not the mesh.
- Soak the strip in cool water for 10 minutes, then press out the water in a towel. Do not wring it.
- Pin it RS up to 7 in × 24.5 in (17.8 cm × 62.2 cm), starting with the four corners.
- Pin the long sides straight, with one pin every 2 in (5.1 cm).
- Pin out each lotus petal tip, side leaf picot and bottom fan picot.
- Open the mesh diamonds evenly. Lightly mist any areas that still look puffy.
- Leave it to dry completely, usually 24 hours.
Final Quality-Control Checklist
- [ ] Each block measures 6.25 in × 7.25 in (15.9 cm × 18.4 cm)
- [ ] Each block edge has 35 / 41 sts per side, and the block edging round has 148 sts
- [ ] Every lotus has 5 plum inner petals, 5 cream petals, 5 outer petals with picots, 2 side leaves and 8 base scallops
- [ ] All lotuses point upward and are sewn at the same height
- [ ] The seams lie flat, with 35 pairs of sts matched in each seam
- [ ] Border Rnd 1 has 320 sts
- [ ] The header row counts are 49, 13, 37 and 37 sts
- [ ] Each long side has 31 evenly spaced picots
- [ ] The final size is 7 in × 24.5 in (17.8 cm × 62.2 cm)
Troubleshooting
- The mesh slants: Check that each Row 2-type row ends with ch 2, dc, so the edges stay straight.
- The lotus cups: Row 2 needs 21 dc. If the count is low, the half circle curls up.
- The cream petals look floppy: Pull the Row 4 chains snug against the plum petals.
- The block edging ruffles: Use 2 sc instead of 3 in one row-end per side, but keep the count of 41.
- The seams pucker: Whipstitch more loosely and check that you matched all 35 sts in each seam.
- The header is wider than the strip: Recount Row H3. It must have 37 sts.
- The sides wave: Make sure you work exactly one sc per st in Row S.
Care
Hand wash in cool water with a mild detergent, then reblock flat. Hang the strips away from strong direct sunlight to keep the plum from fading.
Final Notes
Every measurement builds on the one before it:
1. The mesh is 6 in × 7 in (15.2 cm × 17.8 cm).
2. The edged block is 6.25 in × 7.25 in (15.9 cm × 18.4 cm).
3. Three joined blocks make 6.25 in × 21.75 in (15.9 cm × 55.2 cm).
4. Border Rnd 1 brings it to 6.5 in × 22 in (16.5 cm × 55.9 cm).
5. The header, fan edge and picot sides finish it at 7 in × 24.5 in (17.8 cm × 62.2 cm).
If one checkpoint is right, the next one follows. Make one strip for a small window, or several to hang as a full lace curtain.
Happy crocheting!