

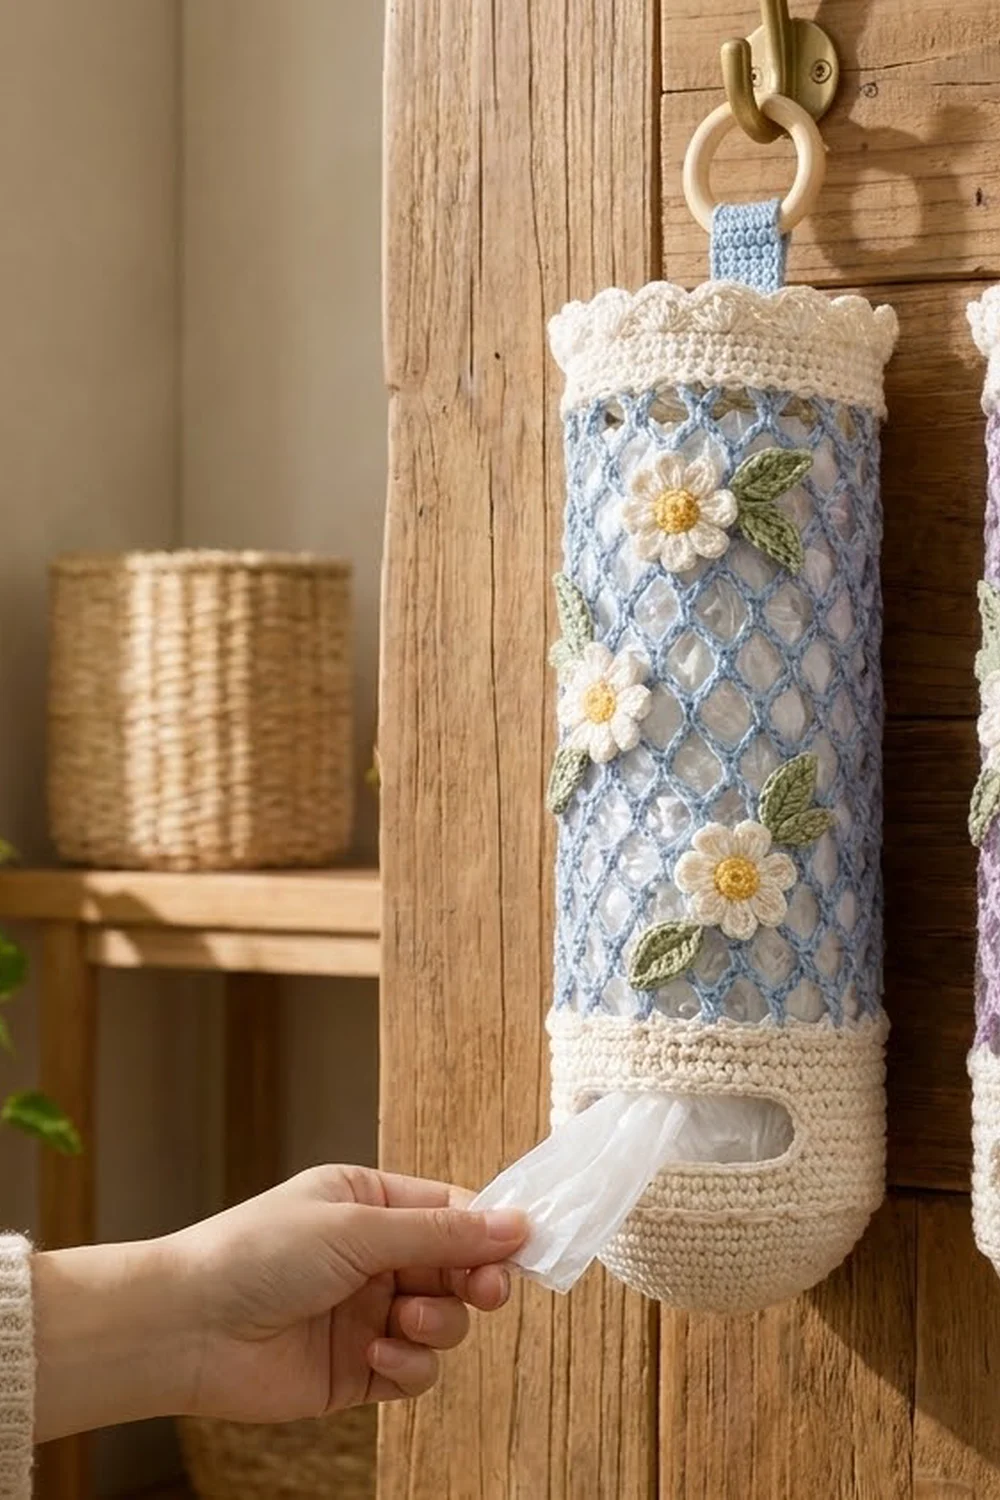
This hanging plastic bag holder pairs a soft blue diamond mesh with sturdy cream ends and a few sweet daisies. You fill it with bags from the top and pull them out one at a time through the oval slot near the bottom.
The colors are calm and fresh. The mesh is powder blue and the solid sections are cream. The daisies have white petals and yellow centers, and the leaves are sage green. A natural wooden ring lets the holder hang from any hook. The look is cottage-kitchen pretty, and the holder is practical and washable.
The pattern uses US crochet terms. The finished body is 7 in (17.8 cm) wide pressed flat and 21.75 in (55.2 cm) long from the domed base to the shell tips. With the tab and ring, it hangs about 25 in (63.5 cm) long.
The holder is built in parts. You crochet a domed cup with a dispenser slot, a mesh tube, a top band, a hanging tab, three daisies, and six leaves. Single crochet seams join the tube to the cup and band. A shell border finishes the top, and the flowers go on last.
Finished Size and Construction
- Finished size: 7 in (17.8 cm) flat width x 21.75 in (55.2 cm) long; about 25 in (63.5 cm) with ring
- Skill level: Intermediate
- Terminology: US
- Yarn weight: worsted cotton (#4, medium)
- Hook: 4.5 mm (US 7)
- Number of pieces: 13 crocheted pieces plus 1 wooden ring
- Layout: cup at the bottom, mesh tube in the middle, band above, tab and ring on top; daisies in an S-curve on the front
- Piece sizes: cup 6 in (15.2 cm) tall; mesh tube 13 in (33.0 cm) tall; band 1.75 in (4.4 cm) tall; daisy 2 in (5.1 cm); leaf 1.75 in (4.4 cm)
- Circumference: 56 stitches = 14 in (35.6 cm); diameter about 4.5 in (11.4 cm)
- Size before border: 21.25 in (54.0 cm) long
- Border depth: 0.5 in (1.3 cm)
Materials
Use a smooth worsted-weight yarn that is 100% cotton or a cotton blend. Cotton holds the cup shape, doesn’t stretch much under the weight of bags, and can go through the wash. Avoid splitty or fuzzy yarns, because they hide the mesh.
- Color A, powder blue: 60 g / 115 m
- Color B, cream: 70 g / 135 m
- Color C, white: 10 g / 20 m
- Color D, yellow: 5 g / 10 m
- Color E, sage green: 10 g / 20 m
These amounts include about 20% extra for swatching and for differences between brands.
Tools:
- 4.5 mm (US 7) crochet hook
- 1 wooden ring, 2.75 in (7.0 cm) outer diameter
- Tapestry needle
- 2 stitch markers
- Scissors and tape measure
- Rust-proof pins and a blocking mat
Abbreviations (US Terms)
- ch – chain
- sl st – slip stitch
- sc – single crochet
- hdc – half double crochet
- dc – double crochet
- inc – 2 sc in the same stitch
- sk – skip
- st(s) – stitch(es)
- MR – magic ring
- Rnd(s) – round(s)
- RS – right side
Special stitch – Shell: 5 dc in the same stitch.
Gauge and Checkpoints
Gauge: 16 sc and 16 rnds = 4 in (10.2 cm), worked in sc in joined rounds.
Mesh gauge: one ch-5 loop plus its sc is about 1 in (2.5 cm) wide. Two mesh rounds are about 1 in (2.5 cm) tall.
Make and measure one piece first. Work the cup base through Rnd 9 and measure it before you start the rest of the holder.
Checkpoints:
- Cup base after Rnd 9: about 4.5 in (11.4 cm) across and slightly cupped
- Cup after Rnd 27: 6 in (15.2 cm) tall and 7 in (17.8 cm) wide flat
- Mesh tube after Rnd 13: about 6 in (15.2 cm) tall
- Mesh tube complete: 13 in (33.0 cm) tall and 7 in (17.8 cm) wide flat
- Top band after Rnd 7: 1.75 in (4.4 cm) tall
If your base is too big, switch to a 4 mm hook. If it is too small, switch to a 5 mm hook. The cup, tube, and band all have the same 56-stitch circumference, so one gauge fix corrects every tube piece.
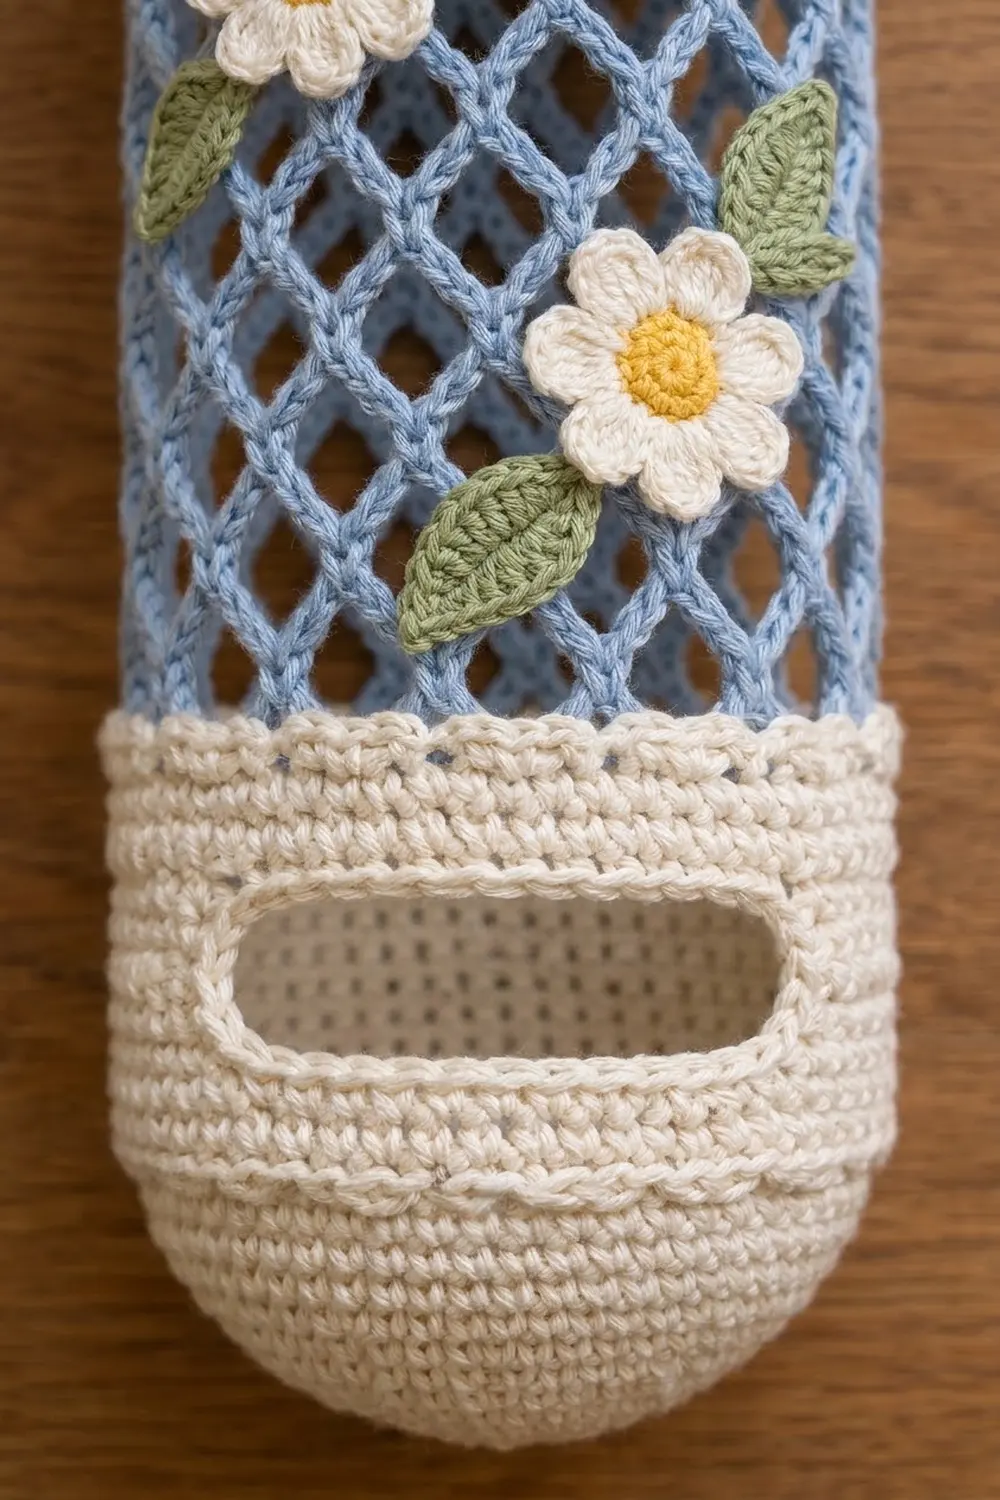
Bottom Cup (Color B, make 1)
Work in joined rounds. End each round with a sl st into the first sc. Start each round with ch 1, which does not count as a stitch.
Rnd 1: MR, 8 sc in ring. (8 sts)
Rnd 2: Inc in each st around. (16 sts)
Rnd 3: Sc 1, inc; repeat around. (24 sts)
Rnd 4: Sc 2, inc; repeat around. (32 sts)
Rnd 5: Sc 3, inc; repeat around. (40 sts)
Rnd 6: Sc in each st around. (40 sts)
Rnd 7: Sc 4, inc; repeat around. (48 sts)
Rnd 8: Sc in each st around. (48 sts)
Rnd 9: Sc 5, inc; repeat around. (56 sts)
Rnds 6 and 8 have no increases, so the base curves upward into a soft dome.
Rnds 10–15: Sc in each st around. (56 sts)
Dispenser slot: You make the slot with partial rows. The 12 stitches you leave unworked become the bottom edge of the opening.
Row 16: Ch 1, sc in the next 44 sts and leave the last 12 sts unworked. Ch 1, turn. (44 sts)
Rows 17–20: Sc in each of the 44 sts. Ch 1 and turn after Rows 17–19. Don’t turn after Row 20. (44 sts)
Close the slot: At the end of Row 20, ch 12 and sl st into the first sc of Row 20. You now have a ring of 44 sc + 12 ch = 56 sts.
Rnd 21: Sc in each of the 44 sc and in each of the 12 ch. (56 sts)
Rnds 22–27: Sc in each st around. (56 sts) Fasten off.
The slot is 3 in (7.6 cm) wide and 1.25 in (3.2 cm) tall. Mark the center of the slot as the front.
Slot edging: Join B at a lower corner of the slot. Sc 12 along the bottom edge, sc 5 along the row ends, sc 12 into the underside of the chains, and sc 5 along the other row ends. Join. (34 sts) Fasten off. This firm edge keeps the opening oval.
Mesh Tube (Color A, make 1)
Rnd 1: Ch 56 and sl st into the first ch to make a ring, without twisting the chain. Ch 1, sc in each ch around, join. (56 sts)
Rnd 2: Ch 1, sc in each st around, join. (56 sts)
Rnd 3 (first mesh round): Ch 1, sc in the first st, ch 5, sk 3, sc in the next st; repeat 12 more times, ch 5, sk 3, sl st into the first sc. (14 ch-5 loops)
Check: each repeat uses 1 sc + 3 skipped sts = 4 sts, and 14 x 4 = 56.
Rnds 4–26: Sl st in each of the first 3 ch of the next loop, ch 1, sc in the same loop, ch 5, sc in the next loop; repeat 12 more times, ch 5, sl st into the first sc. (14 ch-5 loops)
Each new sc lands in the center of a loop below it, so the loops stack into a diagonal diamond lattice. That makes 24 mesh rounds in all.
Rnd 27 (conversion round): Ch 1, sc in the next sc, 3 sc in the next ch-5 loop; repeat around, join. Count: 14 sc (1 in each existing sc) + 42 sc (3 in each loop) = 56 sts.
Rnd 28: Ch 1, sc in each st around, join. (56 sts) Fasten off.
The tube is 13 in (33.0 cm) tall: 1 in (2.5 cm) of solid sc bands plus 12 in (30.5 cm) of mesh. Rnd 1 is the top of the tube and Rnd 28 is the bottom.
Top Band (Color B, make 1)
Rnd 1: Ch 56 and sl st into the first ch without twisting. Ch 1, sc in each ch around, join. (56 sts)
Rnds 2–7: Ch 1, sc in each st around, join. (56 sts) Fasten off.
The band is 1.75 in (4.4 cm) tall. Rnd 1 is the lower edge. Rnd 7 is the upper edge, where the shell border goes later.
Hanging Tab (Color A, make 1)
Row 1: Ch 7, sc in the 2nd ch from the hook and in each ch across, ch 1, turn. (6 sts)
Rows 2–16: Sc in each st across, ch 1, turn. (6 sts) Fasten off and leave a 12 in (30.5 cm) tail.
The tab is 1.5 in (3.8 cm) wide and 4 in (10.2 cm) long.
Daisies (Colors D and C, make 3)
Rnd 1 (D): MR, ch 1, 8 sc in ring, join. (8 sts) Fasten off.
Rnd 2 (C): Join C with a sl st in any sc. Ch 3, 3 dc in the same st, ch 3, sl st in the same st, sl st in the next sc; repeat around. Work the last sl st into the first st. (8 petals)
Fasten off and leave a long tail. Each daisy is about 2 in (5.1 cm) across.
Leaves (Color E, make 6)
Ch 8. Sc in the 2nd ch from the hook, hdc in the next ch, dc in the next 2 ch, hdc in the next ch, sc in the next ch, and 3 sc in the last ch. Then work along the other side of the chain: sc in the next ch, hdc in the next ch, dc in the next 2 ch, hdc in the next ch, and sc in the next ch. Sl st into the first sc. (15 sts)
Count: 6 sts + 3 tip sts + 6 sts = 15. Each leaf is 1.75 in (4.4 cm) long. For a center vein, surface sl st with E from the base to the tip. Fasten off and leave a long tail.
Make All Pieces
- Color B (cream): 1 bottom cup with slot edging, 1 top band
- Color A (blue): 1 mesh tube, 1 hanging tab
- Colors D and C (yellow and white): 3 daisies
- Color E (green): 6 leaves
Front layout (top to bottom):
              [ wooden ring ]
              [  blue tab   ]
[ ~~~~~ cream band + 14 shells ~~~~~ ]
[ mesh          L  DAISY 1  L        ]   upper right
[ mesh   L  DAISY 2  L               ]   center left
[ mesh             L  DAISY 3  L     ]   lower right
[ ===== cream cup, Rnds 10-27 ====== ]
[ ======  (  oval slot  )  ========= ]
[ ======== domed base ============== ]
Tuck 2 leaves behind each daisy’s petals, angled outward.
Joining
The edges you join on the cup, tube, and band each have exactly 56 sts. That means every seam is worked stitch-to-stitch, with no stitches added or skipped.
Join A – cup to mesh tube: Turn both pieces RS out. Hold the bottom edge of the tube (Rnd 28) against the top edge of the cup (Rnd 27) with wrong sides facing. Line the slot up at the front and put the tube’s round joins at the back. Join B and work 56 sc, each one through 1 cup st and 1 tube st together. Join. (56 sts)
Join B – mesh tube to top band: Hold the lower edge of the band (Rnd 1) against the top of the tube (Rnd 1) with wrong sides facing and the band’s round joins at the back. Join B and work 56 sc through both layers. Join. (56 sts) Fasten off.
Tension: Keep the joining sc at the same tension as the rest of your fabric. If you pull tight, the seam narrows and the holder pinches in. If you work loosely, the seam ripples. After 14 sts, stop and check that both edges lie flat.
Size checkpoint: Each join adds about 0.25 in (0.6 cm). Pressed flat, the holder should now be 7 in (17.8 cm) wide and 21.25 in (54.0 cm) long (6 + 0.25 + 13 + 0.25 + 1.75 in).
Border
Border gauge: one shell repeat covers 4 sts, or 1 in (2.5 cm) of band edge. The shells stand 0.5 in (1.3 cm) tall.
Rnd 8 (shell border, B): Join B in any st of band Rnd 7 at the back. Ch 1, sc in the next st, sk 1, Shell in the next st, sk 1; repeat around, join to the first sc. Fasten off.
Count: 14 sc + 70 dc = 84 sts, which makes 14 shells. Pressed flat, each side has 28 band sts and 7 shells.
Why the math works: each repeat uses 4 sts (sc, skip, shell, skip), and 56 ÷ 4 = 14. The round closes evenly with no partial shell at the back. A 5-dc shell over 4 sts adds just enough fullness for a gentle scallop that doesn’t flare.
Attach the tab and ring: Fold the tab around the wooden ring so the two ends meet. Place the ends inside the back of the band, centered above the round joins, covering Rnds 2–6. Use the tail to whipstitch around both tab ends through the band. About 1.25 in (3.2 cm) of tab shows above the shells.
Final Blocking
- Weave in all ends, except the long tails on the daisies and leaves.
- Soak the holder, daisies, and leaves in cool water for 10 minutes. Press out the water in a towel.
- Slide a rolled towel into the tube to shape it into a round column 4.5 in (11.4 cm) across.
- Pin each shell open so it fans out evenly.
- Use your fingers to shape the slot into a smooth oval.
- Pin the daisies flat with the petals spread, and pin each leaf to a point.
- Let everything dry completely.
- Sew on the flowers following the layout grid. Tuck 2 leaves behind each daisy, then sew the daisy center and petal tips to the mesh crossings. Sew through the front layer of the tube only.
Final Quality-Control Checklist
- [ ] The joined edges of the cup, tube, and band each have 56 sts
- [ ] The holder is 7 in (17.8 cm) wide flat
- [ ] The body is 21.75 in (55.2 cm) long, including the shells
- [ ] The slot is 3 in (7.6 cm) wide, edged with 34 sc, and centered on the front
- [ ] The mesh has 14 loops in every round and 24 mesh rounds
- [ ] The border has 14 even shells
- [ ] The tab is centered at the back and holds the ring securely
- [ ] The flowers are sewn to the front layer only
- [ ] All ends are woven in securely
Troubleshooting
Base ruffles: your stitches are too loose. Go down a hook size and measure Rnd 9 again.
Base is flat, not domed: check that Rnds 6 and 8 have no increases.
Gaps at the slot corners: when you work the edging, put the corner sc into the side of the end stitch, not into the gap.
Mesh spirals or loses loops: after the 3 sl sts, always work the first sc into the center of the loop. Count 14 loops every round.
Tube is wider than the cup: check that Rnd 27 has exactly 56 sts.
Daisies curl up: block them flat, or work the petal chains more loosely.
Holder sags when full: only fill it up to the top of the mesh.
Care
Hand wash in cool water, then reshape and dry flat. Keep the wooden ring out of the water as much as you can.
Final Notes
Here is how the measurements fit together. A gauge of 16 sc = 4 in (10.2 cm) gives 56 sts = 14 in (35.6 cm) around, or 7 in (17.8 cm) wide flat. The cup is 6 in (15.2 cm), the mesh tube is 13 in (33.0 cm), and the band is 1.75 in (4.4 cm). The two joins add 0.5 in (1.3 cm) and the shells add another 0.5 in (1.3 cm), for a total length of 21.75 in (55.2 cm).
Once your counts match these checkpoints, try a second holder with a soft lilac mesh and the same cream and daisy details.
Happy crocheting!