

This lacy dove ornament is a soft, light take on the classic peace symbol. The body is an open mesh crescent framed by a solid outline. A layered cream wing with long feathers rises above it, a fan tail spreads out behind, and a small green olive sprig sits in the beak.
The palette is gentle: butter yellow, cream and sage green, with a single black bead for the eye. It looks elegant on a tree, tied to a gift or hung in a window.
The pattern uses US crochet terms. The finished dove is about 5 1/2 in (14.0 cm) wide and 4 in (10.2 cm) tall, plus a 2 in (5.1 cm) hanging loop.
You’ll make six small parts: a mesh body (finished with a border), a round head with a beak, a two-layer wing, a fan tail, an olive sprig and a chain loop. Then you sew them together into one flat ornament.
Finished Size and Construction
- Finished size: 5 1/2 in (14.0 cm) wide × 4 in (10.2 cm) tall, loop not included
- Hanging loop: 2 in (5.1 cm) tall
- Skill level: Intermediate (you need to be comfortable working stitches into a chain loop)
- Terminology: US
- Yarn weight: Fingering / Super Fine (#1) mercerized cotton
- Hook: 2.25 mm (US B-1)
- Number of pieces: 1 ornament made from 6 parts
- Layout: Head at the left end of the body, wing above the body, tail behind the right end, sprig in the beak, loop at the top of the wing
- Body size before border: 4 in × 1 in (10.2 × 2.5 cm)
- Body size after border: 4 1/2 in × 1 1/2 in (11.4 × 3.8 cm)
- Border depth: 1/4 in (0.6 cm), 2 rounds
Materials
Use a smooth mercerized cotton. It shows the stitch outlines clearly, holds its shape when blocked and stays crisp. Avoid fuzzy or very stretchy yarns, because the feather loops will lose their open centers.
- Color A, butter yellow: 6 g, about 20 m (body, head, loop)
- Color B, cream: 6 g, about 20 m (wing, tail)
- Color C, sage green: 2 g, about 7 m (olive sprig)
- 2.25 mm (US B-1) crochet hook
- One 4 mm black bead, or black embroidery floss for a French knot
- Tapestry needle and a fine sewing needle
- Scissors, stitch markers, rustproof pins, blocking mat, spray bottle
All quantities include a small safety margin for gauge swatching and weaving in ends.
Abbreviations (US Terms)
- ch: chain
- sl st: slip stitch
- sc: single crochet
- hdc: half double crochet
- dc: double crochet
- sp: space
- st(s): stitch(es)
- sk: skip
- FLO / BLO: front loop only / back loop only
- RS / WS: right side / wrong side
Special stitch: Feather-N (F-N). In the stated stitch, ch N. Sl st in the same stitch to close a long loop. Working into the loop (over the chains, not into them), work 2 sc, 2 hdc, (N/2 − 4) dc, 3 dc for the tip, (N/2 − 4) dc, 2 hdc and 2 sc. Sl st in the same base stitch.
Each feather therefore has N + 3 stitches. Because the stitches wrap around the chain, the feather keeps a narrow open slit in its center.
Gauge and Checkpoints
Gauge: 14 sc and 16 rows = 2 in (5.1 cm) with a 2.25 mm hook.
Make the body first and use it as your test piece. Check it at each stage:
- After body Row 1: 28 sc measure 4 in (10.2 cm).
- After body Row 4: the mesh crescent is 1 in (2.5 cm) deep at the center.
- After the Border: the body measures 4 1/2 in × 1 1/2 in (11.4 × 3.8 cm).
- A finished F-24 feather: about 1 3/4 in (4.4 cm) long.
If your body is too big, go down one hook size (2.0 mm). If it’s too small, go up one size (2.5 mm). Change the hook for all parts, so they keep their proportions to each other.
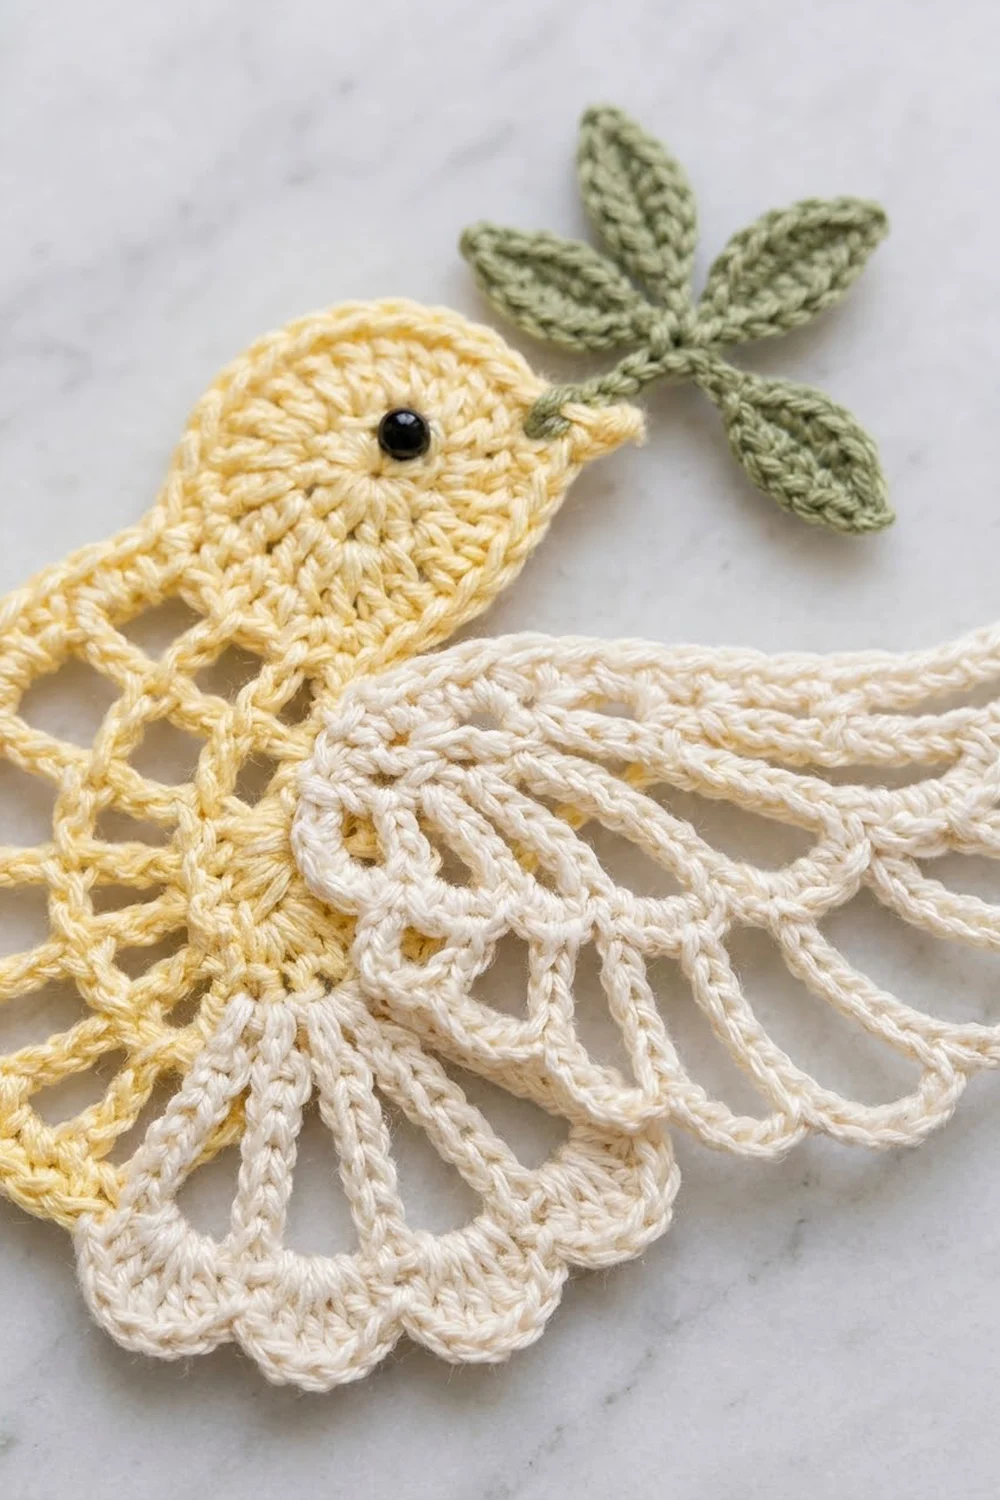
Body (Color A)
The body is worked in rows from the straight top edge down. Each mesh row is shorter than the last, which shapes the curved belly.
Row 1 (RS): Ch 29. Sc in the 2nd ch from hook and in each ch across. Turn. (28 sc)
Row 2: Ch 5 (counts as dc + ch 2). Sk the next 2 sc and dc in the next sc. Ch 2, sk 2 sc, dc in the next sc. Repeat from * across. Dc stitches land on sc 1, 4, 7, 10, 13, 16, 19, 22, 25 and 28. Turn. (10 dc and 9 ch-2 sps = 28 sts)
Row 3: Sl st in each of the next 2 ch and in the next dc. Ch 5 (counts as dc + ch 2). Dc in the next dc. Ch 2, dc in the next dc. Repeat from * until 1 ch-2 sp is left unworked. Turn. (8 dc and 7 ch-2 sps = 22 sts)
Row 4: Repeat Row 3. (6 dc and 5 ch-2 sps = 16 sts)
Don’t fasten off. Go straight on to the Border section below. The body is only finished once the border is done.
Head (Color A)
Rnd 1: Make a magic ring and work 8 sc into it. Join with a sl st to the first sc. (8 sc)
Rnd 2: Ch 1, then 2 sc in each st around. Join. (16 sc)
Rnd 3: Ch 1. Sc in the next st, 2 sc in the next st. Repeat from * 8 times. Join. (24 sc)
Rnd 4 (beak round): Ch 1. Sc in each of the next 23 sts. In the last st, work: hdc, ch 3, sl st in the 2nd ch from hook, sl st in the next ch, hdc. Join.
That’s 24 sts worked 1 per stitch plus 1 extra hdc, for 25 sts plus the beak point.
Fasten off, leaving a 12 in (30.5 cm) tail for sewing. The head measures 1 in (2.5 cm) across, not counting the beak.
Eye: Sew the black bead between Rnds 2 and 3, slightly toward the beak. You can work a black French knot instead.
Wing (Color B)
Row 1: Ch 12. Sc in the 2nd ch from hook and in each ch across. (11 sc)
Row 2 (long feathers, BLO): Ch 1 and turn. Working in BLO only:
Sc in st 1, F-24 in st 2, sc in st 3, F-22 in st 4, sc in st 5, F-20 in st 6, sc in st 7, F-18 in st 8, sc in st 9, F-16 in st 10, sc in st 11.
(6 sc + 5 feathers)
The feathers have 27, 25, 23, 21 and 19 sts. For example, F-24 is 2 sc, 2 hdc, 8 dc, 3 dc, 8 dc, 2 hdc, 2 sc.
Row 3 (front scallops, FLO): Don’t turn. Ch 1 and work back across the unused front loops of Row 1:
Sc in the next st, F-8 in the next st. Repeat from * 5 times, then sc in the last st.
(6 sc + 5 scallops)
Each F-8 scallop is 2 sc, 2 hdc, 3 dc, 2 hdc, 2 sc = 11 sts. Because Row 2 and Row 3 share the same base stitches, the short scallops sit in front of the feather bases as a second layer.
Fasten off, leaving a 12 in (30.5 cm) tail. The wing is about 1 1/2 in (3.8 cm) wide at the base and 2 in (5.1 cm) tall.
Tail (Color B)
Row 1: Ch 5. Sc in the 2nd ch from hook and in each ch across. Turn. (4 sc)
Row 2: Ch 1, then 2 sc in each st. Turn. (8 sc)
Row 3: Ch 1. Sc in the next st, 2 sc in the next st. Repeat from * 4 times. Turn. (12 sc)
Row 4: Ch 1. Sc in the next st, F-14 in the next st. Repeat from * 6 times.
(6 sc + 6 feathers, 17 sts each)
Fasten off, leaving a 10 in (25.4 cm) tail. The fan is about 1 1/2 in (3.8 cm) wide and 1 1/4 in (3.2 cm) long.
Olive Sprig (Color C)
Leaf (worked on 5 chains): sc, hdc, dc, hdc, sc along the chains, then ch 1 at the tip. Rotate and work sc, hdc, dc, hdc, sc into the other side of the same chains. (10 sts per leaf)
- Ch 15.
- Tip leaf: Work a Leaf on chains 2–6, counting from the hook. Sl st in ch 7.
- Sl st in ch 8. Ch 6 and work a Leaf on those chains, starting in the 2nd ch from hook. Sl st in the same stem chain.
- Sl st in each of the next 2 stem chains, then work a side leaf as in step 3. Repeat this step twice more, so you have side leaves at chains 8, 10, 12 and 14. Rotate the stem each time so the leaves alternate sides.
- Sl st in ch 15. (5 leaves)
Fasten off, leaving an 8 in (20.3 cm) tail. The sprig is about 1 3/4 in (4.4 cm) long.
Hanging Loop (Color A)
Ch 36. Sl st in the 2nd ch from hook and in each ch back. (35 sl st)
Fasten off, leaving an 8 in (20.3 cm) tail. Folded in half, the cord makes a 2 in (5.1 cm) loop.
Make All Pieces
You need one of each part:
- Color A: 1 body, 1 head, 1 loop
- Color B: 1 wing, 1 tail
- Color C: 1 sprig
Layout guide (the dove faces left):
            [LOOP]
          [  WING  ]
[HEAD]  [ BODY CRESCENT ]
[SPRIG]               [TAIL]
Joining
Order: Finish the body Border (next section) first, then block every part lightly before you sew. Flat parts line up more accurately.
- Head: Overlap the head’s lower right edge 1/2 in (1.3 cm) over the left end of the body, so the outlines merge into a neck. Whipstitch from the WS, catching only the back loops of Head Rnd 4 and the Border sts underneath.
- Tail: Slide Tail Row 1 behind the right end of the body, with the fan angled down and to the right. Sew the Tail Row 1 sts to the WS of body Border Rnd 1, one stitch to one stitch.
- Wing: Place wing Row 1 along the top edge of the body, starting 1 1/4 in (3.2 cm) from the head. Angle the feathers up and toward the tail. Sew each of the 11 base sts to one top Border st, stitch to stitch. That uses 11 of the 28 top sts.
- Sprig: Tuck the sprig’s stem end under the beak and tack it with 2–3 stitches.
- Loop: Fold the cord in half and sew both ends to the WS of the wing base, behind the F-20 feather.
Tension: Sew snugly, but don’t pull. Puckers on the front mean you need to loosen up.
Checkpoint: The assembled dove measures 5 1/2 in × 4 in (14.0 × 10.2 cm).
Border (Body Edging)
Border gauge: 2 rounds = 1/4 in (0.6 cm).
Rnd 1 (sc): Don’t turn after Row 4. Ch 1 and work sc around the whole body as follows.
- Bottom (across Row 4): 1 sc in each dc and 2 sc in each ch-2 sp. (6 + 10 = 16 sc)
- Each end, stepping up:
- 3 sc around the end post (dc or ch-5) of Row 4
- 2 sc in the exposed ch-2 sp of Row 3, then 1 sc in the end dc of Row 3
- 3 sc around the end post of Row 3
- 2 sc in the exposed sp of Row 2, then 1 sc in the end dc of Row 2
- 3 sc around the end post of Row 2
- 1 sc in the row-end of Row 1
- (16 sc per end)
- Top: 1 sc in each free loop of the foundation chain. (28 sc)
Join with a sl st. Total: 16 + 16 + 16 + 28 = 76 sc
Rnd 2 (conversion round): Ch 1.
- Top: sc in each of the 28 sts.
- Each end: hdc in each st, with 2 hdc in the center st of each 3-sc post group (end sts 2, 8 and 14). (16 + 3 = 19 hdc)
- Bottom: hdc in each st, with 2 hdc in sts 4, 8, 12 and 16. (16 + 4 = 20 hdc)
Join. Total: 76 sts worked 1 per stitch + 10 extra = 86 sts
Fasten off and weave in the end.
Why the math works:
- 2 sc fill a 2-chain space exactly.
- 3 sc cover the height of one dc post.
- 28 top sts match the 28 foundation chains.
- In Rnd 2, the 10 increases sit only on the convex belly and ends, which need extra length to lie flat.
- The straight top gets no increases, so it stays the 4 in (10.2 cm) base for the wing.
- The two border rounds add 1/4 in (0.6 cm) on every side, which gives the 4 1/2 in × 1 1/2 in (11.4 × 3.8 cm) body.
Final Blocking
- Weave in all remaining ends on the WS. Leave them unclipped for now.
- Mist the ornament until it is damp, not dripping.
- Lay it face up on the blocking mat.
- Pin the body’s straight top, then ease the belly into a smooth curve.
- Pin each mesh space open so it looks square.
- Fan out the wing feathers, with a pin inside each open slit to keep it open.
- Spread the tail feathers evenly, about 1 1/2 in (3.8 cm) across.
- Shape the sprig leaves into points.
- Check the overall size: 5 1/2 in × 4 in (14.0 × 10.2 cm).
- Let it dry completely, then clip the ends. For a stiffer ornament, use a light starch spray before drying.
Final Quality-Control Checklist
- Body Row 1 has 28 sc; mesh rows have 10, 8 and 6 dc.
- Border Rnd 1 = 76 sc and Rnd 2 = 86 sts.
- The head has 25 sts plus the beak, and the eye sits evenly placed.
- There are 5 long feathers and 5 front scallops, and every slit is open.
- The tail has 6 feathers that fan evenly.
- The sprig has 5 leaves that alternate sides.
- The loop is centered, so the dove hangs level.
- No seams show from the front.
Troubleshooting
- The belly ruffles: Your Rnd 2 hdc are too loose. Redo the round with sc in place of hdc at the 4 bottom increase points.
- The belly cups: Add 2 more increases along the bottom in Rnd 2.
- The feathers’ slits close up: Don’t crowd the stitches. Push each one snugly toward the base as you work, and pin the slits open when blocking.
- The feathers twist: Check the chain isn’t twisted before the sl st that closes the loop.
- The mesh slants: Make the ch-2 sps the same tension as your dc, then block square.
- The dove tips forward when hung: Move the loop 1/4 in (0.6 cm) toward the tail.
Care
Hand-wash in cool water with mild soap, press out the water in a towel, and reshape flat to dry. If you used starch, reapply it after washing.

Final Notes
Here is how the measurements build on each other:
- Gauge is 14 sc to 2 in (5.1 cm).
- The 28 sc foundation measures 4 in (10.2 cm).
- The mesh crescent is 1 in (2.5 cm) deep.
- Two border rounds bring the body to 4 1/2 in × 1 1/2 in (11.4 × 3.8 cm).
- With the head, wing, tail and sprig added, the dove measures 5 1/2 in × 4 in (14.0 × 10.2 cm), with a 2 in (5.1 cm) loop.
If you check each stage, the finished dove will hang light and level.
Happy crocheting!