

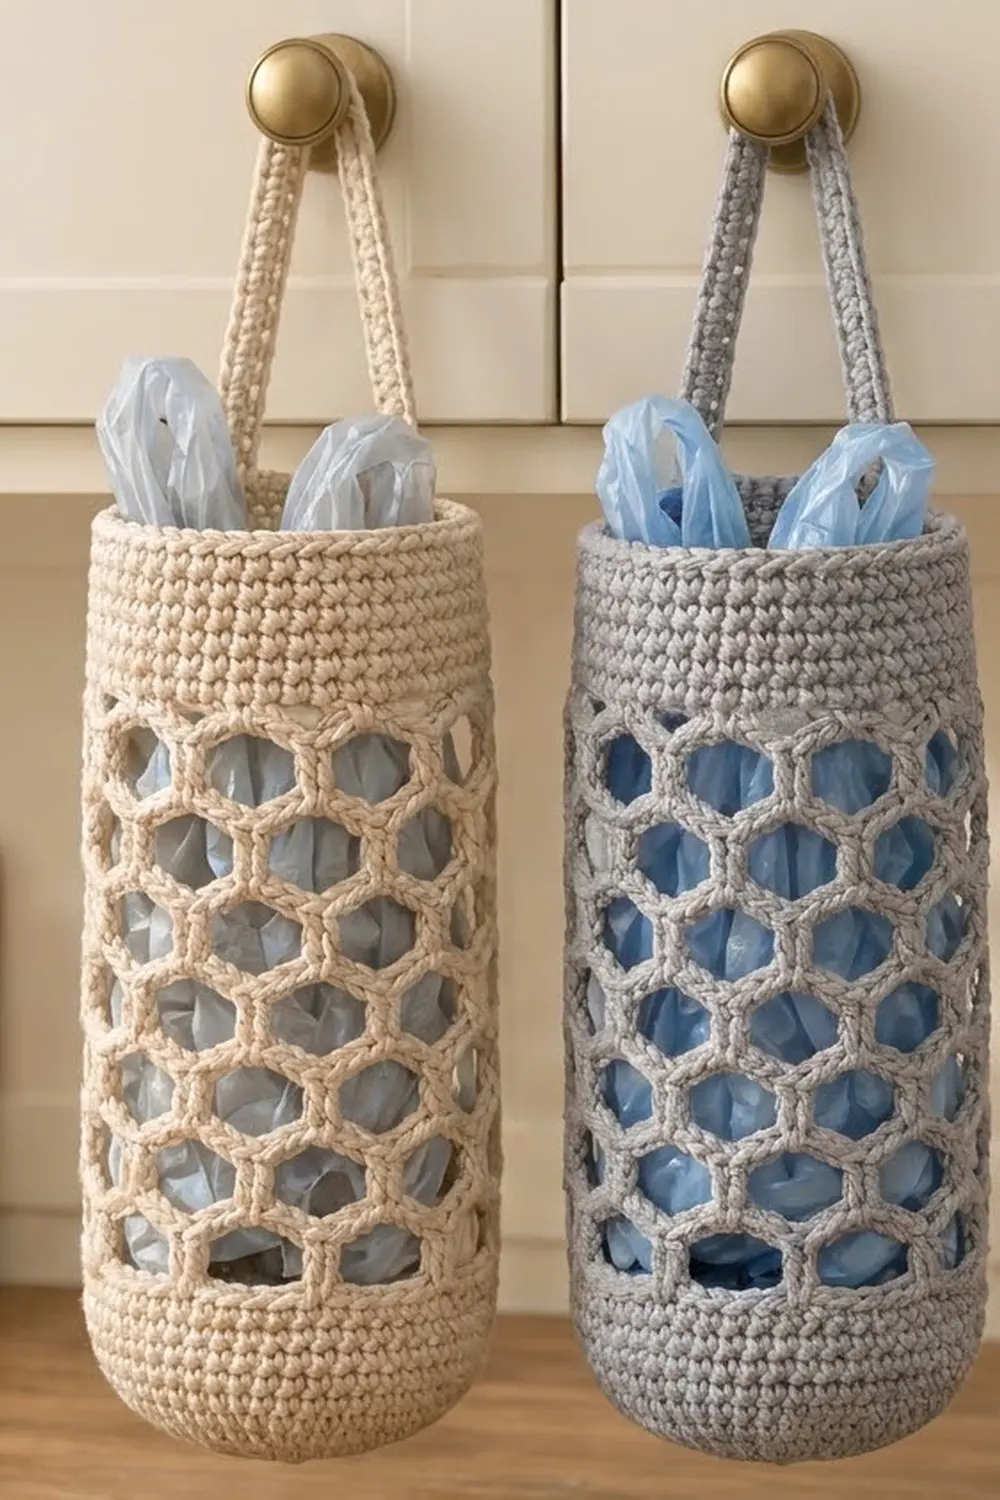
The Honeycomb Pantry Bag Holder is a tall, slim tube that keeps loose plastic bags in one place. A solid single crochet base and two solid bands frame an open honeycomb mesh. A narrow strap lets you hang it from a cabinet knob, a hook, or a door handle.
The sample uses a soft natural cream cotton, which suits a warm, neutral kitchen. A cool gray works just as well, and two holders in different colors look neat hanging side by side. The design is simple and practical: firm bands at the top and bottom, with open hexagon cells in between so you can see how many bags are left.
This pattern uses US crochet terms. The finished holder is about 4 in (10.2 cm) across and 10 in (25.4 cm) tall, with a 12 in (30.5 cm) strap.
Construction is fully seamless:
- You start with a flat single crochet circle for the base and turn the wall upward with a back-loop round.
- Next comes a solid lower band, followed by a chain-and-double-crochet honeycomb mesh.
- A conversion round brings you back to single crochet for the top band.
- The strap is worked in rows straight off the rim and slip stitched to the opposite side.
The only sewing is weaving in two yarn tails.
Finished Size and Construction
- Finished size: about 4 in (10.2 cm) diameter x 10 in (25.4 cm) tall, plus a 12 in (30.5 cm) strap
- Skill level: Easy / advanced beginner
- Terminology: US crochet terms
- Yarn weight: worsted weight (#4) cotton
- Hook: US H-8 (5 mm)
- Number of pieces: 1, worked as one continuous piece (strap included)
- Layout: one standing cylinder with a strap across the top
- Piece size: 48 stitches around, about 12.8 in (32.5 cm) circumference
- Size before border: 8 in (20.3 cm) tall (lower band plus mesh)
- Border depth: 2 in (5.1 cm) solid top band
Materials
Choose a smooth, firm worsted weight cotton or cotton blend. Cotton holds its shape and doesn’t stretch much when the holder is full of bags. It also survives regular washing. Avoid very soft or fuzzy yarns, which blur the honeycomb cells and let the tube sag.
- Natural cream (main color): 75 g, about 120 m (131.2 yd)
For a second holder in another color, such as soft gray, buy the same amount again.
Tools:
- US H-8 (5 mm) crochet hook
- 2 locking stitch markers
- Tapestry needle
- Scissors
- Measuring tape
- A 4 in (10.2 cm) jar or bottle, or a rolled towel, for blocking
Quantities include a margin of about 15% to cover small differences in tension.
Abbreviations (US Terms)
- ch – chain
- sc – single crochet
- dc – double crochet
- sl st – slip stitch
- st(s) – stitch(es)
- sp – space
- inc – increase (2 sc in the same st)
- BLO – back loop only
- MR – magic ring
- rnd – round
Special stitch – honeycomb post: a dc worked into the ch-space, meaning around the whole chain loop rather than into one particular chain. Working around the loop centers the post in the arch below. That centering is what creates the vertical sides of each hexagon.
Gauge and Checkpoints
Gauge: 15 sc and 16 rnds = 4 in (10.2 cm). In the mesh, 3 rnds = 2 in (5.1 cm).
Treat the base as your test piece. Work Rnds 1–8 and measure before going further.
Checkpoints:
- After Rnd 8 (base): 4 in (10.2 cm) across, 48 sts.
- After Rnd 16 (lower band): 2 in (5.1 cm) tall from the turning ridge.
- After Rnd 25 (mesh): 8 in (20.3 cm) tall from the turning ridge.
- After Rnd 33 (top band): 10 in (25.4 cm) tall from the turning ridge.
- Strap: 12 in (30.5 cm) long before you attach it.
If your base is too big (over 4.25 in / 10.8 cm), go down half a hook size. If it is too small (under 3.75 in / 9.5 cm), go up half a hook size. Don’t change the stitch count: the mesh repeat needs exactly 48 stitches to divide evenly.
Pattern Notes
- Join each round with a sl st to the first st. In sc rounds, the ch 1 at the start does not count as a stitch.
- In the mesh, the beginning ch 3 counts as the first dc.
- Don’t turn between rounds. The right side always faces you.
- In the solid sections, place a marker in the first st of each round.
Base
Rnd 1: Make a MR, ch 1, 6 sc in ring, join. (6 sts)
Rnd 2: Ch 1, inc in each st around, join. (12 sts)
Rnd 3: Ch 1, *sc in next st, inc in next st; rep from * 5 more times, join. (18 sts)
Rnd 4: Ch 1, *sc in next 2 sts, inc in next st; rep from * 5 more times, join. (24 sts)
Rnd 5: Ch 1, *sc in next 3 sts, inc in next st; rep from * 5 more times, join. (30 sts)
Rnd 6: Ch 1, *sc in next 4 sts, inc in next st; rep from * 5 more times, join. (36 sts)
Rnd 7: Ch 1, *sc in next 5 sts, inc in next st; rep from * 5 more times, join. (42 sts)
Rnd 8: Ch 1, *sc in next 6 sts, inc in next st; rep from * 5 more times, join. (48 sts)
Checkpoint: the circle lies flat and measures 4 in (10.2 cm) across. If it ruffles, your tension is too loose. If it cups, it is too tight.
Lower Band
Rnd 9: Ch 1, sc in BLO of each st around, join. (48 sts)
This round leaves a crisp ridge on the outside and turns the work upward. The result is a flat bottom that lets the holder stand on its own.
Rnds 10–16: Ch 1, sc in each st around, join. (48 sts)
Checkpoint: the band is 8 rnds and 2 in (5.1 cm) tall from the ridge. Flattened, the tube measures about 6.4 in (16.3 cm) wide.
Honeycomb Mesh
Rnd 17 (foundation arches): Ch 1, sc in first st, *ch 5, skip next 3 sts, sc in next st; rep from * 10 more times, ch 5, skip last 3 sts, join with sl st to first sc. (12 sc, 12 ch-5 sps)
Each repeat uses 4 stitches of the band (1 sc plus 3 skipped), and 12 repeats x 4 = 48 stitches exactly. This round makes the scalloped loops along the top of the band.
Rnd 18: Sl st into first ch-5 sp, ch 3 (counts as dc), ch 4, *dc in next ch-5 sp, ch 4; rep from * 10 more times, join with sl st to top of beginning ch 3. (12 dc, 12 ch-4 sps)
Rnd 19: Sl st into first ch-4 sp, ch 3 (counts as dc), ch 4, *dc in next ch-4 sp, ch 4; rep from * 10 more times, join with sl st to top of beginning ch 3. (12 dc, 12 ch-4 sps)
Rnds 20–25: Repeat Rnd 19. (12 dc, 12 ch-4 sps in each round)
Each dc post sits in the middle of an arch from the round below, so the posts move half a repeat every round. That offset turns the arches into rows of staggered hexagons. The posts form the vertical sides of each cell, and the curved chains above and below form its angled top and bottom edges.
Checkpoint: you now have 9 mesh rnds (Rnd 17 plus 8 dc rnds), which is about 6 in (15.2 cm) of mesh. The work measures 8 in (20.3 cm) from the ridge. Gently stretch the mesh lengthwise. The cells should open into even hexagons with no twisted posts.
Border: Top Band and Strap
The top band is this piece’s border. Its gauge matches the body: 15 sc and 16 rnds = 4 in (10.2 cm).
Rnd 26 (conversion round): Ch 1, sc in same st as join (top of beginning ch 3), 3 sc in next ch-4 sp, *sc in next dc, 3 sc in next ch-4 sp; rep from * 10 more times, join. (12 sc worked 1 per existing post + 36 sc added into the 12 spaces = 48 sts)
Rnds 27–33: Ch 1, sc in each st around, join. (48 sts)
Why the math works: the band has 12 posts and 12 spaces. Working 1 sc in each post and 3 sc in each space gives 4 sts per repeat, and 12 x 4 = 48. That matches the lower band exactly, so the top and bottom of the holder have the same width and the tube hangs straight instead of flaring. The band is 8 rnds (Rnds 26–33), which at 16 rnds per 4 in (10.2 cm) gives 2 in (5.1 cm).
Checkpoint: the body measures 10 in (25.4 cm) from the ridge.
Mark the strap positions: don’t fasten off. Count the 48 sts of Rnd 33. Place one marker in st 1 and another in st 25, which sits directly opposite. The strap starts over sts 1–3 and attaches over sts 25–27.
Strap Row 1: Ch 1, sc in first 3 sts, turn. (3 sts)
Strap Rows 2–48: Ch 1, sc in each st across, turn. (3 sts)
The strap is 0.8 in (2.0 cm) wide and 48 rows, or 12 in (30.5 cm), long. Check that it is straight and untwisted.
Attach the strap: bring the strap end across the top of the holder to sts 25–27, keeping it flat and untwisted. Hold the last strap row against the top of the rim. Working through both layers, sl st in each of the 3 sts. Fasten off, leaving a 6 in (15.2 cm) tail.
When attached, the strap rises about 5 in (12.7 cm) above the rim.
Final Blocking
- Weave in both tails on the inside of the solid bands. Run each tail in one direction, then back the other way.
- Mist the whole holder with water until it is evenly damp but not dripping.
- Slide a 4 in (10.2 cm) jar or bottle, or a tightly rolled towel, inside the tube.
- Straighten the mesh by gently pulling each column of posts vertical. Open the hexagons so they are all the same size.
- Pat the base flat and press the turning ridge into a clean edge.
- Lay the strap flat and straighten its edges with your fingers.
- Let it dry completely, standing upright, then remove the form.
Final Quality-Control Checklist
- Base is flat and 4 in (10.2 cm) across.
- Turning ridge runs evenly around the bottom.
- Lower band and top band each have 48 sts and measure 2 in (5.1 cm) tall.
- Mesh has 12 posts in every round and 9 mesh rounds in total.
- Hexagons line up in staggered columns, with no doubled or missing posts.
- Body measures 10 in (25.4 cm) from the ridge.
- Strap is 12 in (30.5 cm) long, untwisted, and attached directly opposite its starting point.
- Tails are secure and hidden inside.
Troubleshooting
The base cups or ruffles. Cupping means your tension is too tight, so loosen up or go up a hook size. Ruffling means it is too loose, so tighten up or go down a size.
The mesh slants in a spiral. You are probably starting rounds in the wrong place. Always sl st into the first space right after the join, then ch 3.
The mesh has 11 or 13 posts. Count the spaces before joining each round. A skipped or doubled space throws off the conversion round.
The top band flares or pulls in. Recount Rnd 26. It must total 48 sts: 1 in each post and 3 in each space.
The cells look tall and narrow. Your chains are too tight. Make the ch-4 loops a little looser.
The strap twists. Before attaching, lay the strap flat along the rim and check that the same side faces outward at both ends.
The holder sags when full. Use a firmer cotton, or go down half a hook size for the bands only.
Care
Machine wash cold on a gentle cycle in a mesh laundry bag, or hand wash. Reshape while damp and air dry upright over a jar.

Final Notes
Here is how the measurements build on each other. The 8-round base reaches 48 sts and 4 in (10.2 cm). That count carries straight up through an 8-round, 2 in (5.1 cm) lower band. Splitting 48 sts into 12 repeats of 4 gives the mesh, whose 9 rounds add 6 in (15.2 cm). Converting back at 4 sts per repeat restores exactly 48 sts for a 2 in (5.1 cm) top band, for a body height of 10 in (25.4 cm). Finally, a 3-stitch, 48-row strap adds a 12 in (30.5 cm) loop for hanging. If you check your size at each of those points, the finished holder will match the measurements above.
Happy crocheting!