

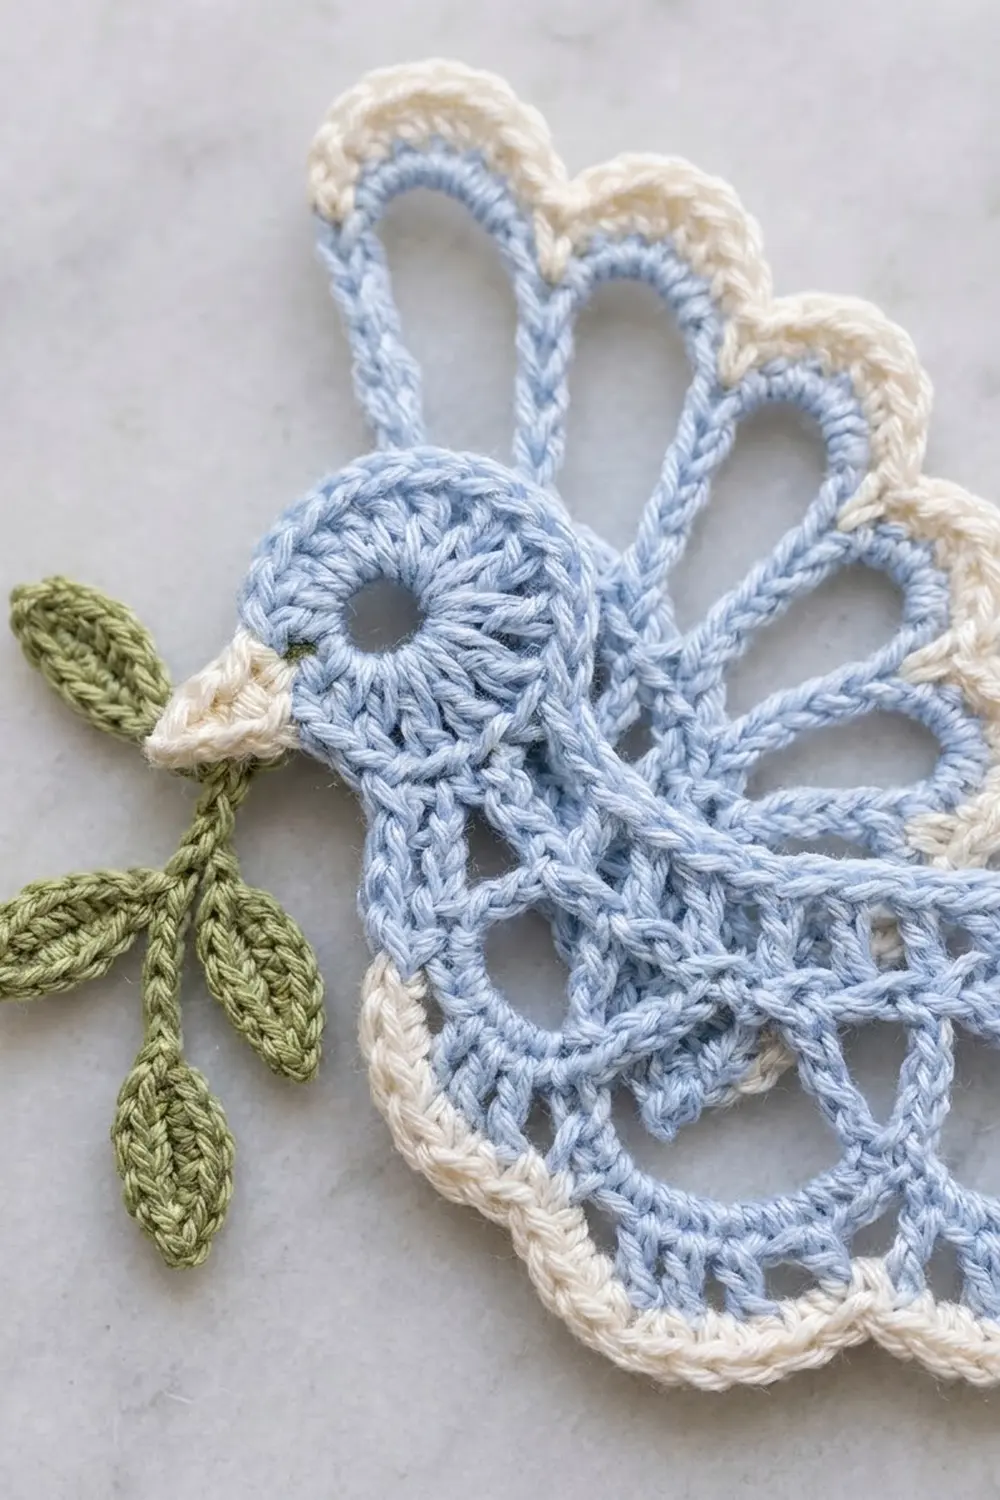
The Olive Branch Peace Dove is a small, lacy holiday ornament with a soft vintage feel. A light blue dove spreads one fanned wing upward, its belly and tail open into airy arches, and every outer edge is finished with a crisp cream scallop. A tiny cream beak holds a sage green olive sprig.
The palette is calm and wintry: light blue for the body, cream for the trims, beak, and hanging loop, and sage green for the sprig. It looks lovely on a tree, in a window, or tied to a gift.
This pattern uses US crochet terms. The finished ornament measures about 5 in (12.7 cm) wide and 4.5 in (11.4 cm) tall, not counting the loop, which adds about 2 in (5.1 cm).
Construction is simple and modular. You work the head in the round, chain the back line, and build the body downward and the upper wing upward from that same chain. The fan tail and olive sprig are made separately and sewn on. Cream scallop borders go on each scalloped edge.
Finished Size and Construction
- Finished size: 5 in (12.7 cm) wide x 4.5 in (11.4 cm) tall, plus a 2 in (5.1 cm) loop
- Skill level: Intermediate
- Terminology: US crochet terms
- Yarn weight: Fingering (#1) mercerized cotton
- Hook: 2.5 mm
- Number of pieces: One finished ornament made from 3 crocheted components (head/body/wing, tail fan, olive sprig); the beak and loop are worked directly onto the main piece
- Layout: Tail fan sewn behind the body’s tail point; sprig sewn under the beak
- Main piece size: about 4 in (10.2 cm) wide x 4.5 in (11.4 cm) tall with borders
- Size before border: about 4.75 in (12.1 cm) x 4.25 in (10.8 cm) assembled
- Border depth: about 0.125 in (0.3 cm) on each scalloped edge
Materials
Choose a smooth, mercerized cotton in fingering weight. It shows the arches clearly and holds a crisp shape after blocking. Avoid fuzzy or very stretchy yarns, which blur the openwork.
- Light blue (A): 6 g, about 24 m
- Cream (B): 3 g, about 12 m
- Sage green (C): 1 g, about 4 m
Quantities include a margin for a gauge test and weaving in ends.
Tools:
- 2.5 mm crochet hook
- Tapestry needle
- Scissors
- 4 locking stitch markers
- Rust-proof pins and a blocking mat
- Spray bottle; spray starch is optional
Abbreviations (US Terms)
- ch – chain
- sl st – slip stitch
- sc – single crochet
- hdc – half double crochet
- dc – double crochet
- tr – treble crochet
- sk – skip
- st(s) – stitch(es)
- sp – space
- FLO – free loop of the foundation chain (the strand left unworked on the other side of the chain)
Special stitch – Leaf: Ch 5, sc in 2nd ch from hook, hdc in next ch, sc in next ch, sl st in last ch. One leaf = 4 sts on a 5-ch spine.
Gauge and Checkpoints
Gauge: 7 sc = 1 in (2.5 cm) with Color A and a 2.5 mm hook.
Make the head and Body Row 1 first as your test piece. They are small and tell you quickly whether your tension will produce the stated size.
Checkpoints:
- Head (Round 1): 1 in (2.5 cm) across, with a clean open eye in the center.
- Body Row 1: 25 sc measure 3.5 in (8.9 cm).
- Body after Row 4: 1.25 in (3.2 cm) deep from the back line to the shell tips.
- Body after border: 1.5 in (3.8 cm) deep.
- Wing after Row 4: 2.75 in (7.0 cm) tall from the back line.
- Wing after border: 3 in (7.6 cm) tall.
- Tail fan with border: 1.75 in (4.4 cm) long x 2 in (5.1 cm) wide.
If your pieces are too big, go down to a 2.25 mm hook. If they are too small, go up to a 2.75 mm hook. Recheck the head and Row 1 before continuing. Small differences add up quickly across the 25-st back line.
Main Piece: Head, Body, and Wing
Head (Color A)
Ch 4, sl st in first ch to form a ring.
Round 1: Ch 3 (counts as dc), 15 dc in ring, sl st to top of ch-3. (16 sts)
The ring stays open and becomes the eye. Do not fasten off. The join point sits at the back of the neck.
Body (Color A)
Foundation: Ch 26, working away from the head toward the tail.
Row 1: Sc in 2nd ch from hook and in each ch back toward the head. (25 sc) Sl st in next 2 dc of the head to anchor the body. Turn.
This row is the back line of the dove. Its other side (the FLO) stays free for the wing.
Row 2 (shaping): Ch 3 (counts as dc), dc in next 14 sts, hdc in next 5 sts, sc in next 3 sts, sl st in last 2 sts. (25 sts: 15 dc, 5 hdc, 3 sc, 2 sl st) Turn.
The tall stitches at the neck end form the full chest. The short stitches taper to the tail point.
Row 3 (arches): Ch 1, sc in first st, ch 5, sk 3 sts, sc in next st; repeat from * 5 more times. (6 ch-5 arches, 7 sc; 1 + 6 x 4 = 25 sts covered)* Turn.
Row 4 (shells): Ch 1, in next ch-5 sp work (sc, hdc, 3 dc, hdc, sc), sl st in next sc; repeat from * 5 more times. (6 shells of 7 sts = 42 sts, plus 6 sl st)* Fasten off.
The open spaces under each ch-5 arch create the lacy belly. Check: 1.25 in (3.2 cm) deep.
Beak (Color B)
Join B in the dc of the head directly opposite the neck join, facing forward. Ch 4, sl st in 2nd ch from hook, sc in next ch, hdc in next ch, sl st in next dc of head. Fasten off. (1 small triangle of 3 sts)
Upper Wing (Color A)
Hold the piece with the back line on top. Count 6 free loops in from the head end.
Row 1: Join A in the 6th FLO, ch 1, sc in same loop and in next 9 FLO. (10 sc) Turn.
Row 2 (fan): Ch 4 (counts as tr), 2 tr in first st, 2 tr in each of next 9 sts. (21 sts: 3 in the first st + 18) Turn.
The fan spreads up and back to form the raised wing.
Row 3 (feather loops): Ch 1, sc in first st, ch 9, sk 3 sts, sc in next st; repeat from * 4 more times. (5 ch-9 loops; 1 + 5 x 4 = 21 sts covered)* Turn.
Row 4 (feathers): Ch 1, in next ch-9 loop work (2 sc, 2 hdc, 7 dc, 2 hdc, 2 sc), sl st in next sc; repeat from * 4 more times. (5 feathers of 15 sts = 75 sts, plus 5 sl st)* Fasten off.
Each feather is a solid dc band arching over an open space, so the wing reads as long, separated plumes. Check: 2.75 in (7.0 cm) tall.
Tail Fan (Color A)
Row 1: Ch 2, 9 sc in 2nd ch from hook. (9 sc) Turn.
Row 2 (feather loops): Ch 1, sc in first st, ch 8, sk 1 st, sc in next st; repeat from * 3 more times. (4 ch-8 loops; 1 + 4 x 2 = 9 sts covered)* Turn.
Row 3 (feathers): Ch 1, in next ch-8 loop work (2 sc, hdc, 7 dc, hdc, 2 sc), sl st in next sc; repeat from * 3 more times. (4 feathers of 13 sts = 52 sts, plus 4 sl st)* Fasten off, leaving a 12 in (30.5 cm) tail of A for sewing.
Olive Sprig (Color C)
Ch 15 for the stem.
Make 1 Leaf for the tip. Sl st in next 3 ch of the stem, make 1 Leaf, make 1 more Leaf (a pair). Sl st in next 3 ch, make 1 Leaf, make 1 more Leaf. Sl st in remaining 9 ch. (15 stem sts, 5 leaves)
Fasten off, leaving an 8 in (20.3 cm) tail. The sprig is about 1.5 in (3.8 cm) long.
Make All Pieces
This is one ornament, so you make one of each component:
- Color A: 1 head/body/wing piece, 1 tail fan
- Color B: 1 beak (on main piece), 3 borders, 1 loop
- Color C: 1 olive sprig
Layout (front view):
            [ loop ]
  [sprig][beak][head][  wing  ]
              [  body  ][tail]
Joining
Sew the components with a tapestry needle and matching yarn. Use small whipstitches through the back loops only, so stitches do not show on the front.
Tail fan: Place the narrow end of the fan (Row 1) behind the tail point of the body, overlapping by about 0.5 in (1.3 cm). Angle the fan down and to the right. Sew the 9 sc of Row 1 to the last 4 sts of Body Row 2 and the back of the last arch, roughly 2 fan sts to 1 body st.
Olive sprig: Lay the stem end just under the beak and let the leaves fall toward the chest. Tack the stem in 3 places with C.
Tension: Sew loosely enough that the pieces lie flat. Tight stitching puckers the tail seam.
Size checkpoint: The assembled ornament, before the cream borders, measures about 4.75 in (12.1 cm) wide x 4.25 in (10.8 cm) tall. If you prefer, you can add the borders before sewing. The counts below are the same either way.
Border
Border gauge matches body gauge: 7 sc = 1 in (2.5 cm) with B. Each border is one row of sc worked across a scalloped edge only.
Body border: Join B in the first sc at the tail end of Body Row 4. Sc in next 3 sts, 3 sc in center dc, sc in next 3 sts, sl st in sl st; repeat from * 5 more times. Count: 7 sts per shell worked 1-per-stitch + 2 extra at the tip = 9 sc per shell; 6 x 9 = 54 sc, plus 6 sl st.* Fasten off.
Wing border: Join B in the first sc of Wing Row 4. Sc in next 7 sts, 3 sc in center dc, sc in next 7 sts, sl st in sl st; repeat from * 4 more times. Count: 15 sts worked 1-per-stitch + 2 extra = 17 sc per feather; 5 x 17 = 85 sc, plus 5 sl st.* Do not fasten off.
Loop: At the end of the wing border, ch 30, sl st in the same sl st to form a ring. Work 30 sc over the chain, sl st to the first sc. (30 sc) Fasten off. The loop stands about 2 in (5.1 cm) tall.
Tail border: Join B in the first sc of Tail Row 3. Sc in next 6 sts, 3 sc in center dc, sc in next 6 sts, sl st in sl st; repeat from * 3 more times. Count: 13 sts worked 1-per-stitch + 2 extra = 15 sc per feather; 4 x 15 = 60 sc, plus 4 sl st.* Fasten off.
Why the math works: Every shell or feather has an odd number of stitches, so there is always one center stitch. Working 1 sc per stitch keeps the border the same length as the edge. The 2 extra sc at each tip add just enough room for the point to curve without cupping, and the sl st between scallops pinches the valley. The border adds about 0.125 in (0.3 cm) all around.
Final Blocking
- Weave in all ends, except any sewing tails you still need.
- Spray the ornament until damp, not dripping.
- Lay it face up on the blocking mat.
- Pin the head round into a neat circle with the eye open.
- Pin each body arch and each feather tip, spacing the wing feathers evenly in a fan.
- Pin the tail feathers so they splay to 2 in (5.1 cm) wide.
- Check the overall size: 5 in (12.7 cm) x 4.5 in (11.4 cm).
- Spray lightly with starch if you want a stiff ornament.
- Let it dry completely before unpinning, then trim the remaining tails.
Final Quality-Control Checklist
- Eye is open and round; head is 1 in (2.5 cm) across.
- Body has 6 even arches and 6 cream scallops.
- Wing has 5 open feathers with 5 cream scallops.
- Tail fan has 4 feathers with 4 cream scallops.
- Beak is a small, clean triangle facing forward.
- Sprig has 5 leaves and is secure under the beak.
- Loop is firmly attached and hangs the dove level.
- Final size is 5 in (12.7 cm) x 4.5 in (11.4 cm).
- No ends are visible on the front.
Troubleshooting
Wing cups or curls. Your tr row is too tight. Go up a hook size for Row 2 only.
Feathers look ruffled. The ch-9 loops are too long for your tension. Try ch 8 and keep Row 4 counts the same.
Belly arches collapse. Check that you skipped exactly 3 sts in Row 3.
Border scallops flip forward. Work the 3 sc tip stitches more loosely, or drop to 2 sc in the center.
Ornament hangs tilted. Move the loop one feather closer to the head.
Tail seam puckers. Unpick and resew with looser whipstitches.
Care
Hand wash in cool water with mild soap, press out water in a towel, and reshape flat to dry. Re-starch if needed.

Final Notes
The measurement chain is simple: a 1 in (2.5 cm) head, a 3.5 in (8.9 cm) back line, a 1.25 in (3.2 cm) belly that becomes 1.5 in (3.8 cm) with its border, and a 2.75 in (7.0 cm) wing that becomes 3 in (7.6 cm). Add the 1.75 in (4.4 cm) tail and the ornament finishes at 5 in (12.7 cm) x 4.5 in (11.4 cm). If each checkpoint matches, the final piece will too.
Make a flock in different blues, or all in cream for a snowy tree.
Happy crocheting!