
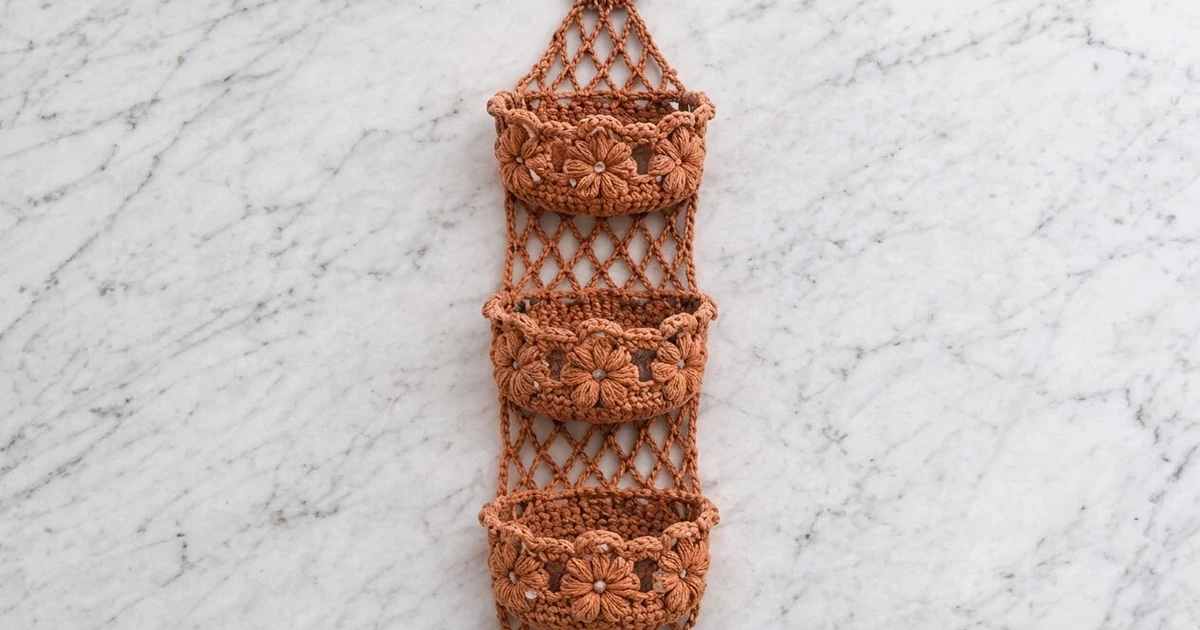
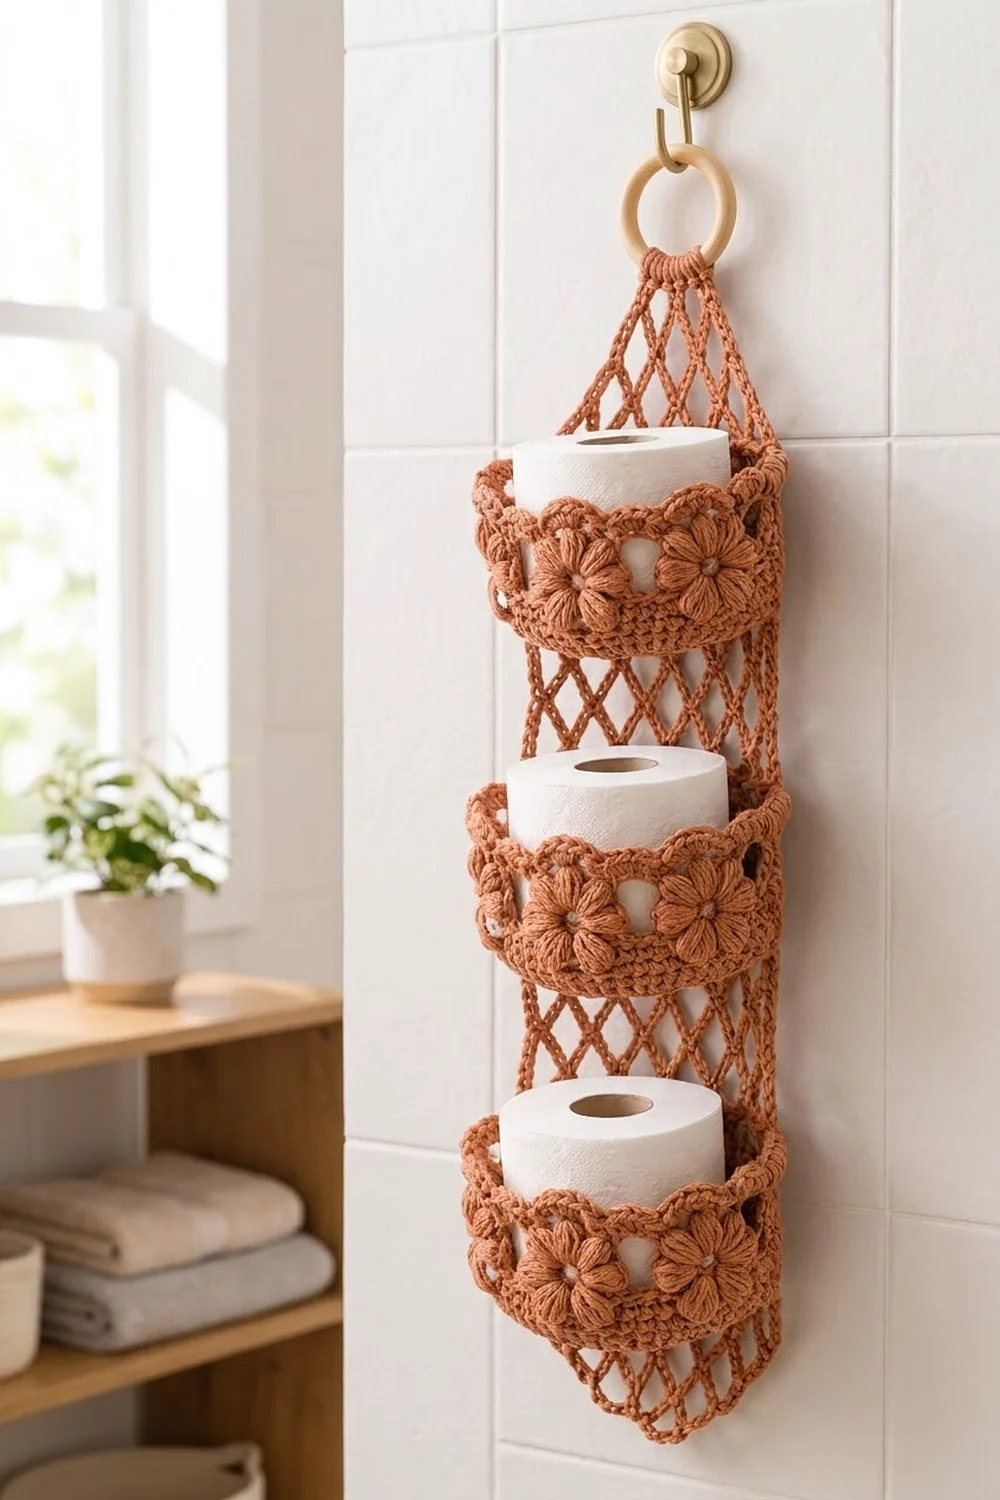
The Terracotta Bloom holder is a three-tier hanging organizer that stores three standard toilet rolls in round baskets. A diamond mesh net runs down the back and around the sides, connects the tiers, and tapers to a wooden ring at the top and a soft point at the bottom.
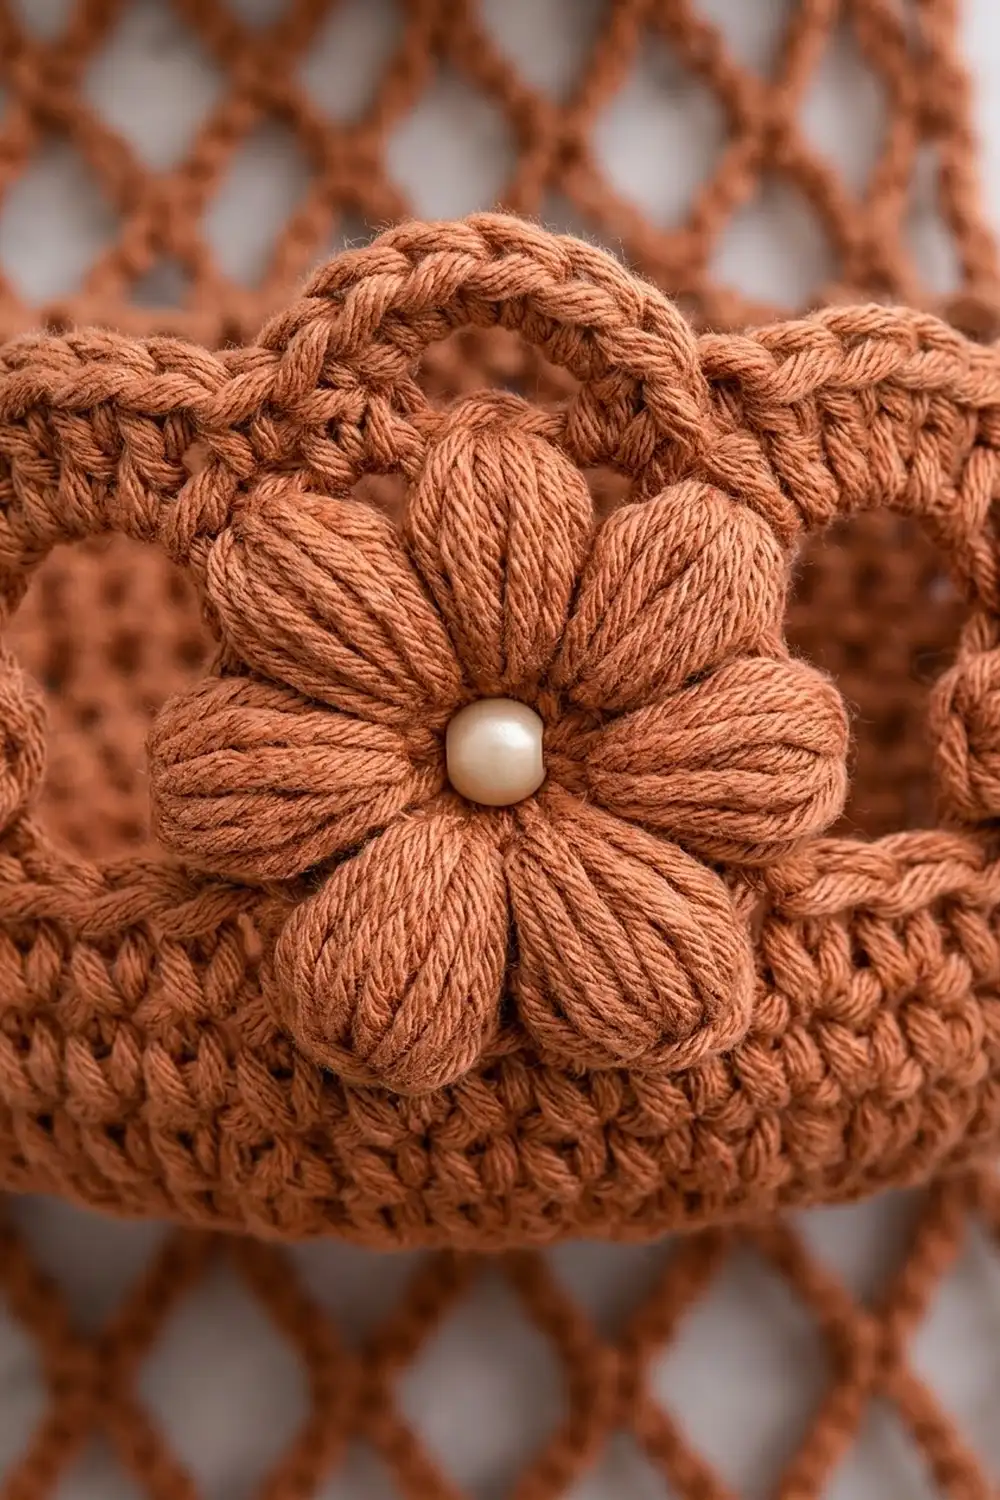
Each basket has a solid single crochet base, a wall with a row of small dc “windows,” six puff-stitch flowers with bead centers, and a crown of picot arches around the rim. The sample uses a warm terracotta cotton. A dusty blue version works just as well if you’d like a cooler bathroom palette.
This pattern uses US crochet terms. The finished holder measures about 28 in (71.1 cm) long including the ring. Each basket is about 5.5 in (14.0 cm) across and about 2.85 in (7.2 cm) tall.
You will make three baskets and eighteen flowers in the round, and one mesh panel in rows. Then you sew the flowers on, tack the baskets to the mesh, add the rim border, and block.
Finished Size and Construction
- Finished size: about 28 in (71.1 cm) long including the ring; the mesh is 9 in (22.9 cm) wide when flat
- Skill level: Intermediate
- Terminology: US
- Yarn weight: worsted (#4) cotton
- Hook: 4.5 mm (US 7)
- Number of pieces: 22 (3 baskets, 18 flowers, 1 mesh panel), plus a wooden ring
- Layout: 3 baskets stacked vertically on one mesh panel, with 6 flowers per basket
- Piece size: base 5.25 in (13.3 cm) across; basket wall 2.25 in (5.7 cm) tall before the border
- Size before border: basket height 2.25 in (5.7 cm)
- Border depth: about 0.6 in (1.5 cm) of picot arches, for a total wall height of about 2.85 in (7.2 cm)
Materials
Use a smooth, firm cotton or cotton blend. Cotton holds the basket shape well and puff stitches show up clearly in it. Avoid splitty or very soft acrylics because the walls will slump.
- Terracotta (main color): 230 g, about 390 m, at roughly 170 m per 100 g
- For a blue version, use the same amount of dusty blue.
Quantities include a margin of about 15% for swatching and tension differences.
Tools:
- 4.5 mm (US 7) crochet hook
- 1 wooden ring, 2 in (5.1 cm) outer diameter
- 18 beads, 8 mm, pearl or natural wood
- Tapestry needle and a beading needle or fine sewing thread
- Stitch markers
- Rustproof pins and a blocking mat
- Measuring tape
Abbreviations (US Terms)
- ch – chain
- sl st – slip stitch
- sc – single crochet
- dc – double crochet
- inc – 2 sc in the same stitch
- BLO – back loop only
- MR – magic ring
- sp – space
- st(s) – stitch(es)
Puff stitch: (Yarn over, insert hook in stitch, yarn over and pull up a loop to petal height) 4 times, so you have 9 loops on the hook. Yarn over and pull through all 9 loops, then ch 1 to lock.
Picot: Ch 3, sl st in the 3rd ch from hook.
Gauge and Checkpoints
Gauge: 16 sc and 18 rounds = 4 in (10.2 cm) in sc worked firmly.
Mesh gauge: 4 loops wide and 6 rows tall = 4 in (10.2 cm) square after light blocking.
Make one full basket before you start the others. It is your gauge swatch.
Checkpoints:
- After Rnd 6 (36 sts), the base is about 2.75 in (7.0 cm) across.
- After Rnd 11 (66 sts), the base is 5.25 in (13.3 cm) across and lies flat.
- After Rnd 20, the wall is 2.25 in (5.7 cm) tall.
- A toilet roll, about 4.5 in (11.4 cm) wide and 4.1 in (10.4 cm) tall, drops in without stretching the wall.
If your base is larger than 5.5 in (14.0 cm), go down 0.5 mm. If it is smaller than 5 in (12.7 cm), or the roll won’t fit, go up 0.5 mm. If the base cups, your tension is too tight on the increases. If it ruffles, it’s too loose.
Basket (Make 3)
Join every round with a sl st to the first st. The ch 1 at the start of a round does not count as a st.
Base
Rnd 1: In MR, ch 1, 6 sc. (6)
Rnd 2: Inc in each st around. (12)
Rnd 3: (Sc, inc) 6 times. (18)
Rnd 4: (Sc in next 2, inc) 6 times. (24)
Rnd 5: (Sc in next 3, inc) 6 times. (30)
Rnd 6: (Sc in next 4, inc) 6 times. (36)
Rnd 7: (Sc in next 5, inc) 6 times. (42)
Rnd 8: (Sc in next 6, inc) 6 times. (48)
Rnd 9: (Sc in next 7, inc) 6 times. (54)
Rnd 10: (Sc in next 8, inc) 6 times. (60)
Rnd 11: (Sc in next 9, inc) 6 times. (66)
Check that the base is 5.25 in (13.3 cm) across.
Wall
Rnd 12: Ch 1, sc in BLO of each st around. (66) This makes the turning ridge, and the wall begins to rise.
Rnds 13–16: Ch 1, sc in each st around. (66)
Rnd 17 (window round): Ch 4 (counts as dc and ch 1), skip next st, dc in next st, ch 1, skip next st; repeat from * 32 more times, then join to the 3rd ch of the beginning ch-4. (33 dc + 33 ch-1 sps = 66 sts)
Rnd 18 (conversion round): Ch 1, sc in each dc and in each ch-1 sp around. (33 sc in dc + 33 sc in ch-1 sps = 66)
Rnds 19–20:* Ch 1, sc in each st around. (66)
Fasten off and leave a long tail. The wall should measure 2.25 in (5.7 cm) from the ridge to the top edge. The border comes later, after the joining step.
Puff Flower (Make 18)
Rnd 1: In MR, ch 1, 12 sc. Join with a sl st to the first sc. (12)
Rnd 2: *Ch 2, puff in next sc, ch 2, sl st in next sc; repeat from * 5 more times. The final sl st lands in the joining sc. (6 petals)
Fasten off and leave a 10 in (25.4 cm) tail. Each flower measures about 1.75 in (4.4 cm) across. Pull the magic ring tight, then sew one 8 mm bead into the center with sewing thread.
Mesh Panel (Make 1)
The mesh is worked in rows from the bottom point to the top. Each mesh loop is a ch-5.
Bottom point
Row 1: Ch 17, sc in 7th ch from hook, (ch 5, skip 4 ch, sc in next ch) twice. (3 loops)
Row 2 (increase): Ch 5, turn, sc in first loop, ch 5, sc in same loop, ch 5, sc in next loop; repeat from * across, ch 5, sc in same loop as last sc. (5 loops)
Rows 3–4:* Repeat Row 2. (7 loops after Row 3, 9 loops after Row 4)
Body
Rows 5–31: Ch 5, turn, sc in first loop, *ch 5, sc in next loop; repeat from * across. (9 loops)
Top taper
Rows 32–39 (decrease): Turn, sl st in each of the first 3 ch to the center of the first loop, *ch 5, sc in next loop; repeat from * across. (8, 7, 6, 5, 4, 3, 2, 1 loops)
Ring: Ch 6, then work 18 sc over the wooden ring. Sl st in the last sc of Row 39 and fasten off. Wrap the tail tightly 6 times around the ch-6 neck and weave it in.
Mesh checkpoints: The bottom point (Rows 1–4) is about 2.7 in (6.9 cm). The body (Rows 5–31) is 18 in (45.7 cm). The top taper (Rows 32–39) is about 5.3 in (13.5 cm). The ring adds 2 in (5.1 cm), for a total of about 28 in (71.1 cm).
Make All Pieces
Everything is made in one color:
- Baskets: 3 in terracotta
- Flowers: 18 in terracotta, 6 per basket
- Mesh panel: 1 in terracotta
Layout grid (mesh rows, top to bottom):
Rows 32–39 + ring   [ top taper to ring ]
Rows 27–31          [ BASKET 1 ]  flowers x6
Rows 21–26          [ gap, 4 in / 10.2 cm ]
Rows 16–20          [ BASKET 2 ]  flowers x6
Rows 10–15          [ gap, 4 in / 10.2 cm ]
Rows 5–9            [ BASKET 3 ]  flowers x6
Rows 1–4            [ bottom point ]
Each basket zone is 5 rows, about 3.3 in (8.4 cm). Each gap is 6 rows, 4 in (10.2 cm). That leaves enough room above each rim for a roll that is 4.1 in (10.4 cm) tall.
Joining
Flowers to baskets: Place 6 markers on Rnd 17, one every 11 sts (6 × 11 = 66). Center one flower over each marker so it covers the window band. Whipstitch around the outer petal tips and through Rnd 1 of the flower. The windows between the flowers stay open.
Baskets to mesh: Lay the mesh flat with the wrong side up. Mark the 33 back sts of each basket on Rnd 20 and the 33 back front loops along the Rnd 12 ridge. That is half of 66.
Each mesh row has 9 sc anchor points. Spread them over 33 sts by tacking one anchor to every 4th st, at sts 1, 5, 9, and so on through 33. That gives 8 intervals × 4 = 32 sts, plus the starting st, so 33.
- Basket 3: tack the Row 5 anchors to the base ridge and the Row 9 anchors to Rnd 20.
- Basket 2: use Rows 16 and 20.
- Basket 1: use Rows 27 and 31.
Use 2 small stitches at each anchor. Keep the mesh relaxed. It should sit flat against the wall without puckering, and the loops should stay open diamonds, not slits.
Checkpoint: With the holder hanging, the front view is about 6 in (15.2 cm) wide. The two gaps should each still measure 4 in (10.2 cm).
Border
The rim border is worked into Rnd 20 of each basket after joining. That way, the tacking stitches sit underneath the arches.
Border gauge: One ch-5 arch spans 3 wall sts, about 0.75 in (1.9 cm) of rim.
Rnd 21: Join yarn in any st. Ch 1, sc in the same st, *ch 5, skip 2 sts, sc in next st; repeat from * 20 more times, ch 5, skip the last 2 sts, sl st to the first sc. (22 sc + 22 ch-5 arches)
This round converts the edge: 22 sc are worked 1 into every 3rd existing st, and 22 arches bridge the 44 skipped sts.
Rnd 22: Sl st into the first arch, ch 1, (3 sc, picot, 3 sc) in each arch around. Join and fasten off. (6 sc per arch × 22 = 132 sc + 22 picots)
Each half of the basket, front and back, carries 11 arches (33 sts ÷ 3). The repeat divides evenly, which is why no arch is squeezed or stretched at the join point.
Why the math works: 66 is divisible by 3 for the arches, by 6 for the flowers, and by 2 for the window round and the back-half tacking. Every element lines up on the same 66-stitch grid.
Final Blocking
- Weave in all ends except the ring wrap.
- Spray the whole holder lightly with water until it is damp, not soaked.
- Put a toilet roll in each basket to set the round shape.
- Lay the piece flat. Pin the mesh to 9 in (22.9 cm) wide and 18 in (45.7 cm) along the body, and open each diamond.
- Pin the picot arches upright so they form a crown.
- Pull each puff petal into shape with your fingers.
- Leave everything to dry completely, then remove the pins and the rolls.
Final Quality-Control Checklist
- Each base is 5.25 in (13.3 cm) across and has 66 sts.
- Each wall is 2.25 in (5.7 cm) tall before the border.
- Each basket has 6 evenly spaced flowers with secure beads.
- Each rim has 22 arches and 22 picots.
- The mesh rows run 3, 5, 7, 9 at the bottom, 9 through the body, and 8 down to 1 at the top.
- The gaps between baskets are 4 in (10.2 cm).
- The total length is about 28 in (71.1 cm).
- The ring wrap is tight and the tails are secure.
Troubleshooting
- The base cups: Your increases are too tight. Go up a hook size, or redo Rnds 8–11 more loosely.
- The base ruffles: Your tension is too loose. Go down 0.5 mm.
- The roll won’t fit: The base is under 5 in (12.7 cm). Remake it with a larger hook.
- The windows close up: Pull up taller dc in Rnd 17 and keep the ch-1 relaxed.
- The puffs look flat: Pull every loop up to the same height before closing the puff.
- The mesh twists: Make sure you turn at the start of every row and work into the center of each loop.
- The baskets tilt forward: Add extra anchors at the base ridge, or tack the Rnd 20 anchors slightly higher.
Care
Hand wash in cool water and press out the water in a towel. Dry flat with rolls inside to keep the basket shape. Don’t tumble dry, because the beads and puffs can be damaged.
Final Notes
The whole design follows one measurement chain. A 66-stitch base measures 5.25 in (13.3 cm). Nine wall rounds give 2.25 in (5.7 cm), and the border brings the total to 2.85 in (7.2 cm). Six flowers sit at 11 sts each, and 22 arches sit at 3 sts each. Nine mesh anchors tack to 33 back sts. Five-row basket zones and six-row gaps build an 18 in (45.7 cm) body, and the full holder is 28 in (71.1 cm). If each link checks out, the finished piece will hang straight and hold three rolls neatly.
Happy crocheting!