

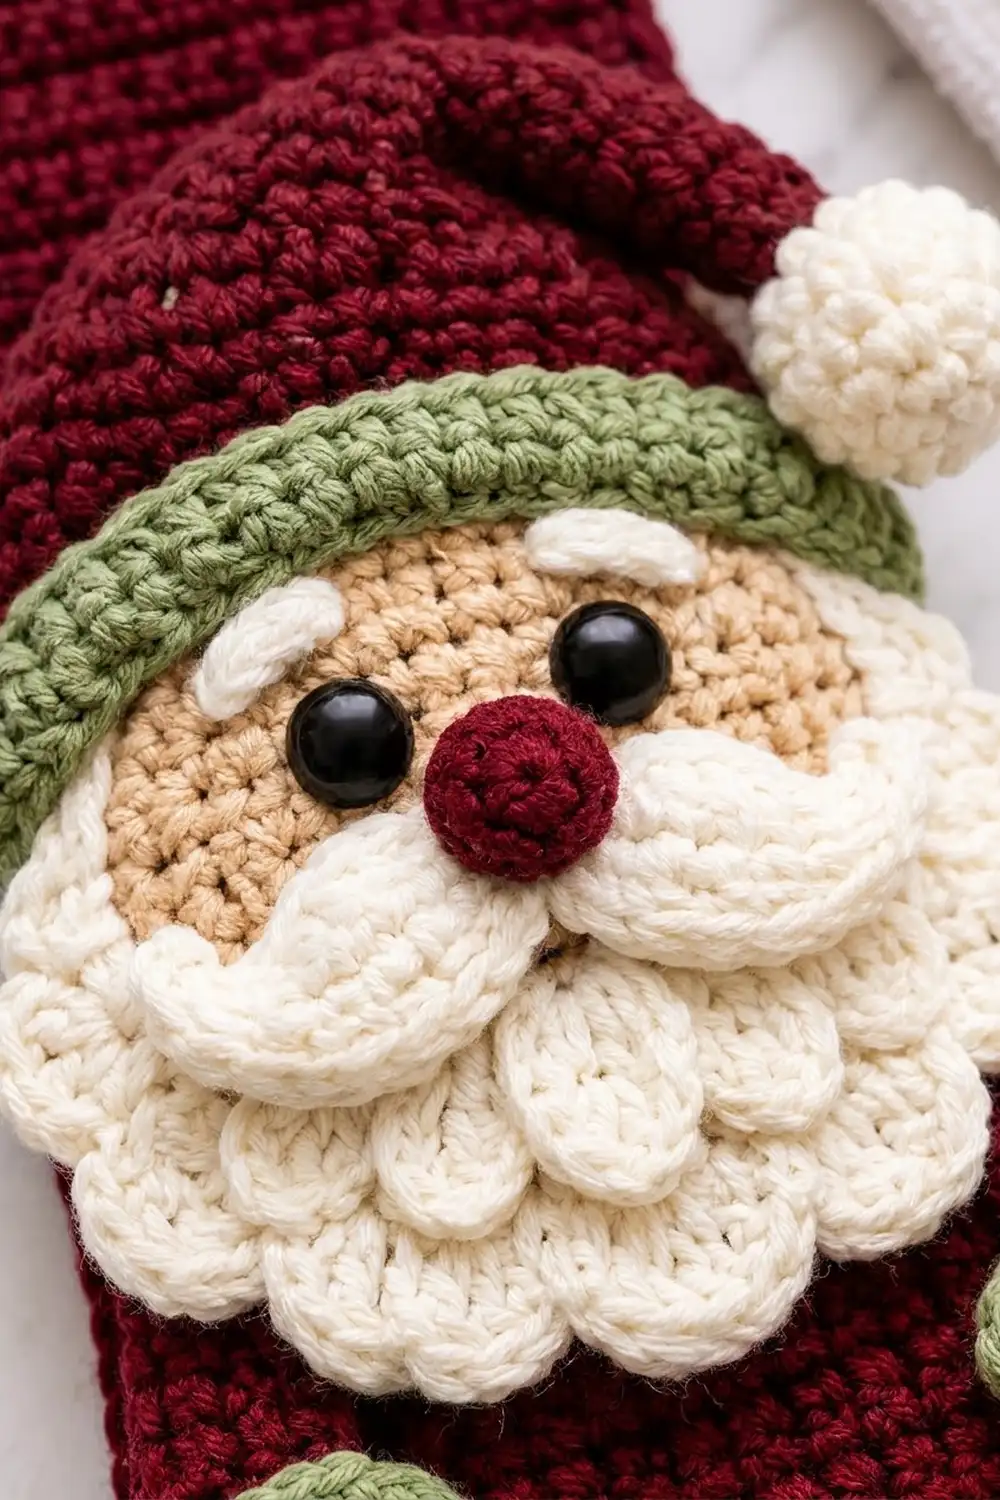
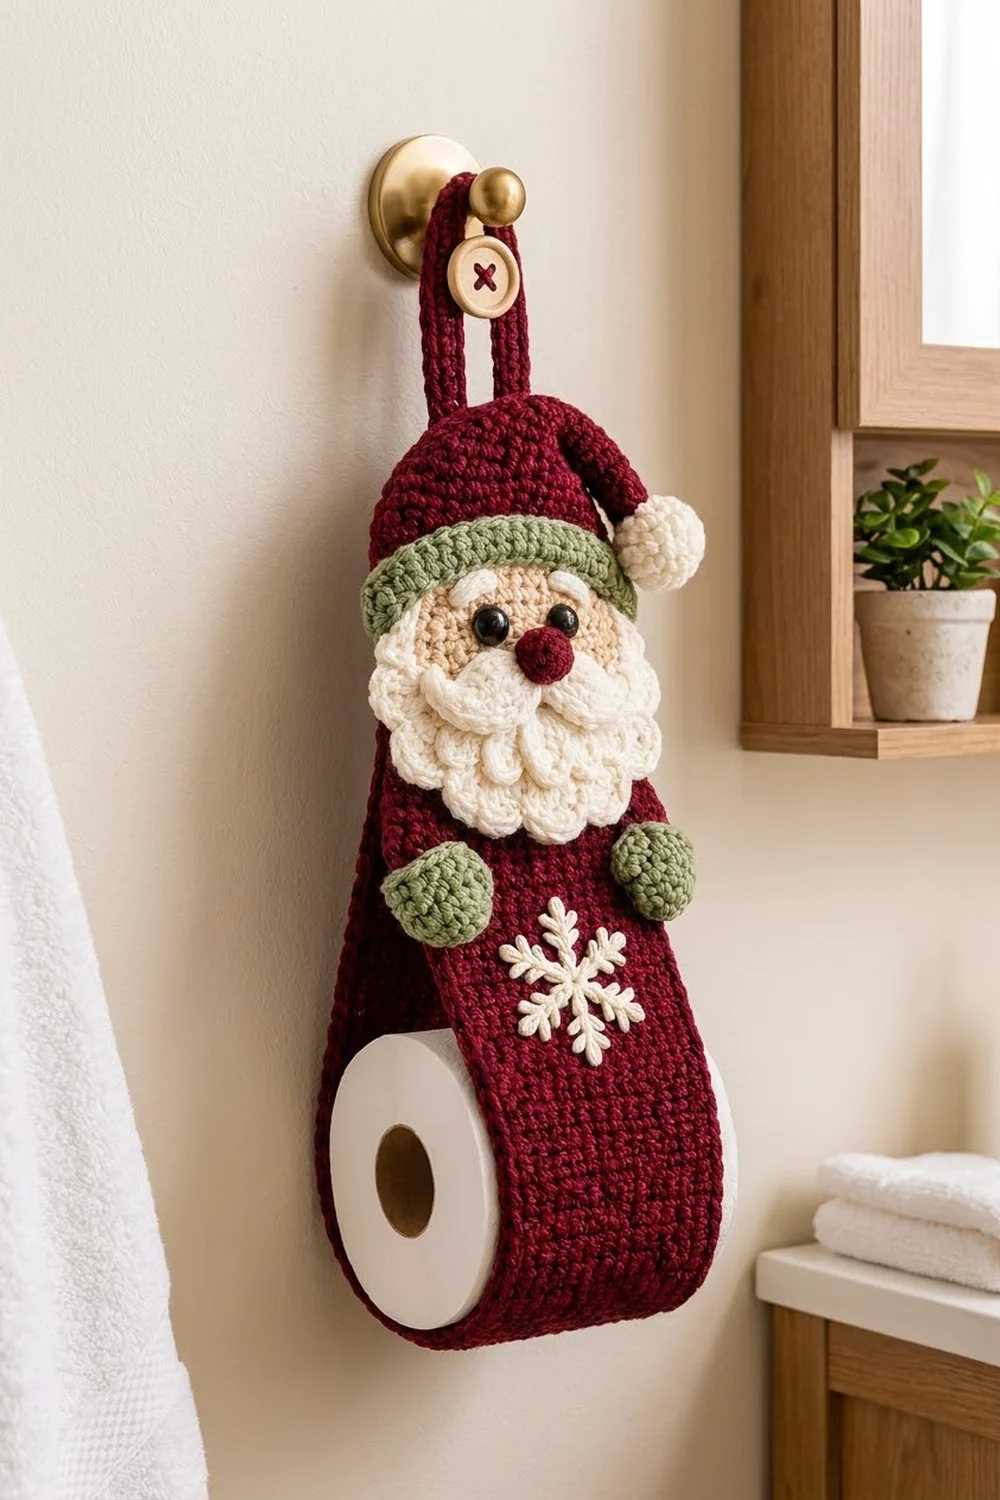
This cheerful Santa hangs from a hook beside the bathroom sink and holds a spare roll in the bottom of his body. A wine-red band forms the body, a layered Santa face sits on top, two sage mittens peek out at the sides, and a cream snowflake decorates the front.
The palette is burgundy, cream, light tan and sage green, with black eyes and a natural wooden button. The look is cozy and rustic, and the textures are simple: ridged half double crochet for the body, smooth single crochet for the appliqués, and shell scallops for the beard.
The pattern uses US crochet terms. The finished body measures 5.5 in (14.0 cm) wide and 12 in (30.5 cm) tall when laid flat. With the hanging loop, the total height is 18 in (45.7 cm).
You’ll crochet one long band in rows and seam its ends into a ring. Then you’ll edge both open sides and make small appliqué pieces. Finally, you’ll assemble the head and sew everything to the front.
Finished Size and Construction
- Finished size: 5.5 in (14.0 cm) wide x 12 in (30.5 cm) tall (body); 18 in (45.7 cm) tall overall
- Skill level: Intermediate
- Terminology: US
- Yarn weight: Worsted (#4)
- Hook: 4.5 mm (US 7)
- Number of pieces: 13, sewn into one holder
- Layout: One band ring with layered appliqués on the front and a loop on the back
- Band size before border: 4.5 in (11.4 cm) x 24 in (61.0 cm) unfolded
- Border depth: 0.5 in (1.3 cm) on each long edge
Materials
Use a smooth worsted acrylic or cotton blend. Smooth yarn shows the scallops clearly, and it stands up to bathroom humidity.
- Burgundy: 140 g / 280 m (band, border, hat, nose, hanging loop)
- Cream: 25 g / 50 m (beard, mustache, eyebrows, pompom, snowflake)
- Sage green: 15 g / 30 m (hat band, mittens)
- Light tan: 8 g / 16 m (face)
These quantities include a margin of about 20 percent.
Tools:
– 4.5 mm (US 7) hook
– Tapestry needle
– Stitch markers
– Pins
– Scissors
– Measuring tape
– A small amount of fiberfill
– Two 10 mm black safety eyes (or embroider the eyes with black yarn)
– One 1 in (2.5 cm) wooden button
– Blocking mat and spray bottle
Abbreviations (US Terms)
- ch: chain
- sl st: slip stitch
- sc: single crochet
- hdc: half double crochet
- dc: double crochet
- inc: 2 sc in the same stitch
- dec: sc2tog
- hdc2tog: half double crochet 2 together
- BLO: back loop only
- MR: magic ring
- st(s): stitch(es)
- RS / WS: right side / wrong side
5-dc bobble: Yarn over, insert the hook in the stitch, yarn over and pull up a loop, yarn over and pull through 2 loops. Repeat from * 4 more times in the same stitch, then yarn over and pull through all 6 loops on the hook.
Picot: Ch 3, then sl st in the 3rd ch from the hook.
Gauge and Checkpoints
- Hdc gauge: 16 hdc and 12 rows = 4 in (10.2 cm)
- Sc gauge: 16 sc and 16 rows = 4 in (10.2 cm)
Before you start the band, make the face (Part 3) as your test piece. It should measure 3 in (7.6 cm) across. Then work the first 12 rows of the band and check them: they should measure 4.5 in (11.4 cm) wide and 4 in (10.2 cm) long.
If your pieces come out too big, go down 0.5 mm in hook size. If they’re too small, go up 0.5 mm. Measure again before you continue, because every later piece is sized from this gauge.
Pattern
Part 1: Body Band (Burgundy)
Ch 20.
Row 1 (RS): Hdc in the 3rd ch from the hook and in each ch across. The skipped ch do not count as a stitch. (18 hdc)
Rows 2–72: Ch 2 (does not count as a stitch), turn, hdc in each st across. (18 hdc)
Checkpoints:
– Row 36: 12 in (30.5 cm) long
– Row 72: 24 in (61.0 cm) long and 4.5 in (11.4 cm) wide
Fasten off and leave a 16 in (40.6 cm) tail.
Part 2: Hanging Loop (Burgundy)
Ch 70 and join with a sl st to form a ring, taking care not to twist the chain. Lay the ring flat as a long, narrow oval.
Rnd 1: Ch 1, sc in next 34 ch, 3 sc in next ch, sc in next 34 ch, 3 sc in last ch, join. (74 sc)
Rnd 2: Ch 1, sc in next 35 sts, 3 sc in next st, sc in next 36 sts, 3 sc in next st, sc in last st, join. (78 sc)
The loop should measure about 9 in (22.9 cm) long and 1.25 in (3.2 cm) wide, with an open slot down the center. Fasten off and leave a long tail.
Part 3: Face (Light Tan)
Rnd 1: 6 sc in MR, join. (6)
Rnd 2: Ch 1, inc in each st, join. (12)
Rnd 3: Ch 1, (sc, inc) 6 times, join. (18)
Rnd 4: Ch 1, (sc 2, inc) 6 times, join. (24)
Rnd 5: Ch 1, (sc 3, inc) 6 times, join. (30)
Rnd 6: Ch 1, (sc 4, inc) 6 times, join. (36)
The face should be a flat circle 3 in (7.6 cm) across. Insert the safety eyes between Rnds 2 and 3 in the upper half, with 5 stitches between them, and fasten the backs.
Part 4: Hat (Sage Green, then Burgundy)
With green, ch 21.
Row 1: Sc in the 2nd ch from the hook and in each ch across. (20)
Rows 2–4: Ch 1, turn, sc in BLO of each st. (20)
The BLO rows make the ridged band. It should measure 5 in (12.7 cm) x 1 in (2.5 cm). Change to burgundy for the hat. The ch 2 at the start of each hat row does not count as a stitch.
Row 5: Ch 2, turn, hdc in each st. (20)
Row 6: Ch 2, turn, hdc2tog, hdc 14, hdc2tog. (16)
Wait — check the decrease math before you work it: each row in the hat drops by exactly 2 stitches, so Row 6 is:
Row 6: Ch 2, turn, hdc2tog, hdc 14, hdc2tog…
Use the corrected sequence below, which loses 2 stitches per row:
Row 6: Ch 2, turn, hdc2tog, hdc 14, hdc2tog. (16) — work instead hdc2tog, hdc 14, hdc2tog only if Row 5 had 18.
To keep it simple, follow these exact counts:
- Row 6: Ch 2, turn, hdc2tog, hdc 16, hdc2tog. (18)
- Row 7: Ch 2, turn, hdc2tog, hdc 14, hdc2tog. (16)
- Row 8: Ch 2, turn, hdc2tog, hdc 12, hdc2tog. (14)
- Row 9: Ch 2, turn, hdc2tog, hdc 10, hdc2tog. (12)
- Row 10: Ch 2, turn, hdc2tog, hdc 8, hdc2tog. (10)
- Row 11: Ch 2, turn, hdc2tog, hdc 6, hdc2tog. (8)
- Row 12: Ch 2, turn, hdc2tog, hdc 4, hdc2tog. (6)
- Row 13: Ch 2, turn, hdc2tog 3 times. (3)
The burgundy section should be 3 in (7.6 cm) tall, so the whole hat measures 4 in (10.2 cm). Fasten off. Bend the tip to the right and down until it touches the right end of the green band, then tack it in place.
Part 5: Pompom (Cream)
Rnd 1: 6 sc in MR. (6)
Rnd 2: Inc in each st. (12)
Rnd 3: (Sc, inc) 6 times. (18)
Rnd 4: Sc in each st. (18)
Rnd 5: (Sc, dec) 6 times. (12)
Stuff the pompom firmly.
Rnd 6: Dec 6 times. (6)
Close the opening. The pompom is about 1.5 in (3.8 cm) across.
Part 6: Beard (Cream)
Odd rows are RS rows.
Row 1 (RS): 4 sc in MR. Do not join. (4)
Row 2: Ch 1, turn, inc in each of the next 3 sts, sc in the last st. (7)
Row 3: Ch 1, turn, (sc, inc) 3 times, sc. (10)
Row 4: Ch 1, turn, (sc 2, inc) 3 times, sc. (13)
Row 5 (RS): Ch 1, turn, working in BLO: (sc 3, inc) 3 times, sc. (16)
Row 6: Ch 1, turn, (sc 4, inc) 3 times, sc. (19)
Row 7: Ch 1, turn, (sc 5, inc) 3 times, sc. (22)
Row 8: Ch 1, turn, (sc 6, inc) 3 times, sc. (25)
Checkpoint: The straight edge should measure 4 in (10.2 cm).
Row 9 (RS, scallop edge): Ch 1, turn, sc in the first st, skip 1, 5 dc in next st, skip 1, sc in next st; repeat from * 5 more times. (6 shells; 37 sts)
Inner tier: With the RS facing, join cream in the first free front loop of Row 4. Sc in that loop, skip 1, 5 dc in next loop, skip 1, sc in next loop; repeat from * 2 more times. (3 shells)
The finished beard is a half circle 5 in (12.7 cm) wide and 2.5 in (6.4 cm) deep, with two tiers of scallops.
Part 7: Mustache (Cream)
Ch 16. Starting in the 2nd ch from the hook, work one stitch in each ch:
sl st, sc, hdc, dc, dc, hdc, sc, sl st, sc, hdc, dc, dc, hdc, sc, sl st. (15)
Curl both ends slightly upward.
Part 8: Nose (Burgundy)
Rnd 1: 6 sc in MR. (6)
Rnd 2: Inc in each st. (12)
Rnd 3: Sc in each st. (12)
Stuff lightly.
Rnd 4: Dec 6 times. (6)
Close the opening. The nose is about 0.75 in (1.9 cm) across.
Part 9: Eyebrows (Cream, Make 2)
Ch 7, then sl st in the 2nd ch from the hook and in each of the next 5 ch. (6 sl st)
Part 10: Mittens (Sage Green, Make 2)
Rnd 1: 6 sc in MR. (6)
Rnd 2: Inc in each st. (12)
Rnd 3: (Sc, inc) 6 times. (18)
Rnd 4: Sc in each st. (18)
Rnd 5: Sc 7, 5-dc bobble in next st, sc 10. (18) Push the bobble to the outside to form the thumb.
Rnd 6: Sc in each st. (18)
Flatten the mitten and sc 9 through both layers to close it. Each mitten measures about 2.25 in (5.7 cm) x 1.75 in (4.4 cm).
Part 11: Snowflake (Cream)
Rnd 1: 6 sc in MR, join. (6)
Rnd 2: Sl st in the first sc. Ch 8, sl st in the 4th ch from the hook (this makes the tip), sl st in next 2 ch, picot twice (this makes the V branch), sl st in next 2 ch, sl st in next sc of Rnd 1; repeat from * 5 more times. (6 arms)
The snowflake measures about 3 in (7.6 cm) across.
Make All Pieces
| Color | Pieces |
|---|---|
| Burgundy | Band, hanging loop, nose; upper part of the hat |
| Sage green | Hat band (worked as part of the hat), 2 mittens |
| Light tan | Face |
| Cream | Beard, mustache, 2 eyebrows, pompom, snowflake |
That makes 13 pieces in total.
Front layout, measured from the top fold of the body (0) downward:
+0.5 in   [ green hat band top ]  hat tip + pompom at right
 0        ---- body top fold ----
-0.5 in   [ green hat band bottom ]
-1.75 in  eyes | nose | mustache = beard top edge
-4 in     [mitten]  beard scallops  [mitten]
-6.5 in        snowflake center
-12 in    ---- body bottom fold ----
Joining
Step 1: Make the ring. Bring Row 72 up to meet the foundation edge of Row 1, keeping the RS on the outside and without twisting. Whipstitch the edges together, matching each of the 18 stitches to its partner, 1 to 1. Keep the tension firm but flat so the seam doesn’t pucker.
Flatten the ring with the seam on the back, 2 in (5.1 cm) below the top fold.
Checkpoint: The flattened ring should measure 12 in (30.5 cm) x 4.5 in (11.4 cm).
Step 2: Work the border. Edge both open sides now (see Border below).
Step 3: Build the head unit.
1. Slip the top 0.25 in (0.6 cm) of the face under the green band, centered, and sew it in place.
2. Sew the beard’s straight edge across the face center, just below the eyes, so its ends extend past the cheeks.
3. Sew the mustache along the top of the beard, centered.
4. Sew the nose above the mustache.
5. Sew the eyebrows over the eyes, curving them slightly.
6. Sew the pompom to the hat tip so it half-overhangs the right end of the band.
Step 4: Attach everything to the body.
1. Center the head unit on the front, with the green band straddling the top fold. Sew around its outline through the front layer only.
2. Sew the mittens at the beard’s lower sides. Each should overhang the body edge by 0.5 in (1.3 cm).
3. Sew the snowflake centered, 6.5 in (16.5 cm) below the fold.
4. Sew the bottom 3 in (7.6 cm) of the hanging loop over the back seam. This leaves 6 in (15.2 cm) of loop above the body.
5. Sew the button to the top of the loop with a burgundy X.
6. Whipstitch the front and back borders together for 2 in (5.1 cm) down from the top fold on each side.
Border
Border gauge: 4 sc per inch along the edge.
Work the border separately around each open side of the ring, joining at the back seam. Each side has 72 row-ends.
Rnd 1: Ch 1. Sc in the next row-end, sc in the next row-end, 2 sc in the next row-end; repeat from * 23 more times. Join. (96 sc)
Rnd 2: Ch 1, sc in each st, join. (96 sc)
Repeat on the other side. A ring has no corners, so each edge holds exactly 96 stitches.
Why the math works: 72 rows at 3 rows per inch makes 24 in (61.0 cm). At 4 sc per inch, that edge needs 24 x 4 = 96 sc. Working 4 sc into every 3 row-ends gives exactly that number.
Two rounds of sc add 0.5 in (1.3 cm) per side. That brings the width from 4.5 in (11.4 cm) to 5.5 in (14.0 cm).
Final Blocking
- Lightly mist the body with water.
- Pin it flat to 5.5 in (14.0 cm) x 12 in (30.5 cm), keeping the border edges straight.
- Pin the beard into a half circle and open each shell.
- Shape the hat tip and mustache curls with your fingers.
- Let everything dry completely before unpinning.
- Don’t press with an iron. Heat flattens the scallops and can damage acrylic.
Final Quality-Control Checklist
- The band has 18 hdc in every row and 72 rows.
- Each border edge has 96 sc.
- The body measures 5.5 in (14.0 cm) x 12 in (30.5 cm).
- The beard shows 6 outer shells and 3 inner shells.
- The eyes are secure, and the nose and pompom are firmly stuffed.
- No stitches pass through to the back layer except where the sides are tacked at the top.
- The loop stands 6 in (15.2 cm) above the body, and the button is secure.
- The holder hangs straight with a roll inside.
Troubleshooting
- Band too wide: Your gauge is loose. Go down one hook size and restart.
- Edge ruffles: Use 3 sc per 3 row-ends in a few places to reduce the count, but keep it even all around.
- Edge pulls in: Add 1 sc to an occasional row-end.
- Beard cups: Your tension is tight. Go up 0.5 mm for the increase rows.
- Shells crowd together: Make sure you skip 1 stitch on each side of every shell.
- Thumb sinks inward: Push the bobble out before working Rnd 6.
- Roll slips out: Extend the top side tack by 0.5 in (1.3 cm).
Care
Spot clean with mild soap and lay flat to dry. If you need to wash it more thoroughly, hand wash in cool water, then reshape and dry flat.
Final Notes
Every measurement follows from your gauge:
– 18 hdc make a band 4.5 in (11.4 cm) wide.
– 72 rows make it 24 in (61.0 cm) long, which folds to 12 in (30.5 cm) as a ring.
– 96 border stitches per edge add 0.5 in (1.3 cm) per side, for a 5.5 in (14.0 cm) body.
– The 6 in (15.2 cm) loop brings the total height to 18 in (45.7 cm).
Check your gauge first, and Santa will come out right.
Happy crocheting!