
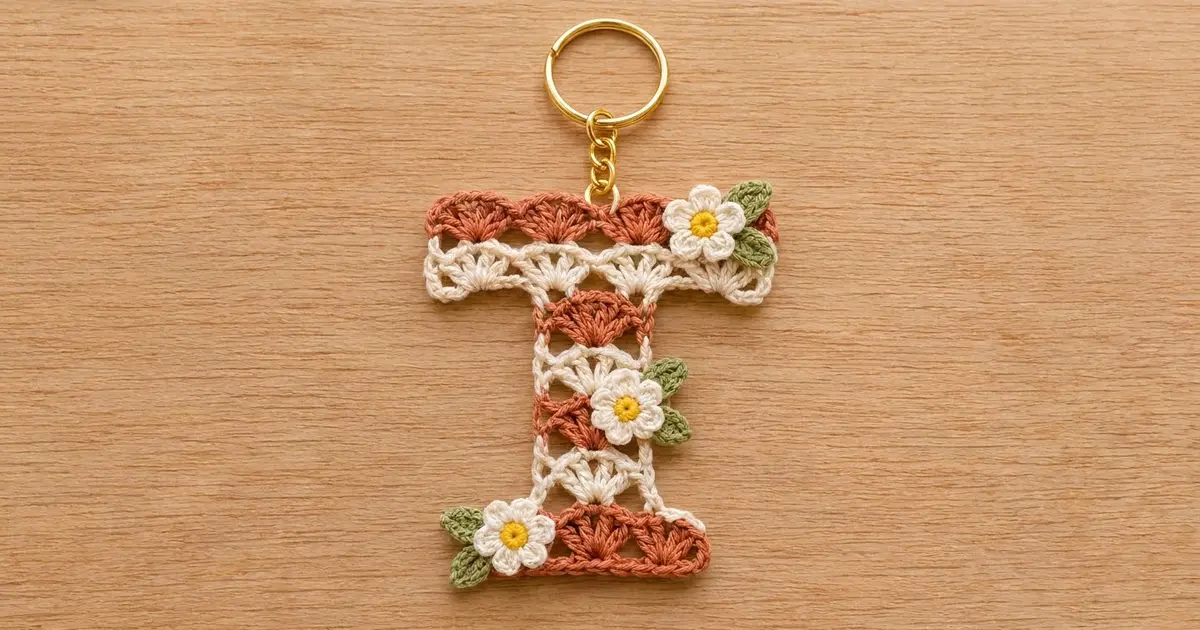
This little letter T keychain is made of soft shells in two warm colors. Rust shells and cream lattice rows trade places from row to row, so the letter looks striped and lacy at the same time. Three tiny daisies with green leaves finish it off.
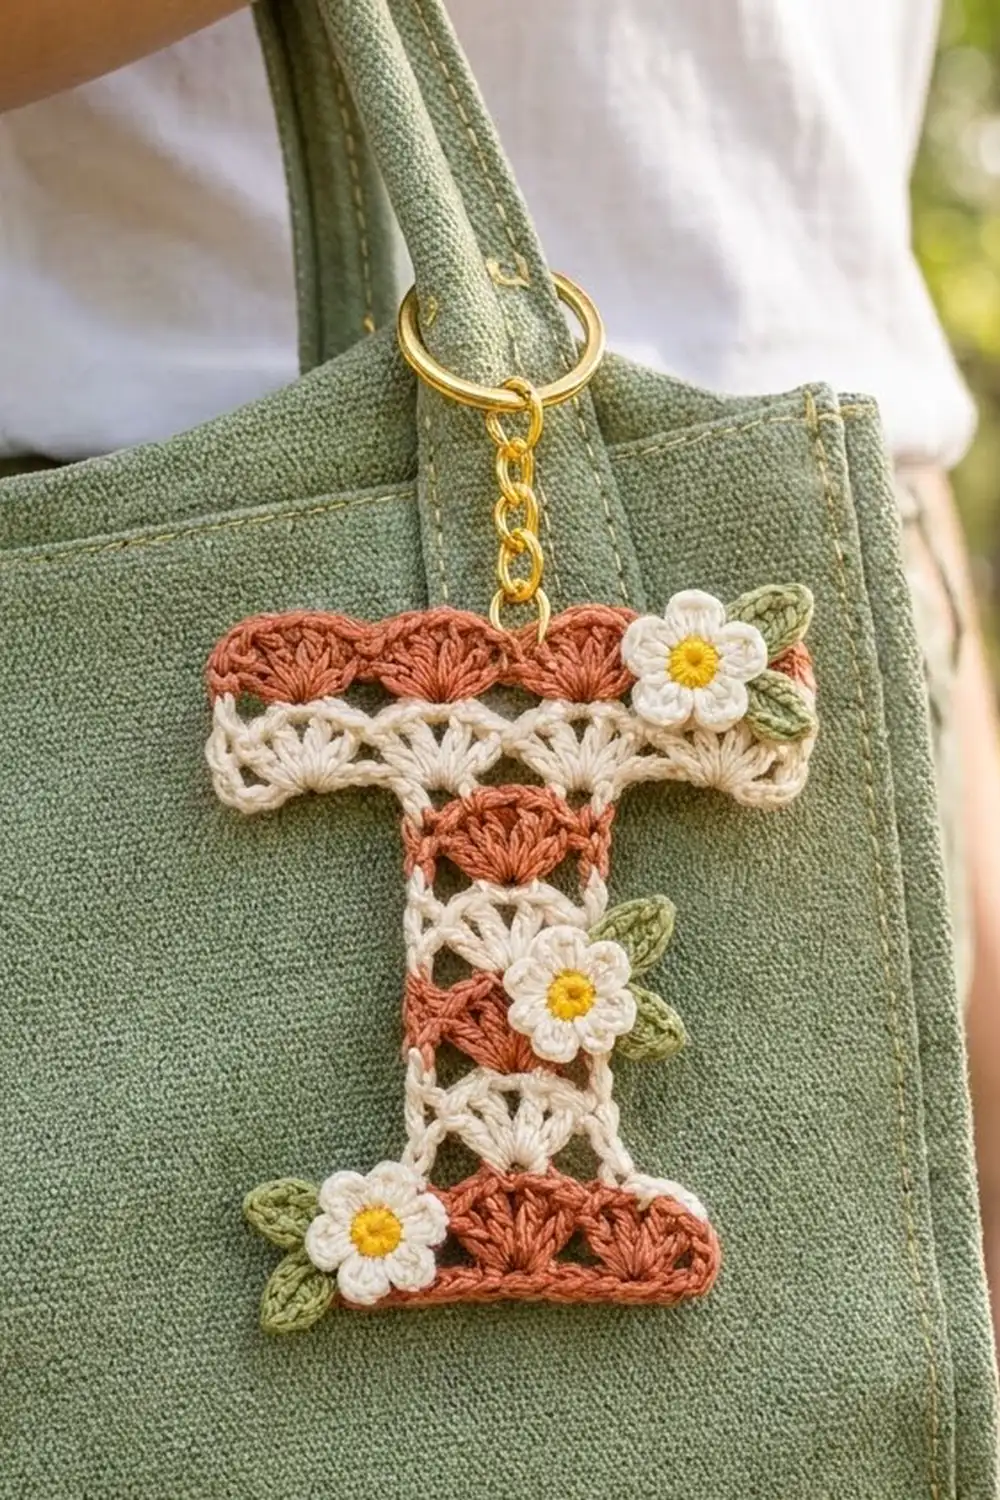
The colors are rust, cream, white, sunny yellow, and sage green. It has a cottage, boho feel that works well on a canvas tote, a backpack zipper, or as a monogram gift. It is a quick project that uses only small amounts of yarn, so it is a good way to use up leftover cotton.
The pattern uses US crochet terms. The finished keychain is about 4.5 in (11.4 cm) wide across the crossbar and 3.85 in (9.8 cm) tall, not counting the key ring.
You work the T flat in one piece from the bottom up. First the 3-shell foot, then a stem 1 shell wide, then the crossbar, which grows sideways from two short chains. A round of cream single crochet goes around the whole letter. Then you make the daisies and leaves, sew them on, and add the hardware.
Finished Size and Construction
- Finished size: 4.5 in (11.4 cm) wide x 3.85 in (9.8 cm) tall
- Skill level: Easy / advanced beginner
- Terminology: US crochet terms
- Yarn weight: Sport weight (#2) cotton
- Hook: 3.25 mm (US D/3)
- Number of pieces: 1 letter body, plus 3 daisies and 6 leaves as appliqués
- Layout: Single letter; no motifs to join
- Piece size before border: 4.25 in (10.8 cm) wide x 3.6 in (9.1 cm) tall
- Foot / stem before border: 3.25 in (8.3 cm) / 1.25 in (3.2 cm) wide
- Border depth: 0.125 in (0.3 cm) on every edge
Materials
Choose a smooth, tightly plied cotton or cotton blend in sport weight, about 150 m per 50 g. Cotton shows off the shell texture and holds its shape on a keychain that gets handled a lot. Avoid fuzzy yarns, which hide the lattice.
- Rust: 6 g (18 m)
- Cream: 7 g (21 m), including the border
- White: 2 g (6 m)
- Yellow: 1 g (3 m)
- Sage green: 1 g (3 m)
All quantities include a small safety margin.
Tools:
- 3.25 mm (US D/3) crochet hook
- Tapestry needle
- Scissors
- Gold split key ring, 1 in (2.5 cm) across, with a short chain and jump ring
- Two pairs of flat-nose pliers
- Rustproof pins and a foam blocking mat
Abbreviations (US Terms)
- ch – chain
- sl st – slip stitch
- sc – single crochet
- sc2tog – single crochet 2 together
- hdc – half double crochet
- dc – double crochet
- st(s) – stitch(es)
- sk – skip
- RS – right side
Special stitches:
- Shell (SH): 5 dc in the same stitch.
- Half shell: 3 dc in the same stitch. If it opens a row, ch 3 counts as the first dc.
Pattern note: Every row of the letter is worked with the RS facing, from right to left, without turning. Cut the yarn at the end of each row, leaving a 4 in (10.2 cm) tail. The border round hides these tails along the sides.
Gauge and Checkpoints
Gauge: 6 sts = 1 in (2.5 cm), so one shell repeat is 1 in (2.5 cm) wide. 5 rows = 2 in (5.1 cm), so each shell or lattice row is 0.4 in (1.0 cm) tall.
Test first: Work Rows 1-2 of the foot as your swatch. It becomes the real foot if it measures correctly. Measure it flat, without stretching it, and measure the width straight across the row, not along the curve of the shells.
Checkpoints:
- After Row 1: 3.25 in (8.3 cm) wide
- After Row 2: 0.8 in (2.0 cm) tall
- After Row 7: stem 1.25 in (3.2 cm) wide; piece 2.8 in (7.1 cm) tall
- After Row 9: crossbar 4.25 in (10.8 cm) wide; piece 3.6 in (9.1 cm) tall
- After border: 4.5 in (11.4 cm) x 3.85 in (9.8 cm)
If it is too big: go down to a 3.0 mm hook. If it is too small: go up to a 3.5 mm (US E/4) hook. Keep the dc stems even. Tall, loose dc make the shells floppy, and the letter will not lie flat.
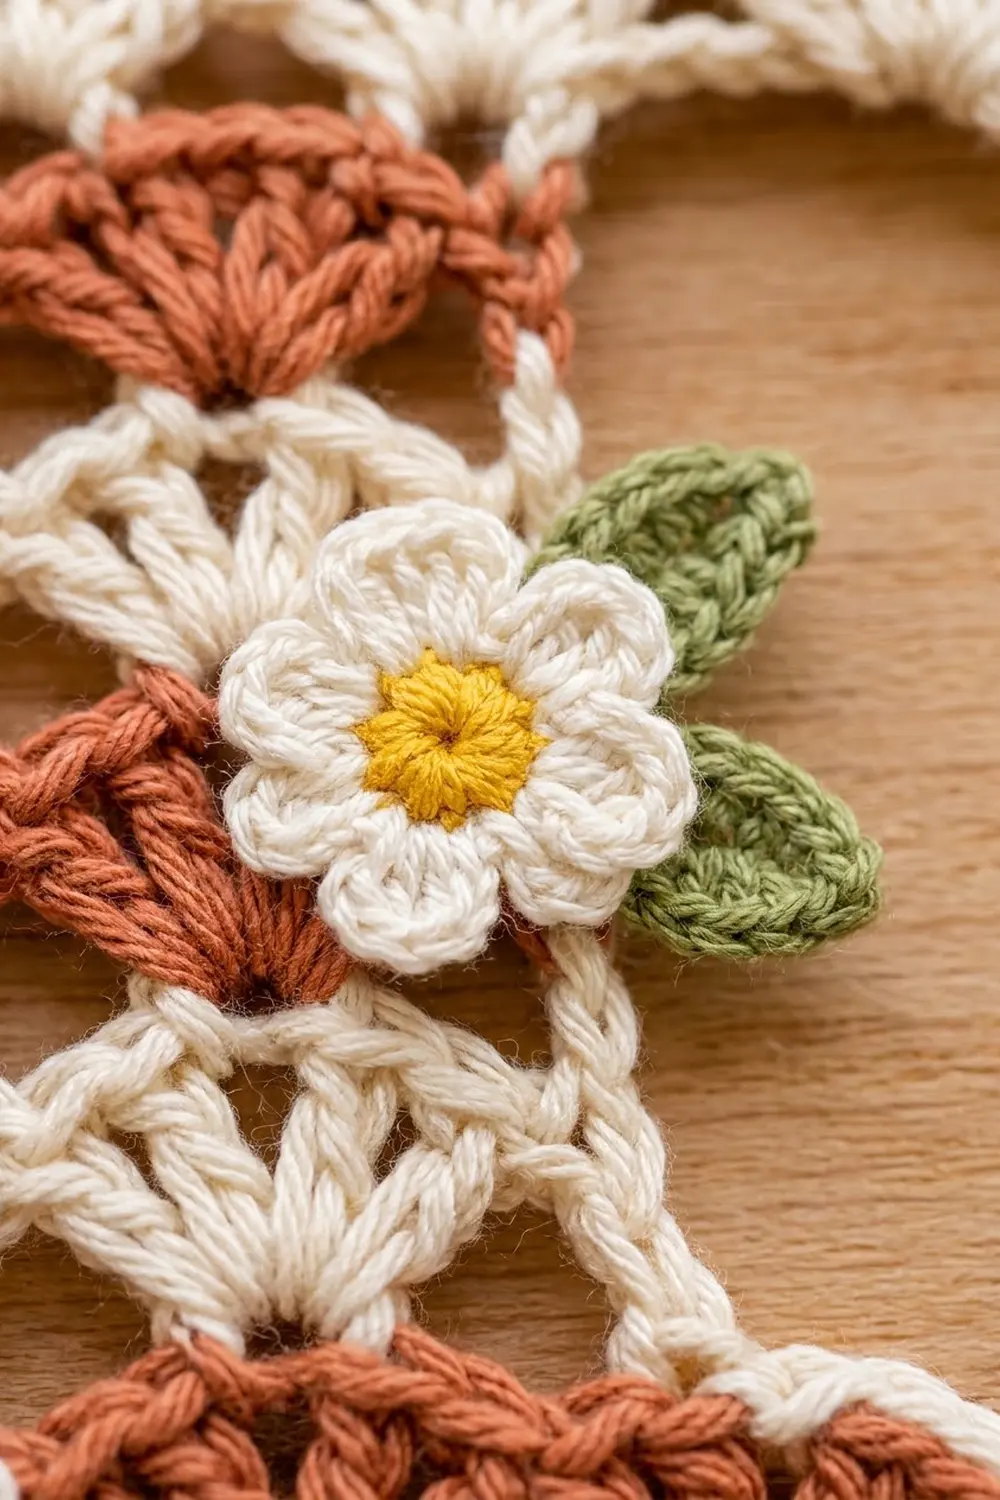
Letter T Body
Foot
Foundation: With rust, ch 20.
Row 1 (RS, rust): Sc in 2nd ch from hook, sk 2 ch, SH in next ch, sk 2 ch, sc in next ch; repeat from * 2 more times. Fasten off. (19 sts: 3 shells and 4 sc)*
Leave the foundation tail. You will weave it in after the border.
Row 2 (cream lattice): Join cream in the first st of Row 1. Ch 3 (counts as dc), 2 dc in same st for a half shell. Sk 2 dc, sc in center dc of shell, sk 2 dc, SH in next sc; repeat from * once more. Sk 2 dc, sc in center dc of last shell, sk 2 dc, 3 dc in last sc. Fasten off. (19 sts: 2 half shells, 2 shells and 3 sc)*
Label the Row 2 sts 1 to 19 from right to left. The center sc is st 10.
Stem
Row 3 (rust): Join rust in st 7, the center dc of the first full shell. Ch 1, sc in same st, sk 2, SH in st 10, sk 2, sc in st 13 (center dc of the second shell). Fasten off. (7 sts: 1 shell and 2 sc)
On each side, 6 sts of Row 2 stay unworked. These make the shoulders of the foot.
Row 4 (cream lattice): Join cream in the first st. Ch 3, 2 dc in same st, sk 2, sc in center dc, sk 2, 3 dc in last st. Fasten off. (7 sts)
Row 5 (rust): Join rust in the top of the ch-3. Ch 1, sc in same st, sk 2, SH in sc, sk 2, sc in last dc. Fasten off. (7 sts)
Row 6 (cream): Work as Row 4. (7 sts)
Row 7 (rust): Work as Row 5. (7 sts)
Checkpoint: the stem is 1.25 in (3.2 cm) wide and the piece is 2.8 in (7.1 cm) tall.
Crossbar
Extension chains: With cream, ch 9. Sl st the last ch to the top of the first st of Row 7, the right-hand corner, then fasten off. Label this chain c1 (outer end) to c9 (next to the stem). Make a second ch 9 and sl st its first ch to the last st of Row 7, the left-hand corner, then fasten off. Label it l1 (next to the stem) to l9 (outer end).
Row 8 (cream lattice): Join cream in c1.
- Ch 3, 2 dc in same ch for a half shell.
- Sk c2-c3, sc in c4, sk c5-c6, SH in c7, sk c8-c9.
- Sc in first st of Row 7.
- Sk 2, SH in center dc of the stem shell, sk 2.
- Sc in last st of Row 7.
- Sk l1-l2, SH in l3, sk l4-l5, sc in l6, sk l7-l8, 3 dc in l9.
Fasten off. (25 sts: 2 half shells, 3 shells and 4 sc)
Count it: 9 sts on the right chain + 7 over the stem + 9 on the left chain = 25. The center shell stacks right over the stem shell, so the crossbar is centered over the stem.
Row 9 (rust): Join rust in the top of the ch-3. Ch 1, sc in same st. Sk 2, SH in next sc, sk 2, sc in next st (center dc of shell, or last st); repeat from * 3 more times. Fasten off. (25 sts: 4 shells and 5 sc)*
The shells land on Row 8 sts 4, 10, 16 and 22. The sc land on sts 1, 7, 13, 19 and 25, so the crossbar top shows 4 rust scallops.
Checkpoint: the crossbar is 4.25 in (10.8 cm) wide and the piece is 3.6 in (9.1 cm) tall.
Border
Border gauge: 1 sc per st along the top and bottom. Along the sides, 2 sc per row end, because each row is about two sc tall. Each outer corner gets 3 sc in 1 st. Each inner corner gets 1 sc2tog.
Before you start, lay the row-end tails along the edges so you crochet over them.
Border round (cream): Join cream in the first st of Row 9, at the top right corner. Work counterclockwise:
- Top: 3 sc in first st, sc in next 23 sts, 3 sc in last st. (29 sc)
- Left crossbar end: 2 sc in the side of Row 9 and 2 sc in the side of Row 8. (4 sc)
- Left crossbar underside: Work in the free loops of the left chain. 3 sc in l9, sc in l8 through l2. (10 sc)
- Inner corner: Sc2tog over l1 and the side of Row 7. (1 st)
- Left stem side: 1 more sc in the side of Row 7, 2 sc in each side of Rows 6, 5 and 4, then 1 sc in the side of Row 3. (8 sc)
- Inner corner: Sc2tog over the side of Row 3 and Row 2 st 14. (1 st)
- Left foot shoulder: Sc in Row 2 sts 15-18, 3 sc in st 19. (7 sc)
- Left foot end: 2 sc in the side of Row 2 and 2 sc in the side of Row 1. (4 sc)
- Bottom: Work in the free loops of the foundation. 3 sc in first ch, sc in next 17 ch, 3 sc in last ch. (23 sc)
- Right side: Work steps 8, 7, 6, 5, 4, 3 and 2 in mirror image up the right side, in that order. (4 + 7 + 1 + 8 + 1 + 10 + 4 = 35 sts)
Sl st to the first sc to join. Fasten off.
Round total: 29 + 35 + 23 + 35 = 122 sts
Why the math works: The top is 25 sts plus 2 extra at each corner, so 25 + 4 = 29. The bottom is the 19 foundation loops plus 2 extra at each corner, so 19 + 4 = 23. On each side, the 35 sts break down as:
- 4 for the 2 crossbar rows
- 10 under the 9 extension chains (9 + 1 extra at the corner)
- 2 sc2tog
- 8 for the 5 stem rows
- 7 along the 6 shoulder sts (6 + 1 extra at the corner)
- 4 for the 2 foot rows
Each row end gets 2 sts. Where a row end shares a sc2tog, its second st is the sc2tog. This keeps the edges flat. The border adds 0.125 in (0.3 cm) on every edge, so 4.25 in (10.8 cm) becomes 4.5 in (11.4 cm) and 3.6 in (9.1 cm) becomes 3.85 in (9.8 cm).
Daisy Appliqués (make 3)
Rnd 1 (yellow): Make a magic ring, ch 1, and work 8 sc in the ring. Pull the ring closed and sl st to the first sc. Fasten off. (8 sc)
Rnd 2 (white): Join white in any sc. In each sc, work (ch 2, 2 dc, ch 2, sl st) for a petal. Fasten off, leaving an 8 in (20.3 cm) tail for sewing. (8 petals)
Each daisy measures about 1 in (2.5 cm) across.
Leaves (make 6)
Leaf (green): Ch 6. Sl st in 2nd ch from hook, then sc, hdc and sc in the next 3 ch, and sl st in the last ch. Fasten off, leaving a 6 in (15.2 cm) tail. (5 sts)
Each leaf is about 0.6 in (1.5 cm) long.
Assembly
- Tuck 2 leaves behind each daisy so they fan out from one side. Stitch them in place through the yellow center.
- Top daisy: Sew it over the right end of the crossbar, with the leaves pointing right past the edge.
- Middle daisy: Sew it on the right edge of the stem at Rows 5-6, with the leaves pointing right.
- Bottom daisy: Sew it on the left end of the foot, with the leaves pointing left.
- Sew around the yellow center and tack the back of each petal. Do not let stitches show on the front.
- Use pliers to open the jump ring. Pass it through the top border sc above Row 9 st 13, the center sc between shells 2 and 3. Hook on the chain and key ring, then close the jump ring tightly.
Final Blocking
- Weave in all remaining tails along the border on the wrong side.
- Spritz the letter until it is damp, but not soaked.
- Pin it on the mat at 4.5 in (11.4 cm) x 3.85 in (9.8 cm). Use a ruler to check that the stem is 1.5 in (3.8 cm) wide and the foot is 3.5 in (8.9 cm) wide.
- Pin the 4 top scallops into even curves and square the inner corners.
- Let it dry completely, then unpin it. Block before sewing on the daisies if you prefer, and steam the flowers lightly on their own.
Final Quality-Control Checklist
- Rows 1-9 match the counts: 19, 19, 7, 7, 7, 7, 7, 25, 25
- The crossbar is centered over the stem
- The border round has 122 sts, with 3 sc at every outer corner
- The edges lie flat with no ruffles or cupping
- All tails are hidden and secure
- Each daisy has 8 petals and 2 leaves
- The jump ring is fully closed and centered at the top
Troubleshooting
- Shells lean or twist: You skipped the wrong number of sts. Count 2 skipped sts before and after every shell.
- Stem is off center: Row 3 must start in Row 2 st 7 and end in st 13.
- Crossbar droops on one side: One extension chain is not 9 ch. Count again and remake it.
- Border ruffles: Work 1 sc instead of 2 in some row ends. Border pulls tight: add a sc at each row end.
- Inner corners gape: Work the sc2tog tighter, or close the gap with one stitch from the wrong side.
- Daisy cups: Make the petal chains a little looser and steam the flower flat.
- Colors show through at joins: Join each new color with a firm sl st and keep the tails on the wrong side.
- Keychain stretches with use: Tighten your tension, or add a short length of matching cream yarn behind the border on the wrong side.
Care
Hand wash in cool water and lay flat to dry. Remove the metal hardware first, or dry it well so it does not tarnish.
Final Notes
The measurement chain is simple to follow:
- Gauge: 6 sts and 2.5 rows per 1 in (2.5 cm)
- Foot: 19 sts, 3.25 in (8.3 cm) wide
- Stem: 7 sts, 1.25 in (3.2 cm) wide
- Crossbar: 9 + 7 + 9 = 25 sts, 4.25 in (10.8 cm) wide
- Height before border: 9 rows, 3.6 in (9.1 cm)
- Border: 122 sts, adding 0.125 in (0.3 cm) per edge
- Finished size: 4.5 in (11.4 cm) x 3.85 in (9.8 cm)
Check each number as you go, and your letter will come out square, centered and ready for its daisies.
Happy crocheting!