

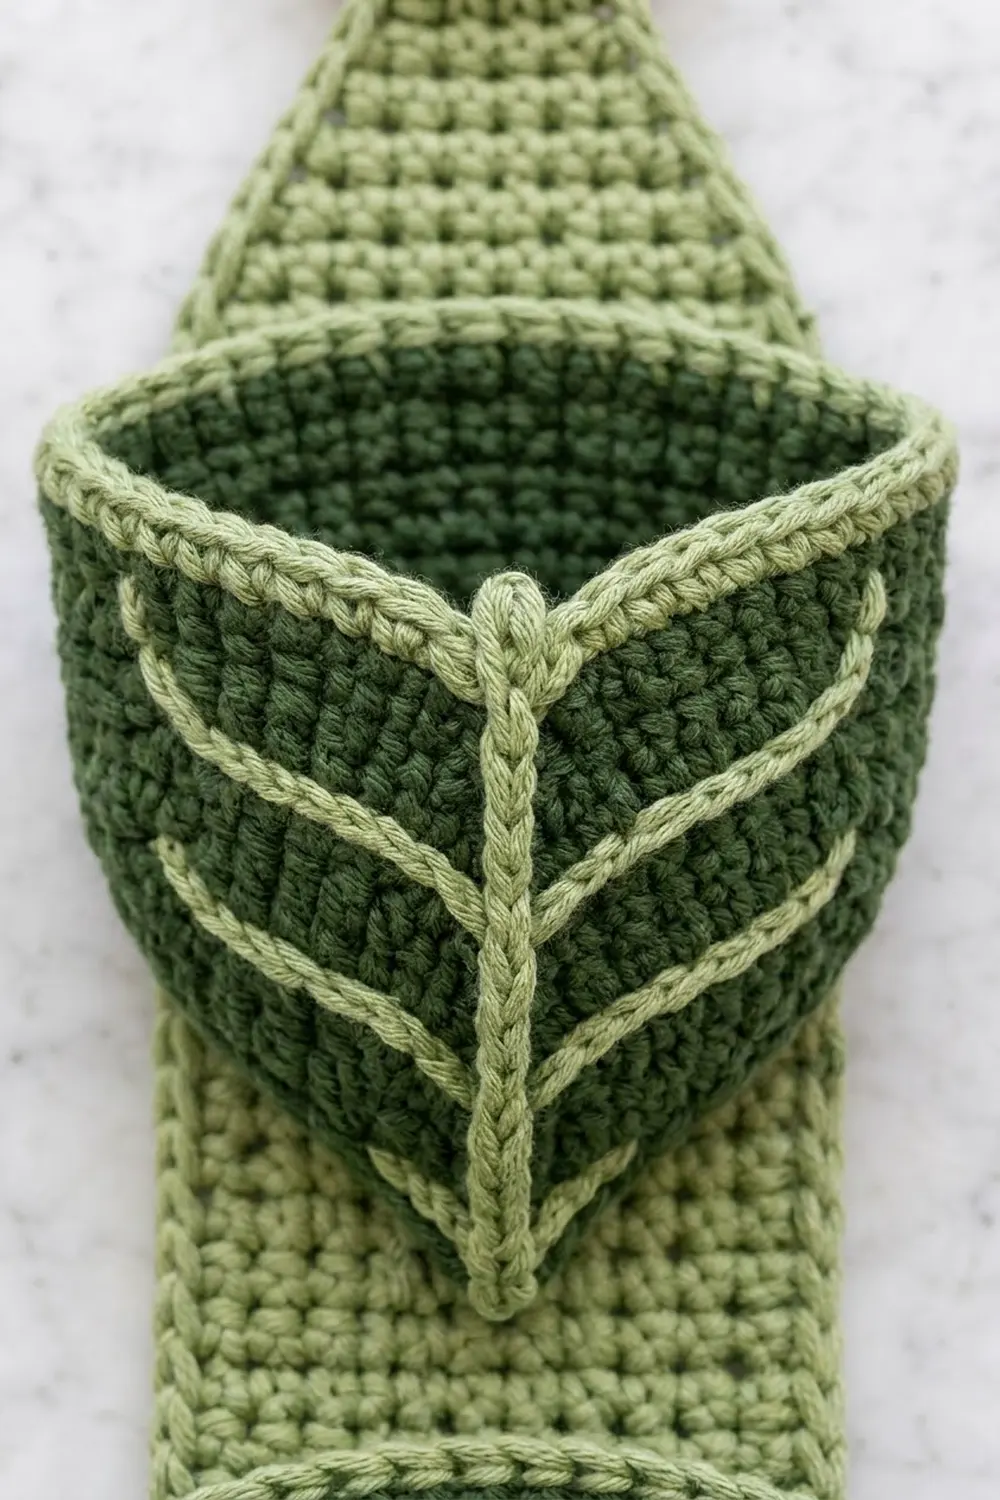
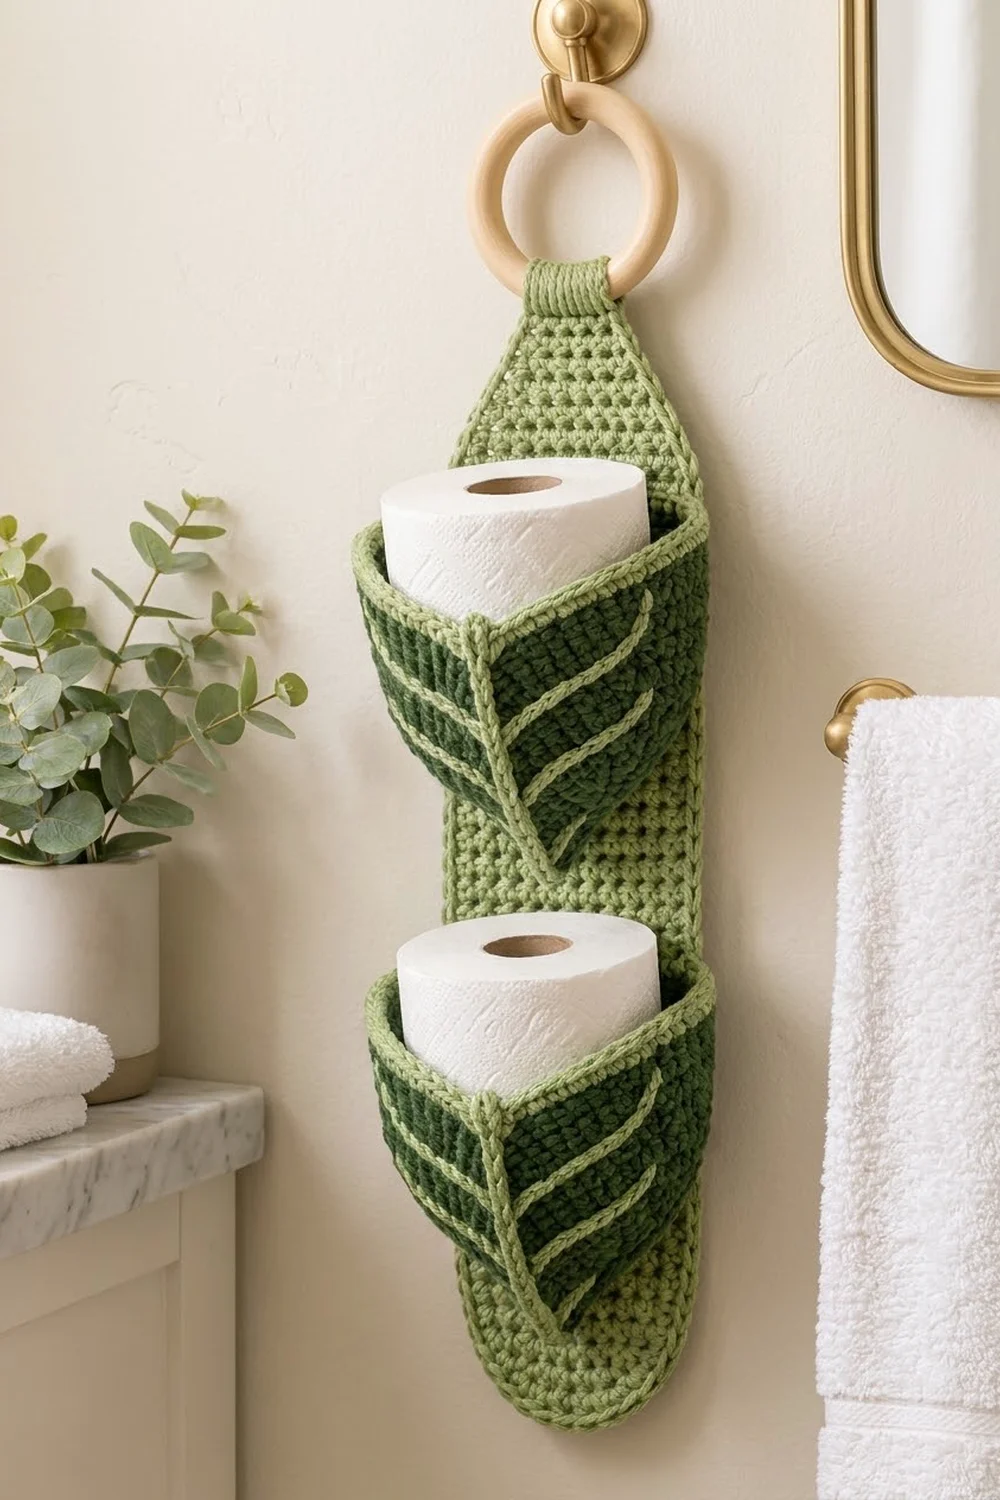
The Evergreen Leaf holder is a hanging bathroom organizer. A long sage-green strip hangs from a wooden ring and carries two forest-green pockets shaped like leaves. Each pocket holds one standard toilet roll.
Two greens do all the work. Dark forest green is used for the pockets. Light sage is used for the backing, the corded pocket rims and the leaf veins, which are surface slip stitched. The look is calm and botanical, and it suits a spa-style bathroom.
This pattern uses US crochet terms. The finished backing measures about 5 in × 16.5 in (12.7 cm × 41.9 cm). With the ring, the holder hangs about 20 in (50.8 cm) tall. Each pocket is about 6.25 in (15.9 cm) wide at the opening and 3 in (7.6 cm) tall.
Construction is simple. You work the backing in rows, shaping a rounded bottom and a tapered tab, then edge it in one round. You work each pocket in joined rounds from an oval base, adding increases at three marked points to build a flat back and a pointed front. Next you add the veins, sew the pockets and ring on, and finish with a two-round corded rim on each pocket.
Finished Size and Construction
- Backing size: 5 in × 16.5 in (12.7 cm × 41.9 cm), plus a 4 in (10.2 cm) tab
- Overall hanging height: about 20 in (50.8 cm) including the ring
- Skill level: Easy–Intermediate
- Terminology: US
- Yarn weight: worsted (#4) cotton
- Hook: 5.0 mm (H-8)
- Number of pieces: 3 crocheted (1 backing, 2 pockets) + 1 wooden ring
- Layout: one vertical strip with 2 pockets stacked
- Pocket size: 6.25 in (15.9 cm) wide × 3 in (7.6 cm) tall
- Pocket size before border: 2.5 in (6.4 cm) tall
- Border depth: about 0.5 in (1.3 cm), 2 rounds
Materials
Use a smooth worsted-weight cotton or cotton blend, about 85 m per 50 g. Cotton holds the pocket shape well and copes with bathroom humidity.
- Color A, light sage: 120 g (204 m), for the backing, veins, rims and sewing
- Color B, dark forest green: 100 g (170 m), for the pockets
These quantities include a margin of about 15%.
Tools:
– 5.0 mm (H-8) crochet hook
– 1 wooden ring, 3 in (7.6 cm) outer diameter
– 4 locking stitch markers
– Tapestry needle
– Rust-proof pins
– Scissors
– Tape measure
Abbreviations (US Terms)
- ch – chain
- sc – single crochet
- sc2tog – single crochet 2 together
- sl st – slip stitch
- BLO – back loop only
- st(s) – stitch(es)
- Rnd – round
- rev sc – reverse single crochet (crab stitch)
Surface slip stitch: Hold the yarn on the wrong side, behind the fabric. Insert the hook from the front through a gap between stitches, pull up a loop, and draw it through the loop on your hook.
Reverse sc: Working from left to right (right-handed), insert the hook into the next stitch to the right, pull up a loop, yarn over, and draw through both loops.
Gauge and Checkpoints
Gauge: 16 sc × 16 rows = 4 in (10.2 cm), so 4 sts and 4 rows per inch. This square gauge lets you work 1 sc per row-end on the edging without ruffling.
Test one piece first. Make one pocket base (Rnds 1–5) before anything else.
Checkpoints:
– Pocket base after Rnd 5: about 5 in × 2.75 in (12.7 cm × 7.0 cm)
– Backing after Row 5: 4.5 in (11.4 cm) wide
– Backing after Row 58: 14.5 in (36.8 cm) long
– Backing after Row 64: 16 in (40.6 cm) long
– Pocket after Rnd 15: flattened back wall 6.25 in (15.9 cm) across; each front side about 5.5 in (14.0 cm)
If your piece is too big, go down 0.5 mm in hook size. If it is too small, go up 0.5 mm. The pockets are meant to fit a roll about 4.5 in (11.4 cm) across and 4 in (10.2 cm) tall, so check the fit before you add the veins.
Backing (Color A)
Work in rows. For every row, ch 1 and turn; the ch 1 does not count as a stitch.
Row 1: Ch 11. Sc in the 2nd ch from the hook and in each ch across. (10)
Row 2: 2 sc in the first st, sc in the next 8, 2 sc in the last st. (12)
Row 3: 2 sc in the first st, sc in the next 10, 2 sc in the last st. (14)
Row 4: 2 sc in the first st, sc in the next 12, 2 sc in the last st. (16)
Row 5: 2 sc in the first st, sc in the next 14, 2 sc in the last st. (18)
Rows 1–5 form the rounded bottom, 1.25 in (3.2 cm) tall.
Rows 6–58: Sc in each st across. (18)
Row 59: Sc2tog, sc in the next 12, sc2tog. (14)
Wait — the taper loses 2 sts per row, and Row 58 has 18 sts. Work it as follows instead:
Row 59: Sc2tog, sc in the next 14, sc2tog. (16)
Row 60: Sc2tog, sc in the next 12, sc2tog. (14)
Row 61: Sc2tog, sc in the next 10, sc2tog. (12)
Row 62: Sc2tog, sc in the next 8, sc2tog. (10)
Row 63: Sc2tog, sc in the next 6, sc2tog. (8)
Row 64: Sc2tog, sc in the next 4, sc2tog. (6)
The strip is now 16 in (40.6 cm) long.
Rows 65–80 (tab): Sc in each st across. (6)
The tab is 4 in (10.2 cm) long. Do not fasten off.
Edging Rnd: Work 1 round of sc around the whole backing, then join with a sl st to the first sc.
– Top of tab: 3 sc in the first st, sc in the next 4, 3 sc in the last st. (10)
– Each long side: 1 sc in each row-end. (80 per side)
– Bottom: 2 sc in the first foundation ch, sc in the next 8, 2 sc in the last. (12)
Total: 10 + 80 + 80 + 12 = 182 sts. The backing now measures 5 in × 16.5 in (12.7 cm × 41.9 cm) below the tab. Fasten off and weave in the ends.
Leaf Pocket (Make 2, Color B)
Work in joined rounds. Ch 1 at the start of each round (it does not count) and join with a sl st to the first sc.
Rnd 1: Ch 12. Sc in the 2nd ch from the hook and in the next 9 chs, 3 sc in the last ch. Working along the other side of the chain, sc in the next 9, then 2 sc in the last ch. (24)
Rnd 2: Sc in the next 9, [2 sc in the next st] 3 times, sc in the next 9, [2 sc in the next st] 3 times. (30)
Rnd 3: Sc in the next 9, [sc 1, 2 sc in the next st] 3 times, sc in the next 9, [sc 1, 2 sc in the next st] 3 times. (36)
Rnd 4: Sc in the next 9, [sc 2, 2 sc in the next st] 3 times, sc in the next 9, [sc 2, 2 sc in the next st] 3 times. (42)
Rnd 5: Sc in the next 9, [sc 3, 2 sc in the next st] 3 times, sc in the next 9, [sc 3, 2 sc in the next st] 3 times. (48)
The oval now has 2 straight sides of 9 sts each and 2 curved ends of 15 sts each. Choose one straight side as the back.
Rnd 6 (turning round): Sc in BLO of each st around. (48)
Place 3 markers in this round:
– Front Center (FC): the 5th st of the front straight side
– L and R: the 8th (middle) st of each curved end
This divides the round into a back side of 23 sts (7 + 9 + 7), a left front side of 11 sts, a right front side of 11 sts, and 3 corner sts. 23 + 11 + 11 + 3 = 48.
Increase round (Rnds 7, 9, 11, 13 and 15):
– Sc in each st to a corner.
– At L and R, work 2 sc in the marked st. Keep the marker in the stitch nearest the back so the new stitch joins the front side.
– At FC, work 3 sc in the marked st and move the marker to the middle sc.
Each increase round adds 4 sts. Both front sides gain 2 sts per round, and the back side stays at 23 sts.
Even round (Rnds 8, 10, 12 and 14): Sc in each st around.
Rnd counts:
| Rnd | Stitches |
|—|—|
| 7 | 52 |
| 8 | 52 |
| 9 | 56 |
| 10 | 56 |
| 11 | 60 |
| 12 | 60 |
| 13 | 64 |
| 14 | 64 |
| 15 | 68 |
After Rnd 15 the pocket has a back side of 23 sts, left and right front sides of 21 sts each, and 3 corner sts: 23 + 21 + 21 + 3 = 68. Repeating the 3-sc increase at FC builds the sharp front ridge that forms the leaf tip. Fasten off.
Veins (Color A)
Work all veins in surface slip stitch, keeping the yarn inside the pocket.
Center vein: Starting at the FC column in Rnd 6, work 1 surface sl st per round straight up the ridge to Rnd 15. (10 sl sts)
Side veins: On each side of the center vein, start 3 veins next to the vein at Rnd 7, Rnd 10 and Rnd 13. For each vein, work 6 surface sl sts that climb 3 rounds and move 6 sts outward:
– 2 sl sts moving outward in the starting round
– 2 sl sts moving outward in the next round up
– 2 sl sts moving outward in the round after that
This gives 3 parallel veins per side, angled upward like a leaf’s side veins, with a total of 46 sl sts per pocket. Fasten off each vein inside the pocket and weave in the ends.
Make All Pieces
- Color A: 1 backing
- Color B: 2 pockets, with veins added in Color A
Layout (front view, top to bottom):
        [ wooden ring ]
        [    tab      ]
        [   taper     ]
        [ POCKET 2    ]  base at Row 36
        [  backing    ]
        [ POCKET 1    ]  base at Row 10
        [ rounded end ]
Joining
Ring: Pass the tab through the ring from front to back. Fold it down so Row 80 lies on the wrong side over Row 65. Whipstitch the 6 tab sts to Row 65 with Color A.
Pockets: Use Color A and whipstitch. Pin Pocket 1 with its base on Row 10, which is 2.5 in (6.4 cm) up from the bottom. Pin Pocket 2 with its base on Row 36, which is 9 in (22.9 cm) up.
Stitch-to-stitch logic:
1. Match the 9 straight back-base sts to the center 9 sts of the backing row (sts 5–13 of 18) and sew them 1 to 1.
2. Flatten the back wall against the backing and sew two vertical seams through the backing’s edging sts. Match 1 pocket round to 1 edging st, from Rnd 6 to Rnd 15: 10 sts on each side.
Both pieces work to 4 sts and 4 rows per inch, so the seams match without easing.
Tension: Pull each whipstitch snug but not tight. Tight stitches pucker the backing and tilt the pocket forward.
Size checkpoint: Each pocket’s back corners should overhang the backing by about 5/8 in (1.6 cm) on each side. The pocket should sit level with its point centered.
Border (Pocket Rims, Color A)
Work the rims after joining, through the pocket sts only. The rims work to the same 4 sts per inch as the rest of the piece. In the counts below, side counts do not include the 3 corner sts, which are listed separately.
Rnd 16: Join A at R. Sc in each st around and join with a sl st.
– Back side: 23
– Left front side: 21
– Right front side: 21
– Corners (L, R and FC): 1 each
Total: 68 sts.
Rnd 17: Ch 1. Rev sc in each st around and join with a sl st.
– Back side: 23
– Each front side: 21
– Corners: 1 each
Total: 68 sts. Fasten off.
Why the math works: Both rim rounds are worked 1 to 1 with no increases. The opening stays at 68 sts, or 17 in (43.2 cm) around. A roll measures about 14.1 in (35.8 cm) around (4.5 in × π), so the rim neither flares nor pulls in, and a roll still slides in easily. The rev sc gives the corded edge, and the rims bring each pocket to its full 3 in (7.6 cm) height.
Final Blocking
- Mist the whole holder lightly with water.
- Lay the backing flat and pin it to 5 in × 16.5 in (12.7 cm × 41.9 cm).
- Push a roll, or a rolled towel, into each pocket to shape it.
- Pinch each front ridge so the leaf point stands sharp.
- Let everything dry completely before hanging.
Final Quality-Control Checklist
- Backing edging has 182 sts and lies flat
- Each pocket ends Rnd 15 with 68 sts
- Front ridge runs straight up from base to rim
- Each pocket has 1 center vein and 3 veins on each side
- Pocket bases sit on Rows 10 and 36
- Rims have 68 sts with a cord that doesn’t ripple
- The tab is sewn securely around the ring
- All ends are woven in
Troubleshooting
- Pocket is lopsided: an increase landed on the wrong side of a corner. Check that the back side still has 23 sts.
- Front point is rounded: you moved the FC marker incorrectly. Keep it in the middle sc of each 3-sc group.
- Veins pucker: your surface sl sts are too tight. Go up 1 hook size for the veins only.
- Backing edging ruffles: your row gauge is off. Skip 1 row-end every 10 rows.
- Rim flares: your tension is loose. Use a 4.5 mm hook for the rev sc round.
Care
Hand wash in cool water and reshape while damp. Dry flat, with the pockets stuffed so they hold their shape.
Final Notes
The measurement chain is:
– Gauge: 4 sts and 4 rows per inch
– Backing: 18 sts = 4.5 in (11.4 cm), with an edging round bringing it to 5 in (12.7 cm)
– Pocket base: 48 sts
– Pocket walls: 5 increase rounds of +4 bring each pocket to 68 sts
– Opening: 17 in (43.2 cm) around, which fits a 4.5 in (11.4 cm) roll
– Rims: 2 one-to-one rounds keep the opening at 68 sts
Check each stage against these numbers and your leaves will hang straight and true.
Happy crocheting!