

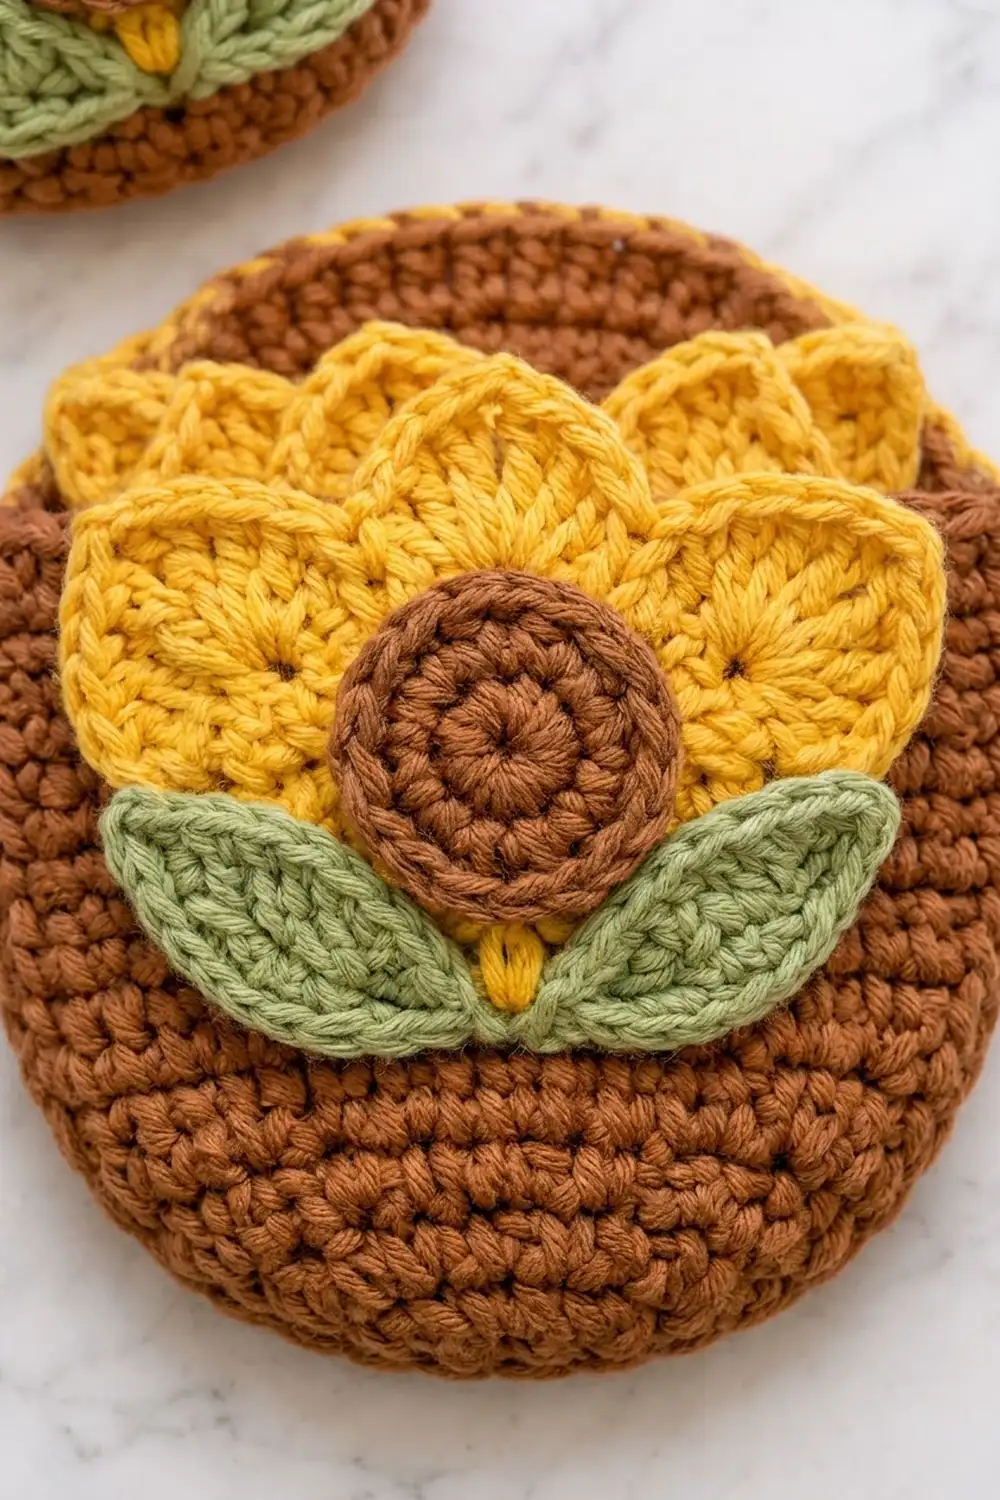
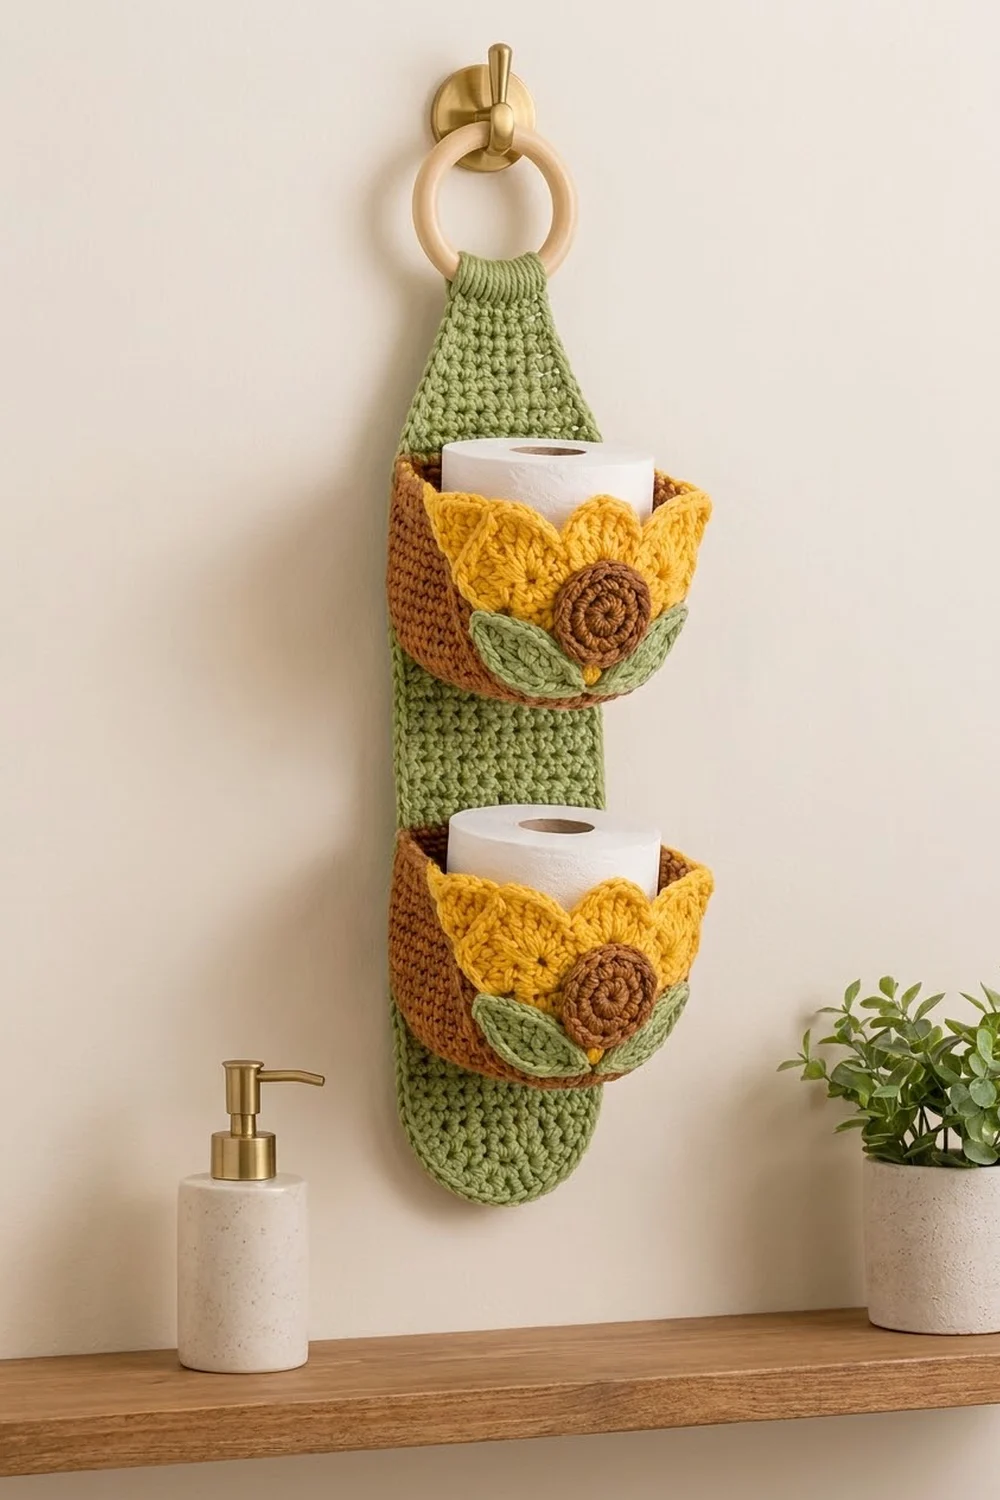
This hanging toilet paper holder brings sunflowers into the bathroom. A long sage-green strip hangs from a wooden ring, and two rust-brown pockets each hold one spare roll. Each pocket has a sunflower made of two layers of pointed golden petals, a spiral brown center, two green leaves and a small yellow stem tip.
The colors are warm and earthy: golden yellow, rust brown and sage green. The style is cottage farmhouse, with firm single crochet fabric and raised appliqué texture. All instructions use US crochet terms.
The finished holder is 6.5 in (16.5 cm) wide at the strip and 7.5 in (19.1 cm) wide at the pockets. It hangs about 21.5 in (54.6 cm) below the ring, or about 24.5 in (62.2 cm) including a 3 in (7.6 cm) ring.
You work the strip flat in rows and crochet each pocket in the round from an oval base. Then you make the sunflower appliqués and sew everything together. One round of edging finishes the strip.
Finished Size and Construction
- Finished size: 6.5 in (16.5 cm) wide strip; 21.5 in (54.6 cm) long below the ring
- Skill level: Intermediate
- Terminology: US
- Yarn weight: Worsted (#4) cotton
- Hook: 4.5 mm (US 7)
- Number of pieces: 1 strip, 2 pockets, plus 6 appliqué pieces per pocket (15 pieces total)
- Layout: 2 pockets stacked vertically on 1 strip
- Pocket size (flattened): 7.5 in (19.1 cm) wide x 4.75 in (12.1 cm) tall
- Strip size before edging: 6 in (15.2 cm) wide
- Edging depth: 0.25 in (0.6 cm) per edge
Materials
Choose a smooth, 100% cotton worsted yarn. Cotton holds the pocket shape, copes with bathroom humidity and keeps the petal points crisp. The amounts below assume about 1.6 m per gram.
- Sage green (A): 130 g / 210 m – strip, edging, leaves
- Rust brown (B): 160 g / 255 m – pockets, flower centers
- Golden yellow (C): 50 g / 80 m – petals, stem tips
These quantities include a margin of about 15% for swatching and joining.
Tools:
- 4.5 mm (US 7) crochet hook
- Wooden ring, 3 in (7.6 cm) outer diameter
- Tapestry needle
- Stitch markers
- Rust-proof pins
- Measuring tape
Abbreviations (US Terms)
- ch – chain
- sl st – slip stitch
- sc – single crochet
- hdc – half double crochet
- dc – double crochet
- tr – treble crochet
- sc2tog – single crochet 2 together
- BLO – back loop only
- st(s) – stitch(es)
- rnd – round
Petal shell: In the same st, work (2 dc, tr, ch 3, sl st in 3rd ch from hook, tr, 2 dc). The picot makes the sharp petal tip, and the gap between the two tr makes the small eyelet down the middle of the petal.
Gauge and Checkpoints
Gauge: 16 sc and 18 rows = 4 in (10.2 cm), which is 4 sc and 4.5 rows per 1 in (2.5 cm).
Make one pocket first as your test piece. It has to fit a roll, and its gauge is easy to see in the round.
Checkpoints:
- Strip Row 5: 24 sts = 6 in (15.2 cm) wide.
- Strip Row 72: 16 in (40.6 cm) from the foundation.
- Strip Row 88: 19.6 in (49.8 cm) from the foundation.
- Pocket Rnd 3: oval base about 6.5 x 1.75 in (16.5 x 4.4 cm).
- Pocket Rnd 21: walls 4 in (10.2 cm) tall; flattened width 7.5 in (19.1 cm).
Too big? Go down 0.5 mm. Too small? Go up 0.5 mm. A pocket that comes out small won’t fit a standard 4.5 in (11.4 cm) roll, so if you’re between sizes, choose slightly larger.
Strip
With A, ch 17.
Row 1: Sc in 2nd ch from hook and in each ch across, turn. (16 sts)
Row 2: Ch 1, 2 sc in first st, sc in each st to last st, 2 sc in last st, turn. (18 sts)
Rows 3-5: Repeat Row 2. (Row 3: 20 sts; Row 4: 22 sts; Row 5: 24 sts)
These quick increases round off the bottom corners.
Rows 6-72: Ch 1, sc in each st across, turn. (24 sts)
Checkpoint: 16 in (40.6 cm) long.
Taper:
Row 73: Ch 1, sc2tog, sc in each st to last 2 sts, sc2tog, turn. (22 sts)
Row 74: Ch 1, sc in each st across, turn. (22 sts)
Rows 75-88: Repeat Rows 73-74 seven more times. (Row 75: 20 sts; Row 77: 18 sts; Row 79: 16 sts; Row 81: 14 sts; Row 83: 12 sts; Row 85: 10 sts; Row 87: 8 sts; Row 88: 8 sts)
Tab:
Rows 89-102: Ch 1, sc in each st across, turn. (8 sts)
Fasten off and leave a 12 in (30.5 cm) tail. The tab is 2 in (5.1 cm) wide.
Pocket (make 2)
With B, ch 24.
Rnd 1: Sc in 2nd ch from hook, sc in next 21 ch, 3 sc in last ch. Working along the opposite side of the chain, sc in next 21 ch, 2 sc in last ch (the same ch as the first sc). Join with sl st to first sc. (48 sts)
Rnd 2: Ch 1, 2 sc in first st, sc in next 21 sts, 2 sc in each of next 3 sts, sc in next 21 sts, 2 sc in each of last 2 sts, join. (54 sts)
Rnd 3: Ch 1, (sc in next st, 2 sc in next st), sc in next 21 sts, (sc in next st, 2 sc in next st) 3 times, sc in next 21 sts, (sc in next st, 2 sc in next st) 2 times, join. (60 sts)
Checkpoint: the base is about 6.5 x 1.75 in (16.5 x 4.4 cm).
Rnd 4: Ch 1, sc in BLO of each st around, join. (60 sts)
The BLO ridge turns the walls upward and marks the base line for sewing later.
Rnds 5-21: Ch 1, sc in each st around, join. (60 sts)
Checkpoint: the walls are 4 in (10.2 cm) tall. Laid flat, the pocket is a U shape 7.5 in (19.1 cm) wide and 4.75 in (12.1 cm) tall. The oval base relaxes into a rounder shape once a roll sits inside.
Rnd 22 (rim): Sl st loosely in each st around. (60 sl sts) Fasten off.
Sunflower Appliqué (make 2 sets)
Each set has one back petal layer, one front petal layer, one center, two leaves and one stem tip.
Back Petal Layer
With C, ch 4.
Row 1: 6 dc in 4th ch from hook, turn. (7 sts; the skipped ch counts as a dc)
Row 2: Ch 3 (counts as dc), 2 dc in first st, 3 dc in each of next 5 sts, 3 dc in top of turning ch, turn. (21 sts)
Row 3: Ch 3 (counts as dc), dc in first st, dc in next 2 sts, 2 dc in next st 6 times, dc in next st, 2 dc in last st, turn. (29 sts)
Row 4: Ch 1, sc in first st, skip 1 st, petal shell in next st, skip 1 st, sc in next st 7 times. (7 petals; uses all 29 sts: 1 + 7 x 4)
Fasten off. The half-circle fan is about 5.5 in (14.0 cm) wide and 2.75 in (7.0 cm) tall.
Front Petal Layer
With C, ch 4.
Rows 1-2: Work as for Back Petal Layer Rows 1-2. (21 sts)
Row 3: Ch 1, sc in first st, skip 1 st, petal shell in next st, skip 1 st, sc in next st 5 times. (5 petals; uses all 21 sts: 1 + 5 x 4)
Fasten off. The fan is about 4.25 in (10.8 cm) wide and 2 in (5.1 cm) tall.
Center
With B, make a magic ring.
Rnd 1: 6 sc in ring. Don’t join; work in a spiral. (6 sts)
Rnd 2: 2 sc in each st around. (12 sts)
Rnd 3: Sc in next st, 2 sc in next st 6 times. (18 sts)
Rnd 4: Sc in next 2 sts, 2 sc in next st 6 times. (24 sts)
Rnd 5: Sl st in each st around. (24 sl sts)
Fasten off and leave a long tail. The center is 2 in (5.1 cm) across. The spiral rounds and the sl st rim give it a ridged, coiled look.
Leaf (make 2 per set)
With A, ch 9.
Rnd 1: Sl st in 2nd ch from hook, sc in next ch, hdc in next ch, dc in next 2 ch, hdc in next ch, sc in next ch, 3 sc in last ch. Working along the opposite side of the chain, sc in next ch, hdc in next ch, dc in next 2 ch, hdc in next ch, sc in next ch, sl st in last ch. (20 sts)
Fasten off and leave a long tail. The leaf is about 2.25 in (5.7 cm) long with pointed ends. The chain spine forms a natural center vein.
Stem Tip
With C, ch 4. Sl st in 2nd ch from hook, sc in next ch, hdc in last ch. (3 sts) Fasten off and leave a tail. This makes a small triangle about 0.75 in (1.9 cm) long.
Assemble the Sunflower
Lay one pocket flat with the round join at the center back. You’ll work on the front face.
- Pin the back petal layer with its straight edge centered horizontally, 1.75 in (4.4 cm) above the Rnd 4 ridge. The petal tips rise about 0.5 in (1.3 cm) above the rim.
- Pin the front petal layer on top with the straight edges lined up. Its 5 petals sit in front of and between the 7 back petals.
- Center the brown center over the middle of the straight edges.
- Place the leaves in a shallow V below the center, tips pointing outward and slightly up.
- Tuck the stem tip in, point down, between the leaf bases.
Whipstitch around the outer edge of each piece, sewing only through the front wall of the pocket. Leave the petal points free above the rim.
Make All Pieces
| Color | Pieces |
|---|---|
| A (sage green) | 1 strip, 4 leaves |
| B (rust brown) | 2 pockets, 2 centers |
| C (golden yellow) | 2 back petal layers, 2 front petal layers, 2 stem tips |
Layout grid (top to bottom):
        [ ring ]
        [ tab  ]
      [  taper  ]
   [  plain strip   ]
 [ POCKET 1 + flower ]
   [  2.5 in gap    ]
 [ POCKET 2 + flower ]
   [ 1.5 in below   ]
Joining
Edge the strip first (see Border: Strip Edging), then attach the pockets.
Method: Whipstitch with B through the back wall of the pocket and the surface stitches of the strip.
Placement: Measure from the bottom edge of the edged strip.
- Lower pocket: base ridge 1.5 in (3.8 cm) up; rim at 6.25 in (15.9 cm).
- Upper pocket: base ridge 8.75 in (22.2 cm) up; rim at 13.5 in (34.3 cm).
This leaves a 2.5 in (6.4 cm) gap between the pockets.
Stitch-to-stitch logic: The flattened back half of the rim has 30 sts. Center the pocket on the strip and sew the middle 26 of those rim sts across the strip, one rim st to one strip st. That’s 26 rim sts to 26 edged strip sts, or 6.5 in (16.5 cm). Then sew the back half of the Rnd 4 ridge to the strip along a matching line. The pocket extends 0.5 in (1.3 cm) past the strip on each side, so it stays rounded and open.
Tension: Pull each stitch snug but not tight. The strip should lie flat behind the pocket with no puckering.
Ring: Fold Rows 96-102 of the tab over the wooden ring to the back. Whipstitch Row 102 to Row 89 with the A tail.
Size checkpoint: The holder measures 21.5 in (54.6 cm) from the bottom edge to the top of the fold, and 7.5 in (19.1 cm) across at each pocket.
Border: Strip Edging
Edging gauge: 4 sc = 1 in (2.5 cm), the same as the strip. The strip has 4.5 row ends per 1 in (2.5 cm), so along the straight sides you work sc in 8 of every 9 row ends.
With A, join with sl st at the right-hand edge of Row 88 (the top of the taper).
Rnd 1:
- Right taper: Sc in each of 16 row ends (Rows 88-73). (16 sts)
- Right side: Sc in next 8 row ends, skip 1 row end 8 times (Rows 72-1). (64 sts)
- Bottom: 2 sc in first foundation ch, sc in next 14 ch, 2 sc in last ch. (18 sts)
- Left side: Work as for the right side, Rows 1-72. (64 sts)
- Left taper: Sc in each of 16 row ends (Rows 73-88). (16 sts)
Total: 16 + 64 + 18 + 64 + 16 = 178 sts, with 80 sts on each long side. Fasten off. Don’t edge the tab.
Why the math works: The straight section is 72 rows, or 16 in (40.6 cm). At 4 sc per 1 in (2.5 cm), 16 in needs 64 sc, which is exactly 8 of every 9 row ends. The taper edge is a diagonal, so it is longer than its 3.6 in (9.1 cm) height, about 4 in (10.2 cm). One sc per row end (16 sts) fits that length. The 2 extra sts at the bottom ease around the rounded corners. The edging adds 1 st on each side, so the strip goes from 24 to 26 sts, or from 6 in to 6.5 in (15.2 cm to 16.5 cm).
Pocket rim: Rnd 22 of each pocket is its edging. One sl st per st keeps the opening at exactly 60 sts, or 15 in (38.1 cm) around.
Final Blocking
- Weave in all ends.
- Lightly mist the strip with water.
- Pin the strip flat to 6.5 x 21.5 in (16.5 x 54.6 cm), keeping the sides straight.
- Put a toilet roll wrapped in a plastic bag into each pocket to shape the walls.
- Pin the petal points outward and upward so each tip is sharp.
- Let everything dry completely, for at least 24 hours.
- Remove the pins and the plastic.
Final Quality-Control Checklist
- The strip is 6.5 in (16.5 cm) wide, with 80 edging sts on each long side.
- Each pocket has 60 sts per round and walls 4 in (10.2 cm) tall.
- Each back petal layer shows 7 points; each front layer shows 5.
- The centers lie flat and measure 2 in (5.1 cm) across.
- The leaves form an even V with the stem tip between them.
- The gap between pockets is 2.5 in (6.4 cm).
- The ring fold is sewn securely, with no stitches showing on the front.
- A standard roll slides in and out easily.
Troubleshooting
- Strip edges wave: There are too many edging sts. Skip every 9th row end consistently.
- Strip edges pull in: The edging is too tight. Use a larger hook for the edging round only.
- Petal fan cups: Your dc are tight. Go up 0.5 mm for the petal layers.
- Petal fan ruffles: Block it flat under pins, or go down 0.5 mm.
- Roll doesn’t fit: The pocket is too tight. Remake it with a larger hook; 60 sts must measure 15 in (38.1 cm) around.
- Pocket sags forward: Sew a second line joining the back wall of the pocket to the strip at mid-height.
- Center puckers: Work the Rnd 5 sl sts more loosely, or use a larger hook for that round.
Care
Hand wash in cool water and lay flat to dry, reshaping the pockets and petals. Take the holder off its hook by the ring before washing.
Final Notes
Each measurement builds on the one before. A gauge of 4 sc per 1 in (2.5 cm) gives a 24-st strip 6 in (15.2 cm) wide, and the edging takes it to 26 sts and 6.5 in (16.5 cm). A 60-st pocket measures 15 in (38.1 cm) around and 7.5 in (19.1 cm) laid flat, which leaves room for a 4.5 in (11.4 cm) roll. The 26 back-rim sts match the 26 edged strip sts exactly, so the pockets sit square. If you check gauge at each checkpoint, the pieces will fit together without guesswork.
Happy crocheting!