

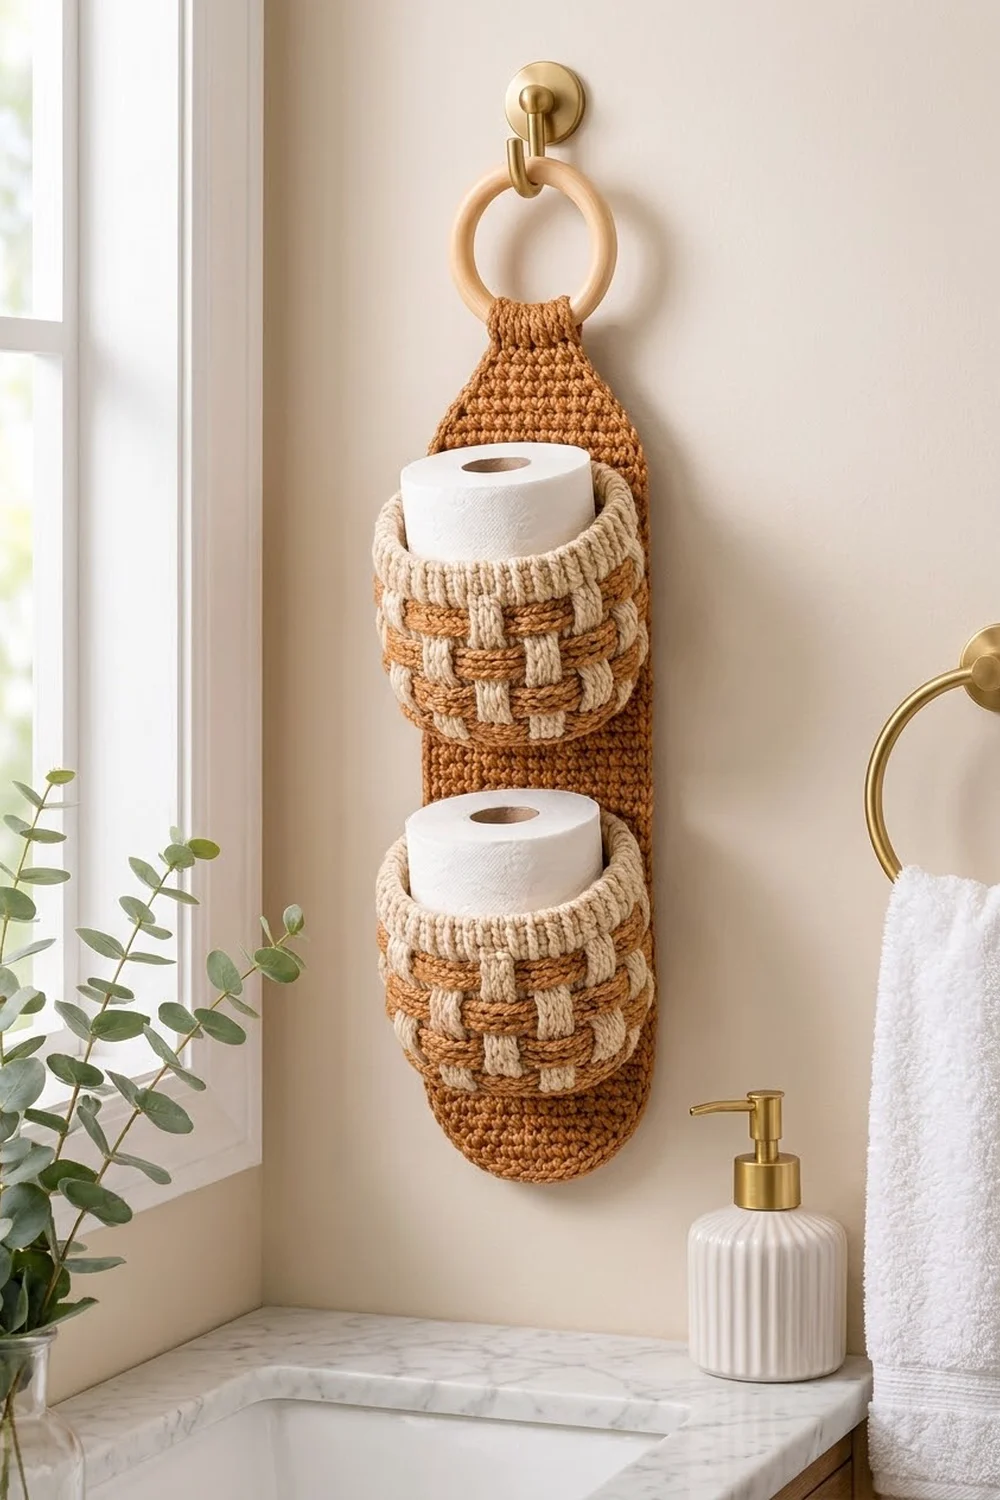
This hanging holder stores two spare rolls in woven-look baskets on a soft caramel backing strip. It hangs from a wooden ring, so it fits on a towel hook, a door hook or a cabinet knob. It’s useful in a small bathroom and looks good too.
Two colors do all the work. Caramel is used for the backing strip, the basket bases and the horizontal bands. Cream is used for the raised bars and the thick basket rims. Front post double crochet bars in a staggered pattern make the walls look like real basketry.
The pattern uses US crochet terms throughout. The finished holder is about 5 2/3 in (14.4 cm) wide and about 16 in (40.6 cm) tall from the bottom edge to the top of the tab fold. With the ring it measures about 18 in (45.7 cm). Each basket is about 4.75 in (12.1 cm) square and 3.75 in (9.5 cm) tall.
Construction: work the strip flat in rows from the bottom up and edge it with a single-crochet border. Work each basket in joined rounds, starting from the center of the base. Sew both baskets to the strip stitch by stitch, then fold the tab over the ring and sew it down.
Finished Size and Construction
- Finished size: 5 2/3 in (14.4 cm) wide × about 16 in (40.6 cm) tall; about 18 in (45.7 cm) including the ring
- Skill level: Intermediate
- Terminology: US
- Yarn weight: Bulky (#5) cotton or cotton blend
- Hook: 6.0 mm (US J-10)
- Number of pieces: 3 crocheted pieces (1 backing strip, 2 baskets) plus 1 wooden ring
- Layout: 2 baskets stacked vertically on 1 strip
- Piece size: Strip 5 in × 15 in (12.7 cm × 38.1 cm) before the border; each basket base 4.75 in (12.1 cm) square, walls 3.75 in (9.5 cm) tall
- Size before border: 5 in (12.7 cm) wide
- Border depth: 1/3 in (0.8 cm), one round of sc
Materials
Choose a firm, smooth bulky cotton or cotton blend at about 110 m per 100 g. Cotton holds the basket shape and handles bathroom humidity better than soft acrylic. Avoid very fuzzy yarns, because they blur the woven texture.
- Color A – Caramel: 250 g, about 275 m
- Color B – Cream: 125 g, about 140 m
These quantities include a margin of about 15% for swatching and joining.
Tools:
– 6.0 mm (US J-10) crochet hook
– Wooden ring, 2.5 in (6.4 cm) outer diameter
– Tapestry needle
– 4 locking stitch markers
– Rust-proof pins
– Scissors and a measuring tape
Abbreviations (US Terms)
- ch – chain
- sc – single crochet
- sc2tog – single crochet 2 together
- sl st – slip stitch
- st(s) – stitch(es)
- MR – magic ring
- BLO / FLO – back loop only / front loop only
- rep – repeat
- Rnd – round
Special stitch – FPdc (front post double crochet), worked two rounds down: Yarn over and insert the hook from front to back to front around the post of the indicated stitch two rounds below. Yarn over, pull up a loop, then (yarn over, pull through 2) twice. Always skip the stitch of the current round that sits behind the FPdc, so the stitch count stays the same.
Gauge and Checkpoints
Gauge: 12 sc × 12 rows = 4 in (10.2 cm) in sc worked flat. To swatch, chain 13, work 12 sc, and work 12 rows. The fabric should be firm and close.
This square gauge matters because one sc per row end along the strip edge only lies flat when rows and stitches are the same size.
Test one piece first: Make one basket base through Rnd 7 before you start anything else.
Checkpoints:
– Basket base after Rnd 4: about 2.75 in (7.0 cm) square
– Basket base after Rnd 7: about 4.75 in (12.1 cm) square
– Basket wall after Rnd 19: about 3.75 in (9.5 cm) tall
– Strip after Row 4: 5 in (12.7 cm) wide
– Strip after Row 36: 12 in (30.5 cm) long
– Strip after Row 45: 15 in (38.1 cm) long
If your piece is too big, go down 0.5 mm in hook size. If it is too small, go up 0.5 mm. A basket that comes out more than 0.25 in (0.6 cm) off will no longer match the 15-stitch width of the strip.
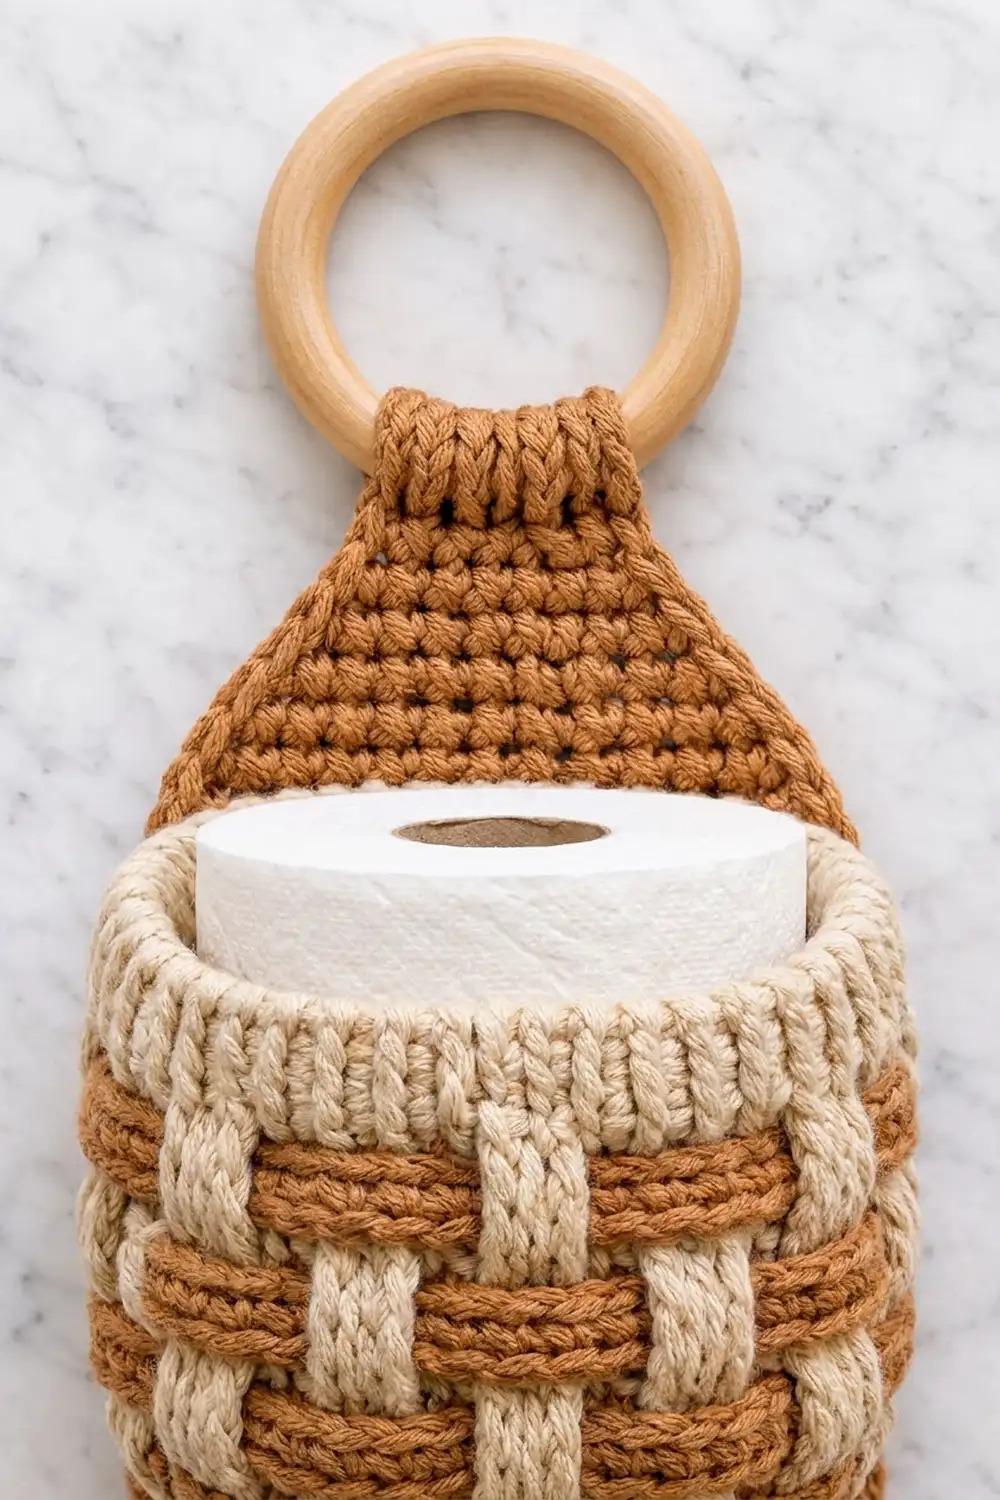
Basket (Make 2)
Work in joined rounds without turning. Begin each round with ch 1 (this does not count as a stitch), and join with a sl st to the first sc.
Base (Color A)
Rnd 1: Work 8 sc in a MR. Join. (8 sts)
Rnd 2: *3 sc in next st, sc in next st; rep from * 3 more times. Join. (16 sts; 5 per side)
Place a marker in the center sc of each 3-sc group. These are the corner stitches.
Rnd 3: *Sc in each st to the corner st, 3 sc in the corner st; rep from * 3 more times, then sc in each remaining st. Join. (24 sts; 7 per side)
Rnd 4: Repeat Rnd 3. (32 sts; 9 per side)
Checkpoint: about 2.75 in (7.0 cm) square.
Rnd 5: Repeat Rnd 3. (40 sts; 11 per side)
Rnd 6: Repeat Rnd 3. (48 sts; 13 per side)
Rnd 7: Repeat Rnd 3. (56 sts; 15 per side)
The per-side counts include both corner stitches, so each round has 4 × (per side) − 4 = total. For Rnd 7, that’s 4 × 15 − 4 = 56. The base measures about 4.75 in (12.1 cm) square, and its corners soften into a rounded square once the walls go up.
Walls
Keep your markers on the 4 corner columns. Work the joins at one corner, which will become the back corner against the strip. Carry the unused color loosely up the inside at the join instead of fastening off.
Rnd 8 (A): Sc in BLO in each st. Join. (56 sts)
This round turns the wall up and leaves a ridge of front loops around the base edge.
Rnd 9 (B): Sc in each st. Join. (56 sts)
Rnd 10 (A): Sc in each st. Join. (56 sts)
Rnd 11 (B): *Sc in next 2 sts, FPdc around each of the next 2 sts of Rnd 9; rep from * 13 more times. Join. (56 sts: 28 sc + 28 FPdc)
Rnd 12 (A): Sc in each st. Join. (56 sts)
Rnd 13 (B): *FPdc around each of the next 2 sts of Rnd 11 (these are the sc stitches), sc in next 2 sts; rep from * 13 more times. Join. (56 sts)
Rnd 14 (A): Sc in each st. Join. (56 sts)
Rnd 15 (B): Repeat Rnd 11, working the FPdc around the sc stitches of Rnd 13. (56 sts)
Rnd 16 (A): Sc in each st. Join. Fasten off A. (56 sts)
Each FPdc pair crosses one caramel band. Because the pairs shift by 2 stitches every cream round, they form the staggered over-under pattern. There are 14 repeats of 4 stitches, which divides 56 exactly.
Rim (Color B)
Rnds 17–18: Sc in each st. Join. (56 sts each round)
Rnd 19: Sl st loosely in FLO of each st. Join. Fasten off. (56 sts)
Checkpoint: The walls (Rnds 8–19) should be about 3.75 in (9.5 cm) tall.
Backing Strip (Color A)
Work flat in rows. Begin each row with ch 1 and turn (the ch 1 does not count as a stitch).
Row 1: Ch 10. Sc in the 2nd ch from the hook and in each ch across. (9 sts)
Row 2: 2 sc in the first st, sc in each st to the last st, 2 sc in the last st. (11 sts)
Row 3: Repeat Row 2. (13 sts)
Row 4: Repeat Row 2. (15 sts)
These increases make the rounded bottom. Checkpoint: 5 in (12.7 cm) wide.
Rows 5–36: Sc in each st. (15 sts each row)
Checkpoint: 12 in (30.5 cm) long.
Taper:
– Row 37: Sc2tog, sc to the last 2 sts, sc2tog. (13 sts)
– Row 38: Sc in each st. (13 sts)
– Row 39: Repeat Row 37. (11 sts)
– Row 40: Sc in each st. (11 sts)
– Row 41: Repeat Row 37. (9 sts)
– Row 42: Sc in each st. (9 sts)
– Row 43: Repeat Row 37. (7 sts)
– Row 44: Sc in each st. (7 sts)
– Row 45: Repeat Row 37. (5 sts)
The taper is 9 rows, about 3 in (7.6 cm). Checkpoint: the strip is 15 in (38.1 cm) long.
Tab – Rows 46–50: Sc in each st. (5 sts each row)
Leave the working loop live for the border.
Make All Pieces
- Backing strip: 1, Color A only
- Baskets: 2, each with Color A base and bands and Color B bars and rim
Layout (front view, top to bottom):
        [ wooden ring ]
          [ tab 46-50 ]
         /  taper 37-45  \
|        rows 30-36 empty       |
|   TOP BASKET   rows 19-29     |
|        rows 16-18 gap         |
|  BOTTOM BASKET rows 5-15      |
|      rows 1-4 rounded base    |
Joining
Place each basket with its join corner at the back left, so the color-change seam sits against the strip and stays hidden.
Stitch-to-stitch logic: The back side of each basket has 15 stitches including its 2 corners, and the strip is 15 stitches wide. The wall has 11 sc rounds (Rnds 8–18), which match 11 strip rows. Every seam is therefore 1 to 1.
- Base edge: With Color A, whipstitch the 15 back front-loops left from Rnd 8 to the 15 stitches of strip Row 4 (bottom basket) or Row 18 (top basket).
- Corner columns: Whipstitch each back corner column, 1 round to 1 row, to strip column 1 and column 15. For the bottom basket that’s Rows 5–15. For the top basket it’s Rows 19–29.
- Rim: Tack the 15 back rim stitches to the strip row level with them (Row 15 or Row 29).
Tension: Pull each whipstitch just snug. Tight sewing puckers the strip, and loose sewing lets the basket sag forward when it holds a roll.
Size checkpoint: The gap between the baskets (Rows 16–18) should be 1 in (2.5 cm). There should be about 2 1/3 in (5.9 cm) of plain strip above the top basket before the taper.
Border
Work the border around the strip after joining, so you can square up any edge pull.
Border gauge: 1 sc per row end along the sides and 1 sc per stitch along the foundation.
Border Rnd 1 (A): Continue from the live loop at the end of Row 50. Turn the work and work down the side edge of the tab, but don’t work into the tab itself. At the base of the tab, start the border:
– Side 1: Sc in each row end from Row 45 down to Row 1. (45 sts)
– Bottom: Sc in the free loop of each of the 9 foundation chains. (9 sts)
– Side 2: Sc in each row end from Row 1 up to Row 45. (45 sts)
Fasten off. Total: 45 + 9 + 45 = 99 sts.
Why the math works: The gauge is square, at 3 sts and 3 rows per inch (2.5 cm), so 45 row ends need exactly 45 stitches to lie flat. The bottom curve needs no extra increases because Rows 2–4 already shaped it. The border adds 1/3 in (0.8 cm) to each edge, bringing the width from 5 in (12.7 cm) to 5 2/3 in (14.4 cm).
Ring: Fold the tab (Rows 46–50) through the wooden ring to the back. Whipstitch the 5 stitches of Row 50 to the back of Row 45.
Final Blocking
- Lightly mist the whole holder with water.
- Pin the strip flat to 5 2/3 in (14.4 cm) wide, keeping the border edges straight.
- Stuff each basket firmly with a towel or a toilet roll to square the walls to 4.75 in (12.1 cm).
- Press the rims into even, rounded edges with your fingers.
- Let it dry completely, at least 24 hours, before removing the pins and stuffing.
Final Quality-Control Checklist
- Each basket has 56 sts in every wall round.
- The FPdc bars stagger evenly across all 14 repeats.
- The color-change seams face the strip.
- The strip has 15 sts through Rows 4–36 and 5 sts at Row 45.
- The border has 99 sts: 45, 9, 45.
- The baskets sit level and centered, with a 1 in (2.5 cm) gap between them.
- The ring tab is secure and all ends are woven in.
Troubleshooting
- The base cups instead of lying flat: Your tension tightened. Go up 0.5 mm in hook size for the base rounds.
- The base ruffles: Check that you work 3 sc only into the marked corner stitches.
- The bars lean: Make sure each FPdc goes around a stitch exactly two rounds below, directly underneath it.
- The stitch count drifts in the bar rounds: Skip the stitch behind every FPdc.
- The side border waves: Your row gauge is taller than your stitch gauge. Skip 1 row end every 10 rows.
- The basket sags: Tighten the corner-column seams and tack the rim more firmly.
- A roll doesn’t fit: The baskets suit standard rolls up to about 4.5 in (11.4 cm) wide. For larger rolls, add a Rnd 8 of increases to the base.
Care
Hand wash in cool water and reshape while damp. Dry flat, with the baskets stuffed so they keep their shape.
Final Notes
The measurement chain is simple to follow:
– A gauge of 12 sc × 12 rows = 4 in (10.2 cm) gives a 56-stitch basket base of 4.75 in (12.1 cm) with 15 sts per side.
– That matches the 15-stitch, 5 in (12.7 cm) strip, so the joining is 1 to 1.
– The 99-stitch border brings the strip to 5 2/3 in (14.4 cm) wide.
– The finished holder is about 16 in (40.6 cm) tall, or about 18 in (45.7 cm) with the ring.
Check each stage against these numbers and the pieces will fit together without any adjustments. Happy crocheting!