

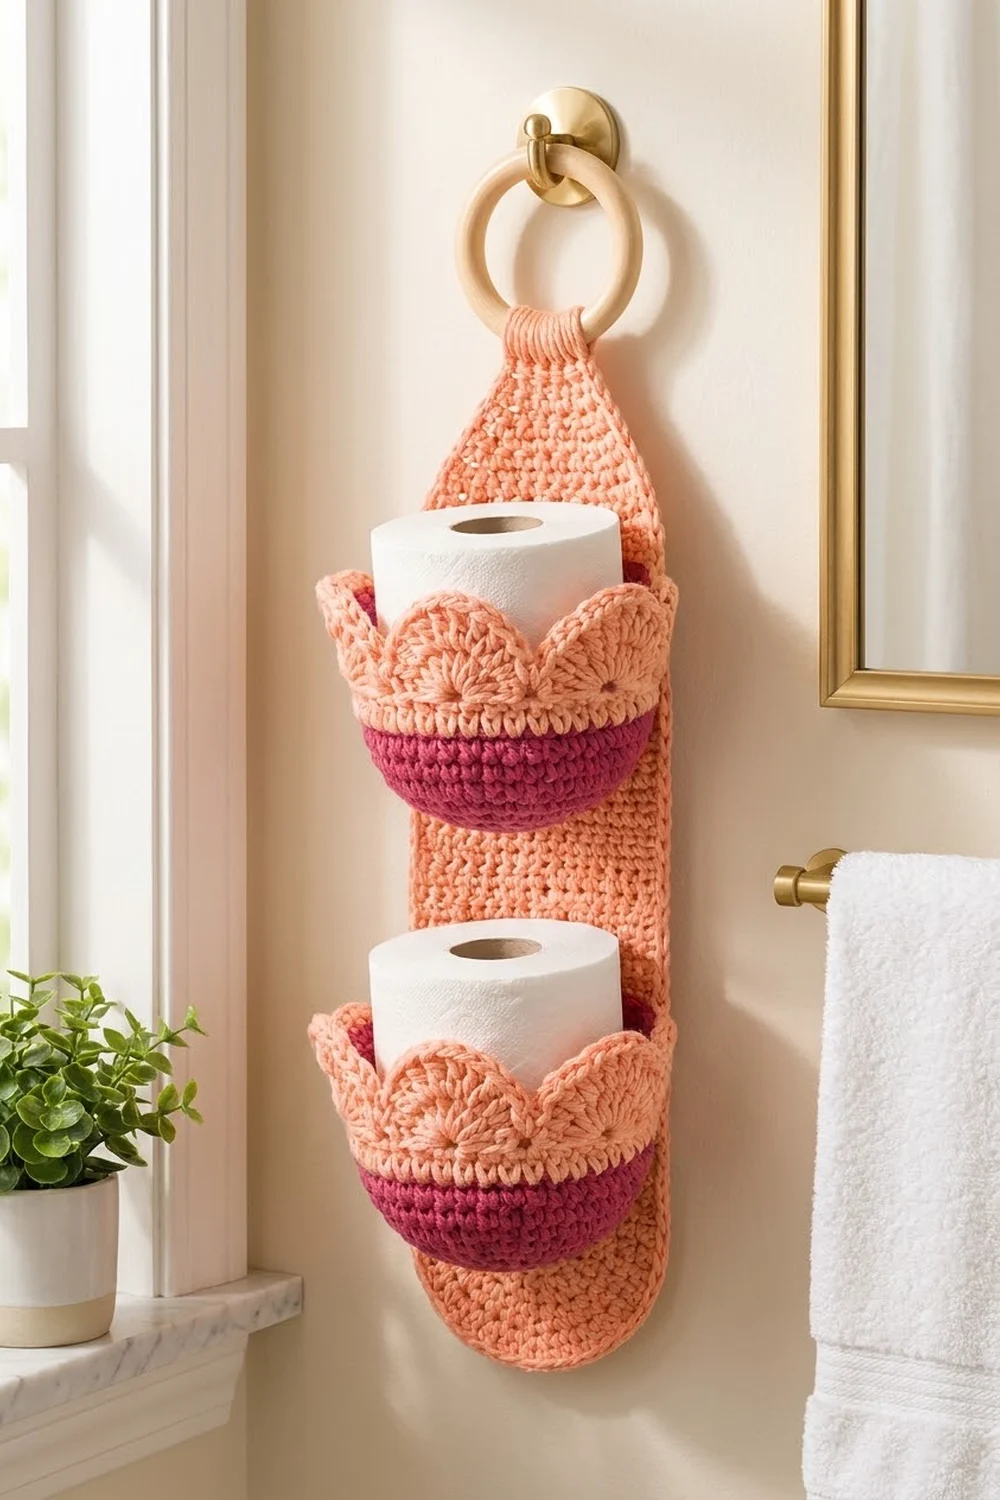
The Coral Bloom holder is a long, soft backing strip with two round cups. Each cup holds one spare roll, and the whole piece hangs from a wooden ring. The cups have a deep raspberry base and a peach band topped with flared scallops, so each roll looks like it sits inside an open flower.
The colors are a soft peach for the strip and scallop bands and a rich raspberry for the cup bases and lower walls. Cotton yarn shows the stitches clearly and is firm enough for the cups to keep their shape.
This pattern uses US crochet terms. The finished holder is about 6.5 in (16.5 cm) wide and 25.5 in (64.8 cm) long, not counting the ring. Each cup is about 5.7 in (14.5 cm) across and 3.5 in (8.9 cm) tall, which fits a standard roll about 4.5 in (11.4 cm) across.
First you crochet two cups in joined rounds, starting at the base. Next, you make the strip in rows, from the rounded bottom up to a narrow tab. A single border round finishes the strip. The tab then wraps around the ring, and the cups are sewn onto the front.
Finished Size and Construction
- Finished size: about 6.5 in (16.5 cm) wide x 25.5 in (64.8 cm) long, not counting the ring
- Skill level: Easy to Intermediate
- Terminology: US crochet terms
- Yarn weight: worsted weight (#4) cotton
- Hook: 5.0 mm (H-8)
- Number of pieces: 3 (1 backing strip, 2 cups)
- Layout: 2 cups stacked on 1 strip
- Piece size: each cup 5.7 in (14.5 cm) across x 3.5 in (8.9 cm) tall; strip body 6 in (15.2 cm) x 24 in (61.0 cm)
- Size before border: strip 6 in (15.2 cm) wide
- Border depth: 1 round of sc, about 0.25 in (0.6 cm) on each edge
Materials
Use a smooth worsted weight cotton or cotton blend. Cotton keeps its shape, holds up well in a bathroom, and is easy to wash. Avoid very soft acrylic, because the cups may sag under the weight of a roll.
- Color A, Peach: about 100 g / 154 m (strip, border, tab, scallop bands on the cups)
- Color B, Raspberry: about 60 g / 92 m (cup bases and lower walls)
Tools:
- 5.0 mm (H-8) crochet hook
- 1 wooden ring, 3 in (7.6 cm) across
- Stitch markers
- Tapestry needle
- Scissors
- Rust-proof pins and a blocking mat
These amounts include about 20 percent extra, which covers a gauge swatch and small tension differences.
Abbreviations (US Terms)
- ch: chain
- sl st: slip stitch
- sc: single crochet
- dc: double crochet
- sc2tog: single crochet 2 together
- inc: 2 sc in the same stitch
- BLO: back loop only
- st(s): stitch(es)
- rnd: round
- rep: repeat
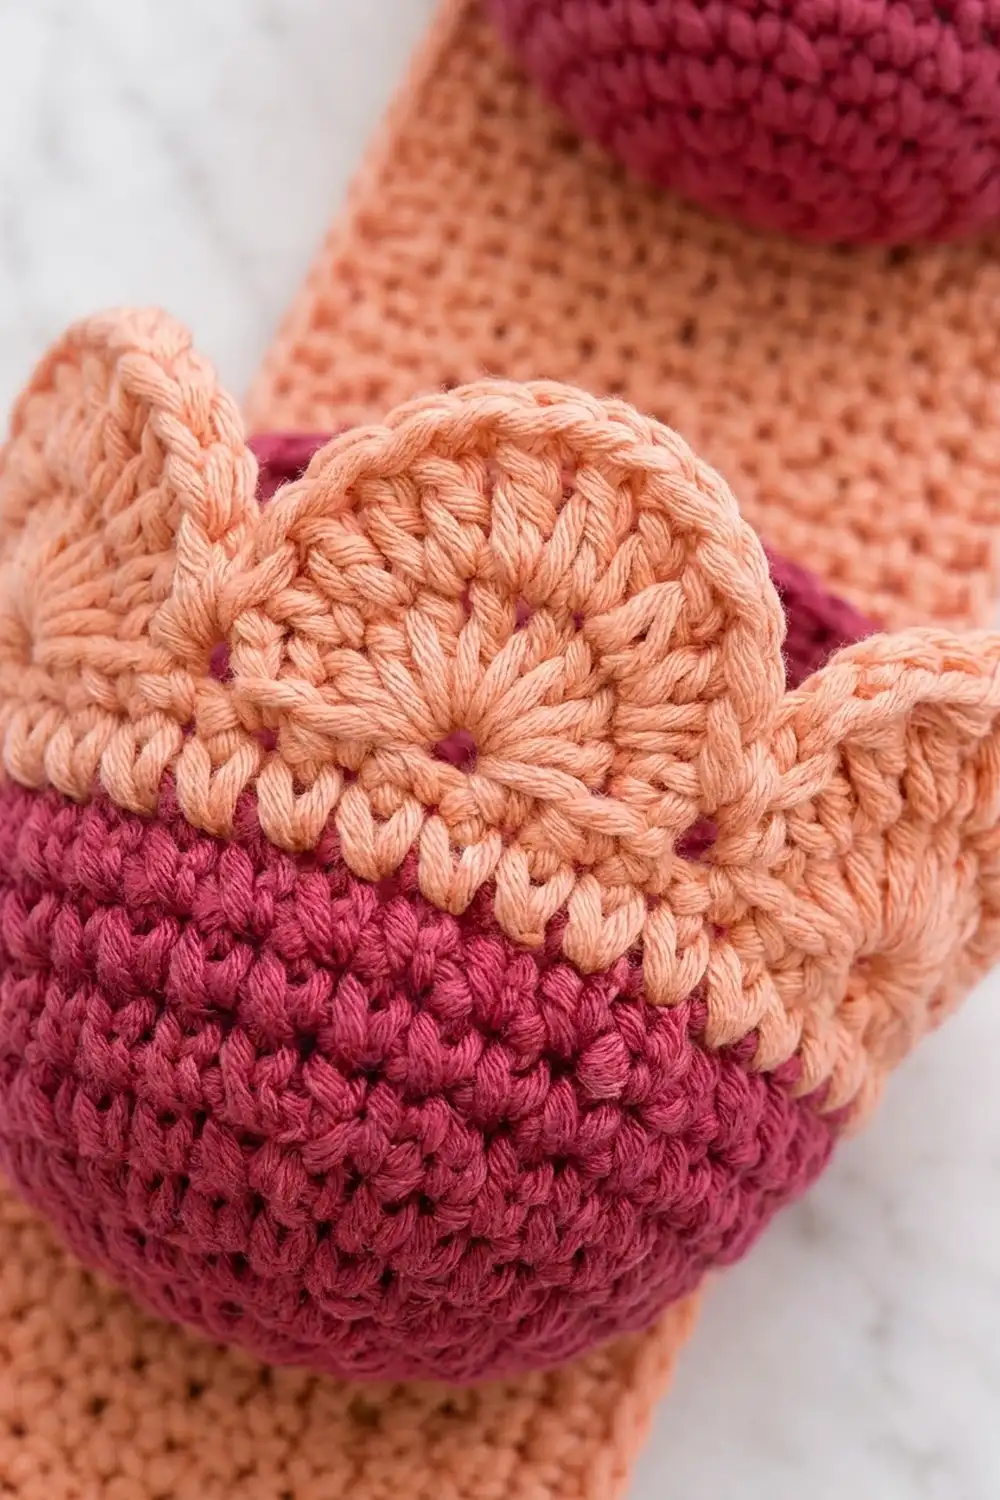
Special stitch – Fan: work 9 dc in the same stitch. Because all 9 dc share one base stitch, a small hole (eyelet) opens at the bottom of each fan.
Gauge and Checkpoints
Gauge: 16 sc and 18 rows = 4 in (10.2 cm) in sc worked in rows with a 5.0 mm hook.
Make one cup before you start the strip. The cup is the best test piece because it uses both colors and every stitch in the pattern, and its size decides whether a roll will fit.
Checkpoints:
- Cup after Rnd 6 (36 sts): about 2.9 in (7.4 cm) across
- Cup after Rnd 12 (72 sts): about 5.7 in (14.5 cm) across, lying flat
- Cup after Rnd 21: raspberry walls about 2 in (5.1 cm) tall
- Finished cup: about 3.5 in (8.9 cm) tall to the scallop tips
- Strip after Row 8: 24 sts, 6 in (15.2 cm) wide, about 1.8 in (4.6 cm) long
- Strip after Row 100: about 22.2 in (56.4 cm) long
- Strip after Row 108: 24 in (61.0 cm) long
If your base measures more than 5.7 in (14.5 cm), switch to a 4.5 mm hook. If it measures less than 5.5 in (14.0 cm), switch to a 5.5 mm hook, or a roll won’t drop in easily. Use the same hook for the strip so that the cups and strip line up row for row when you sew them together.
Cup (Make 2)
Work in joined rounds and do not turn. The ch 1 at the start of each round does not count as a stitch.
Base (Color B, Raspberry)
Rnd 1: Make a magic ring, ch 1, 6 sc in ring, sl st to first sc. (6 sts)
Rnd 2: Ch 1, inc in each st around, sl st to first sc. (12 sts)
Rnd 3: Ch 1, sc in next st, inc in next st; rep from * 6 times, sl st to first sc. (18 sts)
Rnd 4: Ch 1, sc in next 2 sts, inc; rep from * 6 times, join. (24 sts)
Rnd 5: Ch 1, sc in next 3 sts, inc; rep from * 6 times, join. (30 sts)
Rnd 6: Ch 1, sc in next 4 sts, inc; rep from * 6 times, join. (36 sts)
Rnds 7–12: Keep adding 6 sts per round. On each round, work one more plain sc before each inc than on the round before. For example, Rnd 7 is sc in next 5 sts, inc.
Round totals: Rnd 7 = 42 sts, Rnd 8 = 48 sts, Rnd 9 = 54 sts, Rnd 10 = 60 sts, Rnd 11 = 66 sts, and Rnd 12 = 72 sts.
On Rnds 8, 10, and 12, start with half of the plain sc and work the other half at the end of the round. This shifts the increases so the circle stays round instead of turning into a hexagon. Check that the base measures 5.7 in (14.5 cm) across.
Walls (Color B, Raspberry)
Rnd 13: Ch 1, sc in BLO of each st around, join. (72 sts)
Working in the back loops only makes a crisp ridge where the flat base turns up into the wall.
Rnds 14–21: Ch 1, sc in each st around, join. (72 sts)
The walls should now measure about 2 in (5.1 cm) above the ridge. To change color, complete the last join of Rnd 21 with Color A, then fasten off Color B.
Peach Band (Color A, Peach)
Rnds 22–23: Ch 1, sc in each st around, join. (72 sts)
This band is about 0.5 in (1.3 cm) tall.
Scallops (Color A, Peach)
Rnd 24: Ch 1, sc in first st, skip 3 sts, Fan in next st, skip 3 sts, sc in next st. Rep from * 8 more times. On the last rep, instead of the final sc, sl st to the first sc. (9 fans + 9 sc = 90 sts)
Each repeat uses 8 stitches of Rnd 23: 1 sc, 3 skipped, 1 fan base, and 3 skipped. 9 repeats x 8 sts = 72 sts, so the round comes out even.
Rnd 25: Ch 1, sc in first sc, 2 dc in each of next 9 dc, sc in next sc. Rep from * 8 more times. On the last rep, instead of the final sc, sl st to the first sc. (9 x 18 dc + 9 sc = 171 sts)
Working 2 dc in every dc makes each scallop flare outward and adds a second, wider outline around the eyelet. Fasten off and weave in the ends. The cup should be about 3.5 in (8.9 cm) tall.
Make a second cup the same way.
Backing Strip (Color A, Peach)
Work in rows. The ch 1 at the start of each row does not count as a stitch.
Rounded Bottom
Row 1: Ch 15, sc in 2nd ch from hook and in each ch across, turn. (14 sts; 3.5 in / 8.9 cm wide)
Row 2: Ch 1, inc in first st, sc in next 12 sts, inc in last st, turn. (16 sts)
Row 3: Ch 1, inc, sc in next 14 sts, inc, turn. (18 sts)
Row 4: Ch 1, inc, sc in next 16 sts, inc, turn. (20 sts)
Row 5: Ch 1, sc in each st across, turn. (20 sts)
Row 6: Ch 1, inc, sc in next 18 sts, inc, turn. (22 sts)
Row 7: Ch 1, sc in each st across, turn. (22 sts)
Row 8: Ch 1, inc, sc in next 20 sts, inc, turn. (24 sts; 6 in / 15.2 cm wide)
Body
Rows 9–100: Ch 1, sc in each st across, turn. (24 sts)
Taper
Rows 101–108: Ch 1, sc2tog, sc across to last 2 sts, sc2tog, turn.
Each row is 2 sts shorter than the one before. Row totals: Row 101 = 22 sts, Row 102 = 20, Row 103 = 18, Row 104 = 16, Row 105 = 14, Row 106 = 12, Row 107 = 10, and Row 108 = 8. The strip now measures 24 in (61.0 cm).
Hanging Tab
Rows 109–120: Ch 1, sc in each st across, turn. (8 sts)
The tab is 2 in (5.1 cm) wide and about 2.7 in (6.9 cm) long. Don’t fasten off; go straight on to the border.
Make All Pieces
- Color B, Raspberry: Rnds 1–21 of both cups
- Color A, Peach: Rnds 22–25 of both cups, plus the strip, border, and tab
Layout, top to bottom:
[ wooden ring  ]
[ tab, folded  ]
[ taper        ]
[ plain strip  ]
[ CUP 2        ]  bottom ridge at Row 62
[ plain strip  ]
[ CUP 1        ]  bottom ridge at Row 8
[ round bottom ]
Border
Work the border while the strip is still flat, before sewing anything.
Border gauge: Along the sides, 18 rows measure 4 in (10.2 cm), but only 16 sc fit in 4 in (10.2 cm). To keep the edge flat, work 1 sc in each row end but skip every 9th row end. That gives 16 sc for every 18 rows.
How the counts work: The top and bottom counts include their 3-sc corner groups. The side counts are row-end stitches only, with no corner stitches.
Rnd 1: Ch 1 and work around the strip as follows:
- Top edge (Row 120): 3 sc in first st, sc in next 6 sts, 3 sc in last st. (12 sts)
- Side 1: Work down the 120 row ends, 1 sc in each, skipping row ends 9, 18, 27, 36, 45, 54, 63, 72, 81, 90, 99, 108, and 117. (120 − 13 = 107 sts)
- Bottom edge (foundation chain): 3 sc in first ch, sc in next 12 ch, 3 sc in last ch. (18 sts)
- Side 2: Work up the 120 row ends, skipping the same 13 row ends. (107 sts)
Sl st to first sc and fasten off. Total: 12 + 107 + 18 + 107 = 244 sts.
Why the math works: The top has 6 plain sts plus 2 corner groups of 3, for 12. The bottom has 12 plain chains plus 2 corner groups of 3, for 18. At 16 stitches per 18 rows, 120 rows need 106.7 stitches, so 107 is the nearest whole number. The border adds about 0.25 in (0.6 cm) on each side, so the body becomes 6.5 in (16.5 cm) wide.
Joining
Tab to Ring
Pass the tab through the ring from front to back. Fold it down so its bordered top edge lies on the back of the strip over Rows 105–108. With Color A, whipstitch that 12-stitch top edge to the back of the strip, 1 stitch in each border stitch. Pull just firmly enough that the ring sits snugly in the fold.
Cups to Strip
The cups are round, so press the back of each cup flat against the strip and sew around a rectangle.
- Mark Row 8 for Cup 1 and Row 62 for Cup 2. These rows are about 1.8 in (4.6 cm) and 13.8 in (35.1 cm) above the bottom of the body.
- On each cup, mark 16 sts in a row along the Rnd 13 ridge, and the 16 sts directly above them on Rnd 23.
- Place the ridge along the marked row, centered on the strip’s middle 16 sts. This leaves 4 strip sts plus the border free on each side.
- Bottom line: Whipstitch 16 cup sts to 16 strip sts, one to one. Both pieces have 4 sts per 1 in (2.5 cm), so they match exactly.
- Side lines: Whipstitch up both sides of the flattened area, joining 11 cup rounds (Rnds 13–23) to 11 strip rows. Both pieces have 18 rows per 4 in (10.2 cm). Cup 1 covers Rows 8–18, and Cup 2 covers Rows 62–72.
- Top line: Whipstitch the 16 marked Rnd 23 sts to the matching strip sts.
Tension: Sew snugly but not tightly. If the stitches are too tight, the strip will pucker; if they are too loose, the cups will tip forward. Leave Rnds 24–25 unsewn so the scallops flare.
Size checkpoint: The holder should lie flat and measure 6.5 in (16.5 cm) wide and about 25.5 in (64.8 cm) long, from the bottom border to the top of the fold.
Final Blocking
- Weave in any remaining ends through stitches of the same color.
- Mist the holder until damp, not soaked.
- Pin the strip flat at 6.5 in (16.5 cm) wide with straight sides.
- Put a roll wrapped in a plastic bag into each cup so the walls dry round.
- Shape each scallop with your fingers so it curves outward. Pin the tips if needed.
- Let it dry completely, usually 12–24 hours.
Final Quality-Control Checklist
- Each cup base has 72 sts and measures 5.7 in (14.5 cm) across.
- Each cup has 9 even scallops, each with a visible eyelet at its base.
- The color change between Rnds 21 and 22 is a clean line.
- The strip body is 24 sts wide and 24 in (61.0 cm) long before the border.
- The border has 244 sts and lies flat.
- Both cups are centered and level, at Rows 8 and 62.
- The ring is secure, and the tab isn’t twisted.
- A roll drops into each cup easily.
Troubleshooting
- Base curls up into a bowl: Your tension is too tight. Go up a hook size, and check that each round has 6 increases.
- Base ruffles: Your tension is too loose. Go down a hook size, and recount the increases.
- Rnd 24 doesn’t come out even: Rnd 23 needs exactly 72 sts.
- Scallops droop: Work Rnd 25 more firmly, or block the scallops with light spray starch.
- Strip edges ripple: Check that you skipped every 9th row end in the border.
- Cup tips forward: Add a second line of whipstitch along the Rnd 23 line.
Care
Hand wash, or machine wash cold on a gentle cycle. Reshape the cups and dry flat. Don’t tumble dry, because heat can shrink cotton and distort the scallops.
Final Notes
Every measurement in this pattern follows from the gauge of 16 sc and 18 rows to 4 in (10.2 cm). At that gauge, the 72-stitch cup base measures 5.7 in (14.5 cm) across. Each base grows into 2 in (5.1 cm) of raspberry wall, a peach band, and 9 scallops. The strip is 24 sts, or 6 in (15.2 cm), wide and 108 rows, or 24 in (61.0 cm), long. The border brings the width to 6.5 in (16.5 cm). Because the cups and strip share one gauge, they join stitch to stitch and round to row.
Happy crocheting!