

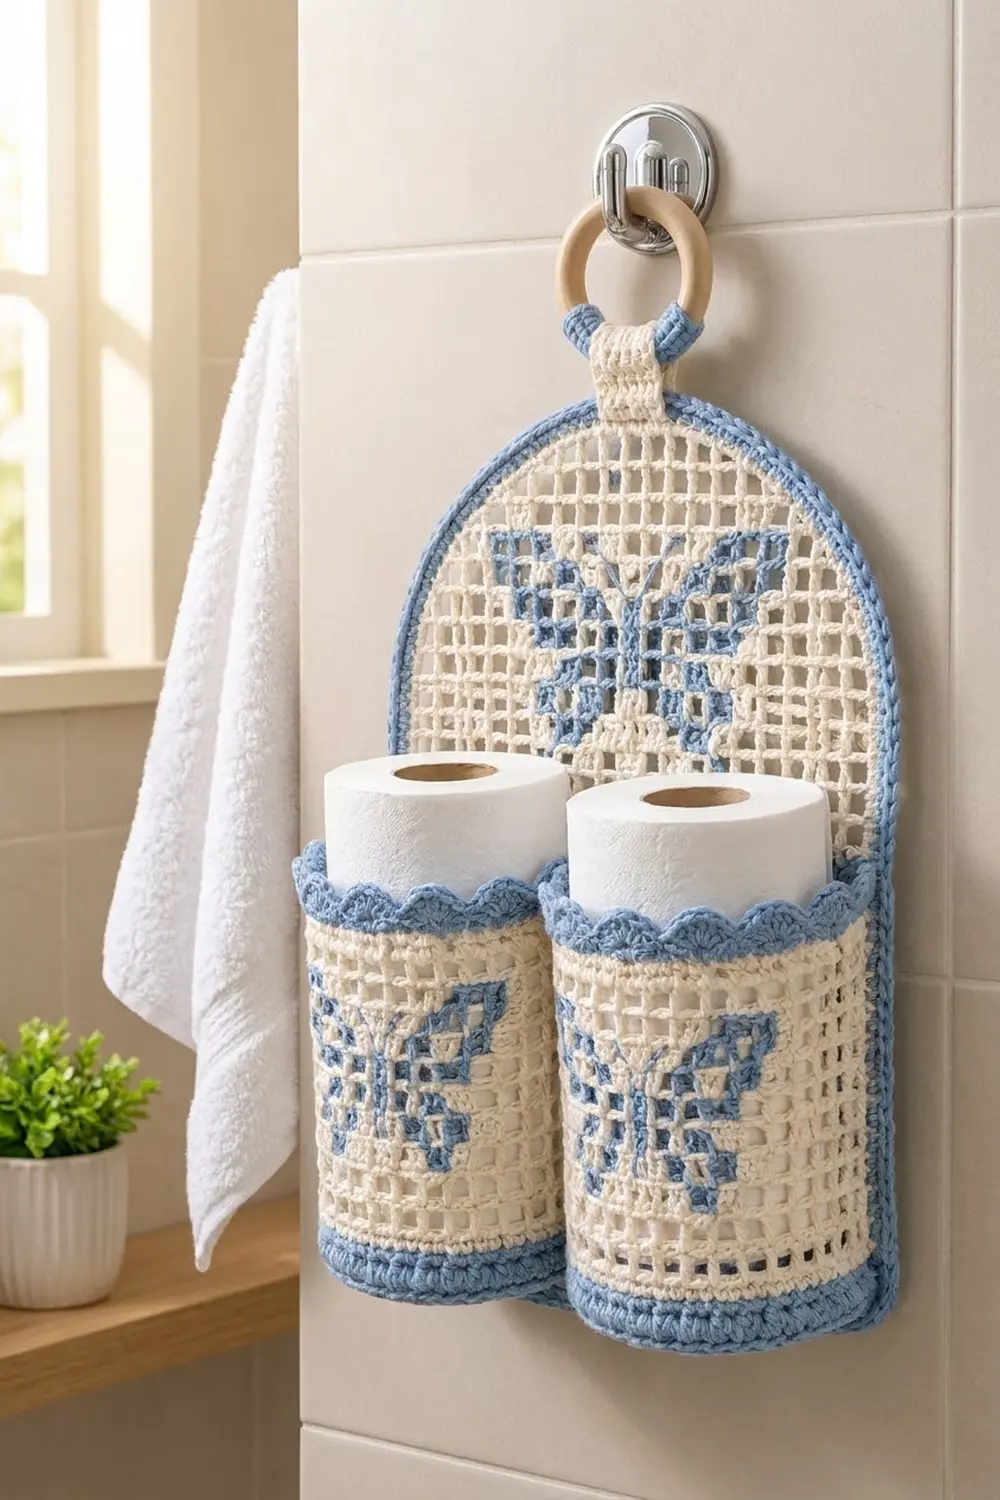
This hanging holder takes two spare toilet rolls and looks calm and tidy on the bathroom wall. Cream filet mesh gives it an airy, lace-like look. Soft blue makes the bases, the edging and the square-block butterflies.
The style is cottage-classic: a dome-topped backboard, two round pockets with scalloped rims, and a wooden ring for hanging. One large butterfly sits on the backboard and a smaller butterfly is on the front of each pocket.
The pattern uses US crochet terms. The finished backboard is 11.5 in (29.2 cm) wide and 11 in (27.9 cm) tall. Each pocket is 4.75 in (12.1 cm) across and about 4.5 in (11.4 cm) tall. Hanging height to the top of the ring is about 14 in (35.6 cm).
To build it, you work each pocket as a blue bowl and continue straight up into a cream mesh wall. The backboard is worked flat in filet rows and shaped into an arch, then gets a blue border. The butterflies are cross-stitched into the mesh afterward. Last, you sew the pockets and the ring tab to the board.
Finished Size and Construction
- Finished size: backboard 11.5 in × 11 in (29.2 cm × 27.9 cm); pockets 4.75 in (12.1 cm) diameter × 4.5 in (11.4 cm) tall
- Skill level: Intermediate
- Terminology: US
- Yarn weight: Worsted (#4) cotton
- Hook: 4.5 mm (US 7)
- Number of pieces: 4 (1 backboard, 2 pockets, 1 hanging tab)
- Layout: two pockets side by side across the lower board, tab centered at the top
- Backboard mesh: 21 squares wide × 20 rows tall
- Size before border: 10.5 in × 10 in (26.7 cm × 25.4 cm)
- Border depth: 0.5 in (1.3 cm), 2 rounds
Materials
Use a smooth, mercerized or combed worsted cotton. Cotton keeps the mesh crisp, holds its shape in a humid bathroom and is easy to wash. Avoid fuzzy yarns, because they blur the filet squares.
- Blue: 75 g (143 m / 156 yd) — pocket bases, bands, rims, border, butterflies, tab edging
- Cream: 100 g (190 m / 208 yd) — pocket mesh, backboard, tab
Tools:
- 4.5 mm (US 7) crochet hook
- Wooden ring, 2.5 in (6.4 cm) outer diameter
- Tapestry needle
- Stitch markers
- Scissors and a measuring tape
- Blocking mat and rust-proof pins
The yarn amounts include a margin of about 15% for gauge swatches and differences between brands.
Abbreviations (US Terms)
- ch – chain
- sl st – slip stitch
- sc – single crochet
- dc – double crochet
- BLO – back loop only
- sk – skip
- sp – space
- st(s) – stitch(es)
- rnd – round
- rev sc – reverse single crochet (crab stitch)
Special stitch – reverse sc: Working from left to right (right to left if you are left-handed), insert the hook into the next st to the right, yarn over, pull up a loop, yarn over, pull through both loops. This makes the twisted, rope-like edge.
Filet square: one dc plus one ch-1 sp is one square. A row of n squares has n + 1 dc and n ch-1 sps, so 2n + 1 sts.
Gauge and Checkpoints
- Sc gauge: 16 sc × 18 rnds = 4 in (10.2 cm)
- Filet gauge: 8 squares × 8 rows = 4 in (10.2 cm), so 1 square = 0.5 in (1.3 cm) each way
Make one pocket first. It shows both gauges, and it is the piece that has to fit a toilet roll.
Checkpoints:
- Pocket base after Rnd 10: 4.75 in (12.1 cm) diameter.
- Pocket wall after Rnd 20: 15 in (38.1 cm) around; a standard roll, about 4.25 in (10.8 cm) wide, slides in easily.
- Backboard after Row 14: 10.5 in (26.7 cm) wide × 7 in (17.8 cm) tall.
- Backboard after Row 20: 10.5 in × 10 in (26.7 cm × 25.4 cm).
- Backboard after border: 11.5 in × 11 in (29.2 cm × 27.9 cm).
If your piece comes out too big, go down 0.5 mm in hook size. If it is too small, go up 0.5 mm. Change hooks for the whole project, not just one part, because the pocket mesh rounds have to line up with the board rows when you sew them.
Pockets (make 2)
Base (blue)
Rnd 1: Magic ring, ch 1, 6 sc in ring, sl st to first sc. (6 sts)
Rnd 2: Ch 1, 2 sc in each st around, sl st to first sc. (12 sts)
Rnd 3: Ch 1, sc in next st, 2 sc in next st, repeat around, sl st to first sc. (18 sts)
Rnd 4: Ch 1, sc in next 2 sts, 2 sc in next st, repeat around, sl st. (24 sts)
Rnds 5–10: Keep increasing 6 sts per rnd, putting 1 more sc between increases each rnd. Rnd 5: 30 sts. Rnd 6: 36 sts. Rnd 7: 42 sts. Rnd 8: 48 sts. Rnd 9: 54 sts. Rnd 10: 60 sts.
Checkpoint: the base is 4.75 in (12.1 cm) across and lies flat.
Wall Band (blue)
Rnd 11: Ch 1, sc BLO in each st around, sl st to first sc. (60 sts) This turns the wall up and leaves a neat ridge around the bottom edge.
Rnds 12–14: Ch 1, sc in each st around, sl st to first sc. (60 sts)
On the last sl st of Rnd 14, change to cream. Fasten off blue. The band is about 0.9 in (2.3 cm) tall.
Mesh Wall (cream)
Rnd 15: Ch 4 (counts as dc + ch 1), sk next st, dc in next st, ch 1, sk next st, repeat 29 times, sl st to 3rd ch of beg ch-4. (30 dc + 30 ch-1 sps = 60 sts; 30 squares)
Rnds 16–20: Ch 4 (counts as dc + ch 1), dc in next dc, ch 1, repeat 29 times, sl st to 3rd ch of beg ch-4. (30 squares)
Number the squares from 1 to 30, starting at the beginning ch-4. The joining seam is the back of the pocket. On the last sl st of Rnd 20, change to blue. Fasten off cream.
Checkpoint: the mesh is 3 in (7.6 cm) tall (6 rnds × 0.5 in) and 15 in (38.1 cm) around.
Rim (blue)
Rnd 21: Ch 1, sc in each dc and each ch-1 sp around, sl st to first sc. (30 + 30 = 60 sts)
Rnd 22 (scallops): Ch 1, sc in first st, sk 2 sts, 5 dc in next st, sk 2 sts, sc in next st, repeat around, ending last repeat with sk 2 sts, sl st to first sc instead of the final sc. (10 scallops; 10 sc + 50 dc = 60 sts)
Fasten off and weave in the ends. Each 6-st repeat makes one shell, and 60 ÷ 6 = 10 even scallops.
The finished pocket is about 4.5 in (11.4 cm) tall.
Pocket Butterfly (blue, cross-stitched)
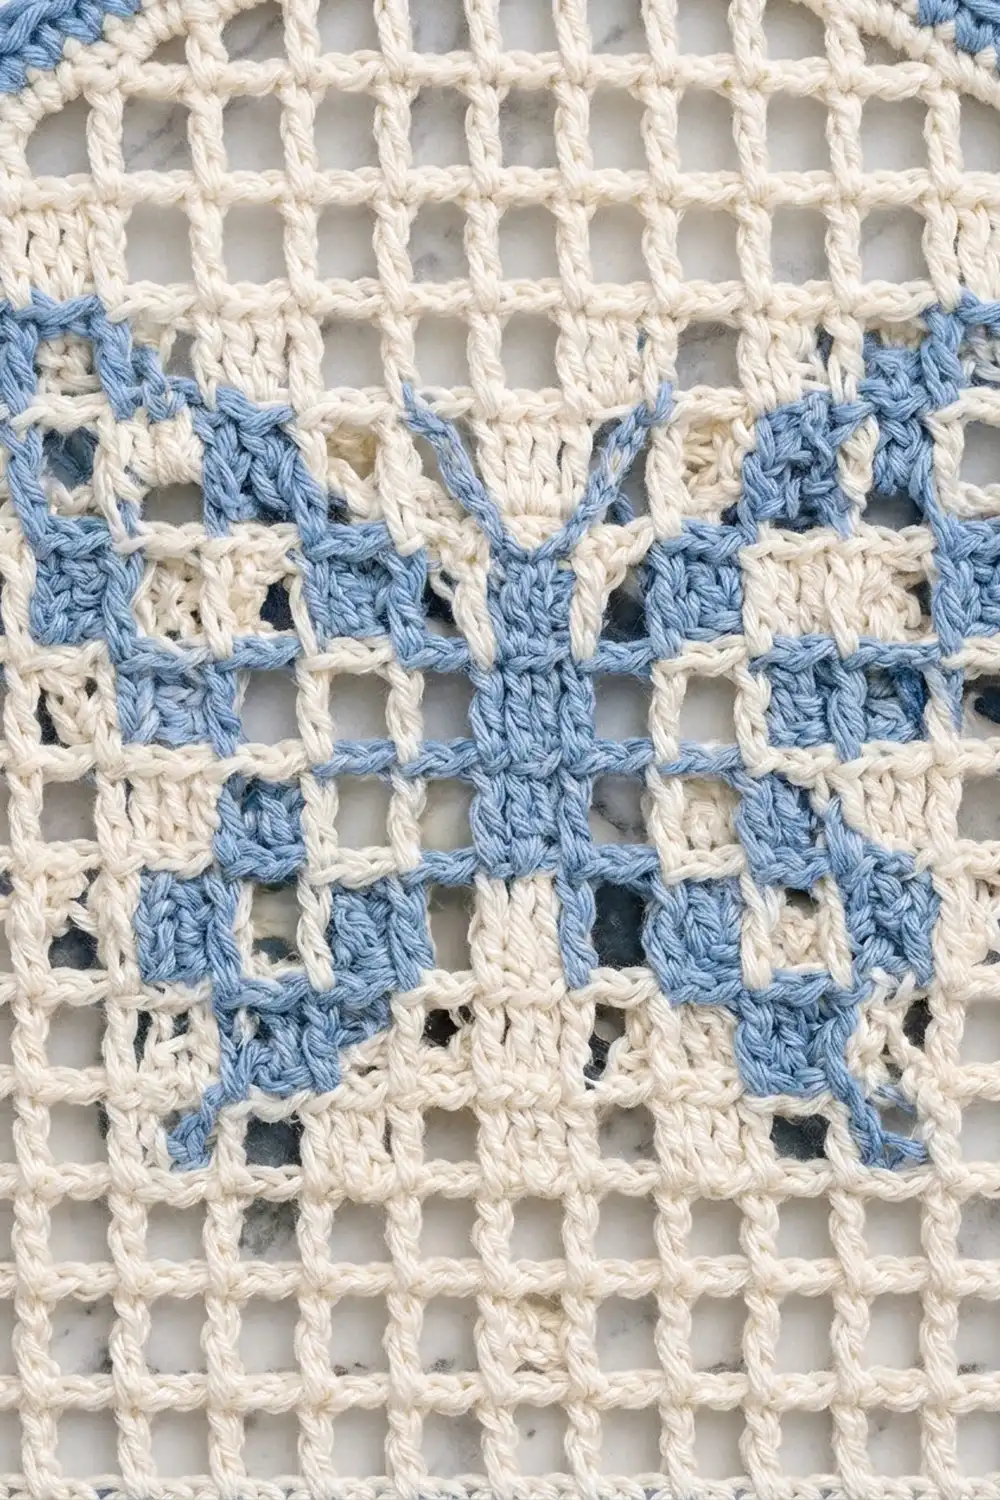
The butterfly fills 40 squares in a block 10 squares wide (squares 11–20) and 6 rnds tall (Rnds 15–20). It is centered on the dc between squares 15 and 16, opposite the seam. X is a blue square and · is left open. Read the chart from the bottom up, with Row 1 on Rnd 15:
Rnd 20:  X X X · · · · X X X   (6)
Rnd 19:  X X X X · · X X X X   (8)
Rnd 18:  · X X X X X X X X ·   (8)
Rnd 17:  · · X X X X X X · ·   (6)
Rnd 16:  · X X · X X · X X ·   (6)
Rnd 15:  X X · · X X · · X X   (6)
To fill one square, use a single strand of blue. Bring the needle up at the lower right corner of the open space and go down at the upper left. Come up at the lower left and go down at the upper right. Work the X twice so it covers the space. Carry the yarn behind the dc posts on the inside of the pocket, and keep it loose enough that the mesh does not pucker.
Backboard (cream)
Row 1: Ch 46, dc in 6th ch from hook (skipped chs count as dc + ch 1 + sk 1), ch 1, sk 1 ch, dc in next ch, repeat to end, turn. (22 dc + 21 ch-1 sps = 43 sts; 21 squares)
Rows 2–14: Ch 4 (counts as dc + ch 1), dc in next dc, ch 1, repeat across, ending dc in 3rd ch of turning ch, turn. (21 squares)
Checkpoint: 10.5 in × 7 in (26.7 cm × 17.8 cm).
Arch Shaping
Each decrease removes squares at both ends of the row. To decrease at the start of a row, sl st across 2 sts per square removed, then sl st into the next dc and ch 4. To decrease at the end, stop at the dc before the squares you are leaving out and turn.
Row 15: Decrease 1 square each end. (19 squares; 39 sts)
Row 16: Work even. (19 squares)
Row 17: Decrease 1 square each end. (17 squares; 35 sts)
Row 18: Decrease 1 square each end. (15 squares; 31 sts)
Row 19: Decrease 1 square each end. (13 squares; 27 sts)
Row 20: Decrease 2 squares each end. (9 squares; 19 sts)
Fasten off. Checkpoint: 10.5 in wide × 10 in tall (26.7 cm × 25.4 cm).
Backboard Butterfly (blue)
Number the board columns 1–21 from the right edge of the full-width rows. The butterfly fills columns 6–16, Rows 11–17 (45 squares). In Rows 15–17, keep counting from the original right edge; Row 14 gives you a guide. Read the chart from the bottom up:
Row 17:  X X X · · · · · X X X   (6)
Row 16:  X X X X · · · X X X X   (8)
Row 15:  · X X X X X X X X X ·   (9)
Row 14:  · · X X X X X X X · ·   (7)
Row 13:  · · · X X X X X · · ·   (5)
Row 12:  · · X X · X · X X · ·   (5)
Row 11:  · X X · · X · · X X ·   (5)
Fill the squares the same way you did on the pockets, carrying the yarn on the back.
Hanging Tab (cream)
Row 1: Ch 7, sc in 2nd ch from hook and in each ch across, turn. (6 sts)
Rows 2–14: Ch 1, sc in each st across, turn. (6 sts)
Fasten off. Join blue at one long edge, ch 1 and work 1 sc in each row end (14 sc). Fasten off, then repeat on the other long edge. The tab is 1.5 in × about 3.1 in (3.8 cm × 7.9 cm).
Make All Pieces
- Blue + cream: 2 pockets, 1 tab
- Cream + blue embroidery and border: 1 backboard
Layout, front view:
          [ ring ]
          [ tab  ]
   /‾‾‾‾‾‾‾‾‾‾‾‾‾‾‾‾‾‾\
  |      butterfly      |
  | [pocket]  [pocket]  |
  |_[  L   ]__[  R   ]__|
Border (backboard, blue)
Border gauge matches the sc gauge: 4 sc = 1 in (2.5 cm) along stitches, and 2 sc per dc row end.
Rnd 1: With the right side facing, join blue in the first foundation ch at a bottom corner. Ch 1, then work:
- Bottom: 3 sc in first ch (corner), sc in next 41 chs, 3 sc in last ch (corner) = 47 sts, including both corners
- First side (Rows 1–14): 2 sc in each row end = 28 sts
- Arch: 24 sts up the stepped edge (2 sc per row end of Rows 15–20 = 12, plus 1 sc per st across the 6 exposed step squares = 12), then 19 sc across the top of Row 20, then 24 sts down the other side = 67 sts
- Second side (Rows 14–1): 2 sc per row end = 28 sts
Sl st to first sc. (47 + 28 + 67 + 28 = 170 sts)
Rnd 2: Ch 1, rev sc in each st around, sl st to first st. (170 sts)
Fasten off.
Why the math works: each square is 2 sts wide, and each dc row is as tall as 2 sc. That keeps the border sts in line with the mesh on every edge: 43 foundation sts + 4 corner extras = 47 along the bottom, and the arch steps add the same 12 + 12 on each side. Rev sc adds no sts, so the count stays 170. The border adds 0.5 in (1.3 cm) on each side, taking the board from 10.5 × 10 in to 11.5 × 11 in (29.2 × 27.9 cm).
Joining
Method: whipstitch with blue yarn and a tapestry needle, working through the back of the pocket and the front of the board.
Placement: count the dc columns of the board from the right edge, with the edge dc as column 0. Center the right pocket’s seam dc on column 6 and the left pocket’s seam dc on column 15. Those columns are 4.5 in (11.4 cm) apart. Each pocket is 4.75 in (12.1 cm) across, so the pockets press lightly together and flatten a little against the board, as they should. Set each pocket’s bottom ridge (Rnd 11) level with the bottom border.
Stitch-to-stitch logic: sew two vertical lines per pocket, using the pocket dc on each side of the seam (the dc at the start of square 30 and the dc at the start of square 2). Sew them to the board dc columns 1 square away from the center column (5 and 7, then 14 and 16). Each pocket mesh rnd lines up with 1 board row, because both are 0.5 in (1.3 cm) dc rows. Work 2 whipstitches per dc row end. Over the blue band, take 1 whipstitch per sc rnd into the border and board Rows 1–2. Sew the base ridge to the bottom border across 4 sts.
Pockets to each other: where the walls touch, whipstitch 4 sts of Rnd 21 and 4 sts of Rnd 14 together.
Tab: fold the tab over the ring. Sew the top 2 rows to the back of the board at the center of Row 20, and sew the tab closed just under the ring.
Tension: pull each whipstitch until it just closes the gap, and no tighter. Tight sewing ripples the mesh.
Size checkpoint: the board still measures 11.5 in (29.2 cm) across with pockets attached. Each pocket’s outer edge sits about 0.6 in (1.5 cm) inside the mesh edge.
Final Blocking
- Before joining, soak the backboard in cool water and press out the extra water with a towel.
- Pin it flat to 11.5 in × 11 in (29.2 cm × 27.9 cm), pinning the corners and the arch first.
- Line up the mesh with a ruler so the columns are straight up and down. Leave it to dry fully.
- Mist the pockets, stuff each one with a toilet roll wrapped in a towel, and leave them to dry round.
- Fan out each scallop with your fingers while it is still damp.
- Join the pieces only after everything is completely dry.
Final Quality-Control Checklist
- Pocket bases measure 4.75 in (12.1 cm) and are 60 sts.
- Each pocket wall has 30 squares in every mesh rnd.
- Each rim has 10 even scallops.
- The board is 21 squares wide, and the arch counts are 19/19/17/15/13/9.
- The border has 170 sts, with crisp bottom corners.
- The butterflies have 40 and 45 filled squares and look symmetrical.
- All ends are woven in on the back or inside.
- The tab holds the board’s weight without stretching.
Troubleshooting
- Base cups up: your gauge is too tight. Use a bigger hook, or add 1 sc between increases.
- Base ruffles: your gauge is too loose. Use a smaller hook.
- Mesh rounds slant: always start with ch 4 above the seam and join into the 3rd ch.
- Scallops don’t fit evenly: check that Rnd 21 has exactly 60 sts.
- Arch looks lopsided: recount the sl sts at the start of the decrease rows (2 per square).
- Butterfly puckers: loosen the carried yarn on the back.
- Pockets sag: add a third whipstitch line along each pocket’s seam dc.
Care
Hand wash in cool water with mild soap, press dry in a towel and lay flat to dry. Reshape the pockets around a roll while they are damp.
Final Notes
Everything depends on one measurement: 1 square = 0.5 in (1.3 cm). Thirty squares make a 15 in (38.1 cm) wall that fits a 4.75 in (12.1 cm) base. Twenty-one squares make a 10.5 in (26.7 cm) board, and the border brings it to 11.5 in (29.2 cm). Check each of these numbers as you go and the pieces will fit together without any adjustments.
Happy crocheting!