

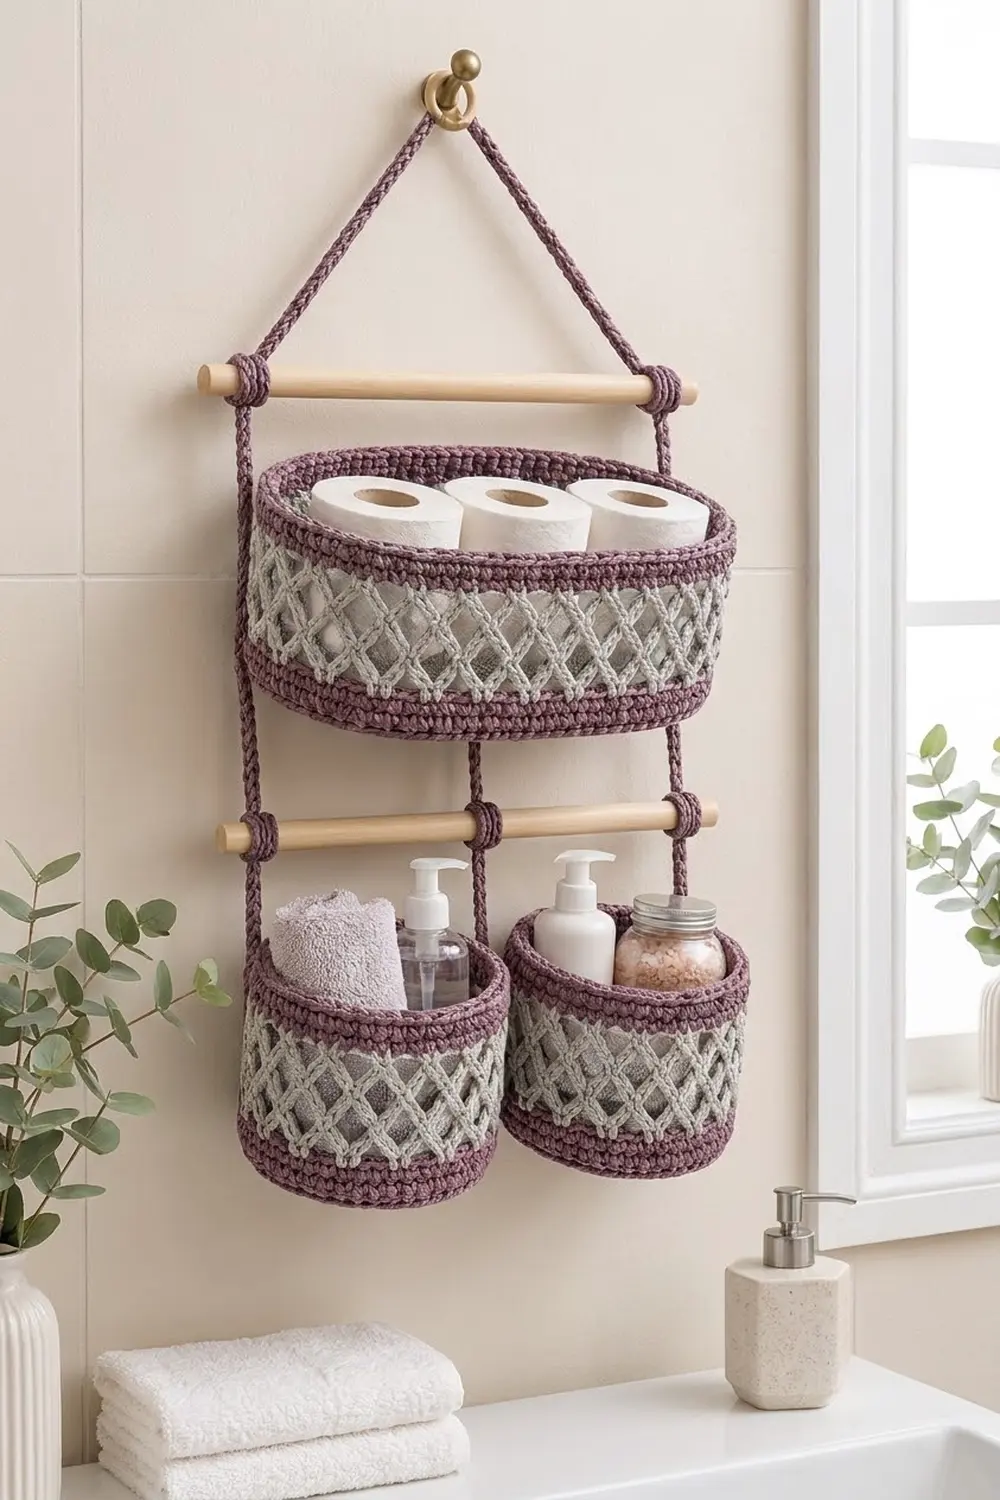
The Mulberry Lattice Organizer is a three-basket wall hanging for bathroom storage. On top, a long oval basket holds three toilet rolls. Below it, two round baskets sit side by side for bottles, soap or folded washcloths. A crocheted cord, two wooden dowels and a wooden ring hold everything together.
Every basket uses the same color plan: a deep mauve base, a mauve band at the bottom of the wall, a light gray diamond lattice in the middle and a mauve rim with a rolled rope edge. The look is soft and modern, with no fringe or extra decoration.
This pattern uses US crochet terms. The finished hanging is about 14 in (35.6 cm) wide and 22 in (55.9 cm) tall from the top of the ring to the bottom of the round baskets. Each basket is 4.5 in (11.4 cm) tall.
To make it, you crochet each basket from the bottom up: a flat base, a back-loop turning round, mauve wall rounds, a chain-loop lattice and then the rim. Next you make one long cord and three short connector loops. Finally, you tie everything onto the dowels.
Finished Size and Construction
- Finished hanging: 14 in (35.6 cm) wide × 22 in (55.9 cm) tall
- Skill level: Intermediate
- Terminology: US
- Yarn weight: Bulky (#5) cotton
- Hook: 5.0 mm (H-8)
- Number of pieces: 7 crocheted pieces (1 oval basket, 2 round baskets, 1 long cord, 3 connector loops), plus 2 dowels and 1 ring
- Layout: 1 oval basket on top, 2 round baskets below
- Oval basket: 12.5 in (31.8 cm) × 5.75 in (14.6 cm) base, 4.5 in (11.4 cm) tall
- Round basket: 5.75 in (14.6 cm) diameter, 4.5 in (11.4 cm) tall
- Wall height before rim (border): 3.1 in (7.9 cm)
- Rim (border) depth: 1.4 in (3.6 cm)
Materials
Use a firm, smooth bulky cotton or cotton-blend yarn. Soft acrylic will sag under the weight of bottles. A tightly plied or cabled cotton gives the clearest stitches and the crispest lattice.
- Color A, mauve: 150 g, about 165 m
- Color B, light gray: 50 g, about 55 m
- 5.0 mm (H-8) crochet hook
- 2 wooden dowels, 14 in (35.6 cm) long and 0.5 in (1.3 cm) in diameter
- 1 wooden ring, 2 in (5.1 cm) in diameter
- Stitch markers (at least 4)
- Tapestry needle, scissors, tape measure
- Rust-proof pins and a towel for blocking
These quantities include a margin of about 25% for your gauge swatch, cord adjustments and weaving in ends.
Abbreviations (US Terms)
- ch: chain
- sc: single crochet
- sl st: slip stitch
- inc: 2 sc in the same stitch
- sk: skip
- BLO: back loop only
- MR: magic ring
- st(s): stitch(es)
- rnd: round
Special stitch: reverse sc (crab stitch). Work from left to right (right-handed). Insert the hook into the next stitch to the right, yarn over, pull up a loop, yarn over and pull through both loops. This makes the rolled, rope-like rim edge.
Gauge and Checkpoints
Gauge: 13 sc × 14 rnds = 4 in (10.2 cm) in spiral sc. Four lattice rounds measure 2 in (5.1 cm) tall.
Make one round basket first and use it as your test piece. It is small and uses all the techniques in the pattern.
Checkpoints:
– Round base after Rnd 5: 2.75 in (7.0 cm) across
– Round base after Rnd 10: 5.75 in (14.6 cm) across
– Oval base after Rnd 5: 9.5 in (24.1 cm) × 2.75 in (7.0 cm)
– Oval base after Rnd 10: 12.5 in (31.8 cm) × 5.75 in (14.6 cm)
– Wall after Rnd 14: 1.1 in (2.8 cm) tall
– Wall after Rnd 18: 3.1 in (7.9 cm) tall
– Wall after Rnd 22: 4.25 in (10.8 cm) tall
– Finished after Rnd 23: 4.5 in (11.4 cm) tall
If your piece is too big, go down to a 4.5 mm hook. If it is too small, go up to a 5.5 mm hook. Don’t add or remove stitches: the lattice needs a stitch count that is a multiple of 4.
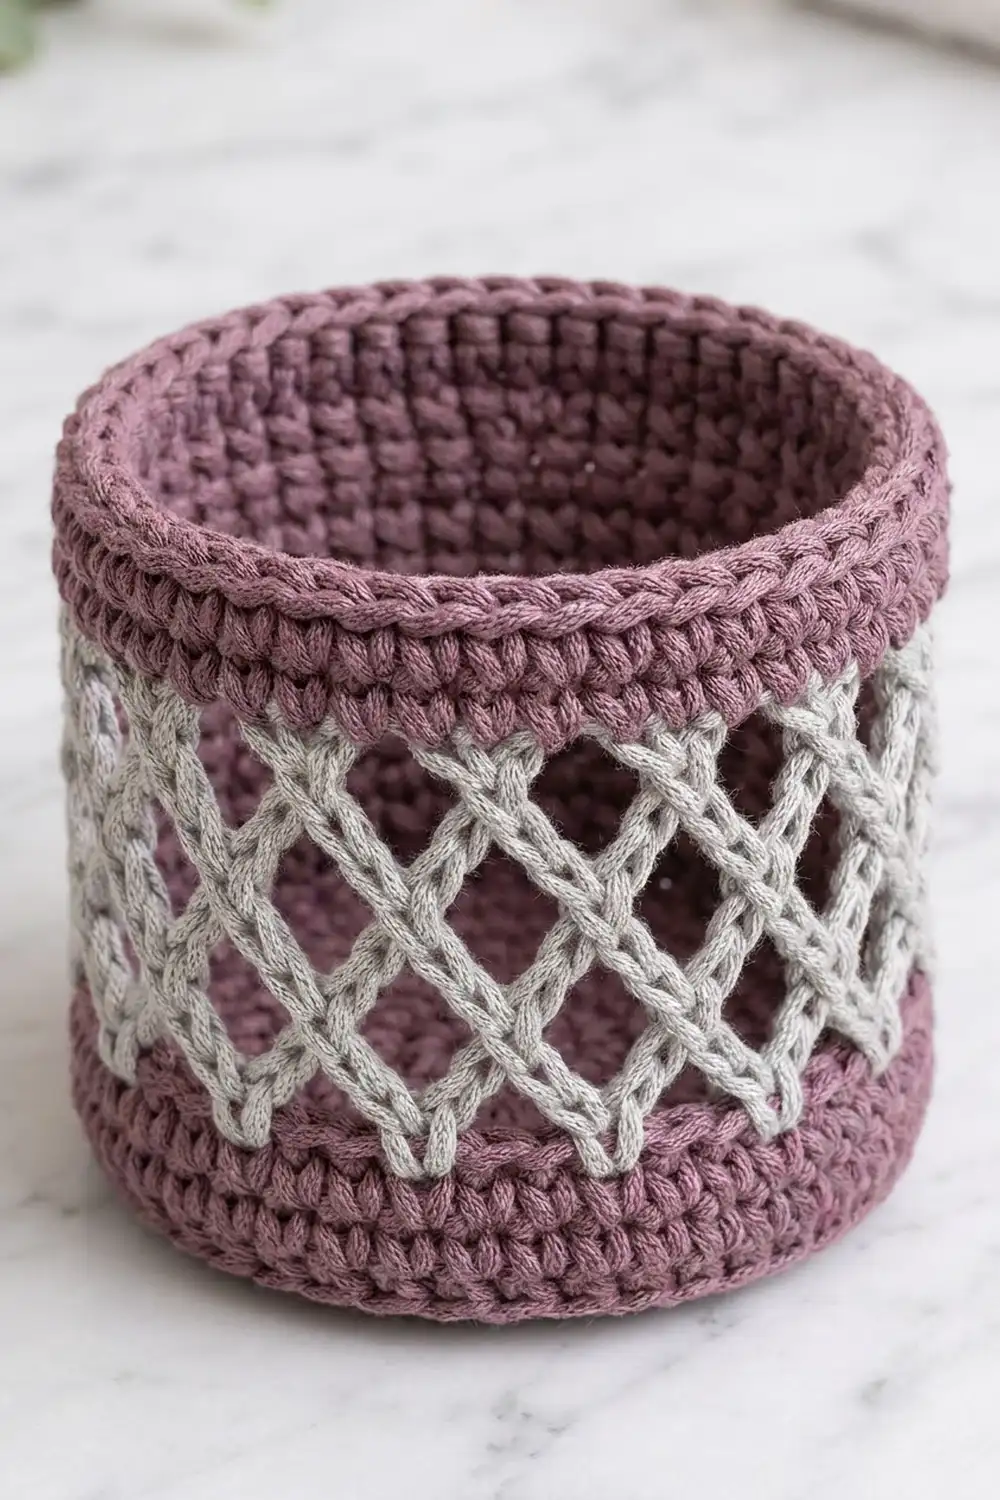
Round Basket (Make 2)
Work in continuous spirals and move a marker up each round. When you reach the lattice, switch to joined rounds.
Base (Color A)
- Rnd 1: 6 sc in MR. (6)
- Rnd 2: Inc in each st. (12)
- Rnd 3: [Sc 1, inc] 6 times. (18)
- Rnd 4: [Sc 2, inc] 6 times. (24)
- Rnd 5: [Sc 3, inc] 6 times. (30)
- Rnd 6: [Sc 4, inc] 6 times. (36)
- Rnd 7: [Sc 5, inc] 6 times. (42)
- Rnd 8: [Sc 6, inc] 6 times. (48)
- Rnd 9: [Sc 7, inc] 6 times. (54)
- Rnd 10: [Sc 8, inc] 6 times. (60)
To keep the base round instead of hexagonal, move the increases around: on even rounds, start each repeat with half the plain sc, then inc, then the rest. The base should measure 5.75 in (14.6 cm) across.
Lower wall (Color A)
- Rnd 11: Sc in BLO of each st. (60) The unused front loops make a crisp fold, and the wall turns up.
- Rnds 12–14: Sc in each st. (60) Finish with a sl st into the next st. The wall measures 1.1 in (2.8 cm).
Fasten off Color A.
Lattice band (Color B)
- Rnd 15: Join B in any st, ch 1, sc in the same st, [ch 5, sk 3, sc in next st] 14 times, ch 5, sk 3, sl st to the first sc. (15 ch-5 loops) Each repeat uses 4 stitches, and 15 × 4 = 60.
- Rnd 16: Sl st into the first 3 ch of the next loop, ch 1, sc in the same loop, [ch 5, sc in next loop] 14 times, ch 5, sl st to the first sc. (15 loops)
- Rnds 17–18: Repeat Rnd 16. (15 loops each)
Each round’s sc sits in the center of a loop from the round below, which creates the diamond lattice. The wall measures 3.1 in (7.9 cm). Fasten off Color B. The rim continues in the Border section.
Oval Basket (Make 1)
Base (Color A)
Ch 25.
- Rnd 1: 3 sc in the 2nd ch from the hook, sc in the next 22 ch, 3 sc in the last ch. Rotate and work along the opposite side of the chain: sc in the next 22 ch. (50) That is 22 + 22 straight stitches plus 3 + 3 end stitches.
Place a marker in the first and last stitch of each 22-stitch straight section. The straight sections stay at 22 stitches. All increases go into the two curved ends.
- Rnd 2: Sc 22, inc in each of the next 3 sts twice. (56: 22 + 6 + 22 + 6)
- Rnd 3: Sc 22, [sc 1, inc] 3 times twice. (62: each end has 9 sts)
- Rnd 4: Sc 22, [sc 2, inc] 3 times twice. (68)
- Rnd 5: Sc 22, [sc 3, inc] 3 times twice. (74)
- Rnd 6: Sc 22, [sc 4, inc] 3 times twice. (80)
- Rnd 7: Sc 22, [sc 5, inc] 3 times twice. (86)
- Rnd 8: Sc 22, [sc 6, inc] 3 times twice. (92)
- Rnd 9: Sc 22, [sc 7, inc] 3 times twice. (98)
- Rnd 10: Sc 22, [sc 8, inc] 3 times twice. (104: 22 + 30 + 22 + 30)
Each round adds 6 stitches, 3 at each end. The base should measure 12.5 in (31.8 cm) × 5.75 in (14.6 cm).
Lower wall (Color A)
- Rnd 11: Sc in BLO of each st. (104)
- Rnds 12–14: Sc in each st. (104) Sl st into the next st and fasten off.
Lattice band (Color B)
- Rnd 15: Join B, ch 1, sc in the same st, [ch 5, sk 3, sc in next st] 25 times, ch 5, sk 3, sl st to the first sc. (26 loops: 26 × 4 = 104)
- Rnds 16–18: Work as Rnd 16 of the round basket. (26 loops each)
Fasten off Color B.
Border: Rim Band (All Three Baskets)
Border gauge: the same as the body, 13 sc = 4 in (10.2 cm) and 14 rnds = 4 in (10.2 cm). The rim adds 1.4 in (3.6 cm) to the 3.1 in (7.9 cm) wall, for 4.5 in (11.4 cm) total.
Rnd 19 (conversion round, Color A): Join A in any ch-5 loop. Work 4 sc in each loop. Here is the count for each basket:
- Round basket: 15 loops × 1 sc (one per existing loop) + 15 × 3 extra sc = 15 + 45 = 60 sc
- Oval basket: 26 loops × 1 sc + 26 × 3 extra sc = 26 + 78 = 104 sc. That is 52 sc (13 loops) on each half of the oval, one straight side plus one curved end.
Rnds 20–22: Sc in each st. (60 for the round baskets, 104 for the oval basket) Re-mark the oval as 22 / 30 / 22 / 30, lined up with the base markers, so you can attach the cords later.
Rnd 23: Reverse sc in each st. (60 / 104) Sl st to the first st, fasten off and weave in the ends.
Why the math works: Rnd 15 uses 4 stitches per loop. Rnd 19 puts 4 stitches back into each loop. So the rim has exactly the same count as the base edge: 60 for the round baskets and 104 for the oval basket. The walls rise straight, without flaring or pulling in. Reverse sc is worked one stitch into each stitch, so the rolled edge stays the same length as the rim too.
Make All Pieces
Color A (mauve):
– 1 oval basket (base, lower wall, rim)
– 2 round baskets (base, lower wall, rim)
– 1 long cord: Ch about 216, or until the chain measures 72 in (182.9 cm). Sl st into the back bump of each ch. This gives a braided-looking cord. Check the length after you slip stitch, because the sl st row can tighten it.
– 3 connector loops: Ch 24 to 8 in (20.3 cm), sl st into each back bump, fold in half and tie the ends together with an overhand knot.
Color B (light gray): the lattice band on all 3 baskets.
Layout:
            ( ring )
           /        \
  [==== top dowel 14 in ====]
  |    [ OVAL BASKET ]     |
  |          |             |
  [=== lower dowel 14 in ===]
  | (ROUND)  |  (ROUND)    |
Joining: Assembling the Hanger
Method: Tie the cords to the dowels with wraps and half hitches. Then tack the cords to the baskets with a mauve tail threaded on the tapestry needle.
- Ring: Fold the long cord in half and attach it to the ring with a lark’s head knot. You now have two legs of equal length.
- Top dowel: Measure 9.25 in (23.5 cm) down each leg. Wrap that point twice around the top dowel, 1 in (2.5 cm) in from the end, and finish with a half hitch. The legs are now 12 in (30.5 cm) apart and form a triangle about 7 in (17.8 cm) tall.
- Oval basket: Hang the oval basket so its rim sits 1 in (2.5 cm) below the top dowel. Each leg runs down the middle of one curved end. That point is stitch 15 of that end’s 30 stitches. Tack the leg to that stitch at Rnd 22, at Rnd 13 and at Rnd 11. Matching one stitch column top to bottom keeps the cord straight.
- Lower dowel: Leave 1.5 in (3.8 cm) of cord below the oval base. Wrap each leg around the lower dowel, 1 in (2.5 cm) from the end, the same way as step 2. The two dowels are now 7 in (17.8 cm) apart.
- Round baskets: Set each round basket so its rim is 1.5 in (3.8 cm) below the lower dowel. Tack the leg to the outermost stitch of each basket at Rnds 22, 13 and 11. Knot the cord end under the base and trim it to 0.75 in (1.9 cm).
- Connectors: Use Connector A to tie the center of the oval base, between the two middle stitches of a straight section on Rnd 10, to the center of the lower dowel. Use Connectors B and C to tie the center of the lower dowel to the innermost rim stitch of each round basket.
Tension: Pull each knot just snug. If you pull too hard, the rims dent. If the knots are too loose, the baskets tilt.
Size checkpoint: The hanging should measure 14 in (35.6 cm) wide and 22 in (55.9 cm) tall.
Final Blocking
- Lightly spray each basket with water until it is damp.
- Stuff each basket firmly with a rolled towel to square up the walls.
- Pin the lattice loops so the diamonds are evenly spaced.
- Let the baskets dry completely, about 24 hours.
- Remove the towels and check the heights: 4.5 in (11.4 cm).
- Hang the organizer and adjust the knots so the dowels are level.
Final Quality-Control Checklist
- Bases lie flat and measure 5.75 in (14.6 cm) and 12.5 × 5.75 in (31.8 × 14.6 cm).
- Each lattice round has 15 or 26 loops.
- Each conversion round has 60 or 104 sc.
- The reverse sc edge is even, with no gaps.
- The dowels are level and 7 in (17.8 cm) apart.
- All ends are woven in securely.
Troubleshooting
- The base ruffles: Your tension is too loose. Use a smaller hook.
- The base cups: Your tension is too tight. Check the increases.
- The oval base looks pointy: Stagger the increases at the ends.
- The lattice leans: Always slip stitch to the center of the loop before you start the round.
- The rim flares: Count Rnd 19 again. It should have exactly 4 sc per loop.
- A basket tilts: Tighten the connector knot or move it one stitch over.
Care
Hand wash in cool water, reshape the baskets and let them dry flat. Take the dowels out before washing.
Final Notes
Here is the measurement chain in short: a gauge of 13 sc = 4 in (10.2 cm) gives bases of 5.75 in (14.6 cm) and 12.5 in (31.8 cm). The walls rise 3.1 in (7.9 cm) through the lattice, and the rim adds 1.4 in (3.6 cm) for a total height of 4.5 in (11.4 cm). The baskets hang on dowels 7 in (17.8 cm) apart, and the finished organizer measures 14 × 22 in (35.6 × 55.9 cm).
Happy crocheting!