

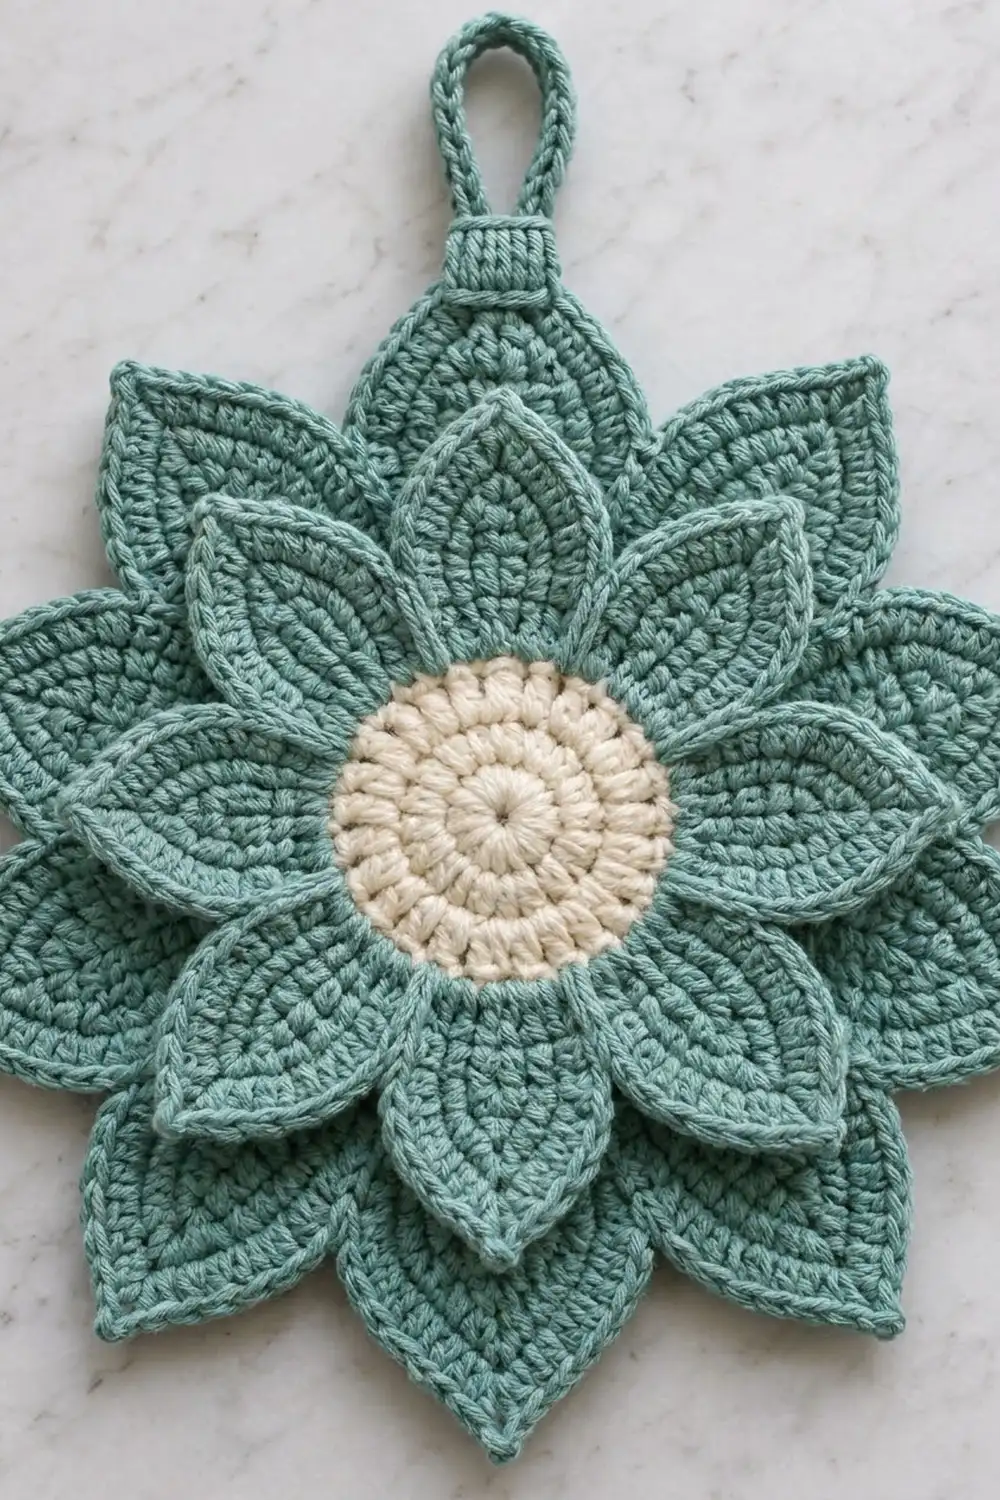
The Teal Lotus Wall Organizer is a layered crochet flower that hangs on the wall and holds your desk clutter. A round cream center sits inside a ring of eight teal petals. Eight larger petals fan out behind them, so the outline reads as a 16-point star. Three round cups across the lower half hold pens, a small notepad, or a phone.
Only two colors are used: a soft sea-teal for the petals, backing, cups, and loop, and a warm cream for the center. Every petal has a neat single crochet rim that frames it like a raised outline. The fabric is dense and textured, so the organizer keeps its shape on the wall.
This pattern uses US crochet terms. The finished flower measures 11.5 in (29.2 cm) from tip to tip. With the hanging loop it is about 14 in (35.6 cm) tall.
Construction is simple. You crochet a center disc, 16 petals, three cups, and a loop as separate pieces. Then you sew the inner petals to the front of the disc and the outer petals to the back, add the cups across the lower half, and attach the loop at the top.
Finished Size and Construction
- Finished size: 11.5 in (29.2 cm) wide; about 14 in (35.6 cm) tall including the loop
- Skill level: Intermediate
- Terminology: US crochet terms
- Yarn weight: Worsted / medium (#4) cotton
- Hook: 4.0 mm (G-6)
- Number of pieces: 21 (1 center disc, 8 inner petals, 8 outer petals, 3 cups, 1 hanging loop)
- Layout: Radial flower with 8 inner petals and 8 offset outer petals, plus 3 cups in a straight row
- Piece sizes: Disc 5 in (12.7 cm) across; inner petal 2.75 x 1.25 in (7.0 x 3.2 cm); outer petal 3.75 x 1.75 in (9.5 x 4.4 cm); cup 2.5 in (6.4 cm) across x 3.5 in (8.9 cm) tall
- Size before border: Inner petal 2.5 x 1 in (6.4 x 2.5 cm); outer petal 3.25 x 1 in (8.3 x 2.5 cm)
- Border depth: 1 rim round on the inner petals, 2 on the outer petals, 1 on the cups; about 0.15 in (0.4 cm) per rim round
Materials
Use a smooth, firm cotton or cotton blend in worsted weight. Cotton holds the petal shapes crisply and does not stretch much when the cups are full. Avoid fuzzy or very soft acrylic, which lets the cups sag.
- Color A, Sea Teal: 160 g, about 320 m (350 yd)
- Color B, Cream: 15 g, about 30 m (33 yd)
Tools:
- 4.0 mm (G-6) crochet hook
- Tapestry needle
- Stitch markers (at least 4)
- Scissors
- Straight pins for layout
- Blocking mat and rust-proof pins
- Spray bottle
- Measuring tape
Quantities include a margin of roughly 15% for gauge differences and sewing tails.
Abbreviations (US Terms)
- MR – magic ring
- ch – chain
- sl st – slip stitch
- sc – single crochet
- hdc – half double crochet
- dc – double crochet
- inc – 2 sc in the same stitch
- BLO – back loop only
- st(s) – stitch(es)
- sp – space
- Rnd – round
Special technique – Petal tip: Work (sc, ch 2, sc) in one stitch or space. The ch-2 makes the sharp point at the end of each petal.
Gauge and Checkpoints
Gauge: 18 sc and 20 rnds = 4 in (10.2 cm) in sc, worked firmly.
Test your gauge on the center disc instead of a swatch. It is the first piece you need, and its measurements tell you whether your gauge is right.
Checkpoints:
- Disc after Rnd 7 (end of cream): 3 in (7.6 cm) across
- Disc after Rnd 12: 5 in (12.7 cm) across
- Inner petal after Rnd 1: 2.5 x 1 in (6.4 x 2.5 cm)
- Outer petal after Rnd 1: 3.25 x 1 in (8.3 x 2.5 cm)
- Cup base after Rnd 6: 2.5 in (6.4 cm) across
If your disc is too big, go down to a 3.75 mm hook. If it is too small, go up to a 4.5 mm hook. A difference of up to 0.25 in (0.6 cm) at Rnd 12 is fine. A bigger difference will change the size of the whole flower.
Center Disc
Work in joined rounds. Start with Color B.
Rnd 1: Make a MR, ch 1, 6 sc in ring, sl st to first sc. (6 sts)
Rnd 2: Ch 1, inc in each st around, sl st to first sc. (12 sts)
Rnd 3: Ch 1, sc in next st, inc in next st; repeat around, sl st to first sc. (18 sts)
Rnd 4: Ch 1, sc in next 2 sts, inc; repeat around, join. (24 sts)
Rnd 5: Ch 1, sc in next 3 sts, inc; repeat around, join. (30 sts)
Rnd 6: Ch 1, sc in next 4 sts, inc; repeat around, join. (36 sts)
Rnd 7: Ch 1, sc in next 5 sts, inc; repeat around, join. (42 sts)
Check: 3 in (7.6 cm). Fasten off Color B. Join Color A in any st.
Rnd 8: Ch 1, sc in next 6 sts, inc; repeat around, join. (48 sts)
Rnd 9: Ch 1, sc in next 7 sts, inc; repeat around, join. (54 sts)
Rnd 10: Ch 1, sc in next 8 sts, inc; repeat around, join. (60 sts)
Rnd 11: Ch 1, sc in next 9 sts, inc; repeat around, join. (66 sts)
Rnd 12: Ch 1, sc in next 10 sts, inc; repeat around, join. (72 sts)
Check: 5 in (12.7 cm). Fasten off, leaving a short tail to weave in. The teal rounds will end up hidden under the petals and act as a backing for them.
Inner Petals (Make 8)
Use Color A. You work each petal around both sides of a foundation chain, and the chain becomes the center vein of the petal.
Ch 11.
Rnd 1: Working in the chain only: sc in 2nd ch from hook, hdc in next ch, dc in next 6 ch, hdc in next ch, petal tip (sc, ch 2, sc) in last ch. Rotate and work along the other side of the chain: hdc in next ch, dc in next 6 ch, hdc in next ch, sc in last ch (same ch as the first sc). Sl st to first sc. (20 sts + ch-2 sp; 10 sts per side, tip sc included)
Check: 2.5 x 1 in (6.4 x 2.5 cm). The tall dc stitches in the middle and short sc at each end make the pointed oval shape.
Leave the yarn attached and work the rim from the Border section next.
Outer Petals (Make 8)
Use Color A. The method is the same as for the inner petals, with a longer chain.
Ch 15.
Rnd 1: Sc in 2nd ch from hook, hdc in next ch, dc in next 10 ch, hdc in next ch, petal tip (sc, ch 2, sc) in last ch. Along the other side: hdc in next ch, dc in next 10 ch, hdc in next ch, sc in last ch. Sl st to first sc. (28 sts + ch-2 sp; 14 sts per side, tip sc included)
Check: 3.25 x 1 in (8.3 x 2.5 cm). Leave the yarn attached for the rim.
Cups (Make 3)
Use Color A. Work in joined rounds.
Rnds 1–6: Work as Center Disc Rnds 1–6, all in Color A. (36 sts)
Check: 2.5 in (6.4 cm) across.
Rnd 7: Ch 1, sc in BLO of each st around, join. (36 sts) This ridge turns the work upward to start the wall.
Rnds 8–23: Ch 1, sc in each st around, join. (36 sts each round)
The wall should measure about 3.25 in (8.3 cm) from the BLO ridge. Leave the yarn attached for the rim.
Hanging Loop
Use Color A and work in rows.
Ch 31.
Row 1: Sc in 2nd ch from hook and in each ch across, turn. (30 sts)
Rows 2–3: Ch 1, sc in each st across, turn. (30 sts)
The strip measures 6.75 x 0.5 in (17.1 x 1.3 cm). Fasten off with a 12 in (30.5 cm) tail.
Fold the strip in half with the short ends together. Using the tail, whip stitch the long edges together for 0.75 in (1.9 cm) from the ends. Then wrap the tail tightly 8 times around this joined section, just above the stitching, to make a neat collar at the base of the loop. To secure it, pass the needle under the wraps.
Make All Pieces
Color A (Sea Teal):
- 1 disc (Rnds 8–12 only)
- 8 inner petals
- 8 outer petals
- 3 cups
- 1 hanging loop
Color B (Cream):
- 1 disc center (Rnds 1–7)
Layout (front view, clock positions):
Outer petals (behind):  12:00  1:30  3:00  4:30  6:00  7:30  9:00  10:30
Inner petals (front):   12:45  2:15  3:45  5:15  6:45  8:15  9:45  11:15

            [  loop  ]
         [ cream center ]
     [Cup 1]  [Cup 2]  [Cup 3]
Each inner petal sits exactly between two outer petals, so both layers show.
Joining
Sew all pieces with whip stitch, using Color A and a tapestry needle. Go through one loop of each piece so the seams sink into the fabric.
Step 1 – Inner petals. Lay the disc right side up. Place each inner petal on the front, with its rounded base touching the line where the cream meets the teal (Rnd 8). Pin all 8 petals evenly. Rnd 8 has 48 sts, so each petal base covers 6 sts (8 x 6 = 48). Sew each base across those 6 sts. Tack each petal again at the vein, 0.5 in (1.3 cm) higher, so it lies flat.
Step 2 – Outer petals. Turn the disc over. Place each outer petal behind the disc, centered between two inner petals, with its base tucked 1 in (2.5 cm) under the disc edge. Rnd 12 has 72 sts, so each outer petal spans 9 sts of the edge (8 x 9 = 72). Sew along the disc edge across those 9 sts, then sew once more at the petal base.
Size checkpoint: Measure from the 3:00 outer tip to the 9:00 outer tip. It should be 11.5 in (29.2 cm). Then measure from 12:00 to 6:00.
Step 3 – Cups. Place the three cups side by side on the front, touching each other. Center the middle cup below the cream center, with its rim 1.75 in (4.4 cm) below the center point. The row spans 7.5 in (19.1 cm). Sew each cup to the flower along a vertical line on the back of the cup, from rim to base. Then sew the cups next to each other together for 1 in (2.5 cm) down from the rims.
Step 4 – Loop. Center the wrapped end of the loop behind the 12:00 outer petal. Sew the end flat to the back of the petal so 2.5 in (6.4 cm) of loop stands above the tip.
Tension advice: Pull each stitch just until the pieces meet. Tight seams pucker the petals, and loose seams let full cups droop forward.
Border: Petal and Cup Rims
Border gauge: The rims use the main gauge, 18 sc = 4 in (10.2 cm). Work each petal rim right after its Rnd 1, and each cup rim right after Rnd 23.
Inner petal rim (Rnd 2): Ch 1, 2 sc in first st, sc in next 9 sts, petal tip (sc, ch 2, sc) in ch-2 sp, sc in next 9 sts, 2 sc in last st, sl st to first sc.
Count: 20 sts worked 1 per existing st + 4 added (1 extra at each base end, 1 tip sc on each side) = 24 sc + ch-2 sp. That is 12 sc per side, tip sc included. Fasten off with a 10 in (25.4 cm) tail for sewing.
Outer petal rim, Rnd 2: Ch 1, 2 sc in first st, sc in next 13 sts, petal tip in ch-2 sp, sc in next 13 sts, 2 sc in last st, join.
Count: 28 + 4 = 32 sc + ch-2 sp (16 per side).
Outer petal rim, Rnd 3: Ch 1, 2 sc in first st, sc in next 15 sts, petal tip in ch-2 sp, sc in next 15 sts, 2 sc in last st, join.
Count: 32 + 4 = 36 sc + ch-2 sp (18 per side). Fasten off with a 10 in (25.4 cm) tail.
Cup rim (Rnd 24): Ch 1, sc in each st around, working slightly firmer than usual, sl st to first sc. Count: 36 + 0 = 36 sc. Fasten off and weave in.
Why the math works: Each sc rim round adds about 0.15 in (0.4 cm) to every edge. A pointed oval only needs extra stitches where the edge curves sharply:
- Base: 1 extra stitch at each end keeps the rounded base flat.
- Tip: 1 extra stitch on each side, plus the ch-2 point, keeps the tip sharp.
- Long sides: These are nearly straight, so 1 sc per stitch is right.
That is why each petal rim round adds exactly 4 stitches. The cup rim is a straight tube edge, so it adds none.
Final Blocking
- Weave in all remaining ends before blocking.
- Lay the organizer face up on the blocking mat.
- Mist the petals evenly until damp, not soaked.
- Pin each outer petal tip so the outline measures 11.5 in (29.2 cm) in both directions.
- Pin each inner petal tip so it points straight between two outer tips.
- Smooth each petal rim with your fingers so it lies flat.
- Stuff each cup lightly with a rolled towel so it dries round, 2.5 in (6.4 cm) across.
- Let it dry fully, at least 12 hours, before hanging.
Final Quality-Control Checklist
- Cream center is 3 in (7.6 cm) across and lies flat.
- 8 inner petals are evenly spaced, each 2.75 in (7.0 cm) long.
- 8 outer petals sit between the inner petals, each 3.75 in (9.5 cm) long.
- Every petal tip is sharp, with a visible ch-2 point.
- Every petal rim is smooth, with no gaps at the base.
- Flower is 11.5 in (29.2 cm) tip to tip.
- Cups are 3.5 in (8.9 cm) tall and level with one another.
- Loop is centered and stands 2.5 in (6.4 cm) above the top tip.
- All ends are hidden on the back.
Troubleshooting
Petal curls into a cup shape. The rim is too tight, or the base increases were skipped. Rework the rim more loosely, with 2 sc at each base end.
Petal ruffles. Extra stitches crept in along the sides. Recount: 12 per side for inner petals, 18 per side for outer petals.
Tip is blunt. Check that every round has the ch-2 at the tip, with 1 sc on each side of it.
Disc cups or ruffles. A disc that cups is crocheted too tightly; one that ruffles is too loose. Change hook size and check the size again at Rnd 7.
Cups lean forward. Add a second seam on each cup, 0.5 in (1.3 cm) to either side of the first.
Organizer tilts on the wall. The loop is off-center. Move it so it sits directly behind the 12:00 tip.
Care
Spot clean with mild soap and cool water, or hand wash gently. Lay flat to dry, and reshape the petals and cups while damp.

Final Notes
The measurement chain is short. Get the disc to 3 in (7.6 cm) at Rnd 7 and 5 in (12.7 cm) at Rnd 12. After their rims, the petals should measure 2.75 in (7.0 cm) and 3.75 in (9.5 cm) long. The assembled flower will then measure 11.5 in (29.2 cm), and the three 2.5 in (6.4 cm) cups will fit neatly across the lower half.
Happy crocheting!