

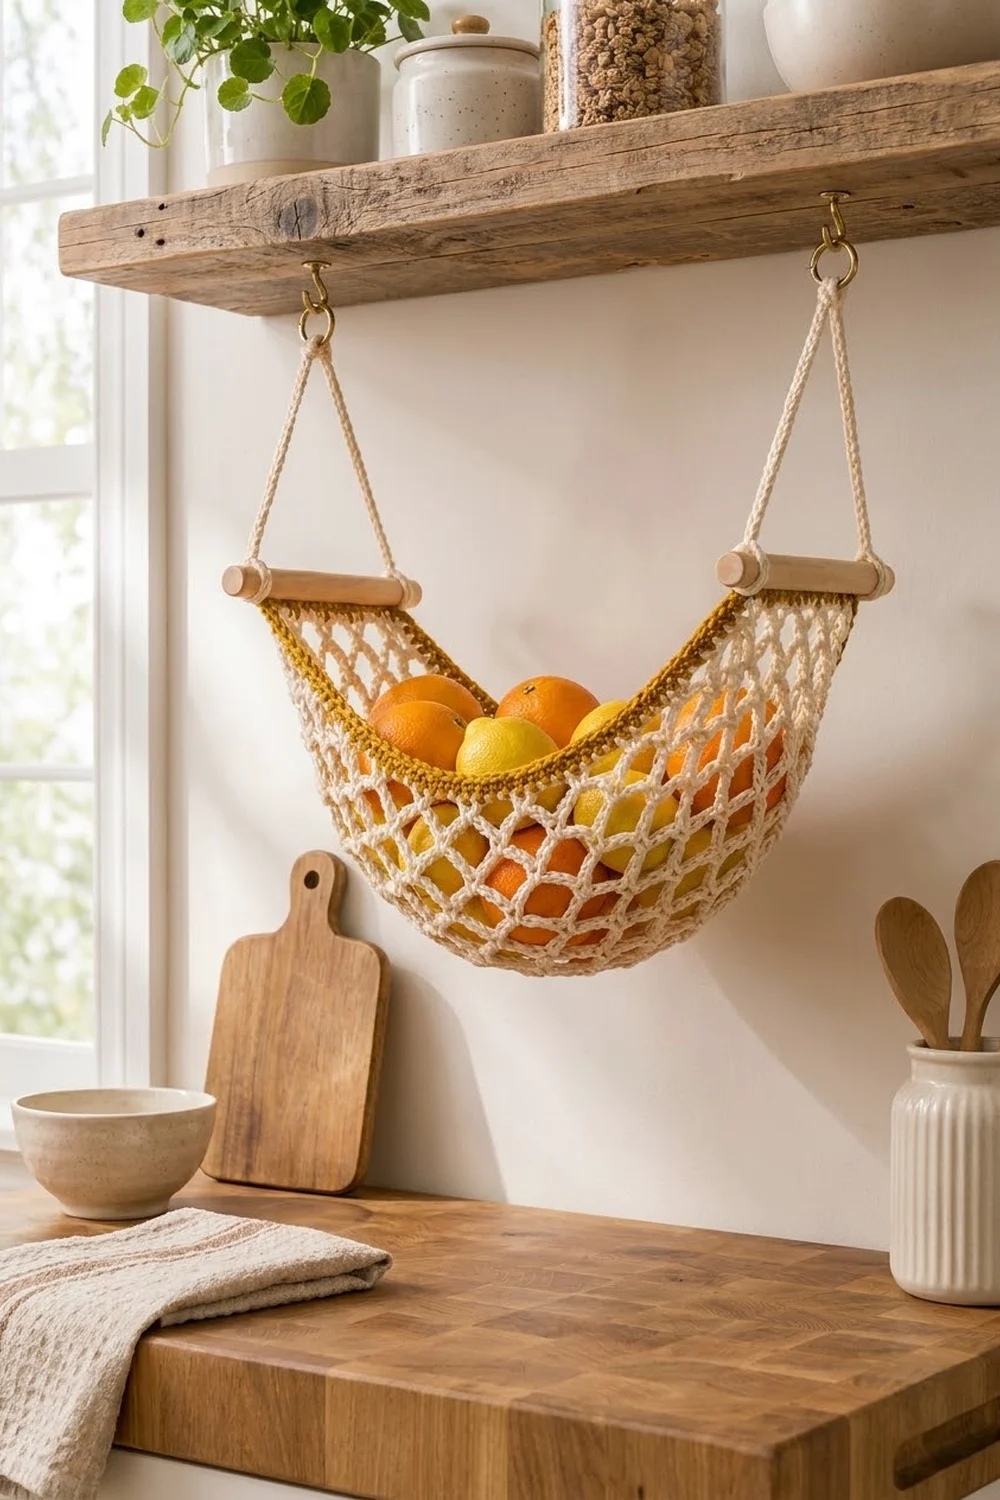
This fruit hammock is a cream mesh net with a solid mustard rim. It hangs under a shelf or cabinet and keeps citrus, onions or garlic off the counter. The open net lets air through, and the mustard border gives the piece a clean outline that also makes it stronger.
The colors are simple: cream cotton for the net and warm mustard for the end bands and border. Wooden dowels at each end and four crocheted cords finish the look, in a light, natural kitchen style.
The pattern uses US crochet terms. The finished hammock measures about 18.5 in (47.0 cm) down the center, 9.75 in (24.8 cm) across, and about 12.5 in (31.8 cm) along each rim.
You’ll work one flat rectangle from end to end: a mustard band, cream mesh rows, then a second mustard band. A mustard border goes all the way around. Its long sides are worked with fewer stitches on purpose, which pulls the rims in and turns the flat panel into a deep crescent-shaped pocket. Last, you make four cords and weave a dowel through each end.
Finished Size and Construction
- Finished size: 18.5 in (47.0 cm) center length × 9.75 in (24.8 cm) wide; rims about 12.5 in (31.8 cm)
- Skill level: Easy
- Terminology: US
- Yarn weight: Worsted (#4) cotton
- Hook: 5.0 mm (US H-8)
- Number of pieces: 1 mesh panel + 4 hanging cords
- Layout: Single panel; no joining
- Panel size before border: 8.25 in × 17 in (21.0 cm × 43.2 cm)
- Border depth: 3 rounds, 0.75 in (1.9 cm)
Materials
Use a smooth, firm worsted-weight cotton or cotton blend. Cotton holds the weight of fruit without stretching much and can be washed. Avoid acrylic: it stretches too much under load.
- Cream (net and cords): 60 g, about 110 m
- Mustard (bands and border): 40 g, about 70 m
Both quantities include a safety margin of roughly 20%.
Tools:
– 5.0 mm (US H-8) crochet hook
– 2 wooden dowels, 6 in (15.2 cm) long and 0.5 in (1.3 cm) thick, each with a small hole drilled 0.5 in (1.3 cm) from each end
– 2 brass cup hooks
– Tapestry needle
– Scissors
– Stitch markers
– Rust-proof pins and a blocking mat
Abbreviations (US Terms)
- ch – chain
- sc – single crochet
- sl st – slip stitch
- sk – skip
- sp – space
- st(s) – stitch(es)
- *…* – repeat between asterisks as directed
Special stitch – mesh loop: a ch-5 anchored at each end by a sc. “Ch 5, sc in next ch-5 sp” makes one new mesh loop.
Gauge and Checkpoints
- Single crochet: 16 sc × 16 rows = 4 in (10.2 cm)
- Mesh: 4 loops × 5 rows = 4 in wide × 3 in tall (10.2 cm × 7.6 cm), lightly stretched
Treat the first end band as your gauge swatch. Make it, measure it, and only then go on.
Checkpoints:
1. First band (after 4 rows): 8.25 in (21.0 cm) wide × 1 in (2.5 cm) tall.
2. After 10 mesh rows: the mesh section measures 6 in (15.2 cm), lightly stretched.
3. After 25 mesh rows: the mesh section measures 15 in (38.1 cm).
4. After the second band: the whole panel measures 8.25 in × 17 in (21.0 cm × 43.2 cm).
5. After the border: the center length is 18.5 in (47.0 cm) and the rims have drawn in to about 12.5 in (31.8 cm).
If your band is too wide, go down to a 4.5 mm hook. If it’s too narrow, go up to a 5.5 mm hook. If only the mesh height is off, don’t change the hook. Instead, keep your chain-5 loops even and relaxed, and check again after blocking. Mesh height changes a lot with tension.

Pattern
First End Band (Mustard)
With mustard, ch 34.
Row 1: Sc in 2nd ch from hook and in each ch across. (33 sc)
Rows 2–4: Ch 1, turn, sc in each sc across. (33 sc)
On the last yarn over of the final sc of Row 4, change to cream. Cut mustard and weave in the end later.
Checkpoint: 8.25 in × 1 in (21.0 cm × 2.5 cm).
Mesh Net (Cream)
The mesh uses two kinds of row. A-rows have 8 full loops. B-rows have 7 full loops plus a half loop at each edge, which keeps the side edges straight.
Mesh Row 1 (A): Ch 1, turn, sc in first sc, *ch 5, sk 3 sc, sc in next sc* 8 times. (8 loops, 9 sc)
Check: 1 sc + 8 × (3 skipped + 1 sc) = 33 band stitches used.
Mesh Row 2 (B): Ch 1, turn, sc in first sc, ch 2, sc in first ch-5 sp, *ch 5, sc in next ch-5 sp* 7 times, ch 2, sc in last sc. (7 full loops, 2 ch-2 half loops, 10 sc)
Mesh Row 3 (A): Ch 1, turn, sc in first sc, *ch 5, sc in next ch-5 sp* 7 times, ch 5, sc in last sc. (8 loops, 9 sc)
In this row, the first and last ch-5 pass over the ch-2 half loops. Don’t work into the ch-2 spaces.
Mesh Rows 4–25: Repeat Rows 2 and 3, ending with a Row 3 (A).
That gives 25 mesh rows in total: 13 A-rows (the odd rows) and 12 B-rows (the even rows). Row 25 has 8 loops and 9 sc.
Checkpoint: the mesh measures 15 in (38.1 cm) lightly stretched.
On the last yarn over of the final sc of Row 25, change to mustard. Cut cream.
Second End Band (Mustard)
Band Row 1 (conversion): Ch 1, turn, sc in first sc, *3 sc in next ch-5 sp, sc in next sc* 8 times. (9 sc worked one per existing sc + 24 sc added into the loops = 33 sc)
Band Rows 2–4: Ch 1, turn, sc in each sc across. (33 sc)
Don’t fasten off.
Checkpoint: the panel measures 8.25 in × 17 in (21.0 cm × 43.2 cm). This is the flat rectangle stage.
Hanging Cords (Cream, make 4)
Leave a 6 in (15.2 cm) tail.
- Ch 8, then sl st in the first ch to form the top loop.
- Ch 40.
- Turn, then sl st in the back bump of each of the 40 ch back toward the loop. (40 sl st)
- Fasten off, leaving an 8 in (20.3 cm) tail.
Each cord measures about 10 in (25.4 cm) plus the top loop, which is about 1 in (2.5 cm) long. The slip-stitch pass makes the cord firm and stops it from stretching.
Border (Mustard)
The border is worked in rounds around the whole panel. Corners are ch-2 spaces. They are not counted as stitches and are not part of any side count.
Border gauge: the same as the band, 16 sc = 4 in (10.2 cm), and 3 rounds = 0.75 in (1.9 cm).
Round 1:
1. Ch 1, turn. Sc in each of the 33 sts across the top band, then ch 2 for the corner.
2. Work down the long edge:
– 1 sc in the end of each of the 4 band rows
– 2 sc in the end of each A-row and 1 sc in the end of each B-row across the mesh (13 × 2 + 12 × 1 = 38 sc)
– 1 sc in the end of each of the 4 first-band rows
That makes 46 sc. Ch 2.
3. Sc in each of the 33 loops of the foundation chain, then ch 2.
4. Work up the second long edge the same way (46 sc), then ch 2. Sl st to the first sc.
Round 1 total: 33 + 46 + 33 + 46 = 158 sc + 4 ch-2 corners.
Round 2: Ch 1, sc in each sc around, and work (sc, ch 2, sc) in each corner sp. Sl st to the first sc.
– Short sides: 33 + 2 = 35 sc each
– Long sides: 46 + 2 = 48 sc each
– Round 2 total: 166 sc + 4 ch-2 corners
Round 3: Repeat Round 2.
– Short sides: 37 sc each
– Long sides: 50 sc each
– Round 3 total: 174 sc + 4 ch-2 corners
Fasten off and weave in the ends.
Why the math works:
– Short ends: the 33 border stitches match the 33-stitch bands exactly, so the ends lie flat and straight. That’s where the dowels go.
– Long edges: 15 in (38.1 cm) of mesh would need 60 sc to lie flat. Instead it gets only 38 sc, which is 9.5 in (24.1 cm) at gauge. That deliberate shortfall pulls the rims in and makes the deep crescent pocket.
– Rim length: after Round 3, each long rim has 50 sc, or about 12.5 in (31.8 cm). The center of the net stays at about 18.5 in (47.0 cm).
Checkpoint: laid flat, the hammock curves into a crescent with raised, narrow tips.
Final Blocking
- Soak. Soak the hammock and the cords in cool water for 10 minutes. Press out the water; don’t wring.
- Roll. Roll everything in a towel to remove extra moisture.
- Pin the ends. Lay the hammock on the mat and pin both short ends straight at 9.75 in (24.8 cm) wide.
- Open the net. Gently stretch the center to 18.5 in (47.0 cm) and pin. Open each mesh loop into an even diamond.
- Shape the rims. Let the long rims curve inward naturally. Pin them into smooth arcs, but don’t stretch them flat.
- Pin the cords. Pin the cords out straight at 10 in (25.4 cm).
- Dry. Let everything dry completely, at least 24 hours.
- Add the dowels. Weave one dowel through the 8 loops of mesh Row 1, going over and under. Weave the other dowel through the loops of Row 25. The end gathers onto the dowel between the drilled holes.
- Attach the cords. Thread each cord’s long tail through one dowel hole, knot it securely, and weave the tail back up into the cord.
- Hang. Hang both top loops from one end on a single cup hook. Do the same at the other end. Space the hooks about 17 in (43.2 cm) apart.
Final Quality-Control Checklist
- Both end bands have 33 sc and measure 8.25 in (21.0 cm) wide.
- There are 25 mesh rows, starting and ending with an A-row.
- Every mesh loop is a full ch-5, and no B-row half loop was worked into.
- Border rounds have 158, 166 and 174 sc.
- Both long sides have matching counts (46/48/50), so the curve is symmetrical.
- All corners are a clean ch-2 space.
- The four cords are equal in length.
- The dowel knots are tight and the tails are woven in.
- The empty hammock hangs level.
Troubleshooting
- Rims ruffle instead of curving: too many sc went into the mesh row ends. Recount to 38 per long edge.
- Hammock is too shallow: rework Round 1 using 1 sc in every mesh row end (25 sc). Each long side then has 33 sc in Round 1, 35 in Round 2 and 37 in Round 3. Recount the round totals before you go on.
- Edges of the mesh lean or slant: you probably skipped the ch-2 half loops on B-rows. Rip back to the last correct row.
- The 3-sc row bunches up: your ch-5 loops are too tight. Relax your chain tension.
- Hammock tilts when hung: your cords aren’t the same length. Re-knot the tails at the dowel holes to even them out.
- Net sags too much with fruit in it: use firmer cotton or go down one hook size for the mesh.
Care
Hand wash in cool water and lay flat to dry, then re-pin the rims if needed. Take out the dowels before washing.
Final Notes
The measurement chain is:
1. A 33-stitch band at 8.25 in (21.0 cm) wide
2. 25 mesh rows to 15 in (38.1 cm)
3. A matching band, giving a 17 in (43.2 cm) panel
4. A 3-round border that adds 0.75 in (1.9 cm) on every side and pulls the rims in to about 12.5 in (31.8 cm), for a finished hammock 18.5 in × 9.75 in (47.0 cm × 24.8 cm)
Check each stage against these numbers and the fruit hammock will hang evenly and hold its shape.
Happy crocheting!