
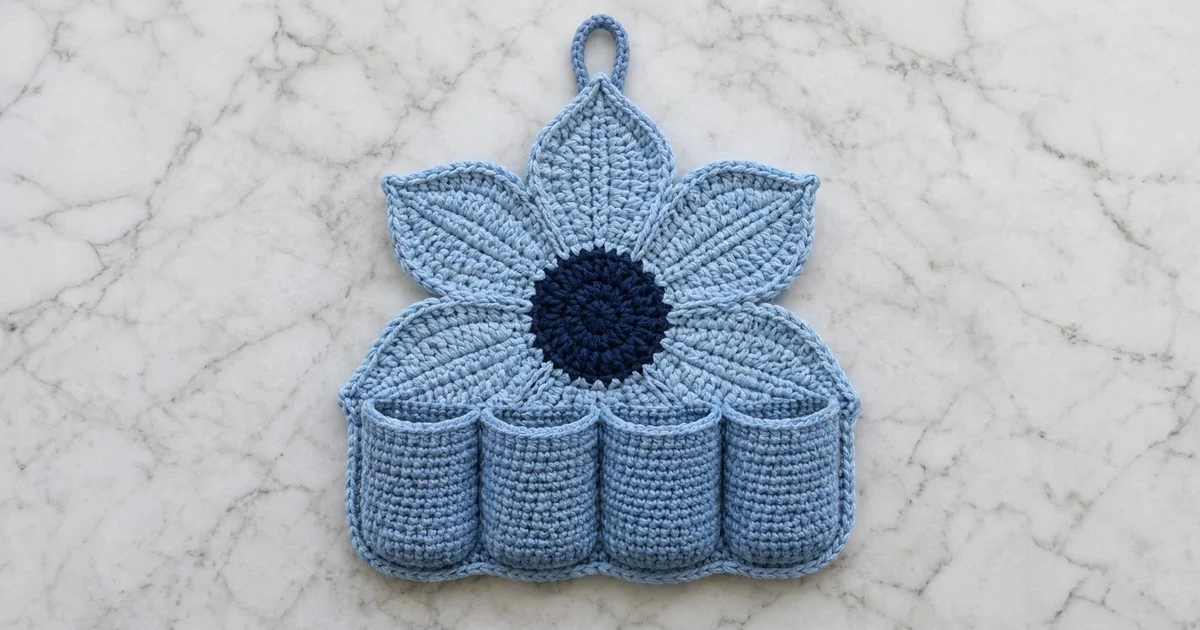
This wall organizer puts a bold six-petal flower above four sturdy tube pockets. It hangs from a single loop and keeps pens, a small notepad, a phone and a remote off your desk.
All the colors are blues. The center is navy, the petals are light sky blue, and the panel, pockets and loop are medium cornflower blue. A dusty blue outline runs around every petal and around the panel. Each petal has a crisp center spine and pointed tips.
This pattern uses US crochet terms. The finished organizer is about 12.9 in wide x 12.9 in tall (32.8 cm x 32.8 cm) to the tip of the top petal, or about 15.4 in (39.1 cm) tall including the loop.
You will make five kinds of pieces: a flat circle for the center, six petals worked around a foundation chain, a backing panel worked in rows, four pockets worked in the round from a flat base, and a short strip folded into a loop. You sew the petals under the center, add a two-round border to the panel, and then stitch everything together.
Finished Size and Construction
- Finished size: 12.9 in x 12.9 in (32.8 cm x 32.8 cm); 15.4 in (39.1 cm) tall with the loop
- Skill level: Intermediate
- Terminology: US
- Yarn weight: Worsted (#4), cotton or cotton blend
- Hook: 4.0 mm (G-6)
- Number of pieces: 13 (1 center, 6 petals, 1 panel, 4 pockets, 1 loop)
- Layout: The flower is centered on the panel’s top edge. The four pockets sit in one row along the bottom.
- Piece sizes: Center 3.5 in (8.9 cm) across; each petal 4.75 in x 2.75 in (12.1 cm x 7.0 cm); each pocket 2.9 in (7.4 cm) across x 4 in (10.2 cm) tall
- Panel size before border: 12 in x 6 in (30.5 cm x 15.2 cm)
- Border depth: 2 rounds, about 0.44 in (1.1 cm) on each edge
Materials
Choose a smooth, firm worsted cotton. Cotton holds the pocket shape and won’t stretch when the pockets are full. Avoid fuzzy or very soft acrylic, because it lets the pockets sag.
- Color A, Navy: 15 g / 26 m
- Color B, Light Sky Blue: 35 g / 60 m
- Color C, Medium Cornflower Blue: 120 g / 204 m
- Color D, Dusty Blue: 20 g / 34 m
Tools:
- 4.0 mm (G-6) crochet hook
- Tapestry needle
- Stitch markers
- Scissors
- Rust-proof pins and a blocking mat
- Spray bottle
The amounts above include about 15% extra for a gauge swatch and sewing tails.
Abbreviations (US Terms)
- ch – chain
- sl st – slip stitch
- sc – single crochet
- hdc – half double crochet
- dc – double crochet
- tr – treble crochet
- BLO – back loop only
- sp – space
- st(s) – stitch(es)
- MR – magic ring
Special stitch – sc BLO: Insert the hook under the back loop only of the stitch, yarn over, pull up a loop, yarn over and pull through both loops. You use this round once on each pocket to make a sharp turn from the base up into the wall.
Gauge and Checkpoints
Gauge: 16 sc x 18 rows = 4 in (10.2 cm) in single crochet. 16 dc x 8 rows = 4 in (10.2 cm) in double crochet.
Make the center first. It’s small, so it tells you quickly whether your gauge is right.
Checkpoints:
- Center after Round 4: 3.5 in (8.9 cm) across
- Petal after Round 1: about 4 in (10.2 cm) long, tip to tip
- Petal after Round 3: 4.75 in x 2.75 in (12.1 cm x 7.0 cm)
- Panel before border: 12 in x 6 in (30.5 cm x 15.2 cm)
- Pocket: 9 in (22.9 cm) around, 2.9 in (7.4 cm) across and 4 in (10.2 cm) tall
- Assembled flower: 12 in (30.5 cm) from one petal tip to the opposite tip
If your pieces are too big, go down 0.5 mm in hook size. If they’re too small, go up 0.5 mm. The pockets have to fit across the panel, so check the panel and one pocket before you make the rest.
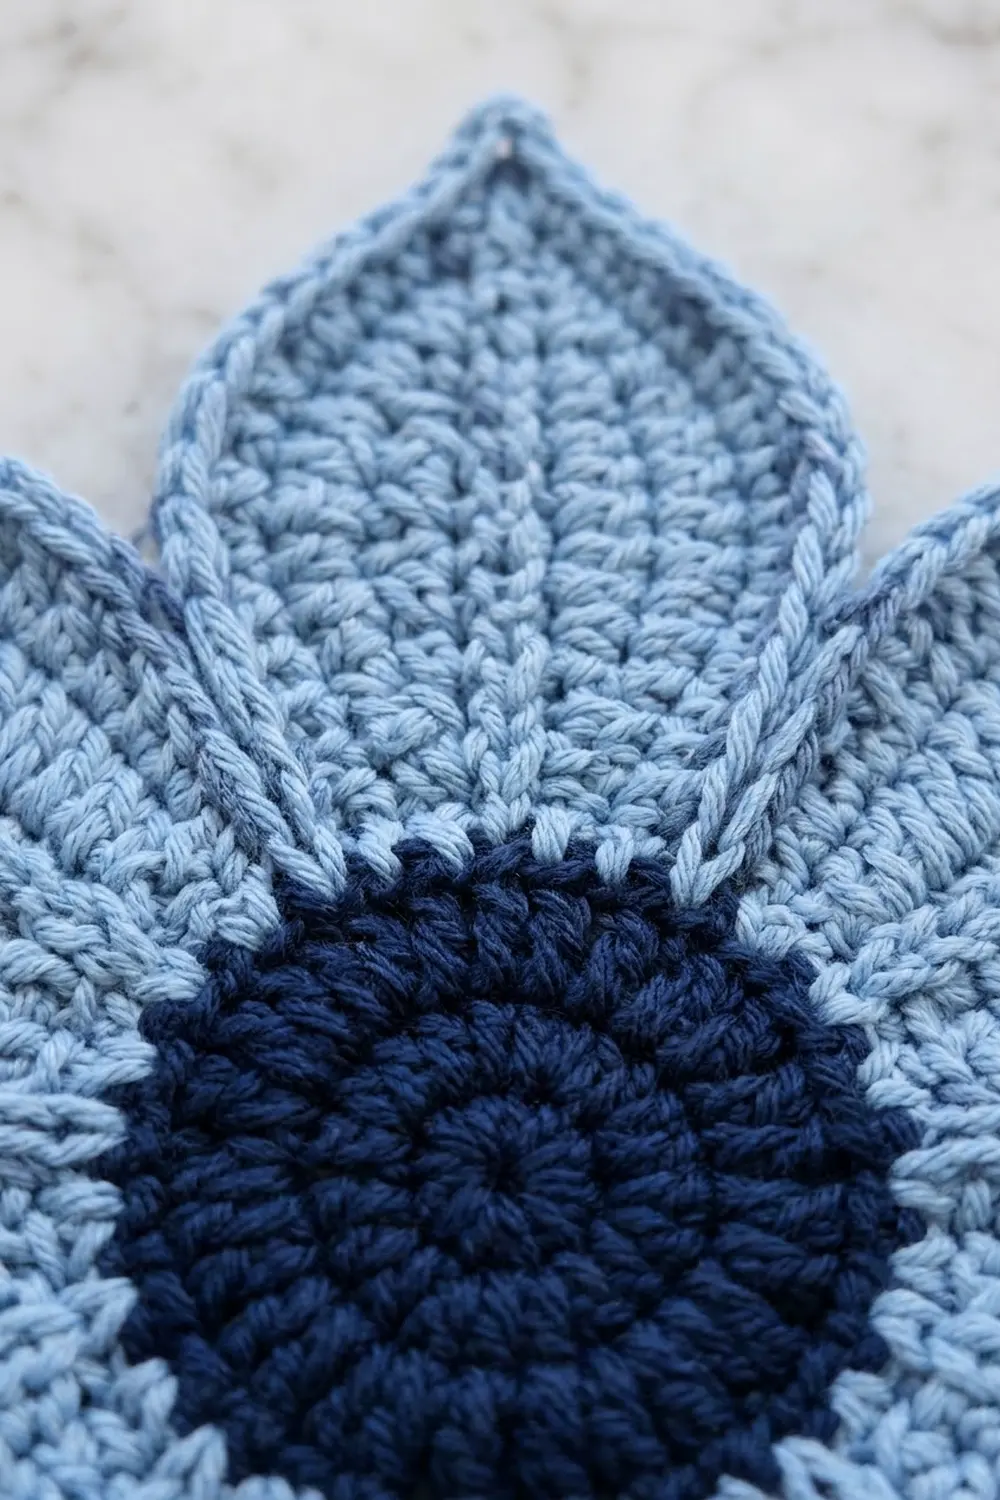
Center (Make 1, Color A)
Round 1: Make a MR, ch 2 (doesn’t count as a st), then work 12 dc in the ring. Pull the ring closed. Sl st to the first dc. (12 dc)
Round 2: Ch 2, work 2 dc in each st around. Sl st to the first dc. (24 dc)
Round 3: Ch 2, dc in next st, 2 dc in next st; repeat from * around. Sl st to the first dc. (36 dc)
Round 4: Ch 1, sc in next 5 sts, 2 sc in next st; repeat from * around. Sl st to the first sc. (42 sc)
Fasten off and leave a 24 in (61.0 cm) tail for sewing. The center should lie flat and measure 3.5 in (8.9 cm) across.
Petals (Make 6)
You work each petal around both sides of a foundation chain. The two sides meet along the chain, and that seam makes the center spine.
With Color B, ch 17.
Round 1: Sc in the 2nd ch from the hook, hdc in next ch, dc in next 3 ch, tr in next 5 ch, dc in next 3 ch, hdc in next 2 ch, sc in last ch (16 sts). Ch 2 for the tip. Turn the piece so you can work along the bottom loops of the chain: sc in first ch, hdc in next 2 ch, dc in next 3 ch, tr in next 5 ch, dc in next 3 ch, hdc in next ch, sc in last ch (16 sts). Ch 2 for the second tip. Sl st to the first sc. (32 sts and 2 ch-2 tip spaces)
The two sides mirror each other. The 5 tr on each side line up across the spine, which makes the middle of the petal its widest point.
Round 2: Ch 1, sc in next 5 sts, [2 sc in next tr, sc in next tr] twice, 2 sc in next tr, sc in next 6 sts (19 sc on this side). Work (sc, ch 2, sc) in the tip space. Sc in next 6 sts, [2 sc in next tr, sc in next tr] twice, 2 sc in next tr, sc in next 5 sts (19 sc on this side). Work (sc, ch 2, sc) in the tip space. Sl st to the first sc and fasten off B.
Round 2 count: 32 sts worked one per stitch, plus 6 increases on the tr, plus 4 sc at the tips = 42 sc and 2 ch-2 tip spaces.
Round 3 (trim): Join D in any sc. Ch 1, sc in each sc around, working (sc, ch 2, sc) in each ch-2 tip space. Sl st to the first sc.
Round 3 count: 42 sc worked one per stitch, plus 4 sc at the tips = 46 sc and 2 ch-2 tip spaces.
Fasten off and leave a 12 in (30.5 cm) tail. Each petal should measure 4.75 in x 2.75 in (12.1 cm x 7.0 cm).
Backing Panel (Make 1, Color C)
Foundation: Ch 49.
Row 1: Sc in the 2nd ch from the hook and in each ch across. Turn. (48 sc)
Rows 2–27: Ch 1, sc in each st across. Turn. (48 sc)
Fasten off. The panel should measure 12 in x 6 in (30.5 cm x 15.2 cm).
Pockets (Make 4, Color C)
Base:
Round 1: Make a MR, ch 1, work 6 sc in the ring. Sl st to the first sc. (6 sc)
Round 2: Ch 1, 2 sc in each st around. Sl st to the first sc. (12 sc)
Round 3: Ch 1, sc in next st, 2 sc in next st; repeat around. Sl st to the first sc. (18 sc)
Round 4: Ch 1, sc in next 2 sts, 2 sc in next st; repeat around. Sl st to the first sc. (24 sc)
Round 5: Ch 1, sc in next 3 sts, 2 sc in next st; repeat around. Sl st to the first sc. (30 sc)
Round 6: Ch 1, sc in next 4 sts, 2 sc in next st; repeat around. Sl st to the first sc. (36 sc)
Walls:
Round 7: Ch 1, sc BLO in each st around. Sl st to the first sc. (36 sc)
Rounds 8–24: Ch 1, sc in each st around. Sl st to the first sc. (36 sc)
Fasten off and leave a 30 in (76.2 cm) tail. Rounds 7–24 make 18 rounds, which gives a 4 in (10.2 cm) wall. Each pocket is 9 in (22.9 cm) around and 2.9 in (7.4 cm) across.
Hanging Loop (Make 1, Color C)
Foundation: Ch 25.
Row 1: Sc in the 2nd ch from the hook and in each ch across. Turn. (24 sc)
Row 2: Ch 1, sc in each st across. (24 sc)
Fasten off and leave a 16 in (40.6 cm) tail. The strip is 6 in (15.2 cm) long. Fold it in half so the short ends meet. Wrap the tail tightly around both layers 6 to 8 times, about 0.5 in (1.3 cm) up from the ends, then secure the wrap with a few stitches. The loop stands about 3 in (7.6 cm) tall.
Make All Pieces
- Color A: 1 center
- Colors B and D: 6 petals
- Color C: 1 panel, 4 pockets and 1 loop
- Color D: the panel border
Layout (front view):
              [Loop]
             [Petal 1]
   [Petal 6]           [Petal 2]
              [CENTER]
-------- panel top edge ---------
   [Petal 5]           [Petal 3]
             [Petal 4]
 [Pocket][Pocket][Pocket][Pocket]
------ panel bottom edge --------
Petal 1 points straight up. The others go clockwise at even 60-degree spacing, so Petal 4 points straight down behind the pockets.
Joining
Work the panel border (see the Border section below) before Step 3, while the panel edges are still easy to reach.
Step 1 – Join the petals to each other. Lay the six petals in a ring with their inner tips meeting in the middle. Where neighboring petals touch near the base, whipstitch them together through the D outline for about 1 in (2.5 cm). Match the stitches one to one. Leave the outer part of each petal free.
Step 2 – Put the center on top. Place the center over the inner tips so it overlaps each petal by about 0.5 in (1.3 cm). Whipstitch through the back loops of Round 4 into the petals underneath, one stitch per center sc (42 stitches in all). Keep the tension snug but not tight, or the center will cup. Checkpoint: the flower measures 12 in (30.5 cm) across.
Step 3 – Attach the flower to the panel. Lay the bordered panel flat, right side up. Line up the middle of the navy circle with the midpoint of the panel’s top edge, with Petal 4 pointing straight down, and pin. Sew the lower half of the center, Petals 3, 4 and 5, and the lower edges of Petals 2 and 6 to the panel with small running stitches through the D outlines. The upper half of the flower stands free above the panel.
Step 4 – Attach the pockets. Set the four pockets in a row with their bases just above the bottom border. The pockets are 4 x 2.9 in = 11.6 in (29.5 cm) wide in total, which leaves about 0.2 in (0.5 cm) of panel showing inside the border at each side. On each pocket, whipstitch a vertical line along the back from base to rim, then sew the back half of the base edge to the panel. Tack neighboring pockets together where they touch at the rim and at the base.
Step 5 – Attach the loop. Sew the wrapped end of the loop to the back of Petal 1, 0.5 in (1.3 cm) below its tip. About 2.5 in (6.4 cm) of loop should show above the petal.
Checkpoint: without the loop, the organizer measures 12.9 in x 12.9 in (32.8 cm x 32.8 cm).
Border (Panel Only, Color D)
You work the border around the panel only, which is a single piece. That means the starting counts come straight from the panel: 48 stitches across the top and bottom, and 27 row ends on each side.
Border gauge: 16 sc = 4 in (10.2 cm). Each sc round adds about 0.22 in (0.6 cm) to each edge.
The side counts below include sc only. The ch-2 corner spaces aren’t counted.
Round 1: Join D in the first st of Row 27. Ch 1, sc in each st across the top (48 sc), ch 2. Sc in each row end down the side (27 sc), ch 2. Sc in each foundation ch across the bottom (48 sc), ch 2. Sc in each row end up the other side (27 sc), ch 2. Sl st to the first sc. (150 sc: 48 / 27 / 48 / 27)
Round 2: Sl st into the corner space. Ch 1. Work (sc, ch 2, sc) in each corner space and sc in each sc along every side. Sl st to the first sc. (158 sc: 50 / 29 / 50 / 29)
Fasten off and weave in the ends.
Why the math works: Each (sc, ch 2, sc) corner adds one sc to each of the two sides next to it. So every side gains exactly 2 sc in Round 2, and 150 + 8 = 158. Two rounds of about 0.22 in (0.6 cm) each add 0.44 in (1.1 cm) to each edge. That turns 12 in x 6 in into 12.9 in x 6.9 in (32.8 cm x 17.5 cm). The top petal reaches 6 in (15.2 cm) above the panel’s top edge, so the total height is 12.9 in (32.8 cm).
Final Blocking
- Weave in all remaining ends.
- Pin the organizer face up on a blocking mat, keeping the panel square and its edges straight.
- Pin each petal tip into a sharp point, and pin the petal sides into smooth curves.
- Fill each pocket with a rolled towel or a 2.75 in (7.0 cm) jar so it dries round.
- Mist the piece until it’s damp but not soaked.
- Let it dry completely, for at least 24 hours.
Final Quality-Control Checklist
- The center measures 3.5 in (8.9 cm) and lies flat.
- All six petals match: 46 sc in Round 3 and 4.75 in x 2.75 in (12.1 cm x 7.0 cm).
- The petal spines point toward the middle of the center.
- The panel border has 158 sc: 50 / 29 / 50 / 29 per side.
- Each of the four pockets has 36 sc around and stands 4 in (10.2 cm) tall.
- The pockets sit level and evenly spaced.
- The loop is centered behind Petal 1 and firmly attached.
- The overall size is 12.9 in x 12.9 in (32.8 cm x 32.8 cm).
Troubleshooting
- The center cups: Your tension is tight. Go up a hook size, or loosen the whipstitches in Step 2.
- The center ruffles: Your tension is loose. Go down a hook size.
- The petal tips are blunt: Make sure you worked (sc, ch 2, sc) at the tips, then pin the tips firmly when blocking.
- The pockets are too wide for the panel: Remake them with a smaller hook. Each pocket can be no more than 2.9 in (7.4 cm) across.
- The pockets flare at the top: Work the last 2 rounds with a hook 0.5 mm smaller.
- The organizer tilts: Move the loop so it sits exactly above the navy center.
Care
Spot clean with a damp cloth. If you need to, hand wash in cool water, press the water out in a towel and dry flat with the pockets stuffed into shape.

Final Notes
Each measurement depends on the one before it. The center is 3.5 in (8.9 cm), and each petal is 4.75 in (12.1 cm), which together make a 12 in (30.5 cm) flower. The panel starts at 12 in x 6 in (30.5 cm x 15.2 cm) and measures 12.9 in x 6.9 in (32.8 cm x 17.5 cm) with the border. Four 2.9 in (7.4 cm) pockets fill 11.6 in (29.5 cm) of that width. The finished organizer is 12.9 in x 12.9 in (32.8 cm x 32.8 cm), or 15.4 in (39.1 cm) tall with the loop.
Happy crocheting!