

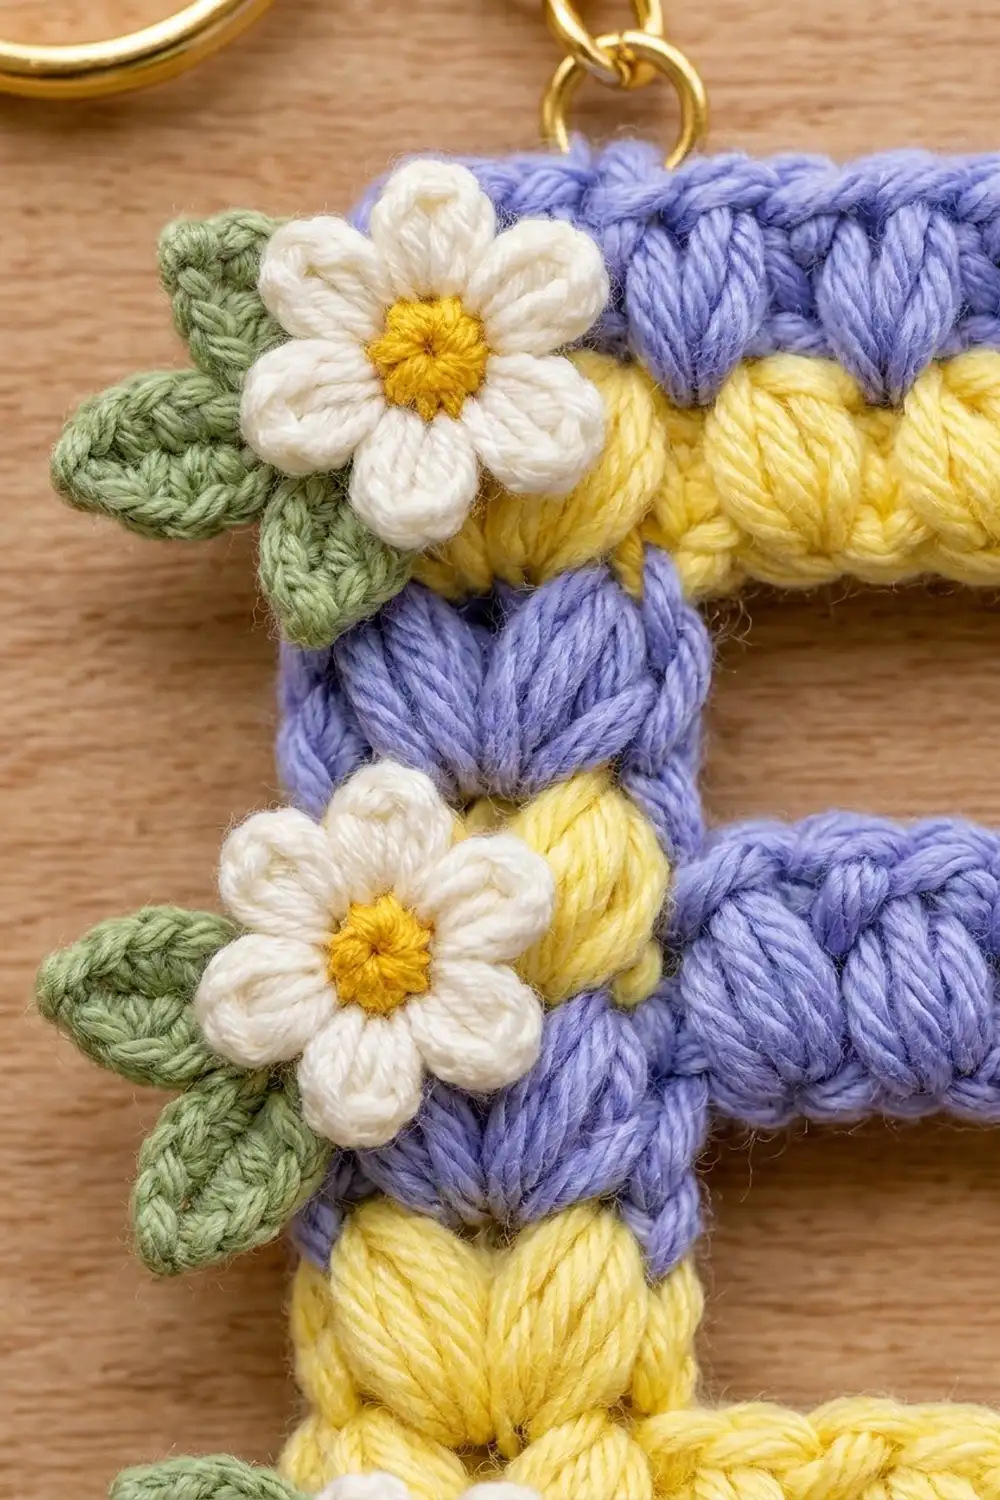
This cheerful letter E keychain is made of rows of soft puff stitches in alternating periwinkle-lavender and butter-yellow stripes. Three tiny white daisies with sunny centers and sage-green leaves run down the left edge, so it looks like a little spring garden clipped to your bag.
The style is cottagecore but tidy. Every puff stacks straight on top of the puff below it, so the stripes stay crisp and the letter shape stays easy to read from across the room. It makes a quick personalized gift, a tag for a tote, or a bag charm for anyone whose name starts with E.
This pattern uses US crochet terms. The finished letter measures 2.75 in (7.0 cm) wide by 3.6 in (9.1 cm) tall, not counting the hardware.
The E is worked flat in 9 rows, always with the right side facing, from the bottom bar up to the top bar. You change color every row. Stitches are added with short chains to make the middle arm and the top bar. Afterwards you make three daisies and six leaves, sew them on, and attach a keyring.
Finished Size and Construction
- Finished size: 2.75 in (7.0 cm) wide x 3.6 in (9.1 cm) tall
- Skill level: Advanced beginner
- Terminology: US terms
- Yarn weight: DK (#3) cotton or cotton blend
- Hook: 3.5 mm (E-4)
- Number of pieces: 1 letter body, plus 9 small appliqués (3 daisies, 6 leaves)
- Layout: One letter. Daisies sit along the left spine at the bottom, middle and top.
- Spine width: 1.25 in (3.2 cm), which is 5 sts
- Bar width: 2.75 in (7.0 cm), which is 11 sts. The middle arm is 2.25 in (5.7 cm), which is 9 sts.
- Size before border: 2.75 x 3.6 in (7.0 x 9.1 cm)
- Border depth: 0 in (0 cm). The hdc end stitches form the edge.
Materials
Use a smooth, mercerized or soft-twist cotton. It shows puff stitches clearly and stands up to daily handling on a bag. Acrylic DK also works, but the puffs will look fluffier.
- Lavender (L): 5 g, about 12 m (13.1 yd)
- Pale yellow (Y): 5 g, about 12 m (13.1 yd), which also covers the daisy centers
- White (W): 2 g, about 5 m (5.5 yd)
- Sage green (G): 2 g, about 5 m (5.5 yd)
All quantities include a margin for a gauge test and for long sewing tails.
Tools:
– 3.5 mm (E-4) crochet hook
– Tapestry needle
– Gold split keyring, about 1.2 in (3.0 cm) across, with a short chain of about 1.5 in (3.8 cm) and a jump ring
– 2 pairs of small pliers
– Scissors
– Rust-proof pins and a foam blocking mat
Abbreviations (US Terms)
- ch: chain
- sl st: slip stitch
- sc: single crochet
- hdc: half double crochet
- dc: double crochet
- st(s): stitch(es)
- sp: space
- RS: right side
Puff stitch (puff): (Yo, insert hook in the indicated st, yo and pull up a loop to hdc height) 3 times. You now have 7 loops on the hook. Yo and pull through all 7 loops. When you work a puff into a puff, insert the hook under both top loops of the puff below.
Standing hdc: With a slipknot on the hook, yo, insert hook in the indicated st, yo and pull up a loop, yo and pull through all 3 loops.
Gauge and Checkpoints
Gauge: 4 sts and 2.5 rows = 1 in (2.5 cm). That means 11 sts = 2.75 in (7.0 cm) and each puff row is 0.4 in (1.0 cm) tall.
The letter is small, so the letter itself is your gauge test. Measure lightly flattened, without stretching, at each checkpoint:
- After Row 2: 2.75 x 0.8 in (7.0 x 2.0 cm)
- After Row 4: height 1.6 in (4.1 cm). The spine is 1.25 in (3.2 cm) wide.
- After Row 5: height 2.0 in (5.1 cm). The arm row is 2.25 in (5.7 cm) wide.
- After Row 9: 2.75 x 3.6 in (7.0 x 9.1 cm)
If Row 2 is more than 0.25 in (0.6 cm) too wide, start over with a 3.25 mm hook. If it is too narrow by the same amount, use a 3.75 mm hook. If the width is right but the rows are too tall, pull up shorter loops in each puff.
Pattern Notes
- Every row is worked with the RS facing, from right to left. Fasten off at the end of each row and join the next color as directed.
- Leave 6 in (15.2 cm) tails. Crochet over them as you go where you can.
- The ch-1 after each puff counts as a stitch.
- On the narrow spine rows, the stitches are always the 5 sts at the left edge of the row below.
Letter Body
Row 1 (L): Ch 13. Hdc in 3rd ch from hook. The 2 skipped ch do not count. Puff in next ch, ch 1, skip next ch; rep from * 3 more times. Puff in next ch, hdc in last ch. Fasten off. (11 sts: 2 hdc, 5 puffs, 4 ch-1 sps)*
Row 2 (Y): With RS facing, join Y with a standing hdc in the first st of Row 1 (at the right edge). Puff in next puff, ch 1, skip next ch-1 sp; rep from * 3 more times. Puff in next puff, hdc in last hdc. Fasten off. (11 sts)*
Checkpoint: the bottom bar is 2.75 x 0.8 in (7.0 x 2.0 cm).
Row 3 (L), spine begins: Count 5 sts in from the left edge of Row 2. The 5th st is a ch-1 sp. Join L with a standing hdc in that ch-1 sp. Puff in next puff, ch 1, skip next ch-1 sp, puff in next puff, hdc in last hdc. Fasten off. (5 sts: 2 hdc, 2 puffs, 1 ch-1 sp)
Row 4 (Y): Join Y with a standing hdc in the first hdc of Row 3. Puff in next puff, ch 1, skip next ch-1 sp, puff in next puff, hdc in last hdc. Fasten off. (5 sts)
Row 5 (L), middle arm: Join L with a sl st in the first (rightmost) hdc of Row 4. Ch 5. Working back along the chain toward the join: hdc in 3rd ch from hook (the 2 skipped ch do not count), puff in next ch, ch 1, skip next ch, puff in next ch. That uses all 5 ch. Ch 1, skip the joining st. Puff in next puff, ch 1, skip next ch-1 sp, puff in next puff, hdc in last hdc. Fasten off. (9 sts: 4 over the chain + 5 over the spine)
Checkpoint: the arm row is 2.25 in (5.7 cm) wide and the letter is 2.0 in (5.1 cm) tall.
Row 6 (Y): Count 5 sts in from the left edge of Row 5. The 5th st is the ch-1 sp above the joining st. Join Y with a standing hdc in that sp. Puff in next puff, ch 1, skip next ch-1 sp, puff in next puff, hdc in last hdc. Fasten off. (5 sts)
Row 7 (L): Work as Row 4 in L. (5 sts)
Checkpoint: the letter is 2.8 in (7.1 cm) tall and the spine is still 1.25 in (3.2 cm) wide.
Row 8 (Y), top bar: Join Y with a sl st in the first (rightmost) hdc of Row 7. Ch 7. Working back along the chain: hdc in 3rd ch from hook, then puff in next ch, ch 1, skip next ch; rep from * once more, puff in next ch. That uses all 7 ch. Ch 1, skip the joining st. Puff in next puff, ch 1, skip next ch-1 sp, puff in next puff, hdc in last hdc. Fasten off. (11 sts: 6 over the chain + 5 over the spine)*
Row 9 (L): Work as Row 2 in L. (11 sts)
Checkpoint: the letter is 2.75 x 3.6 in (7.0 x 9.1 cm). Check stitch counts: the bars have 11 sts, the arm has 9 and each spine row has 5. Each bar has 5 puffs, the arm has 4 and each spine row has 2.
Daisies (Make 3)
Rnd 1 (Y): Make a magic ring and work 8 sc into it. Pull the ring closed and sl st to the first sc. Fasten off. (8 sc)
Rnd 2 (W): Join W with a sl st in any sc. In the next sc work (ch 2, 2 dc, ch 2, sl st); rep from * 7 more times. The last petal goes into the joining sc. Fasten off with an 8 in (20.3 cm) tail for sewing. (8 petals)*
Each daisy measures about 0.9 in (2.3 cm) across.
Leaves (Make 6)
With G, ch 5. Sl st in 2nd ch from hook, sc in next ch, hdc in next ch, (sc, ch 1, sc) in last ch. Rotate to work along the other side of the chain: hdc in next ch, sc in next ch, sl st in last ch. Fasten off and leave a tail.
Each leaf is about 0.6 in (1.5 cm) long, with 4 sts on each side and a ch-1 at the base.
Border
This design has no added border round. The stripes run to the edge in their own colors, just like the photographed piece, so the edge comes from the hdc that starts and ends every row. That makes the border depth 0 in (0 cm), and the border gauge is the body gauge: 4 sts = 1 in (2.5 cm).
Edge counts around the outline:
– Top edge: 11 sts (Row 9)
– Bottom edge: 11 foundation ch (Row 1)
– Left spine: 9 row-ends, 1 per row
– Right end of the top bar: 2 row-ends (Rows 8–9)
– Right end of the middle arm: 1 row-end (Row 5)
– Right end of the bottom bar: 2 row-ends (Rows 1–2)
Edge-firming step: Weave each tail 0.5 in (1.3 cm) through its own end hdc before trimming. This rounds the corners and stops the color changes from gapping.
Why the math works: Every bar is 11 sts at 4 sts per inch, so it is 2.75 in (7.0 cm). The arm is 9 sts, which is exactly 0.5 in (1.3 cm) shorter. The spine is 5 sts, or 1.25 in (3.2 cm). Nine rows at 0.4 in (1.0 cm) each give 3.6 in (9.1 cm). The extension chains (5 for the arm, 7 for the top bar) each include 2 turning ch. So the arm adds exactly 4 sts and the top bar adds exactly 6, and no stitches are counted twice.
Assembly
- Place a leaf behind the left edge of each daisy position so its tip sticks out about 0.25 in (0.6 cm) past the spine. Use 2 leaves per daisy, angled up and down. Tack each leaf on from the back.
- Bottom daisy: Center it over the left end of Rows 1–2. It should overlap the left edge by 0.25 in (0.6 cm).
- Middle daisy: Center it over the left end of Row 5.
- Top daisy: Center it over the left end of Rows 8–9.
- Sew around each daisy center with small stitches, then tack down the tip of each petal.
- Open the jump ring with pliers. Pass it through the ch-1 sp between the first and second puff of Row 9, counted from the left, then close it. Attach the chain and split ring.
Final Blocking
- Lightly mist the letter with water, or hover a steam iron 1 in (2.5 cm) above it. Never press down on the puffs.
- Pin it to 2.75 x 3.6 in (7.0 x 9.1 cm) on a foam mat.
- Square the inner corners of the two gaps. Each gap should be 0.8 in (2.0 cm) tall.
- Gently pinch each puff so it is round again.
- Let it dry completely, about 2 hours, before you remove the pins.
Final Quality-Control Checklist
- The letter is 2.75 x 3.6 in (7.0 x 9.1 cm).
- The bars have 11 sts, the arm has 9 and the spine rows have 5.
- The stripes alternate L, Y, L, Y, L, Y, L, Y, L from bottom to top.
- The puffs line up in vertical columns.
- Each daisy has 8 petals and a yellow center and is sewn down at the petal tips.
- The leaf tips stick out evenly on the left side.
- All tails are woven in and nothing is visible from the front.
- The jump ring is fully closed.
Troubleshooting
- Bars flare or ripple: Your puff loops are uneven. Pull each loop up to the same hdc height.
- Spine leans right: You started a spine row in the wrong stitch. Count 5 sts from the left edge again.
- Arm or top bar is too short: You probably counted the 2 turning ch as stitches. Skip them.
- Gaps at the color changes: Tighten the tails when you weave them in, and work the next standing hdc firmly.
- Daisies cup: Work Rnd 1 more loosely, or block the daisy flat before sewing it on.
- Keyring pulls the edge out of shape: Move the jump ring 1 st farther in, or add a tiny sc backing patch behind it.
Care
Hand wash in cool water and lay flat to dry. Remove the metal hardware before washing so it doesn’t rust or tarnish.

Final Notes
Your measurement chain is short and reliable. Row 2 sets the width at 2.75 in (7.0 cm). Row 4 confirms the 1.25 in (3.2 cm) spine. Row 5 checks the 2.25 in (5.7 cm) arm and the 2.0 in (5.1 cm) height. Row 9 finishes at 3.6 in (9.1 cm). If each checkpoint matches, the daisies will fit neatly along the spine and the keychain will hang straight. Once you have the method down, you can design other letters using the same rows, spine counts and extension chains.
Happy crocheting!