

This hanging organizer pairs a calm cream backing panel with three deep terracotta cups, all hung from a simple wooden dowel. It holds whisks, spatulas, and wooden spoons on a kitchen wall. It also works for art brushes, pens, or knitting needles.
The look comes from two textures. The cream panel is worked sideways in single crochet through the back loop, so the ridges run up and down like knit ribbing. The rust cups use the waistcoat stitch, which makes neat knit-look columns of small V shapes. A cream border frames the panel, and three cream tabs fold over the dowel.
The pattern uses US crochet terms. The finished panel measures 13 in wide by 9 in tall (33.0 cm by 22.9 cm). Each cup is about 3.8 in (9.7 cm) across and 5 in (12.7 cm) tall.
Construction is simple. You make one panel and add a two-round border. Then you crochet three cups from the base up and make three tabs. Sew the cups side by side across the lower panel, sew the tabs to the top edge, and slide the dowel through.
Finished Size and Construction
- Finished size: 13 in x 9 in (33.0 cm x 22.9 cm), panel with border
- Skill level: Easy / Intermediate (waistcoat stitch, neat seaming)
- Terminology: US crochet terms
- Yarn weight: Worsted (#4), cotton or cotton blend
- Hook: 5.0 mm (H-8)
- Number of pieces: 7 crocheted pieces (1 panel, 3 cups, 3 tabs) plus 1 wooden dowel
- Layout: 3 cups in one row across the lower panel; 3 tabs centered above the cups
- Panel size before border: 12 in x 8 in (30.5 cm x 20.3 cm)
- Border depth: 0.5 in (1.3 cm) on every side (2 rounds)
- Cup size: 3.8 in (9.7 cm) diameter x 5 in (12.7 cm) tall
- Tab size: 6 in x 1.5 in (15.2 cm x 3.8 cm)
Materials
Choose a smooth worsted cotton or cotton blend. Cotton holds the cup shape, stands up to kitchen use, and washes well. Avoid fuzzy or very stretchy yarn, because the cups will slump.
- Cream (panel, border, tabs, seams): 100 g / 170 m (186 yd)
- Rust / terracotta (cups, cup seams): 160 g / 272 m (297 yd)
These amounts include about 20 percent extra for your gauge swatch and sewing tails.
Tools:
- 5.0 mm (H-8) crochet hook
- Wooden dowel, 0.5 in (1.3 cm) diameter, 16 in (40.6 cm) long
- Tapestry needle
- 6 locking stitch markers
- Rustproof pins and a blocking mat
- Measuring tape and scissors
- Optional: 24 in (61.0 cm) of cord for hanging
Abbreviations (US Terms)
- ch – chain
- sc – single crochet
- sl st – slip stitch
- inc – 2 sc in the same stitch
- BLO – back loop only
- MR – magic ring
- st(s) – stitch(es)
- rnd – round
- ws – waistcoat stitch (see below)
Waistcoat stitch (ws): Look at the sc below. Its front forms a V with two vertical legs. Insert your hook from front to back through the center of that V, between the legs and under the top loops. Yarn over, pull up a loop, yarn over, and draw through both loops. Keep the pulled-up loop slightly loose so the next round is easy to work into.
Gauge and Checkpoints
- Panel, tabs, and border (sc BLO in rows): 14 sts and 16 rows = 4 in (10.2 cm)
- Cup walls (waistcoat stitch in rounds): 16 sts and 16 rnds = 4 in (10.2 cm)
Make one cup first. It is the quickest way to test your base tension and your waistcoat gauge.
Checkpoints:
- Cup base after Rnd 8: 3.75–4 in (9.5–10.2 cm) across
- Cup wall: 12 in (30.5 cm) around, 3.8 in (9.7 cm) across when round
- Finished cup: 5 in (12.7 cm) tall
- Panel after Row 8: 2 in (5.1 cm) wide
- Panel after Row 48: 12 in x 8 in (30.5 cm x 20.3 cm)
Too big? Go down 0.5 mm in hook size. Too small? Go up 0.5 mm. Many crocheters work the waistcoat stitch tightly. If your walls measure under 12 in (30.5 cm) around, use a 5.5 mm (I-9) hook for the cups only.
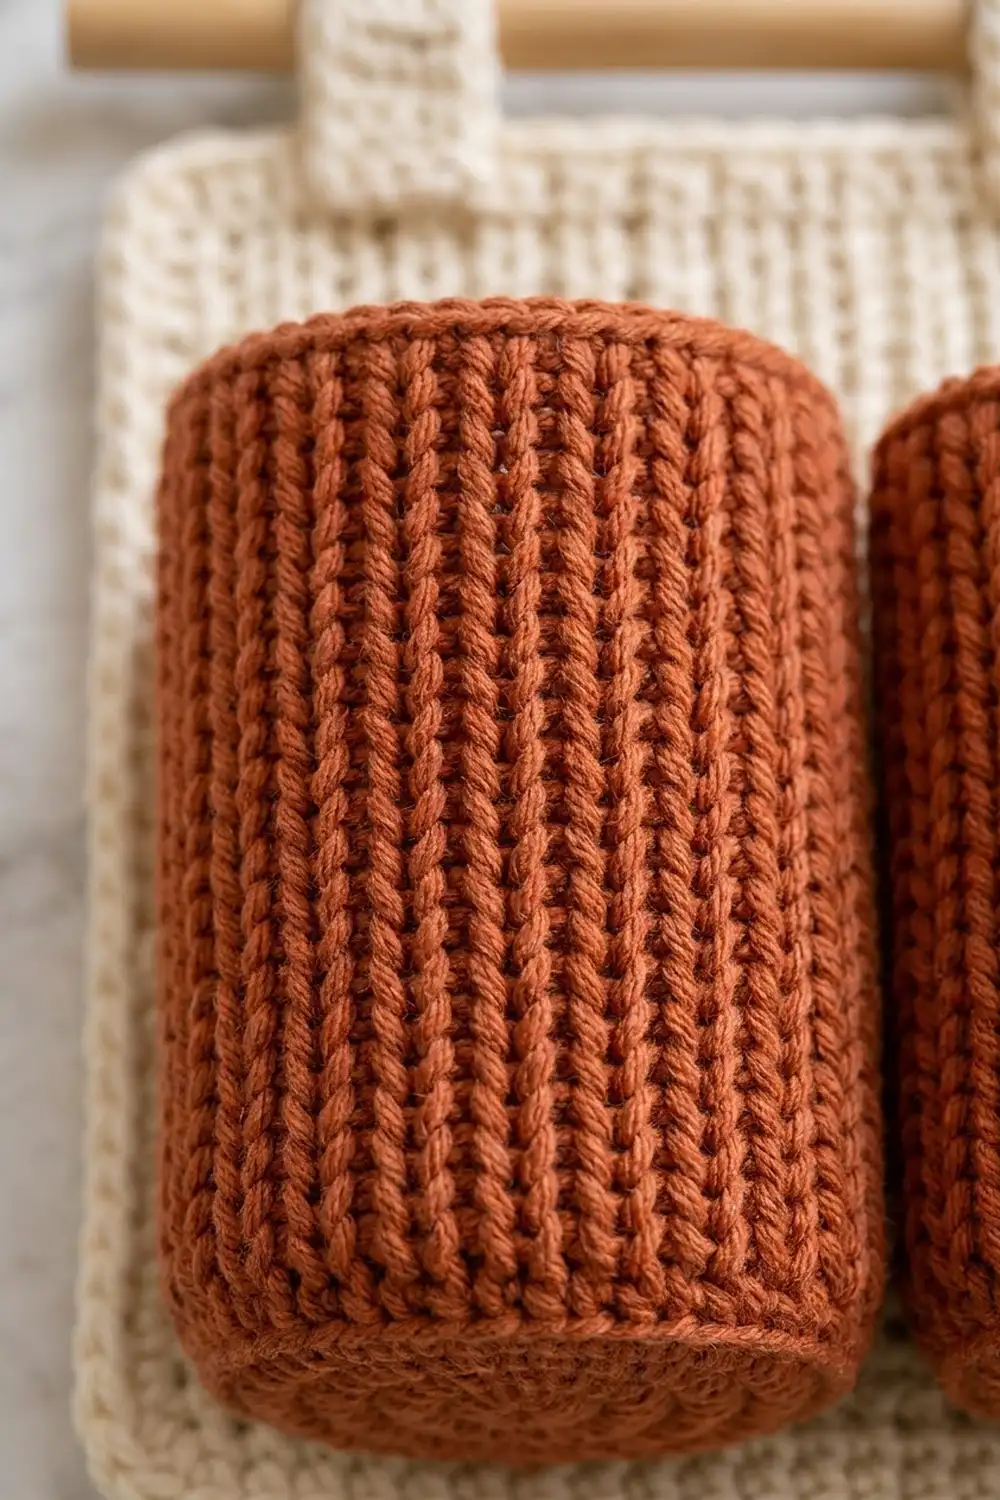
Cups (make 3 in rust)
Work in a continuous spiral. Place a marker in the first stitch of each round and move it up as you go.
Base
- Rnd 1: 6 sc in MR. (6)
- Rnd 2: Inc in each st around. (12)
- Rnd 3: [Sc 1, inc] 6 times. (18)
- Rnd 4: [Sc 2, inc] 6 times. (24)
- Rnd 5: [Sc 3, inc] 6 times. (30)
- Rnd 6: [Sc 4, inc] 6 times. (36)
- Rnd 7: [Sc 5, inc] 6 times. (42)
- Rnd 8: [Sc 6, inc] 6 times. (48)
Checkpoint: the base lies flat and measures 3.75–4 in (9.5–10.2 cm) across.
Turning Round
- Rnd 9: Sc BLO in each st around. (48)
The unused front loops form a crisp ridge, and the work starts to turn up into a wall.
Wall
- Rnds 10–27: Ws in each st around. (48 per rnd, 18 rnds)
Checkpoint after Rnd 27: the wall is 4.75 in (12.1 cm) tall above the base ridge.
Rim
- Rnd 28: Sc in each st around through both loops. (48) Sl st in the next st and fasten off with an invisible join. Weave in the tail.
The wall (Rnds 9–28) is 20 rounds. At 16 rnds per 4 in, that gives 5 in (12.7 cm). The plain sc rim round gives the top edge its smooth, rounded look.
Backing Panel (make 1 in cream)
The panel is worked sideways. The foundation chain runs up the height of the panel, and each row adds width. Every row is worked in the back loop, so the ridges run vertically on the finished piece.
- Foundation: Ch 29.
- Row 1: Sc in 2nd ch from hook and in each ch across. (28)
- Rows 2–48: Ch 1, turn, sc BLO in each st across. (28)
Checkpoint after Row 8: 2 in (5.1 cm) wide. Checkpoint after Row 48: 12 in (30.5 cm) wide and 8 in (20.3 cm) tall. Do not fasten off, because the border starts here.
Tabs (make 3 in cream)
The tabs are worked lengthwise so their ridges run along the strap, the same as on the panel.
- Foundation: Ch 22.
- Row 1: Sc in 2nd ch from hook and in each ch across. (21)
- Rows 2–6: Ch 1, turn, sc BLO in each st across. (21)
Fasten off and leave a 12 in (30.5 cm) tail for sewing. Each tab measures 6 in x 1.5 in (15.2 cm x 3.8 cm).
Make All Pieces
- Rust: 3 cups
- Cream: 1 panel, 3 tabs
Layout (front view):
    [TAB]        [TAB]        [TAB]
====================================  <- dowel
+----------------------------------+
|                                  |
|    cream panel, vertical ribs    |
| +---------++---------++--------+ |
| |  CUP 1  ||  CUP 2  || CUP 3  | |
| |  rust   ||  rust   || rust   | |
| +---------++---------++--------+ |
+----------------------------------+
Each tab sits directly above the center of a cup.
Joining
Finish the panel border (see the Border section) before you sew anything. That way the edges are fixed and the panel is square.
Mark the panel. Count the vertical ridges (rows) from the left edge. Place markers at the top of Rows 7, 12, 22, 27, 37, and 42. The pairs are symmetrical across the 48-row panel: Row 7 mirrors Row 42, Row 12 mirrors Row 37, and Row 22 mirrors Row 27.
Mark the cups. Choose the back of each cup and mark 2 wall columns that are 5 sts apart. The 5 sts between them (1.25 in / 3.2 cm) will lie against the panel. This matches the 5 rows (1.25 in / 3.2 cm) between each pair of panel markers.
Sew. Thread a 24 in (61.0 cm) length of rust onto a tapestry needle. Place the left cup so its base ridge sits on the inner edge of the bottom border, 0.5 in (1.3 cm) above the panel’s outer edge. Line up its marked columns with Rows 7 and 12. Whipstitch one marked column to the Row 7 ridge with 1 sewing stitch per wall round. That makes 20 sewing stitches, from Rnd 9 to Rnd 28. Repeat for the second column on Row 12. Then sew the 5 base-ridge stitches between the columns to the panel.
Repeat for the center cup on Rows 22 and 27, and for the right cup on Rows 37 and 42.
Tension. Pull each sewing stitch snug but not tight. The panel should stay flat, and the front of each cup should stay round. If the panel puckers behind a cup, your seams are too tight.
Tabs. Center one tab above each cup, over the same rows (7–12, 22–27, 37–42). Fold each tab in half over the top edge so that 1.25 in (3.2 cm) lies on the front and 1.25 in (3.2 cm) on the back. This leaves 3.5 in (8.9 cm) free as a loop. Whipstitch both ends to the panel through all layers. Slide the dowel through the 3 loops.
Size checkpoint: The 3 cups together measure about 11 in (27.9 cm) across. That leaves about 0.5 in (1.3 cm) of panel on each side inside the border.
Border
Border gauge: 14 sc = 4 in (10.2 cm), the same as the panel stitches, or 3.5 sc per inch.
Rnd 1 (cream): Ch 1, turn. Work 3 sc in the first st (corner), sc in the next 26 sts, 3 sc in the last st (corner). Rotate and work along the row ends: [sc in each of the next 7 row ends, skip 1 row end] 6 times. (42 sc) Work 3 sc in the first free loop of the foundation chain (corner), sc in the next 26 free loops, 3 sc in the last free loop (corner). Work along the second row-end edge: [sc in each of the next 7 row ends, skip 1 row end] 6 times. (42 sc) Sl st to the first sc.
Count after Rnd 1: the long sides (top and bottom) each have 42 sc between corner groups. The short sides each have 26 sc between corner groups. Counted from corner center to corner center, each long side holds 46 sts and each short side holds 30 sts. Total: 2 x 42 + 2 x 26 + 4 corner groups x 3 = 148 sts.
Rnd 2: Ch 1, sc in the first st, [3 sc in the corner center st, sc in each st to the next corner center] 4 times, ending the last repeat at the first sc. Sl st to the first sc. Fasten off and weave in the ends.
Count after Rnd 2: counting corner centers, each long side holds 48 sts and each short side holds 32 sts. Total: 148 + 8 = 156 sts.
Why the math works: The panel is 48 rows across, and 16 rows = 4 in, so it is 12 in wide. At 3.5 sc per inch, the border needs 42 sc to cover 12 in. That is 7 sc for every 8 row ends, which fits into 48 row ends exactly 6 times. The short sides already have 28 sts at 3.5 per inch, which is 8 in. Each round of sc adds 0.25 in (0.6 cm), so the 2-round border is 0.5 in (1.3 cm) deep. The finished panel is 12 + 1 = 13 in (33.0 cm) wide and 8 + 1 = 9 in (22.9 cm) tall.
Final Blocking
- Before sewing on the cups, lightly mist the bordered panel with water.
- Pin it to 13 in x 9 in (33.0 cm x 22.9 cm). Check that the corners are square and the ribs run straight up and down.
- Let it dry completely.
- Mist each cup and slip it over a can or jar about 3.8 in (9.7 cm) across. Let the cups dry upright.
- Lightly steam the tabs flat.
- After assembly, hang the organizer and gently shape each cup into a smooth cylinder.
Final Quality-Control Checklist
- The panel measures 13 in x 9 in (33.0 cm x 22.9 cm).
- Each cup has 48 sts per round and is 5 in (12.7 cm) tall.
- The panel ribs run straight and vertical.
- The border corners lie flat, without curling or flaring.
- The 3 cups sit level on the bottom border and are evenly spaced.
- Each tab is centered over its cup.
- All seams are hidden and secure, and all tails are woven in.
- The dowel slides easily through the tabs.
Troubleshooting
- Waistcoat stitch is hard to insert: Loosen your pulled-up loops, or use a 5.5 mm (I-9) hook for the walls.
- Cup flares at the top: The rim round is loose. Rework Rnd 28 with a smaller hook.
- Base turns up too early: Your increase rounds are tight. Check that the base reaches 3.75 in (9.5 cm) before Rnd 9.
- Panel edges slant: You missed or added a stitch at a row end. Count 28 sts every few rows.
- Border ripples: You worked into every row end. Use the 7-in-8 ratio.
- Border pulls in: Skip fewer row ends, but keep each long side at 42 sc.
- Cups tilt forward: Add a few tacking stitches at the rim where each cup meets the panel.
Care
Remove the dowel, then hand wash in cool water. Lay flat to dry, and reshape the cups over a jar.

Final Notes
Here is the measurement chain. Forty-eight rows of sc BLO make a 12 in x 8 in (30.5 cm x 20.3 cm) panel. Two border rounds bring it to 13 in x 9 in (33.0 cm x 22.9 cm). Each 48-stitch cup is 3.8 in (9.7 cm) across and 5 in (12.7 cm) tall, so the three cups fill about 11 in (27.9 cm) of the panel. Check gauge on one cup and keep your counts steady, and every piece will line up exactly.
Happy crocheting!