

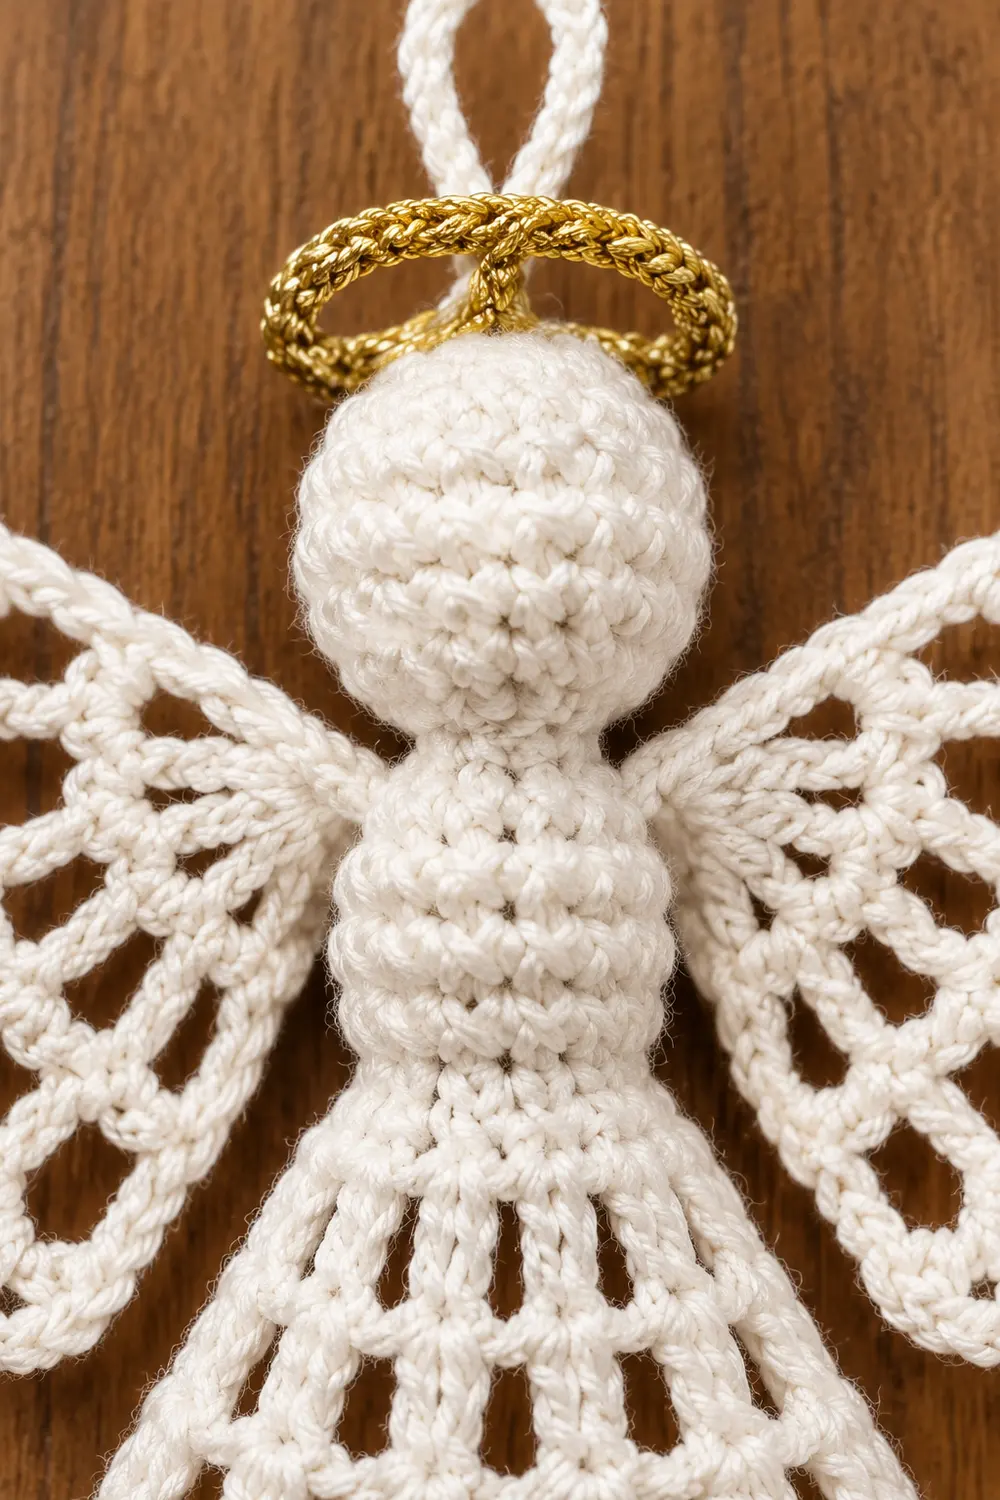
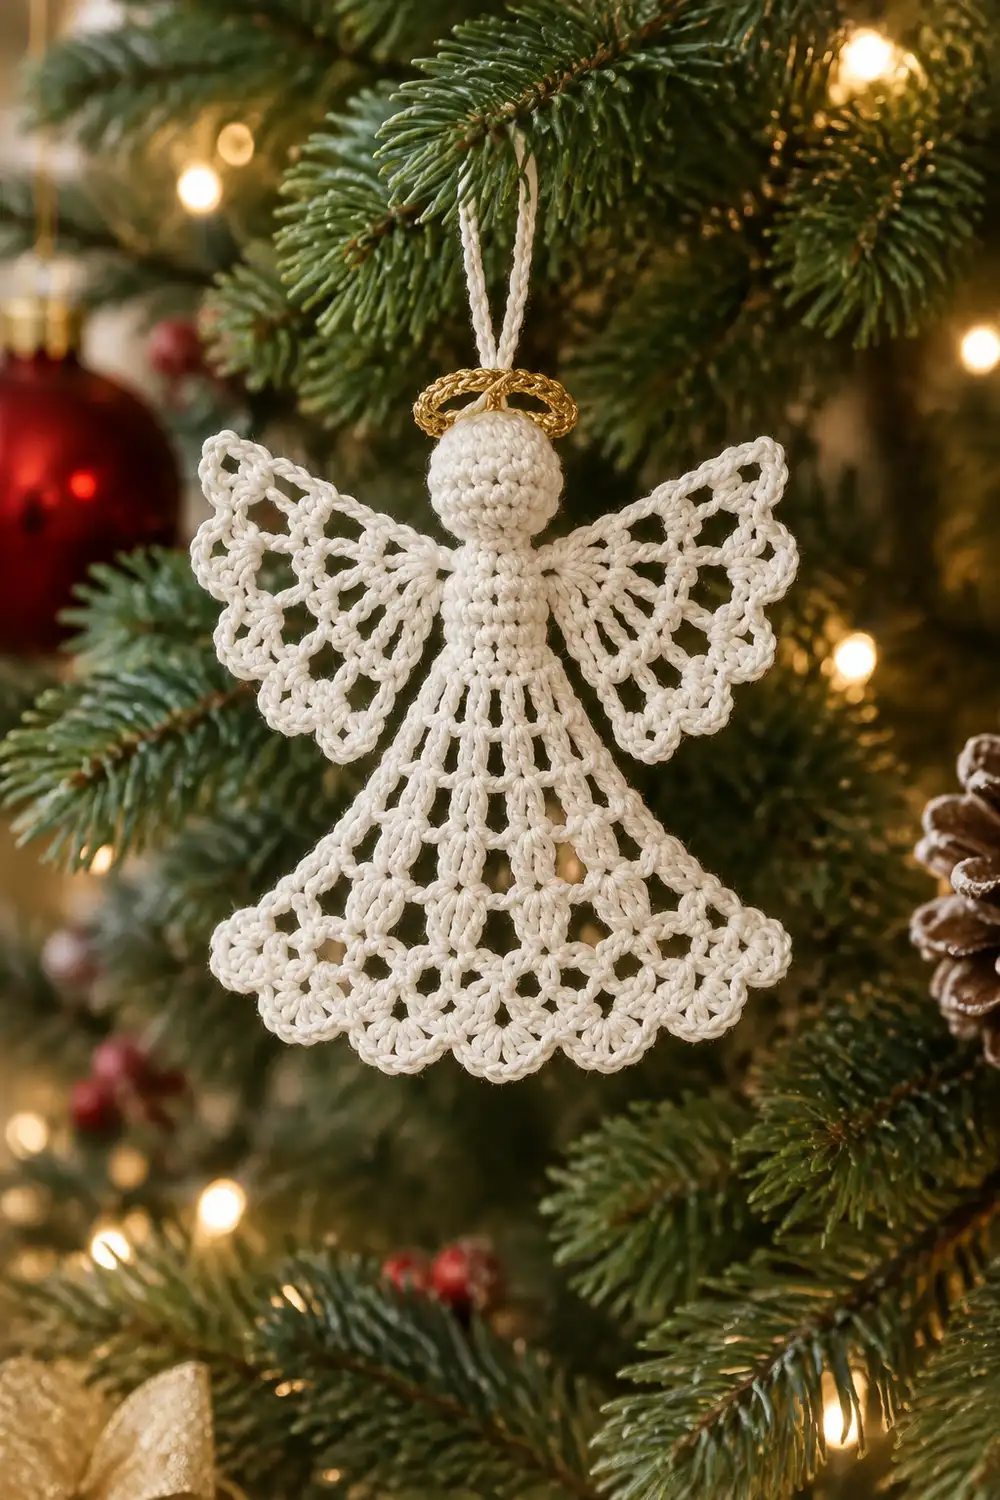
The Snowlace Angel is a small, lacy Christmas ornament worked in cream cotton thread. She has a rounded head, a neat cylindrical body, two openwork wings edged with shell scallops, and a bell-shaped skirt finished with clustered scallops. A small golden halo sits on her head and doubles as the hanging point.
The palette is simple: cream for the whole angel and a touch of gold for the halo. The style is classic filigree, and she looks best blocked flat and lightly stiffened.
This pattern uses US crochet terms. The finished angel measures 4.5 in (11.4 cm) tall, not counting the hanging loop, and 4 in (10.2 cm) wide across the wings and the skirt hem.
Construction is one continuous piece. You crochet the head and body in the round, amigurumi style, then flatten and close the body. The skirt is worked flat in rows down from the closing row. The wings are worked directly off the sides of the body, and the halo is chained directly onto the head.
Finished Size and Construction
- Finished size: 4.5 in (11.4 cm) tall, 4 in (10.2 cm) wide
- Skill level: Intermediate
- Terminology: US
- Yarn weight: Size 3 cotton crochet thread (CYC 0, lace)
- Hook: 2.25 mm (US B-1)
- Number of pieces: 1. The wings and halo are worked directly onto the angel, so there is no sewing.
- Layout: Halo, head, body and skirt run vertically, with one wing at each shoulder
- Piece size before border: 4 in (10.2 cm) tall, skirt 3.5 in (8.9 cm) wide, each wing 1.3 in (3.3 cm) long
- Border depth: Skirt hem 0.5 in (1.3 cm), wing edges 0.2 in (0.5 cm)
Materials
Use a smooth, mercerized cotton thread. It gives crisp stitch definition and blocks well. Avoid fuzzy or very stretchy fibers, because the lace will lose its shape.
- Cream, size 3 cotton thread: 15 g, about 45 m
- Gold metallic thread or metallic crochet thread of a similar thickness: 2 g, about 6 m
Tools:
- 2.25 mm (B-1) hook
- 2 stitch markers
- Tapestry needle
- Scissors
- A small pinch of polyester fiberfill
- Blocking mat and rust-proof pins
- Spray starch or fabric stiffener (optional)
- Ruler or tape measure
The quantities above include a margin of about 20% for gauge swatching and tails.
Abbreviations (US Terms)
- ch: chain
- sl st: slip stitch
- sc: single crochet
- hdc: half double crochet
- dc: double crochet
- inc: 2 sc in the same stitch
- dec: sc2tog (an invisible decrease is recommended)
- MR: magic ring
- st(s): stitch(es)
- sp: space
- tch: turning chain
- rep: repeat
- RS / WS: right side / wrong side
Special stitches:
- csc (center single crochet): Insert the hook through the center of the “V” of the stitch below, between its two legs, and complete an sc. Stacked csc stitches form straight vertical columns.
- CL (3-dc cluster): Yo, insert the hook in the indicated sp, pull up a loop, yo, pull through 2 loops. Work from * to * 3 times in the same sp, then yo and pull through all 4 loops on the hook.
- Shell: (dc, ch 1, dc, ch 1, dc) in the same sp.
- Scallop: (CL, ch 2, CL, ch 2, CL) in the same sp.
Gauge and Checkpoints
Gauge: 7 sc and 8 sc rounds = 1 in (2.5 cm). Each dc row = 0.4 in (1.0 cm) tall.
Work the head (Rounds 1–7) first as your gauge test. Check these points:
- After Round 3: The flat disk is 0.75 in (1.9 cm) across.
- After Round 7, lightly stuffed: The head is about 0.875 in (2.2 cm) tall and wide.
- After the body: The body is 1 in (2.5 cm) tall and 1.25 in (3.2 cm) wide when flattened.
- After skirt Row 5: The skirt is 1.75 in (4.4 cm) tall and 3.5 in (8.9 cm) wide at the hem.
- Finished angel: 4.5 in (11.4 cm) by 4 in (10.2 cm).
If your head is larger than 0.875 in (2.2 cm), change to a 2.0 mm hook. If it is smaller, change to a 2.5 mm hook. Restart rather than adjusting the stitch counts. Every count below depends on them.
Head
Work in a continuous spiral. Mark the first stitch of each round.
- Round 1: 6 sc in MR. (6)
- Round 2: Inc in each st around. (12)
- Round 3: (Sc, inc) 6 times. (18)
- Rounds 4–6: Sc in each st around. (18)
- Round 7: (Sc, dec) 6 times. (12)
Stuff the head lightly so it stays rounded but can still lie flat against the blocking surface. The textured sc surface gives the head its look.
Body
- Round 8 (neck): Sc in each st around. (12)
- Round 9: (Sc, inc) 6 times. (18)
- Rounds 10–15: Csc in each st around. (18)
You now have 6 rounds of vertical csc columns. Stuff the body lightly so it reads as a cylinder.
Mark the fold columns. Flatten the body with the end of the round at the right-hand fold. The front face is sts 1–9 and the back face is sts 10–18. Front sts 1 and 9 sit right on the folds. These two columns are the wing columns.
Closing row (RS): With the front facing, work sc through both layers, pairing front and back stitches: st 1 with st 18, st 2 with st 17, and so on to st 9 with st 10. (9 sc)
Checkpoint: The body is 1 in (2.5 cm) tall, plus a 0.125 in (0.3 cm) closing row. It is 1.25 in (3.2 cm) wide.
Skirt
Work the skirt flat, turning at the end of each row. The turning chain counts as a stitch.
- Row 1 (WS): Ch 3 (counts as dc), dc in each of next 8 sc. Turn. (9 dc)
- Row 2: Ch 4 (counts as dc + ch 1), (dc in next dc, ch 1) 7 times, dc in top of tch. Turn. (9 dc, 8 ch-1 sps)
- Row 3: Ch 5 (counts as dc + ch 2), (dc in next dc, ch 2) 7 times, dc in 3rd ch of tch. Turn. (9 dc, 8 ch-2 sps)
- Row 4: Ch 1, sc in first dc, (2 sc in next ch-2 sp, sc in next dc) 8 times. Work the last sc in the 3rd ch of the tch. Turn. (25 sc)
- Row 5: Ch 5 (counts as dc + ch 2), skip 2 sc, (dc in next sc, ch 2, skip 2 sc) 7 times, dc in last sc. Turn. (9 dc, 8 ch-2 sps)
In Row 5, the dc stitches land on sc 1, 4, 7, 10, 13, 16, 19, 22 and 25.
Checkpoint: Row 1 is 1.5 in (3.8 cm) wide and Row 3 is 3 in (7.6 cm) wide. Rows 1–5 together are 1.75 in (4.4 cm) tall and 3.5 in (8.9 cm) wide. The dc columns radiate from the waist like the spokes of a bell.
Do not fasten off. Continue directly to Border, Part A.
Wings
Work each wing into its wing column on Rounds 10–12, which spans 0.375 in (1.0 cm). Insert the hook under the V of each column stitch. Work both wings with the front of the angel facing, so they mirror each other.
Row 1:
- Right-hand wing: Join cream at the right wing column on Round 12. Work 3 sc, one each into Rounds 12, 11 and 10, moving upward. Turn. (3 sc)
- Left-hand wing: Join cream at the left wing column on Round 10. Work 3 sc moving downward into Rounds 10, 11 and 12. Turn. (3 sc)
Rows 2–4 (both wings):
- Row 2: Ch 4 (counts as dc + ch 1), dc in same st, ch 1, (dc, ch 1, dc) in next sc, ch 1, (dc, ch 1, dc) in last sc. Turn. (6 dc, 5 ch-1 sps)
- Row 3: Ch 5 (counts as dc + ch 2), (dc in next dc, ch 2) 4 times, dc in 3rd ch of tch. Turn. (6 dc, 5 ch-2 sps)
- Row 4: Ch 1, sc in first dc, (shell in next ch-2 sp, sc in next dc) 5 times. Work the last sc in the 3rd ch of the tch. Turn. (5 shells, 6 sc)
Checkpoint: Each wing is 1.3 in (3.3 cm) long and fans upward and outward.
Do not fasten off. Continue to Border, Part C.
Halo and Hanging Loop
- With gold thread, insert the hook into the top center of the head, around a stitch of Round 2, and pull up a loop.
- Ch 22, then sl st into the same head stitch to form a ring.
- Ch 1 and work 22 sc over the ring. Sl st into the head stitch.
- Ch 12 and sl st into the same head stitch to form the hanging loop.
- Tilt the ring back so it sits above and behind the head. Tack it once at the back with gold.
Checkpoint: The halo is about 1 in (2.5 cm) across and rises 0.25 in (0.6 cm) above the head. The hanging loop is 0.75 in (1.9 cm) long.
Border
Border gauge: The border uses the same tension as the body, 7 sc = 1 in (2.5 cm). Each skirt scallop sits over one panel 0.44 in (1.1 cm) wide.
Part A: Skirt hem (Row 6, RS)
Ch 1, sc in first dc, (scallop in next ch-2 sp, sc in next dc) 8 times. Work the last sc in the 3rd ch of the tch.
Count: 9 sc and 8 scallops, which is 24 CL and 16 ch-2 sps.
Part B: Skirt side edges
- First side: Do not turn. Rotate the work and sc up the row ends. Work 2 sc in each dc row end (Rows 5, 3, 2 and 1) and 1 sc in the end of Row 4. Skip the end of Row 6. Sl st into the end of the closing row and fasten off. (9 sc)
- Second side: Join at the other end of the closing row. Work the same 9 sc down the row ends, then sl st into the first sc of Row 6. (9 sc)
Part C: Wing edge (Row 5, each wing)
Ch 1, sc in first sc. Then work this repeat 5 times: sc in next dc, 3 hdc in next ch-1 sp, sc in next dc, 3 hdc in next ch-1 sp, sc in next dc, sl st in next sc. Fasten off.
Count: 1 + 5 × 10 = 51 sts.
Why the math works:
- The skirt keeps 9 dc spokes from Row 1 onward. Nine spokes make 8 spaces, so you get 8 scallops, with an sc anchored on each spoke.
- Row 4 turns 8 ch-2 sps and 9 dc into 25 sc. Row 5 skips 2 sc per gap, which restores exactly 8 gaps.
- Each wing has 6 spokes, which make 5 spaces, so you get 5 shells and then 5 scallop pairs.
- On the side edges, 4 dc rows × 2 sc plus 1 sc row × 1 sc = 9 sc per side.
Final Blocking
- Weave in all tails along the dc posts and trim them close.
- Mist the angel with water, or dip it in diluted stiffener and squeeze out the excess.
- Pin it face up. Pin the head and body first, keeping the body 1.25 in (3.2 cm) wide.
- Pin the skirt hem at 4 in (10.2 cm) wide. Put one pin in the tip of each scallop.
- Pin each wing so it is 1.5 in (3.8 cm) long including the edge, with a pin in each shell scallop. Check that the wings are symmetrical.
- Shape the halo ring by hand.
- Let the angel dry completely, at least 12 hours, before unpinning.
Final Quality-Control Checklist
- [ ] The angel is 4.5 in (11.4 cm) tall and 4 in (10.2 cm) wide.
- [ ] The head is round and evenly stuffed, 0.875 in (2.2 cm).
- [ ] The body columns are vertical and straight.
- [ ] The skirt has 9 spokes, 8 scallops and 9 sc on each side edge.
- [ ] Each wing has 5 shells and 51 edge stitches.
- [ ] Both wings attach at Rounds 10–12 and mirror each other.
- [ ] The halo is secure and the hanging loop bears weight.
- [ ] No tails are visible from the front.
Troubleshooting
- The skirt ruffles: Your chains are too loose. Tighten the ch-2 sps, or go down a hook size for the skirt rows.
- The skirt cups: Your chains are too tight. Loosen them slightly and block firmly.
- The body columns slant: You are working sc instead of csc. Insert the hook in the center of the V.
- The wings don’t match: Check that both Row 1s were worked with the front of the angel facing.
- The scallops lean: Re-count Row 5. Each scallop must sit in its own ch-2 sp.
- The head is floppy: Add a little more stuffing before Round 8.
Care
Hand wash in cool water and lay flat to dry. Re-block, and re-stiffen if needed. Store flat between tissue layers.
Final Notes
The measurement chain runs top to bottom:
- Halo: 0.25 in (0.6 cm)
- Head: 0.875 in (2.2 cm)
- Body: 1 in (2.5 cm)
- Closing row: 0.125 in (0.3 cm)
- Skirt: 1.75 in (4.4 cm)
- Hem trim: 0.5 in (1.3 cm)
Together these give 4.5 in (11.4 cm) total. Across the angel, the skirt grows from 9 sc to 3.5 in (8.9 cm), and the hem scallops bring it to 4 in (10.2 cm). Check gauge at the head, and every later number will follow.
Optional: Repeat the angel in gold-trimmed batches for gift tags or a tree set.
Happy crocheting!