

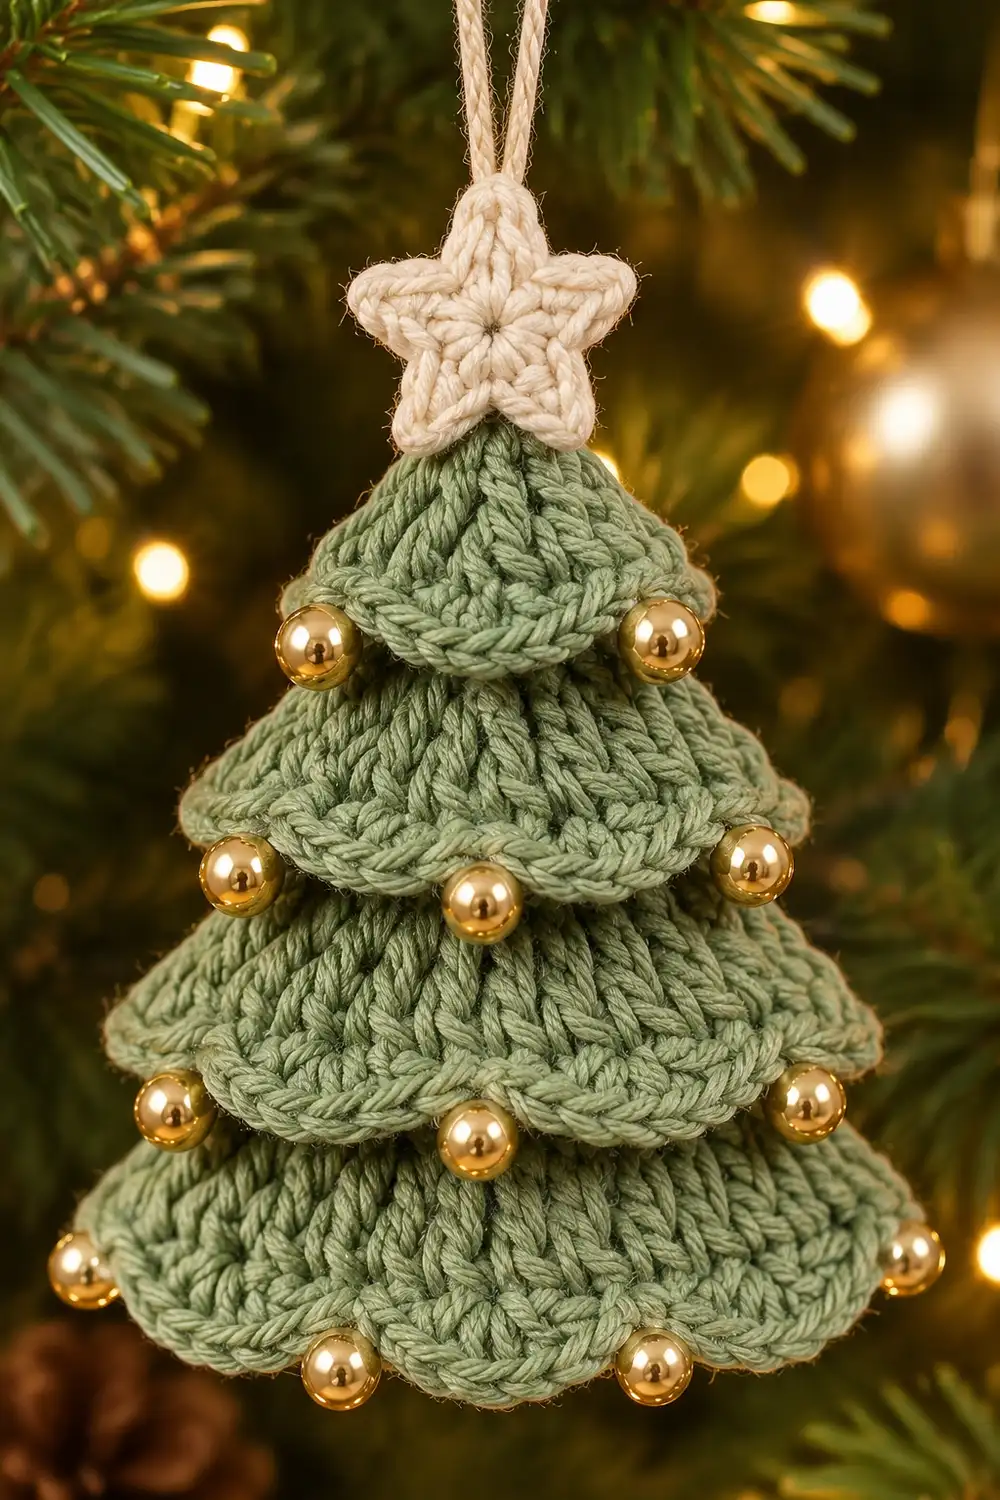
This little tree ornament has a soft sage green body built from four tiered, scalloped layers. Each layer overlaps the one below it like the branches of a real fir. Small gold beads sit on every scallop, and a cream crocheted star crowns the tip. A cream loop at the star lets it hang on a branch.
The style is calm, natural, and slightly vintage. Muted green, ivory, and gold suit a farmhouse or classic gold-and-green tree. Matte cotton yarn keeps the tiers crisp, so each scallop catches the light from your tree lights.
The pattern uses US crochet terms. The finished ornament is about 3.8 in (9.7 cm) tall including the star and about 3.2 in (8.1 cm) wide at the bottom scallops.
The ornament is worked as one continuous piece. You crochet the star first in cream. Then you join green at the bottom of the star and work the tree top-down in rows. Each tier’s scallops are worked into the front loops of a row, and the body continues into the back loops of that same row. This makes the scallops hang over the next section. Beads and a hanging loop are added at the end.
Finished Size and Construction
- Finished size: about 3.8 in (9.7 cm) tall with star; 3.2 in (8.1 cm) wide at the bottom scallops
- Skill level: Easy-intermediate
- Terminology: US crochet terms
- Yarn weight: DK / light worsted (#3), cotton or cotton blend
- Hook: 3.5 mm (E-4)
- Number of pieces: 1 (star and tree worked continuously)
- Layout: Single ornament, star at top, four scalloped tiers below
- Piece size: tree body 3 in (7.6 cm) wide at Row 17
- Size before border: 2.8 in (7.1 cm) tall from tip to Row 17, star not included
- Border depth: bottom scallop row adds about 0.4 in (1.0 cm)
Materials
Yarn: Choose a smooth, mercerized or matte DK cotton. Cotton holds the scallop shape and does not fuzz over the beads. Acrylic works, but the tiers will be softer and may need firmer blocking.
- Sage green (MC): 10 g, about 23 m (25 yd)
- Cream / ivory (CC): 3 g, about 7 m (8 yd)
Quantities are for one ornament and include a margin for swatching and weaving in. For a set of three like the photo, simply triple the amounts.
Tools and notions:
- 3.5 mm (E-4) crochet hook
- 19 gold beads, 4 mm, with holes large enough for a sewing needle
- Gold or green sewing thread
- Fine beading or sewing needle
- Tapestry needle
- Cream cotton string or cream yarn, 8 in (20.3 cm), for the hanging loop
- Scissors, rustproof pins, spray bottle
Abbreviations (US Terms)
- ch – chain
- sl st – slip stitch
- sc – single crochet
- hdc – half double crochet
- dc – double crochet
- MR – magic ring
- FLO – front loop only
- st(s) – stitch(es)
- inc – 2 sc in the same stitch
- RS / WS – right side / wrong side
- rep – repeat
Special stitch – Scallop: 3 dc in the same stitch.
Unworked loops: After a FLO row, the back loops of the row below stay empty. “Work into unworked loops” means you insert your hook only under those remaining loops.
Turning chains: Ch 1 at the start of a row does not count as a stitch.
Gauge and Checkpoints
Gauge: 20 sc × 24 rows = 4 in (10.2 cm), or 5 sc and 6 rows = 1 in (2.5 cm).
Test one ornament before making a set. You do not need a separate swatch. Instead, measure at each checkpoint below while working your first tree.
| Checkpoint | Stitches | Width | Height from tip |
|---|---|---|---|
| Star (after Rnd 2) | 5 points | 0.8 in (2.0 cm) across | – |
| After Row 4 | 5 | 1 in (2.5 cm) | 0.7 in (1.8 cm) |
| After Row 9 | 9 | 1.8 in (4.6 cm) | 1.5 in (3.8 cm) |
| After Row 14 | 13 | 2.6 in (6.6 cm) | 2.3 in (5.8 cm) |
| After Row 17 | 15 | 3 in (7.6 cm) | 2.8 in (7.1 cm) |
Measure body width across the sc row, not across the scallops.
Too big? Switch to a 3.25 mm hook and restart.
Too small or stiff? Switch to a 3.75 mm hook.
Small differences of about 0.1 in (0.3 cm) are fine. Blocking will even them out.
Star Topper (Cream)
Rnd 1: With CC, make a MR. Ch 1, work 10 sc in ring. Pull ring tight. Sl st in first sc to join. (10 sc)
Rnd 2: Ch 3, sl st in 2nd ch from hook, hdc in next ch, sk next sc, sl st in next sc; rep from * 4 more times. The last sl st lands in the first sc of Rnd 1. (5 points)*
Each repeat uses 2 sc of Rnd 1: 5 repeats × 2 = 10 sts. Every point sits over a skipped sc. The sl st sc’s form the inner “valleys” between points.
Fasten off CC, leaving a 6 in (15.2 cm) tail. Weave the tail through the back of the star and trim.
Checkpoint: The star measures about 0.8 in (2.0 cm) point to point.
Tree Body (Sage Green)
Lay the star RS up with one point pointing straight up. The valley between the two lower points is where the tree begins.
Row 1 (RS): Join MC with a sl st under both loops of the sc in the bottom valley. Ch 1, work 3 sc in the same sc. (3)
Row 2 (WS): Ch 1, turn. Inc in first st, sc in next st, inc in last st. (5)
Row 3 (RS): Ch 1, turn. Sc in each st across. (5)
Row 4 (WS): Ch 1, turn. Sc in each st across. (5)
Tier 1 Scallops
Row 4S (RS): Ch 1, turn. Working in FLO of Row 4 only: sl st in first st, scallop in next st, sl st in next st; rep from * once more. (2 scallops: 3 sl st + 6 dc)*
The scallops point down the tree and sit on the RS.
Row 5 (WS): Ch 1, turn. Working into the unworked loops of Row 4: inc in first st, sc in next 3 sts, inc in last st. (7)
Row 6 (RS): Ch 1, turn. Sc across. (7)
Row 7 (WS): Ch 1, turn. Sc across. (7)
Row 8 (RS): Ch 1, turn. Inc in first st, sc in next 5 sts, inc in last st. (9)
Row 9 (WS): Ch 1, turn. Sc across. (9)
Checkpoint: 1.8 in (4.6 cm) wide, 1.5 in (3.8 cm) from tip.
Tier 2 Scallops
Row 9S (RS): Ch 1, turn. Working in FLO of Row 9: sl st in first st, scallop in next st, sl st in next st; rep from * 3 more times. (4 scallops: 5 sl st + 12 dc)*
Row 10 (WS): Ch 1, turn. Working into the unworked loops of Row 9: sc in each st across. (9)
Row 11 (RS): Ch 1, turn. Inc in first st, sc in next 7 sts, inc in last st. (11)
Row 12 (WS): Ch 1, turn. Sc across. (11)
Row 13 (RS): Ch 1, turn. Sc across. (11)
Row 14 (WS): Ch 1, turn. Inc in first st, sc in next 9 sts, inc in last st. (13)
Checkpoint: 2.6 in (6.6 cm) wide, 2.3 in (5.8 cm) from tip.
Tier 3 Scallops
Row 14S (RS): Ch 1, turn. Working in FLO of Row 14: sl st in first st, scallop in next st, sl st in next st; rep from * 5 more times. (6 scallops: 7 sl st + 18 dc)*
Row 15 (WS): Ch 1, turn. Working into the unworked loops of Row 14: sc across. (13)
Row 16 (RS): Ch 1, turn. Sc across. (13)
Row 17 (WS): Ch 1, turn. Inc in first st, sc in next 11 sts, inc in last st. (15)
Checkpoint: 3 in (7.6 cm) wide, 2.8 in (7.1 cm) from tip. This is the size before the border.
Why the rows line up: Increases fall on Rows 2, 5, 8, 11, 14, and 17, every third row. Each adds 2 sts: 3 + (6 × 2) = 15. Every tier base row (4, 9, 14) is a WS row, so each scallop row is worked with the RS facing. Each tier’s stitch count is odd, giving a sl st at both ends.
Border: Bottom Scallop Edge (Tier 4)
The bottom tier doubles as the border. It is worked at the same gauge as the body, 5 sts per inch (2.5 cm). It goes into both loops, because nothing continues below it.
Row 18 (RS): Ch 1, turn. Working in both loops of Row 17: sl st in first st, scallop in next st, sl st in next st; rep from * 6 more times. (7 scallops: 8 sl st + 21 dc)*
Fasten off, leaving a 6 in (15.2 cm) tail.
Counts per side:
- Bottom edge: 15 base sts → 7 scallops.
- Left and right edges: no edging stitches. The row ends are covered by the ends of the tier scallops.
Why the math works: The scallop repeat uses 2 sts (scallop + sl st), plus 1 sl st to close. That needs an odd count of 2n + 1. Row 17 has 15 sts, and 15 = 2 × 7 + 1, so exactly 7 scallops fit. The same rule gives 2 scallops on 5 sts, 4 on 9 sts, and 6 on 13 sts.
Checkpoint: Tree height is now about 3.2 in (8.1 cm) from tip to scallop edge. The bottom scallops flare to about 3.2 in (8.1 cm) wide.
Finishing: Beads and Hanging Loop
Beads: Thread a fine needle with doubled gold thread and knot it. Sew one 4 mm bead to the middle dc of each scallop:
- Tier 1: 2 beads
- Tier 2: 4 beads
- Tier 3: 6 beads
- Tier 4: 7 beads
- Total: 19 beads
Pass through each bead twice. Travel between beads on the WS so no thread shows on the front.
Hanging loop: Thread the 8 in (20.3 cm) cream string through the top star point, just below the tip. Knot the ends together. The finished loop hangs about 3.5 in (8.9 cm). Slide the knot behind the star.
Weave in all remaining tails along WS stitches.
Final Blocking
- Lightly mist the ornament with water until damp, not soaked.
- Lay it RS up on a blocking mat or folded towel.
- Shape the body into a triangle 3 in (7.6 cm) wide at Row 17 and 2.8 in (7.1 cm) tall from the tip.
- Pull each scallop tier gently downward so it overlaps the tier below by about 0.25 in (0.6 cm).
- Pin the bottom scallops into an even curve about 3.2 in (8.1 cm) wide.
- Pin each star point outward so the star is 0.8 in (2.0 cm) across.
- Let it dry completely, then remove the pins.
Block before sewing beads if you prefer. Pinning around beads works too, but avoid pinning through them.
Final Quality-Control Checklist
- Star has 5 even points and measures 0.8 in (2.0 cm).
- Tree body counts: 3, 5, 7, 9, 11, 13, 15 sts at the correct rows.
- Four tiers: 2, 4, 6, and 7 scallops.
- All scallops sit on the RS and hang downward.
- Body is 3 in (7.6 cm) wide at Row 17.
- Total ornament height is about 3.8 in (9.7 cm).
- 19 beads sewn securely, one per scallop.
- Hanging loop is centered on the top star point.
- No tails visible from the front.
Troubleshooting
Scallops sit on the back of the tree. The scallop row was worked with the WS facing. Check that each tier base row (4, 9, 14) is a WS row before you turn.
Body has holes at the tiers. You may have worked the next row into both loops. Work only into the unworked loops left by the FLO row.
Scallops won’t fit evenly. The base row has an even count. Recount; every tier base must be an odd number.
Tree curls or cups. Your sc is tight. Go up a hook size, or block firmly and let it dry fully.
Tiers ruffle too much. Your dc is loose compared with your sc. Go down half a hook size for the scallop rows only.
Star is lopsided. Rnd 1 needs exactly 10 sc. Pull the magic ring fully closed before Rnd 2.
Beads droop. Pass the thread through each bead twice and anchor it with a small knot on the WS.
Care
Spot clean or hand wash in cool water and lay flat to dry. Store flat in tissue so the scallops and star keep their shape.

Final Notes
The size depends on a simple measurement chain. The 0.8 in (2.0 cm) star leads into a 3-stitch tip. The body grows by 2 sts every third row to 15 sts, which is 3 in (7.6 cm) wide and 2.8 in (7.1 cm) tall. The bottom scallop border adds 0.4 in (1.0 cm), bringing the tree to 3.2 in (8.1 cm) tall. With the star on top, the full ornament is about 3.8 in (9.7 cm) tall.
If your first ornament matches the checkpoints, every tree in your set will match too.
Happy crocheting!