

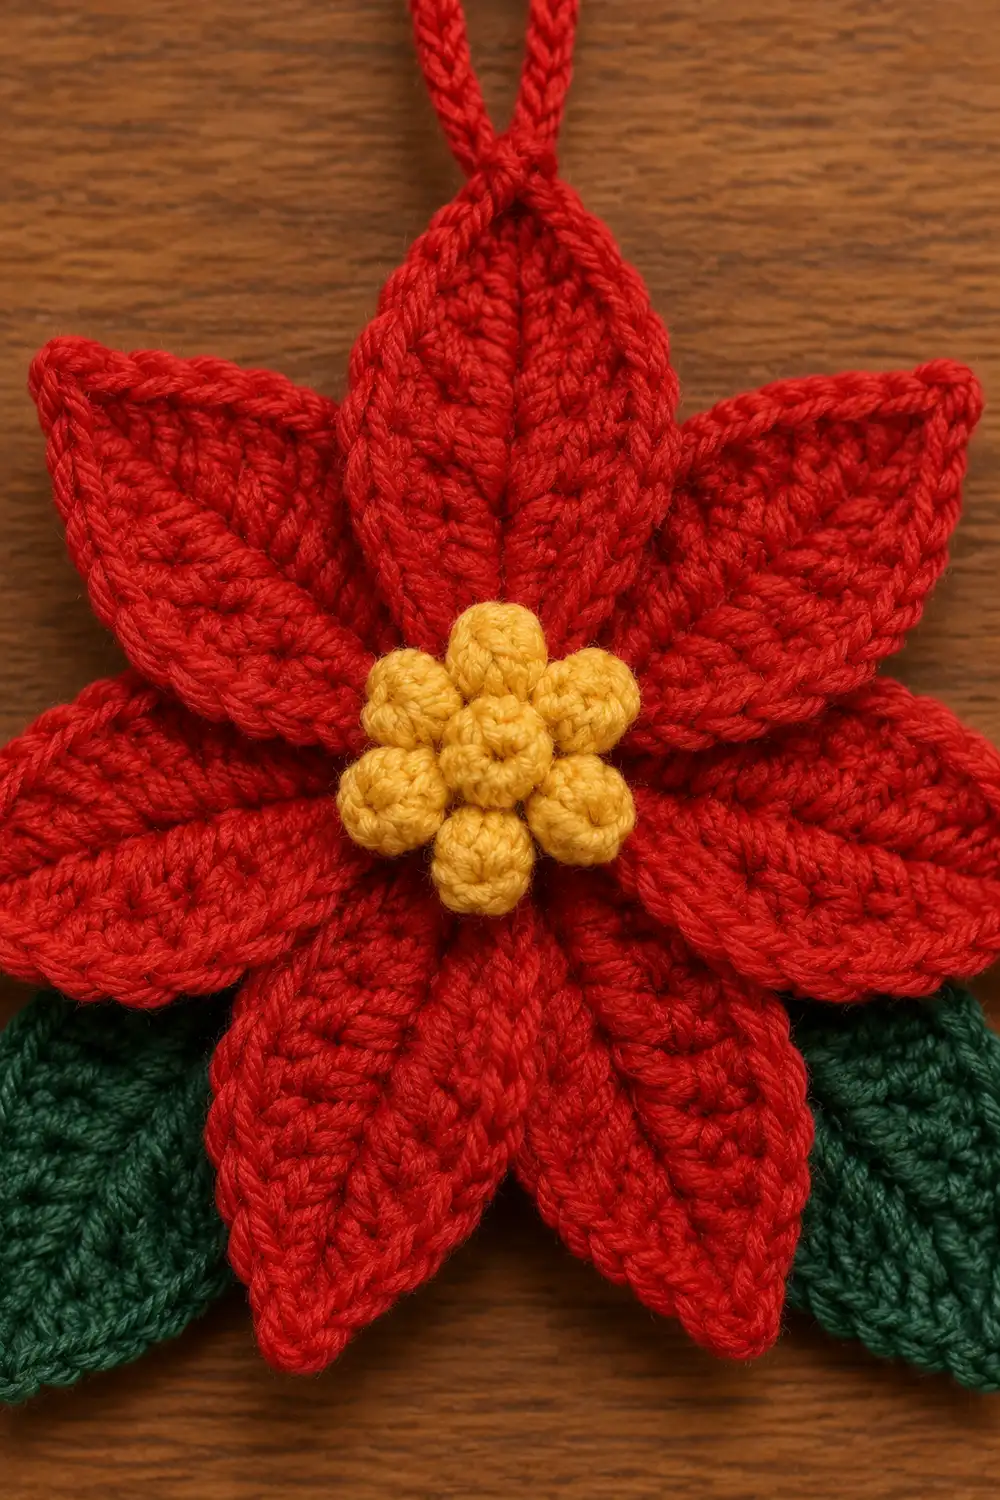
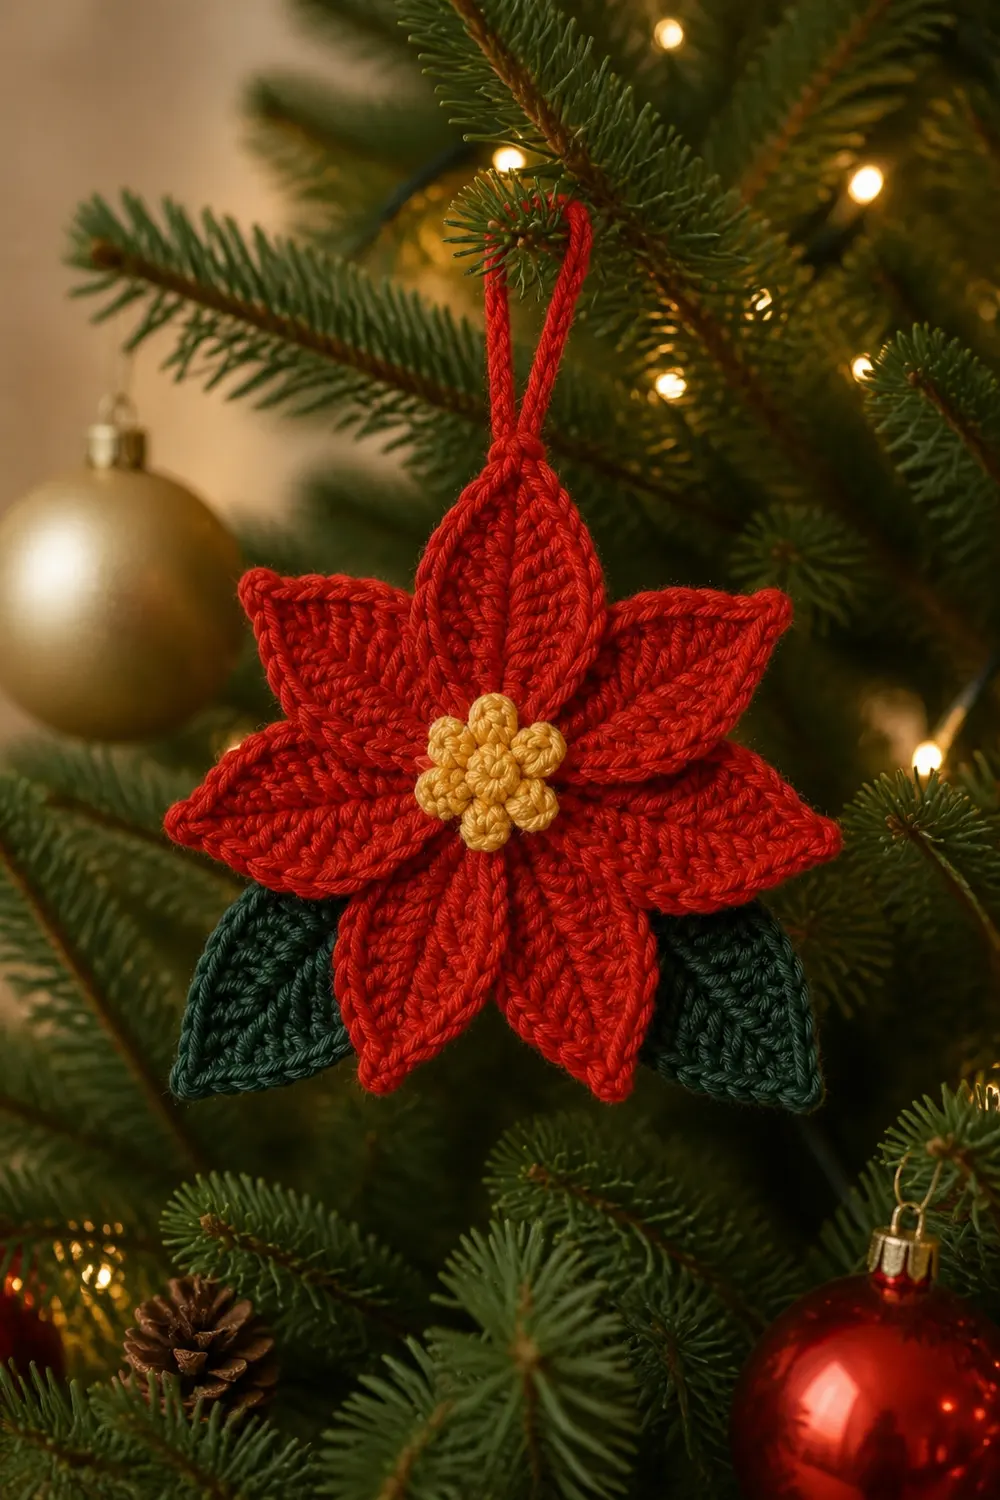
This Starlight Poinsettia is a single flat Christmas ornament: one assembled poinsettia flower with a hanging loop. Five red pointed petals form a star. A golden popcorn-stitch center sits in the middle, and two dark green leaves peek out beneath the lower petals. A red twisted cord loop rises from the top petal for hanging.
Each petal is shaped like an elongated leaf. It is worked in dense single crochet through the back loop only, which builds diagonal ridges and a raised center vein. The leaves use the same method at a smaller size. The center is a tiny round of popcorn stitches that pop forward for a bumpy, berry-like cluster.
This pattern uses US crochet terms. The finished ornament measures about 6 in (15.2 cm) across and 6 in (15.2 cm) tall, not counting the loop. The loop adds about 2.5 in (6.4 cm).
Construction is simple. You crochet five petals, two leaves, and one center. Then you sew them into a single flower and attach the twisted cord. Each petal and leaf gets one round of edging, which sharpens the tip and smooths the outline.
Finished Size and Construction
- Finished size: about 6 in (15.2 cm) wide x 6 in (15.2 cm) tall, plus a 2.5 in (6.4 cm) loop
- Skill level: Easy to intermediate
- Terminology: US crochet terms
- Yarn weight: Worsted (#4)
- Hook: 3.75 mm (US F-5)
- Number of pieces: 8 crocheted components (5 petals, 2 leaves, 1 center) plus 1 twisted cord, assembled into one ornament
- Layout: five petals in a star with one petal pointing straight up, center on top, leaves behind the lower petals
- Piece size (after edging): petal 3 in (7.6 cm) long x 1.5 in (3.8 cm) wide; leaf 2.5 in (6.4 cm) long x 1.5 in (3.8 cm) wide; center 1.25 in (3.2 cm) across
- Size before edging: petal 2.8 in (7.1 cm) x 1.1 in (2.8 cm); leaf 2.3 in (5.8 cm) x 1.1 in (2.8 cm)
- Edging depth: 1 round of sc, about 0.2 in (0.5 cm) per side
Materials
Choose a smooth worsted-weight acrylic or cotton. Cotton gives the crispest ridges and the sharpest tips. Acrylic is softer and slightly lighter on a tree. Avoid fuzzy yarns, because they hide the back-loop texture.
- Red: 15 g / 30 m (petals, cord, sewing)
- Dark green: 5 g / 10 m (leaves)
- Golden yellow: 3 g / 6 m (center)
These quantities include a margin for swatching, tails, and sewing.
Tools:
– 3.75 mm (US F-5) crochet hook
– Tapestry needle
– Scissors
– Stitch marker
– Rustproof pins and a foam blocking mat
– Spray bottle
– Ruler or tape measure
Abbreviations (US Terms)
- ch – chain
- sc – single crochet
- dc – double crochet
- sl st – slip stitch
- st(s) – stitch(es)
- sp – space
- BLO – back loop only
- Rnd – round
- RS / WS – right side / wrong side
Special stitch – Popcorn (pc): Work 4 dc in the same stitch. Remove the hook from the loop. Insert the hook from front to back into the top of the first dc of the group. Pick up the dropped loop and pull it through. The popcorn pops toward you, onto the RS.
The turning ch 1 never counts as a stitch.
Gauge and Checkpoints
Gauge: 18 sc and 20 rows = 4 in (10.2 cm) in sc. That works out to 4.5 sc and 5 rows per 1 in (2.5 cm).
Gauge matters less for an ornament than for a garment. It still controls how well the petals fit around the center. Make one petal first and check it before making the rest.
Petal checkpoints:
– After Row 1: about 2.5 in (6.4 cm) long and 0.4 in (1.0 cm) wide
– After Row 3: 2.8 in (7.1 cm) long x 1.1 in (2.8 cm) wide
– After edging: 3 in (7.6 cm) long x 1.5 in (3.8 cm) wide
Leaf checkpoint after edging: 2.5 in (6.4 cm) x 1.5 in (3.8 cm).
Center checkpoint: 1.25 in (3.2 cm) across after Rnd 2.
If your petal is too big: go down to a 3.5 mm (US E-4) hook.
If your petal is too small: go up to a 4.0 mm (US G-6) hook.
Do not change the chain count. That would break the stitch counts below.
Petals (Make 5, Red)
Each petal is worked in turned rows around both sides of a foundation chain. The BLO rows form chevron ridges. The 3 sc group at the tip builds the pointed end and the center vein. Leaving 2 stitches unworked at the end of each row tapers the base.
Ch 12.
Row 1: Sc in 2nd ch from hook and in each of next 9 ch (10 sc). Work 3 sc in last ch (tip). Rotate and work along the opposite side of the foundation chain: sc in each of next 10 ch. (23 sts: 10 / 3 / 10)
Mark the center stitch of the 3 sc tip group. Move the marker up to the new center stitch on every row.
Row 2: Ch 1, turn. Working in BLO: sc in each of next 11 sts. Work 3 sc in next st (marked center). Sc in each of next 9 sts. Leave the remaining 2 sts unworked. (23 sts: 11 / 3 / 9)
Row 3: Ch 1, turn. Working in BLO: sc in each of next 10 sts. Work 3 sc in next st (marked center). Sc in each of next 10 sts. Leave the remaining 2 sts unworked. (23 sts: 10 / 3 / 10)
The count stays at 23 on every row. The 2 extra stitches made at the tip balance the 2 left unworked at the base. This keeps the petal long and narrow instead of rounding out.
Do not fasten off. Continue straight into the edging in the Border section.
Checkpoint: 2.8 in (7.1 cm) x 1.1 in (2.8 cm). You should see clear diagonal ridges meeting in a raised center line.
Leaves (Make 2, Dark Green)
The leaves use the same method with a shorter chain.
Ch 10.
Row 1: Sc in 2nd ch from hook and in each of next 7 ch (8 sc). Work 3 sc in last ch. Working along the opposite side of the chain, sc in each of next 8 ch. (19 sts: 8 / 3 / 8)
Row 2: Ch 1, turn. Working in BLO: sc in each of next 9 sts. Work 3 sc in next st. Sc in each of next 7 sts. Leave 2 sts unworked. (19 sts: 9 / 3 / 7)
Row 3: Ch 1, turn. Working in BLO: sc in each of next 8 sts. Work 3 sc in next st. Sc in each of next 8 sts. Leave 2 sts unworked. (19 sts: 8 / 3 / 8)
Do not fasten off. Continue into the edging.
Checkpoint: 2.3 in (5.8 cm) x 1.1 in (2.8 cm).
Center (Make 1, Golden Yellow)
Rnd 1: Make a magic ring. Ch 1, then work 6 sc in the ring. Sl st to the first sc. Pull the ring closed. (6 sts)
Rnd 2: Ch 1. Work (sc, pc) in each st around. Sl st to the first sc. (12 sts: 6 sc + 6 pc)
This is a growth round, and 12 is the round’s complete count.
Fasten off, leaving a 12 in (30.5 cm) tail for sewing. Gently push each popcorn forward so the cluster looks full and bumpy.
Checkpoint: 1.25 in (3.2 cm) across.
Twisted Cord Loop (Red)
- Cut one strand of red 36 in (91.4 cm) long.
- Fold it in half and anchor the folded end on a hook or doorknob.
- Twist the strand firmly until it kinks back on itself when relaxed.
- Fold the twisted length in half and let it spin together into a cord.
- Knot the loose ends together. The cord should be about 8 in (20.3 cm) long.
- Fold the cord into a loop with a finished height of 2.5 in (6.4 cm). Leave about 1 in (2.5 cm) of each end free for attaching.
Assemble the Ornament
- Lay the five petals RS up. Place their bases so they meet within a 0.5 in (1.3 cm) circle at the middle. Space them evenly, about 72 degrees apart, with one petal pointing straight up.
- Overlap neighboring base edges by about 0.25 in (0.6 cm). Pin them in place.
- Turn the flower over. Using a red tail, sew the overlapping bases together with small whipstitches through the base edging stitches. Keep the stitches on the WS.
- Turn the flower RS up. Center the yellow popcorn cluster over the meeting point and sew it around the Rnd 1 stitches. Weave the tail out of sight.
- Place the two leaves behind the flower so each tip angles outward between a side petal and a lower petal, toward the lower left and lower right. Each leaf should show about 1.5 in (3.8 cm) beyond the petals. Sew the leaf bases to the WS of the petals.
- Lay the cord ends flat against the back of the top petal, about 0.75 in (1.9 cm) below its tip. Sew through both cord ends and the petal back several times.
Checkpoint: The flower measures about 6 in (15.2 cm) from the left petal tip to the right petal tip.
Border (Petal and Leaf Edging)
The edging is worked in the same yarn, hook, and gauge as the pieces: 4.5 sc per 1 in (2.5 cm). It goes through both loops so the outline stays smooth, while the ridged BLO texture stays inside.
This is a trim round. Every stitch of Row 3 gets one sc. The only additions are 1 extra sc at the tip and 3 sc across the base.
Petal Edging (1 round)
Continue from the end of Row 3. Do not turn.
- Ch 1. Rotate the petal and work 3 sc evenly across the stepped base edge.
- Sc in each of the first 10 sts of Row 3 (side A).
- Sc in the next st.
- Work (sc, ch 2, sc) in the center tip st.
- Sc in the next st.
- Sc in each of the last 10 sts of Row 3 (side B).
- Sl st to the first base sc. Fasten off, leaving an 8 in (20.3 cm) tail.
Counts per side:
– Side A: 11 sc
– Tip: 2 sc + one ch-2 sp
– Side B: 11 sc
– Base: 3 sc
– Total: 27 sc + 1 ch-2 sp
Why the math works: Row 3 has 23 sts. Working 1 sc into each gives 23 sc. The center stitch gets 2 sc instead of 1, which adds 1 extra. The base adds 3 more. So 23 + 1 + 3 = 27 sc.
At 4.5 sc per 1 in (2.5 cm), 11 sc per side matches the 2.4 in (6.1 cm) slope of each petal side. The ch-2 sp gives the tip its sharp point.
Leaf Edging (1 round)
Work it the same way as the petal edging:
- 3 sc across the base
- 9 sc up the first side
- (sc, ch 2, sc) in the center tip st
- 9 sc down the second side
- Sl st to the first sc
Total: 23 sc + 1 ch-2 sp. That is 19 sc worked 1 per Row 3 st, + 1 extra at the tip, + 3 at the base.
Fasten off, leaving an 8 in (20.3 cm) tail.
Final Blocking
- Weave in all tails except the ones still needed for sewing.
- Lay the ornament RS up on a blocking mat.
- Pin each petal tip and leaf tip outward to a clean point. Check that the flower spans 6 in (15.2 cm) wide.
- Pin the sides of each petal so the edges run straight, not wavy.
- Mist lightly with water until damp, not soaked. For cotton, you can steam lightly instead. Never touch acrylic with the iron.
- Leave it to dry completely, usually 6 to 8 hours.
- Unpin it and fluff the popcorns forward with a fingertip.
Final Quality-Control Checklist
- Five petals, each 3 in (7.6 cm) x 1.5 in (3.8 cm), with a sharp tip
- Ridges run in a clear chevron toward each center vein
- Petal edging counts are 11 / tip / 11 / 3 base
- Leaf edging counts are 9 / tip / 9 / 3 base
- Center shows 6 raised popcorns, 1.25 in (3.2 cm) across
- Both leaves are visible beneath the lower petals and angle outward evenly
- The cord loop stands 2.5 in (6.4 cm) tall and is securely sewn through two layers
- No tails or sewing stitches show on the RS
- The ornament lies flat when it hangs
Troubleshooting
Petals curl lengthwise: Your tension is too tight. Go up 0.25 mm in hook size, or block firmly.
Tip is rounded, not pointed: Make sure the 3 sc always go into the marked center stitch. Work the ch-2 point in the edging.
Petal widens at the base: Check that you left exactly 2 sts unworked at the end of Rows 2 and 3.
Ridges don’t show: You may have worked through both loops. Rows 2 and 3 must be worked in BLO.
Popcorns sink to the back: Insert the hook from front to back when closing each popcorn.
Flower won’t lie flat: The petal bases overlap too much. Keep the overlap to 0.25 in (0.6 cm).
Loop tilts sideways: Center the cord ends on the top petal and sew through both ends.
Care
Hand wash in cool water and press out the water in a towel. Lay flat and reshape the petal tips to dry.
Final Notes
The measurement chain is simple and predictable:
- Gauge of 18 sc = 4 in (10.2 cm)
- Petal after Row 3: 2.8 in (7.1 cm) x 1.1 in (2.8 cm)
- Petal after edging: 3 in (7.6 cm) x 1.5 in (3.8 cm)
- Five petals around a 1.25 in (3.2 cm) center: a 6 in (15.2 cm) poinsettia
- Cord loop: 2.5 in (6.4 cm) on top
If the first petal hits its checkpoints, the whole ornament will come together at the right size.
Optional: For a matching set, simply make extra ornaments the same way. Each one stays a separate single flower.
Happy crocheting!