

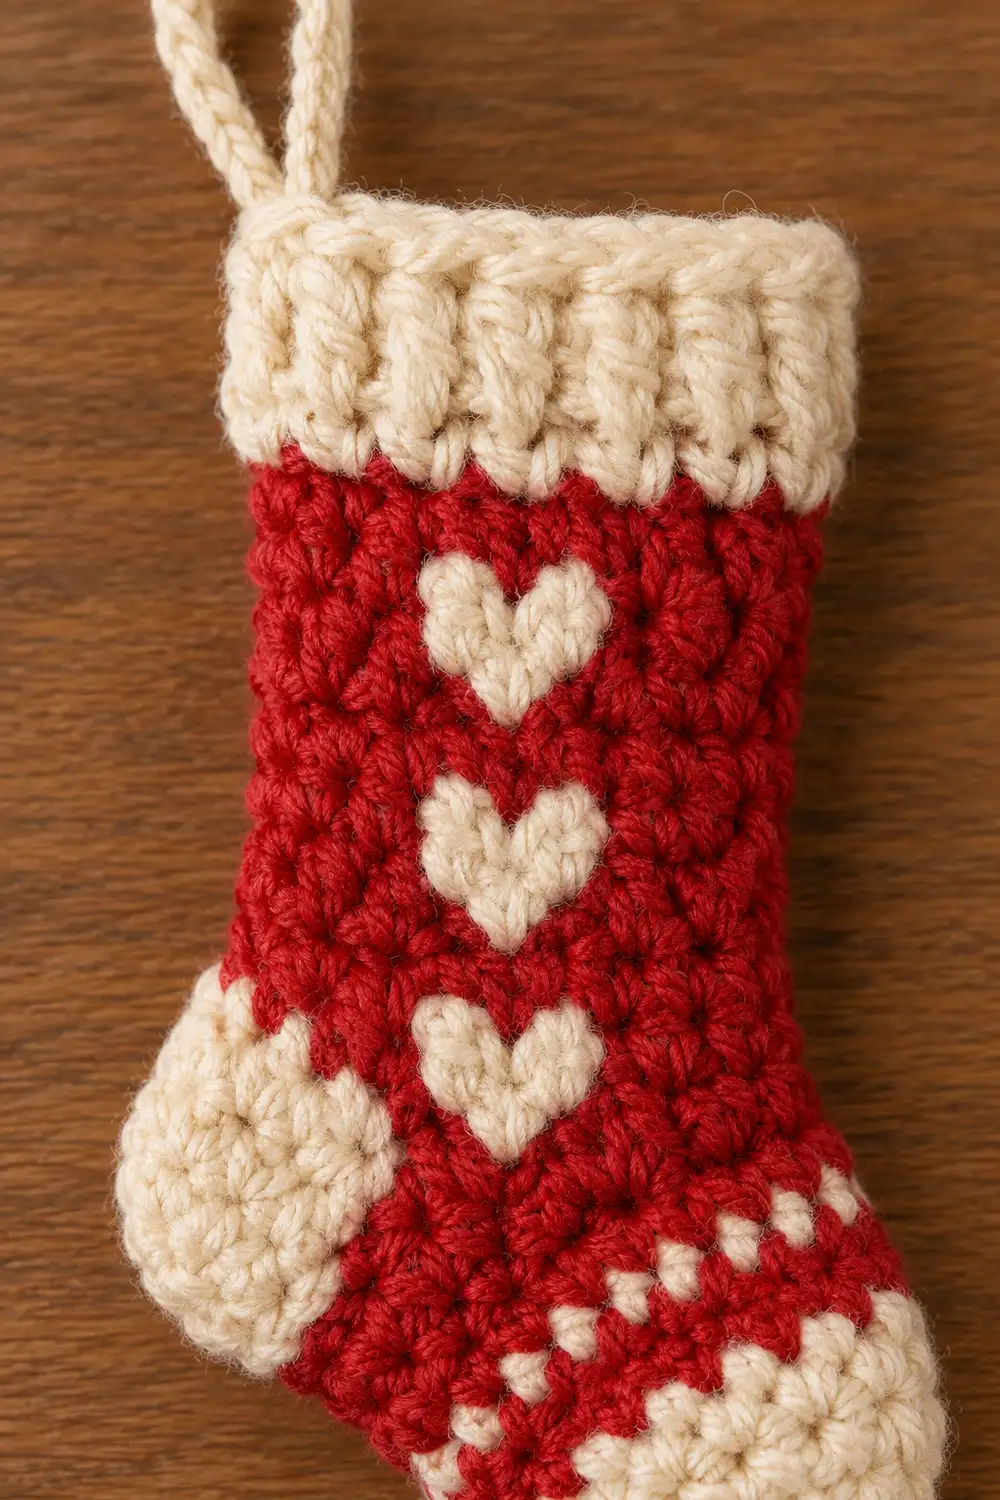
This tiny stocking is a classic holiday ornament. A ribbed cream cuff sits at the top. Below it is a red leg with three small cream hearts stacked down the front, and the stocking ends in a cream foot with a rounded heel and toe. A cream loop at the top lets it hang from a tree branch, a garland hook, or a gift bow.
The look is simple Scandinavian-cottage style: two colors, crisp single crochet, and a little texture from the ribbed cuff. The hearts use an intarsia-style method. Each heart has its own small cream bobbin, so no cream strand is carried around the back of the leg.
The pattern uses US crochet terms. The finished stocking measures about 3.5 in (8.9 cm) tall from the top of the cuff to the bottom of the heel, not counting the loop. It measures 2 in (5.1 cm) wide across the flattened leg.
Construction is one continuous piece. You work the cuff sideways as a short ribbed strip and join it into a tube. You then work the red leg top-down in joined, turned rounds from the cuff edge. The foot is worked in cream with an afterthought heel opening, and the toe is closed with even decreases. Finally, you add the heel cup into the opening, then a top edging and a hanging loop.
Finished Size and Construction
- Finished size: 3.5 in (8.9 cm) tall x 2 in (5.1 cm) wide at the leg, laid flat
- Foot length (back of heel to toe tip): about 2.25 in (5.7 cm)
- Skill level: Intermediate (small-scale color changes)
- Terminology: US
- Yarn weight: Sport (#2)
- Hook: 2.75 mm (US C/2)
- Number of pieces: 1
- Layout: Single stocking, worked in one piece
- Piece size: Same as finished size
- Size before border: 3.4 in (8.6 cm) tall x 2 in (5.1 cm) wide
- Border depth: about 0.1 in (0.3 cm), one round of sc on the cuff top, plus the loop
Materials
Yarn: Use a smooth sport weight yarn in cotton, cotton blend, or acrylic. Smooth yarn shows the tiny hearts clearly. Avoid fuzzy or highly textured yarns, because a 3-stitch heart disappears in a halo.
- Cream: 7 g, about 21 m (cuff, foot, heel, toe, hearts, edging, loop)
- Red: 5 g, about 15 m (leg)
These quantities include a margin of roughly 20% for gauge swatching and tails.
Tools:
- 2.75 mm (US C/2) crochet hook
- 2 locking stitch markers
- Tapestry needle
- Small scissors
- Blocking mat and rustproof pins
- Steam iron or garment steamer (optional)
Abbreviations (US Terms)
- ch – chain
- sc – single crochet
- sl st – slip stitch
- sc2tog – single crochet 2 together (decrease)
- BLO – back loop only
- st(s) – stitch(es)
- Rnd – round
- C – cream
- R – red
- RS / WS – right side / wrong side
Special technique: Color change. Work the last sc before the new color until 2 loops remain on the hook. Yarn over with the new color and pull through.
Special technique: Enclose. While working a stitch in one color, lay the unused strand along the top of the previous round and work over it. The strand is hidden inside the stitch and is ready on the other side.
Joined, turned rounds: At the end of each round, sl st to the first sc. At the start of the next round, ch 1 and turn, then work around in the other direction. The ch 1 does not count as a stitch.
Gauge and Checkpoints
Gauge: 7.5 sc and 8 rows = 1 in (2.5 cm) in sc worked back and forth.
Test first: Ch 16. Work 15 sc for 16 rows. The swatch should measure 2 in x 2 in (5.1 cm x 5.1 cm). Turned rounds behave like flat rows, so this swatch predicts the leg accurately.
Checkpoints:
- Cuff strip (30 rows): 3.75 in (9.5 cm) relaxed. It stretches easily to 4 in (10.2 cm).
- After Leg Rnd 1: The tube lies flat at 2 in (5.1 cm) wide.
- After Leg Rnd 16: The leg is 2 in (5.1 cm) tall below the cuff.
- After Foot Rnd 24: The foot tube is 1 in (2.5 cm) below the heel opening.
- Finished, before edging: 3.4 in (8.6 cm) tall.
If too big: Go down to 2.5 mm, or tighten your tension.
If too small: Go up to 3.0 mm.
A small gauge difference changes this piece noticeably. Fix gauge before starting the leg.
Cuff (Cream)
You work the cuff sideways, so the BLO ridges run vertically once the strip is joined into a tube.
Ch 6.
Row 1: Sc in 2nd ch from hook and in each ch across. (5 sc)
Rows 2–30: Ch 1, turn, sc in BLO of each st across. (5 sc per row)
Join into tube: Fold the strip so Row 30 meets the foundation chain. Sl st through the BLO of Row 30 and the free loops of the foundation chain. (5 sl st) Fasten off.
You now have a ribbed tube 0.7 in (1.8 cm) tall with 30 row ends along each edge. The seam marks one side of the stocking.
Leg (Red, with Cream Hearts)
Rnd 1 (RS, conversion round): Join R at the seam on one row-end edge of the cuff. Ch 1, then work 1 sc in the end of each cuff row around. Sl st to the first sc. (30 sc: 1 per row end, no extra stitches)
Sts 1–15 form the front and sts 16–30 form the back. Place a marker in st 7 and another in st 9. Sts 7–9 are the heart zone, with 6 red sts on each side. Move the markers up as you go.
Rnds 2–3: Ch 1, turn, sc in each st around, sl st to join. (30 sc)
Heart Chart (3 sts x 3 rounds)
Work the rounds in this order, top-down:
- Heart Rnd A: C, R, C (the top bumps)
- Heart Rnd B: C, C, C
- Heart Rnd C: R, C, R (the point)
The heart is symmetrical, so it reads the same on RS and WS rounds.
Working a heart round: Sc in R to the heart zone, changing to C on the last red st. Work the 3 zone sts per the chart. Enclose R behind every C stitch, and enclose C behind any R stitch inside the zone. Change back to R and sc to the end of the round.
In Heart Rnd A, join a new 12 in (30.5 cm) cream bobbin. Because you turn each round, the bobbin always waits at the edge of the zone where the next round arrives. After the last stitch of Heart Rnd C, enclose the cream under the next red st. Then cut it, leaving a 6 in (15.2 cm) tail.
Rnds 4–6: Heart 1 (Heart Rnds A, B, C). (30 sc each round: 27 R + 3 zone sts)
Rnd 7: All R. (30 sc)
Rnds 8–10: Heart 2. (30 sc each round)
Rnd 11: All R. (30 sc)
Rnds 12–14: Heart 3. (30 sc each round)
Rnds 15–16: All R. (30 sc)
On the final join of Rnd 16, change to C. Cut R.
Checkpoint: The leg measures 2 in (5.1 cm) below the cuff. The three hearts stack in a single column centered on the front.
Foot (Cream)
Rnd 17 (RS, heel opening): Ch 1, turn, sc in each of the front 15 sts. Ch 15, skip the 15 back sts, and sl st to the first sc. (15 sc + 15 ch)
Rnd 18 (conversion round): Ch 1, turn, sc in each ch, then sc in each sc. Sl st to join. (30 sc: 15 into ch + 15 into sc)
Rnds 19–24: Ch 1, turn, sc around, sl st to join. (30 sc)
Checkpoint: The foot tube measures 1 in (2.5 cm) from Rnd 17.
Rounded Toe
Continue the joined, turned rounds. Space the decreases evenly so the toe forms a rounded dome.
Rnd 25: Sc 3, sc2tog 6 times. (24 sc)
Rnd 26: Sc around. (24 sc)
Rnd 27: Sc 2, sc2tog 6 times. (18 sc)
Rnd 28: Sc 1, sc2tog 6 times. (12 sc)
Rnd 29: Sc2tog 6 times. (6 sc)
Fasten off. Leave an 8 in (20.3 cm) tail, weave it through the front loops of the last 6 sts, pull tight, and secure. The toe adds about 0.6 in (1.5 cm).
Heel (Cream)
Turn the stocking so the heel opening faces you. The opening has 15 skipped leg sts on one side and the free loops of the 15-ch on the other.
Heel Rnd 1 (conversion round): Join C at one corner. Ch 1, sc in each of the 15 skipped leg sts, then sc in each of the 15 free ch loops. Sl st to join. (30 sc)
If a small hole forms at a corner, close it with the yarn tail during finishing. Do not add stitches.
Heel Rnd 2: Ch 1, turn, sc around. (30 sc)
Heel Rnd 3: Sc 3, sc2tog 6 times. (24 sc)
Heel Rnd 4: Sc 2, sc2tog 6 times. (18 sc)
Heel Rnd 5: Sc 1, sc2tog 6 times. (12 sc)
Heel Rnd 6: Sc2tog 6 times. (6 sc)
Fasten off and close the heel the same way as the toe. The heel cup adds about 0.7 in (1.8 cm) below the leg. The stocking now bends into its L-shape.
Checkpoint: Measure from the top of the cuff to the bottom of the heel: 0.7 in cuff + 2 in leg + 0.7 in heel = 3.4 in (8.6 cm).
Border
Border gauge: 7.5 sc per 1 in (2.5 cm). This is the same gauge as the leg, so the edging neither ruffles nor pulls.
Border Rnd 1: With C, join at the cuff seam on the top edge. Ch 1, then work 1 sc in the end of each cuff row around. Sl st to join. (30 sc: 15 across the front, 15 across the back)
Hanging loop: At the seam, ch 15 and sl st into the same st to form a loop. Work 20 sc over the chain loop, then sl st to the base. Fasten off and weave in the tail. The finished loop hangs about 1 in (2.5 cm) above the cuff.
Why the math works: The cuff has 30 rows. Leg Rnd 1 took exactly 1 sc per row end, which gave 30 sts. The top edging uses the same 30 row ends on the opposite edge, which again gives 30 sc. At 7.5 sc per inch, 30 sc = 4 in (10.2 cm) around, or 2 in (5.1 cm) per flattened side, with 15 sc on each side. The cuff, leg, and edging all match without easing.
Final Blocking
- Weave in all tails, including the six heart bobbin tails. Weave each heart tail through cream stitches inside its own heart.
- Use the tapestry needle to nudge any loose heart stitches into place, especially the center red notch stitch.
- Lay the stocking flat with the hearts centered on the front. Keep the cuff seam on one side fold.
- Pin the leg to 2 in (5.1 cm) wide and the total height to 3.5 in (8.9 cm).
- Shape the heel and toe into smooth curves with your fingers.
- Hover the steam iron 0.5 in (1.3 cm) above the piece and steam lightly. Never press the iron down, especially on acrylic yarn.
- Let it dry completely before removing the pins.
Final Quality-Control Checklist
- The cuff ribs run vertically, and the cuff is 0.7 in (1.8 cm) tall
- The leg has 30 sts and measures 2 in (5.1 cm) wide when flat
- There are three hearts, each 3 sts wide and 3 rounds tall, stacked with 1 red round between them
- The hearts are centered on the front, with 6 red sts on each side
- No red strand shows through the cream heart stitches
- The foot, heel, and toe are fully cream
- The heel and toe close neatly with no holes
- The top edging has 30 sc, 15 per side
- The loop is secure and about 1 in (2.5 cm) tall
- The finished stocking is 3.5 in (8.9 cm) tall
Troubleshooting
Red peeks through the hearts: Keep the enclosed strand snug against the top of the previous round. If needed, switch to a tighter yarn.
The hearts look lopsided: Check the markers. The zone must always be sts 7–9. Count from the seam on every heart round.
The cream bobbin is on the wrong side of the zone: You forgot to turn. Turned rounds are essential through the hearts.
There are holes at the heel corners: Close them with the heel tail during finishing. Do not add extra stitches, because they change the decrease math.
The leg flares or puckers below the cuff: Rework Leg Rnd 1 with exactly 1 sc per row end, for 30 sts.
The toe looks pointed rather than round: Make sure the decreases are stacked evenly. Do not skip the plain Rnd 26.
The visible join seam wanders: Always sl st into the first sc of the round, not the turning ch.
Care
Spot clean with cool water and mild soap, then reshape and lay flat to dry. Store the ornament flat in tissue paper between seasons.

Final Notes
The measurement chain is short and simple. A 30-row cuff gives 30 leg stitches. Thirty stitches at 7.5 sc per inch give 2 in (5.1 cm) of flat width. Sixteen leg rounds at 8 rounds per inch give 2 in (5.1 cm) of height. Adding the 0.7 in (1.8 cm) cuff and the 0.7 in (1.8 cm) heel brings the stocking to 3.4 in (8.6 cm). The top edging finishes it at 3.5 in (8.9 cm).
If you check gauge first and confirm each checkpoint, your stocking will match the one in the photo.
Optional: make several in different heart colors to fill a small ornament basket.
Happy crocheting!