

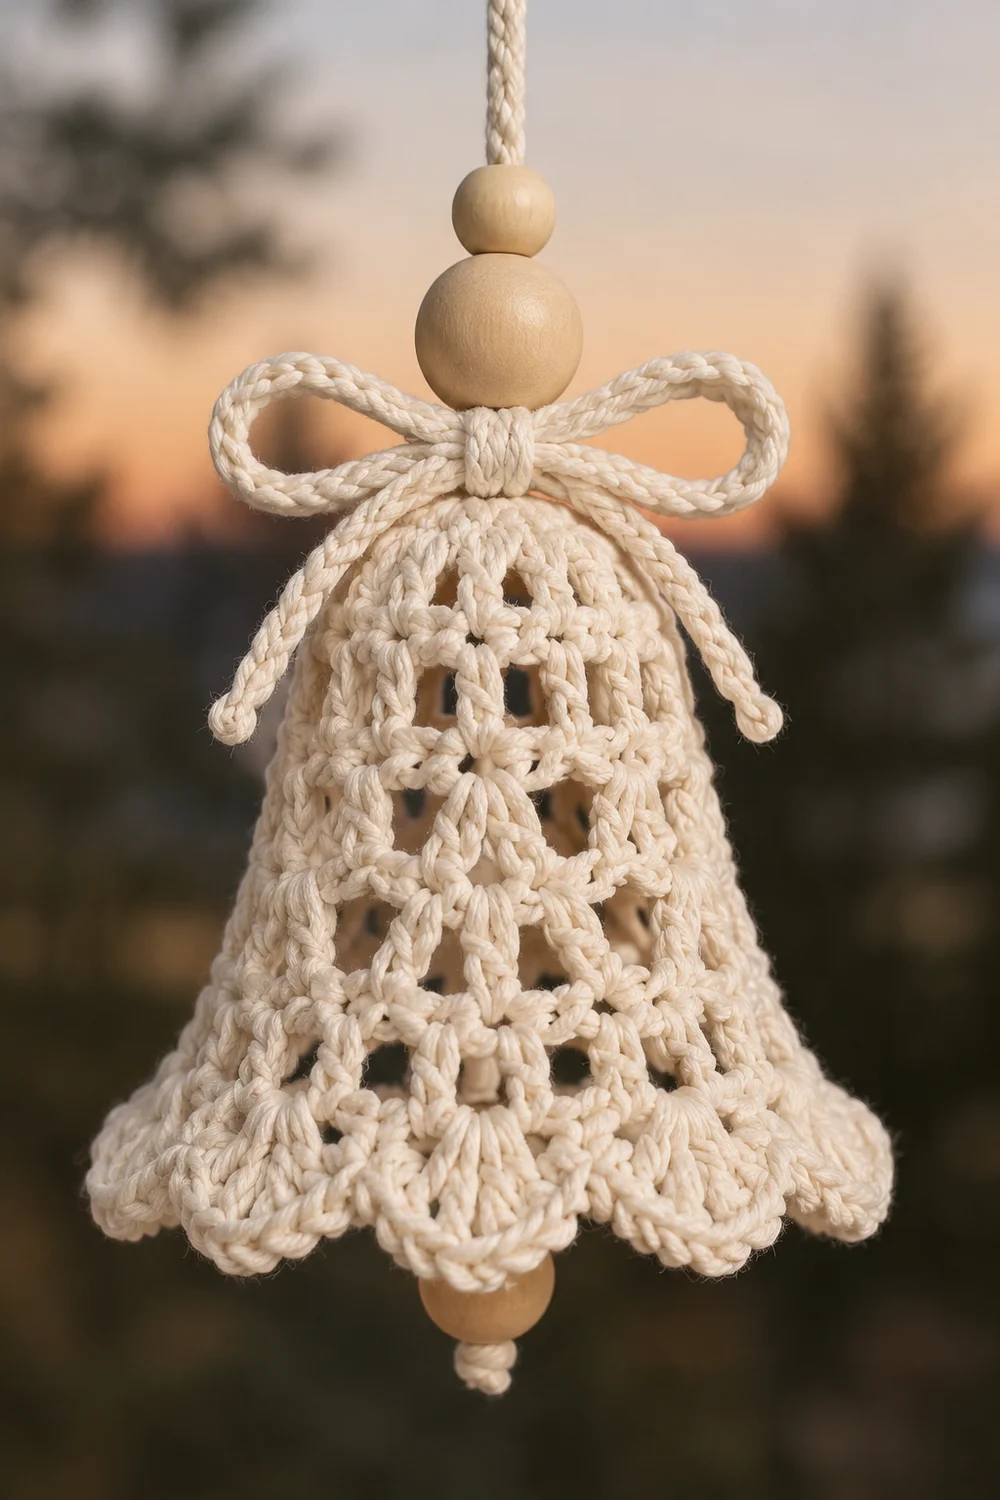
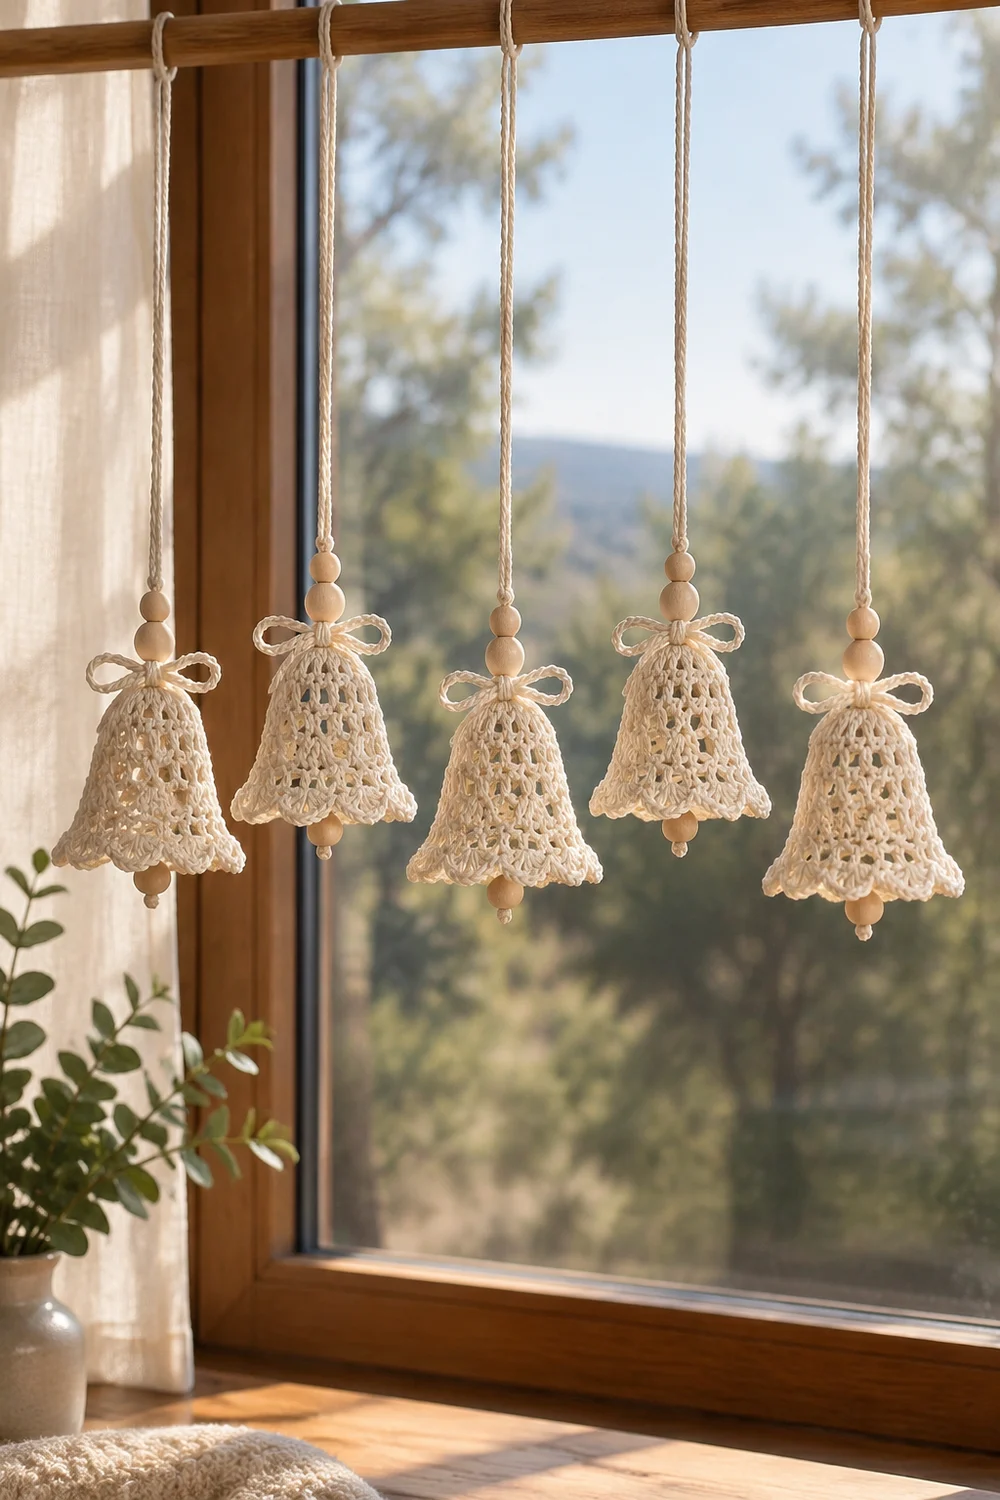
These little lace bells look lovely against a winter window. Five identical cream bells hang from natural cotton rope strands tied to a wooden rod. Each one has an open shell lattice, a scalloped picot rim, a wooden bead clapper peeking out below, a crocheted bow at the crown, and a wooden bead above the bow.
The style is soft Scandinavian: one cream color, natural wood, and plain cotton rope. The stitches do all the decorative work.
This pattern uses US crochet terms. Each finished bell is 2.75 in (7.0 cm) tall. The rim measures 3.4 in (8.6 cm) across at the sc round and about 3.75 in (9.5 cm) across at the scallop tips.
Each bell is worked top-down in the round. You start with a flat sc crown, then work V-stitches and shells that turn down into a dome. Two straight lattice rounds form the waist, and a large-shell round flares the rim. A two-round scalloped picot border finishes the edge. A slip-stitch cord bow, a clapper bead, a top bead, and a rope strand complete each ornament. All five ornaments then hang from the rod.
Finished Size and Construction
- Finished bell size: 2.75 in (7.0 cm) tall; rim 3.4 in (8.6 cm) across at the sc round
- Skill level: Easy+ (simple rounds, careful counting)
- Terminology: US
- Yarn weight: DK / light (#3) cotton
- Hook: 3.5 mm (E-4)
- Number of pieces: 5 bells and 5 bows, plus beads, rope, and rod
- Layout: 5 bells in a single row on a 30 in (76.2 cm) rod, spaced 5 in (12.7 cm) apart
- Piece size: 2.75 in (7.0 cm) tall
- Size before border: 2.25 in (5.7 cm) tall; rim 3.4 in (8.6 cm) across
- Border depth: 0.5 in (1.3 cm)
Materials
Yarn advice: Choose a smooth, mercerized or combed DK cotton. Cotton holds the lace shape after starching, while acrylic tends to go limp. Pick a warm cream or natural shade so it matches the wood and rope.
- Cream (only color): 70 g / 154 m total. That covers about 11 g / 24 m per bell (bell plus bow) for 5 bells, with a margin.
Tools and notions:
- 3.5 mm (E-4) crochet hook
- Tapestry needle
- 5 wooden beads, 12 mm (about 1/2 in), for the clappers; holes at least 4 mm
- 5 wooden beads, 16 mm (about 5/8 in), for the toppers; holes at least 4 mm
- 3 mm natural cotton macrame cord: 5 strands of 30 in (76.2 cm) each, 150 in (381.0 cm) total; buy 5 yd (4.6 m)
- Wooden dowel, 30 in (76.2 cm) long and 0.5 in (1.3 cm) thick
- Stitch marker, scissors, spray starch or a 1:1 glue-water mix
- A blocking form about 2.5 in (6.4 cm) wide, such as a small plastic cup or a rolled cardstock cone
All yarn and cord quantities include a margin for swatching and knots.
Abbreviations (US Terms)
- ch – chain
- sl st – slip stitch
- sc – single crochet
- dc – double crochet
- sk – skip
- sp – space
- st(s) – stitch(es)
- MR – magic ring
Special stitches:
- V-st: (dc, ch 1, dc) in the same stitch or space.
- Shell: (2 dc, ch 1, 2 dc) in the same space.
- Large shell: (3 dc, ch 1, 3 dc) in the same space.
- Picot: ch 3, sl st in 3rd ch from hook.
- Scallop: (4 dc, picot, 4 dc) in the same stitch.
Gauge and Checkpoints
Make one complete bell before starting the others. That single bell is your gauge swatch.
Gauge: Rounds 1–3 make a flat disc 1.25 in (3.2 cm) across. In the border, 6 sc = 1 in (2.5 cm).
Checkpoints (measure lightly stretched, before blocking):
- After Round 3: flat disc 1.25 in (3.2 cm) across
- After Round 5: 1 in (2.5 cm) tall from crown to edge; opening 2 in (5.1 cm) across
- After Round 7: 1.75 in (4.4 cm) tall; opening 2.5 in (6.4 cm) across
- After Round 8: 2.25 in (5.7 cm) tall; rim 3.4 in (8.6 cm) across
- After Border: 2.75 in (7.0 cm) tall
If your bell is too big, go down to a 3.25 mm hook. If it is too small, go up to a 3.75 mm hook. If only the crown is off, adjust your tension in Rounds 1–3 rather than changing hooks.
Bell Body
Work in joined rounds and do not turn. The beginning ch 3 counts as a dc throughout.
Round 1: MR, ch 1, 8 sc in ring. Pull the ring nearly closed, leaving a small center hole for the rope later. Join with sl st to first sc. (8 sc)
Round 2: Ch 1, 2 sc in each st around. Join. (16 sc)
Round 3: Ch 1, sc in next st, 2 sc in next st, repeat 8 times. Join. (24 sc) The disc should lie flat.
Round 4 (V-stitches): Ch 4 (counts as dc + ch 1), dc in same st as join. Sk 2 sts, V-st in next st, repeat 7 more times. On the last repeat, sk the final 2 sts. Join to 3rd ch of beginning ch-4. (8 V-sts: 16 dc, 8 ch-1 sps)
The work begins to curve downward here. That curve is the start of the dome.
Round 5 (shells): Sl st into first ch-1 sp. Ch 3, (dc, ch 1, 2 dc) in same sp. Shell in each remaining V-st sp around. Join to top of ch-3. (8 shells: 32 dc, 8 ch-1 sps)
Round 6 (lattice): Sl st in next dc and into ch-1 sp. Ch 3, (dc, ch 1, 2 dc) in same sp, ch 1. Shell in next shell sp, ch 1, repeat 7 times. Join. (8 shells: 32 dc, 16 ch-1 sps)
The ch-1 between the shells opens the lattice windows.
Round 7 (waist): Repeat Round 6. (8 shells: 32 dc, 16 ch-1 sps)
The count is unchanged, so the sides drop straight down to form the bell’s waist.
Round 8 (flare): Sl st in next dc and into ch-1 sp. Ch 3, (2 dc, ch 1, 3 dc) in same sp, ch 1. Large shell in next shell sp, ch 1, repeat 7 times. Join to top of ch-3. (8 large shells: 48 dc, 16 ch-1 sps)
Each shell grows from 4 dc to 6 dc, which pushes the rim outward into the classic bell flare. Do not fasten off; continue to the border.
Bow (Make 1 per Bell)
Ch 46. Sl st in 2nd ch from hook and in each ch across. (45 sl st) Fasten off, leaving a 6 in (15.2 cm) tail.
The finished cord is about 7 in (17.8 cm) long.
Tie the cord into a bow with two loops of 0.75 in (1.9 cm) each and two tails of 1.5 in (3.8 cm) each. The bow is about 2 in (5.1 cm) wide. Leave the tail for attaching.
Make All Five Bells
Make 5 bells (body plus border) and 5 bows, all in cream.
| Piece | Color | Quantity |
|---|---|---|
| Bell (body + border) | CREAM | 5 |
| Bow | CREAM | 5 |
Text layout grid (left to right along the rod):
ROD:   BELL 1   BELL 2   BELL 3   BELL 4   BELL 5
COLOR: CREAM    CREAM    CREAM    CREAM    CREAM
Check each bell against the checkpoints before moving on. The five bells should match within 1/8 in (0.3 cm) in height.
Joining (Assembly and Hanging)
The bells are never stitched to each other. Each ornament is assembled on its own rope strand, and all five strands are tied to the rod. The stitch-level joins are the bow-to-crown tack and the rope passing through the Round 1 center.
1. Clapper. Tie a double overhand knot 1 in (2.5 cm) from one end of a cord strand. Thread a 12 mm bead up to the knot.
2. Support knot. Measure 2.5 in (6.4 cm) up from the top of the clapper bead and tie an overhand knot.
3. Bell. Wrap the long cord end in tape. Push it up from inside the bell through the Round 1 center hole, between the 8 sc. The crown rests on the support knot.
The clapper’s bottom now sits 3 in (7.6 cm) below the crown top. That is about 0.25 in (0.6 cm) below the rim, so the bead peeks out as in the photo.
4. Bow. Lay the bow on top of the crown so the cord passes through the center of the bow knot. Using the bow tail, tack the bow knot to Round 1 and Round 2 with 3–4 small stitches. Let the bow tails fall onto the bell. Weave in the tail.
5. Top bead. Thread a 16 mm bead down onto the bow. Tie an overhand knot snugly above it to lock the stack.
6. Rod. Measure 14 in (35.6 cm) up from the top of the bead. Tie the cord around the rod with two half hitches at that point.
Space the strands 5 in (12.7 cm) apart, starting 5 in (12.7 cm) from each end of the rod: 4 gaps × 5 in + 2 ends × 5 in = 30 in (76.2 cm). Trim the excess cord and seal the ends with a dab of glue.
Tension advice: Pull every knot firmly so the beads cannot creep. Keep the bow tacks snug but not tight enough to pucker the crown.
Size checkpoint: From the top of the bead to the bottom of the clapper, each ornament measures about 3.75 in (9.5 cm). Check all five against each other.
Optional: For a staggered look, alternate drops of 12 in (30.5 cm) and 14 in (35.6 cm).
Border
The border continues directly from Round 8.
Border gauge: 6 sc = 1 in (2.5 cm). This is slightly denser than the lace body, which keeps the scallops from rippling.
Border Round 1 (sc trim): Sl st in next 2 dc and into the first shell’s ch-1 sp. Ch 1, sc in same sp. Work 1 sc in each dc and 1 sc in each ch-1 sp all the way around. Finish with the first shell’s 3 opening dc, the beginning ch-3 counting as a dc. Join to first sc.
This is a conversion round:
- 48 sc worked 1-per-dc
- 16 sc worked 1-per-ch-1-sp
- Total: 64 sc
Around the bell, each shell repeat gives 8 sc in this order: center sp, 3 dc, between-shell sp, 3 dc.
At 6 sc per inch, 64 sc is 10.7 in (27.2 cm) around. That gives the 3.4 in (8.6 cm) rim diameter.
Border Round 2 (scalloped picot edge): Ch 3 (counts as dc), (3 dc, picot, 4 dc) in same st as join. Sk 3 sc, sc in next sc, sk 3 sc. Scallop in next sc, sk 3 sc, sc in next sc, sk 3 sc, repeat 7 times. Join to top of beginning ch-3. Fasten off and weave in ends. (8 scallops, 8 sc)
Why the math works: Each scallop repeat uses exactly 8 sc: 1 sc for the scallop, 3 skipped, 1 for the sc, and 3 skipped. 8 repeats × 8 sc = 64 sc, which matches Border Round 1 exactly.
The scallops land on the shell-center sc stitches. The sc anchors land on the between-shell sc stitches. As a result, every scallop sits directly below a lattice column.
The border adds 0.5 in (1.3 cm) to the height, for a total of 2.25 + 0.5 = 2.75 in (7.0 cm).
Final Blocking
- Dampen the bell, or spray it evenly with starch.
- Slip it over the blocking form, crown down on top.
- Ease the waist (Rounds 6–7) straight against the form.
- Flare the rim to 3.4 in (8.6 cm) at the sc round.
- Open each picot with a pin and spread the scallops to 3.75 in (9.5 cm) across the tips.
- Shape the bow loops with your fingers and give them a light spray.
- Let dry completely, ideally overnight, before assembling.
Final Quality-Control Checklist
- [ ] Each bell has an 8 sc / 16 sc / 24 sc crown.
- [ ] Round 8 has 8 large shells (48 dc, 16 ch-1 sps).
- [ ] Border Round 1 has 64 sc.
- [ ] Each bell has 8 scallops, each with a picot.
- [ ] Each bell is 2.75 in (7.0 cm) tall with a 3.4 in (8.6 cm) rim.
- [ ] Each clapper hangs about 0.25 in (0.6 cm) below the rim.
- [ ] The bows are centered and tacked; the top beads are locked with a knot.
- [ ] The strands are spaced 5 in (12.7 cm) apart on the rod.
- [ ] All ends are woven in and the cord ends are sealed.
Troubleshooting
The crown cups before Round 4. Your sc tension is too tight. Loosen up or use a larger hook for Rounds 1–3.
The bell is flat instead of domed. Check that Round 4 skips 2 sts between V-sts. Too few skips keeps the work flat.
The waist flares early. Recount Rounds 6–7. They must both have 32 dc and 16 ch-1 sps.
The scallops ripple. Border Round 1 has too many sc. Recount to 64, or work the trim round more tightly.
The scallops cup inward. Your trim round is too tight. Loosen up or go up 0.25 mm for the border only.
The clapper hides inside the bell. Retie the support knot slightly higher on the cord.
The bow droops. Re-tack it through Round 2 and starch it again.
Care
Spot clean with mild soap and cool water, then reshape and lay flat to dry. Store the ornaments flat in tissue to protect the scallops and bows.
Final Notes
Here is the full measurement chain:
- Crown: 1.25 in (3.2 cm) after Round 3
- After Round 5: 1 in (2.5 cm) tall
- Waist after Round 7: 1.75 in (4.4 cm) tall, 2.5 in (6.4 cm) wide
- Flared rim after Round 8: 2.25 in (5.7 cm) tall, 3.4 in (8.6 cm) wide
- Trim round: 64 sc at 6 sc per inch
- Scallop round: 8 scallops × 8 sc, adding 0.5 in (1.3 cm) for a finished 2.75 in (7.0 cm) bell
Make five matching bells, hang each from its own strand at 5 in (12.7 cm) spacing, and your window display is complete.
Happy crocheting!