

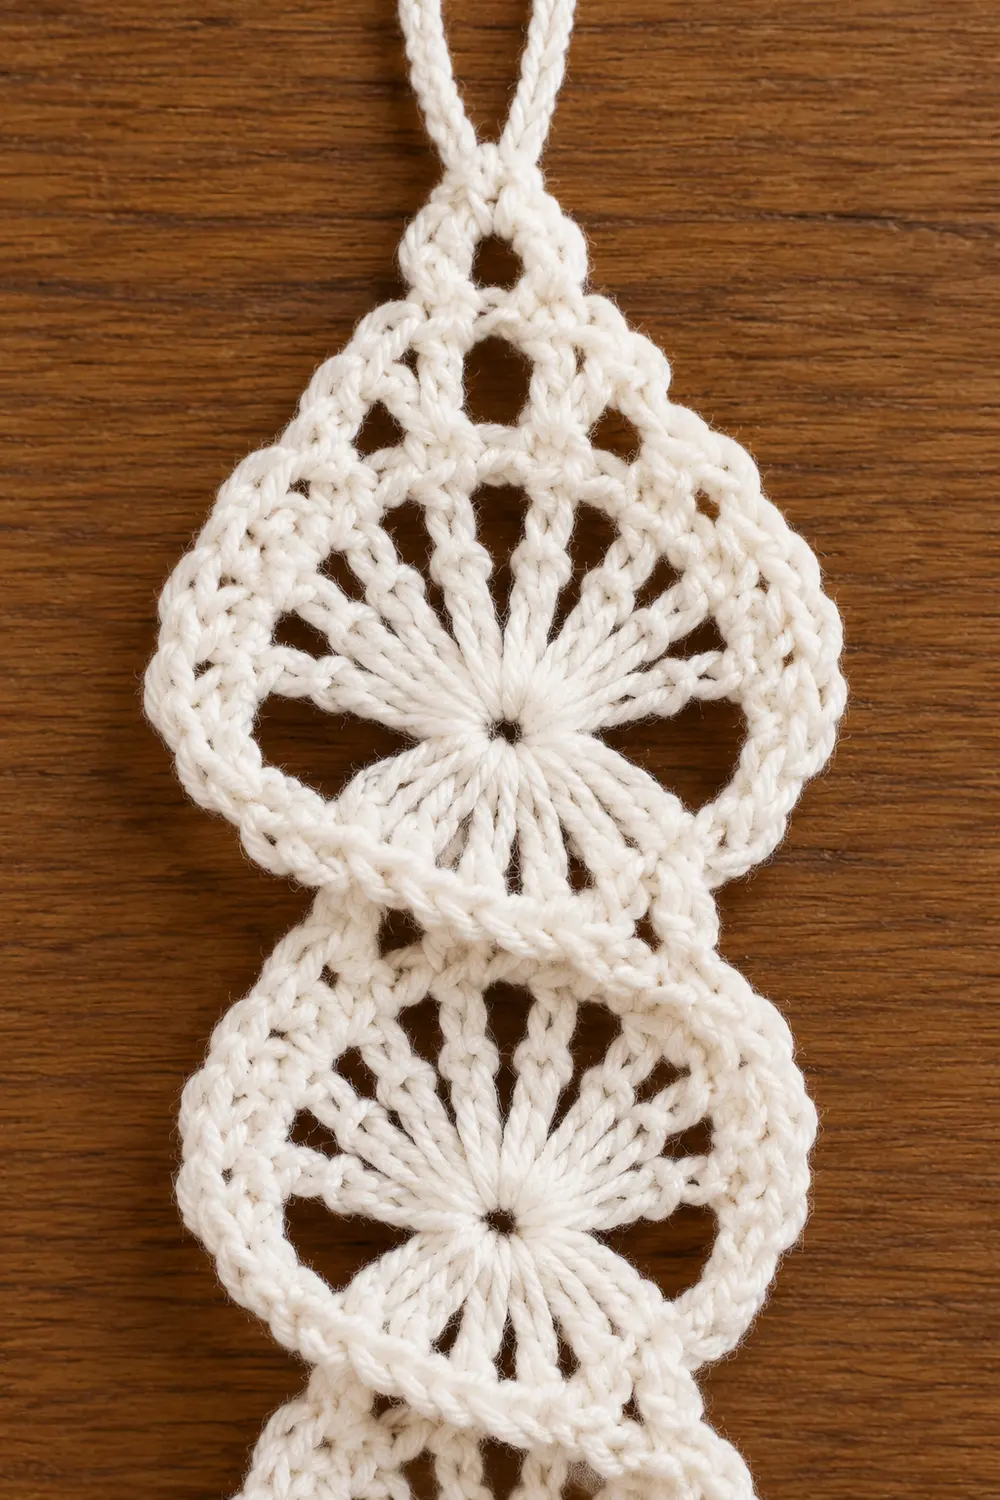
The Frost Cascade is a slender hanging ornament made of four lacy fans stacked in a vertical line. Each fan is a semi-circular shell of radiating spokes with open spaces between them. The fans get slightly smaller toward the bottom, and the piece finishes in a fine pointed tip.
The ornament is worked in white or cream cotton for a frosty, vintage lace look. It hangs from a small crocheted loop at the top. Once blocked flat, the airy openwork catches the light on a tree branch, in a window, or on a gift.
This pattern uses US crochet terms. The finished ornament measures 4.5 in (11.4 cm) long including the hanging loop, and 1.9 in (4.8 cm) wide at the largest fan.
The ornament is one single piece, worked from the bottom tip upward. Each fan is a row of spokes worked into a small chain ring. A short travel row of slip stitches carries the yarn to the fan’s center. From there, a chain stem and a new ring start the next fan. At the top you make the hanging loop. Then one continuous border pass travels down one edge and up the other, adding chain-loop scallops to every fan arc.
Finished Size and Construction
- Finished size: 4.5 in (11.4 cm) long including loop; body 3.5 in (8.9 cm) long; 1.9 in (4.8 cm) wide at Fan 4
- Skill level: Intermediate
- Terminology: US crochet terms
- Yarn weight: Fine (#2, sport) mercerized cotton
- Hook: 3.25 mm (US D/3)
- Number of pieces: 1
- Layout: 4 fans stacked vertically, smallest (Fan 1) at the bottom, largest (Fan 4) at the top
- Fan widths after border: Fan 1: 1.3 in (3.3 cm); Fan 2: 1.5 in (3.8 cm); Fan 3: 1.7 in (4.3 cm); Fan 4: 1.9 in (4.8 cm)
- Size before border: body 3.3 in (8.4 cm) long, 1.5 in (3.8 cm) wide at Fan 4
- Border depth: 0.2 in (0.5 cm) beyond the spoke tips
Materials
Choose a smooth, mercerized cotton in sport weight. Mercerized cotton gives crisp stitch definition and holds its shape after blocking. Avoid fuzzy or very stretchy yarns, which blur the open spaces.
- White or cream: 5 g, about 16 m (17 yd)
The quantity includes a margin for a test fan and weaving in ends.
Tools:
– 3.25 mm (US D/3) crochet hook
– Tapestry needle
– Scissors
– Ruler or tape measure
– Rust-proof pins and a foam blocking mat
– Fabric stiffener or spray starch (optional)
Abbreviations (US Terms)
- ch – chain
- sl st – slip stitch
- sc – single crochet
- hdc – half double crochet
- dc – double crochet
- tr – treble crochet
- sp – space
- st(s) – stitch(es)
Special terms:
- Spoke: each hdc, dc, or tr worked into a fan’s ring. The beginning chain of each fan counts as the first spoke.
- Ring with stem: a chain whose last few chains are joined into a small ring with a sl st. The chains left below the ring form a short stem.
- Ring junction: the sl st that closes a ring, at the base of the fan’s spokes.
Gauge and Checkpoints
Spoke height (base of ring to top of stitch):
– hdc: 0.35 in (0.9 cm)
– dc: 0.5 in (1.3 cm)
– tr: 0.65 in (1.7 cm)
Test first. Work the Foundation, Fan 1, and Fan 2, then measure before continuing.
Checkpoints (before border, tolerance ±0.1 in / 0.3 cm):
– After Fan 1: width 0.9 in (2.3 cm)
– After Fan 2: width 1.1 in (2.8 cm); length from tip 1.5 in (3.8 cm)
– After Fan 3: width 1.3 in (3.3 cm); length 2.35 in (6.0 cm)
– After Fan 4: width 1.5 in (3.8 cm); length 3.3 in (8.4 cm)
– After border: Fan 4 width 1.9 in (4.8 cm); body 3.5 in (8.9 cm); total with loop 4.5 in (11.4 cm)
Measure width straight across, from the tip of one outer spoke to the tip of the opposite outer spoke, with the fan lying flat.
If your fans are too big, go down to a 3.0 mm hook. If they are too small, go up to a 3.5 mm hook. Do not change spoke or chain counts. The border math depends on them.
Pattern
Foundation (Tip and Fan 1 Ring)
Leave a 6 in (15.2 cm) tail.
Ch 8, sl st in 4th ch from hook. The last 4 ch form the ring. The first 4 ch hang below as the tip stem, about 0.3 in (0.8 cm) long.
Fan 1 (Smallest)
Row A (spokes): Ch 2 (counts as first hdc), (ch 1, hdc in ring) 4 times. Turn.
Count: 5 hdc spokes, 4 ch-1 sp.
Push the spokes together so they fan around the top half of the ring only.
Row B (travel): Sl st in top of last hdc made, (sl st in next ch-1 sp, sl st in next hdc) 2 times.
Count: 5 sl st, ending on the center spoke (spoke 3).
Fan 1 measures 0.9 in (2.3 cm) wide and 0.45 in (1.1 cm) tall.
Fan 2
Ring with stem: Ch 6, sl st in 4th ch from hook. This gives a 4-ch ring on a 2-ch stem.
Row A: Ch 3 (counts as first dc), (ch 1, dc in ring) 6 times. Turn.
Count: 7 dc spokes, 6 ch-1 sp.
Row B: Sl st in top of last dc made, (sl st in next ch-1 sp, sl st in next dc) 3 times.
Count: 7 sl st, ending on spoke 4 (center).
Fan 2 measures 1.1 in (2.8 cm) wide and 0.55 in (1.4 cm) tall.
Fan 3
Ring with stem: Ch 7, sl st in 5th ch from hook. This gives a 5-ch ring on a 2-ch stem.
Row A: Ch 3 (counts as first dc), (ch 2, dc in ring) 6 times. Turn.
Count: 7 dc spokes, 6 ch-2 sp.
Row B: Sl st in top of last dc made, (sl st in next ch-2 sp, sl st in next dc) 3 times.
Count: 7 sl st, ending on spoke 4 (center).
Fan 3 measures 1.3 in (3.3 cm) wide and 0.65 in (1.7 cm) tall.
Fan 4 (Largest)
Ring with stem: Ch 7, sl st in 5th ch from hook.
Row A: Ch 4 (counts as first tr), (ch 2, tr in ring) 8 times. Turn.
Count: 9 tr spokes, 8 ch-2 sp.
Row B: Sl st in top of last tr made, (sl st in next ch-2 sp, sl st in next tr) 4 times.
Count: 9 sl st, ending on spoke 5 (center).
Fan 4 measures 1.5 in (3.8 cm) wide and 0.75 in (1.9 cm) tall.
Because you turn after each Row A, the fans alternate which side they start from. This is expected. Blocking lays them all flat and even.
Hanging Loop
Ch 14, sl st in the same center spoke. Work 18 sc into the ch-14 loop, then sl st in the same center spoke at the base of the loop. Do not fasten off.
The loop hangs about 1.0 in (2.5 cm) above the body.
Border
The border is one continuous pass. It goes down the left edge to the tip, then up the right edge back to the hanging loop. It is a trim pass. Every stitch is either 1 sc per existing spoke top, sc worked along an outer spoke post, a ch-3 loop between spokes, or a connecting sl st. It adds no new spokes.
Border gauge: about 6 sc per 1 in (2.5 cm) along spoke posts. That works out to 2 sc on an hdc post, 3 sc on a dc post, and 4 sc on a tr post. Each ch-3 loop arches 0.2 in (0.5 cm) beyond the spoke tips.
Working spoke tops: If a travel sl st sits on a spoke top, insert your hook under the sl st and the stitch top together.
Direction: Do not turn. From the loop base, keep working in the same direction, toward the Fan 4 half not covered by travel sl sts. Hold the piece tip down and call this side the left edge.
Left Edge (Down)
Fan 4: (Ch 3, sc in next spoke top) 4 times, ending on the outer spoke. Work 4 sc evenly down the post of that outer spoke. Sl st in the ring junction, then sl st in each of the 2 stem ch. You are now on Fan 3’s center spoke.
Count: 4 loops, 4 top sc, 4 post sc, 3 sl st.
Fan 3: (Ch 3, sc in next spoke top) 3 times. Work 3 sc down the outer spoke post. Sl st in the ring junction and in each of the 2 stem ch.
Count: 3 loops, 3 top sc, 3 post sc, 3 sl st.
Fan 2: Work the same as Fan 3.
Count: 3 loops, 3 top sc, 3 post sc, 3 sl st.
Fan 1: (Ch 3, sc in next spoke top) 2 times. Work 2 sc down the outer hdc post. Sl st in the foundation ring junction.
Count: 2 loops, 2 top sc, 2 post sc, 1 sl st.
Left edge total: 12 loops, 24 sc (12 top + 12 post), 10 sl st.
Right Edge (Up)
Fan 1: Work 2 sc up the opposite outer hdc post. Sc in top of that outer spoke, ch 3, sc in next spoke top, ch 3. Sl st in each of the 2 Fan 2 stem ch, then sl st in the Fan 2 ring junction.
Count: 2 post sc, 2 top sc, 2 loops, 3 sl st.
Fan 2: Work 3 sc up the outer dc post. Sc in top of the outer spoke, (ch 3, sc in next spoke top) 2 times, ch 3. Sl st in the 2 Fan 3 stem ch and in the Fan 3 ring junction.
Count: 3 post sc, 3 top sc, 3 loops, 3 sl st.
Fan 3: Work the same as Fan 2, connecting to Fan 4’s stem and ring.
Count: 3 post sc, 3 top sc, 3 loops, 3 sl st.
Fan 4: Work 4 sc up the outer tr post. Sc in top of the outer spoke, (ch 3, sc in next spoke top) 3 times, ch 3. Sl st in the center spoke at the base of the hanging loop.
Count: 4 post sc, 4 top sc, 4 loops, 1 sl st.
Right edge total: 12 loops, 24 sc, 10 sl st.
Fasten off with a 6 in (15.2 cm) tail.
Why the Math Works
Every fan has an odd number of spokes: 5, 7, 7, and 9. The center spoke divides each arc into two equal halves of (spokes − 1) ÷ 2 spokes: 2, 3, 3, and 4.
Each half gets that many ch-3 loops and that many top sc. Both edges therefore total 2 + 3 + 3 + 4 = 12 loops and 12 top sc.
Every non-center spoke gets exactly one sc: 4 + 6 + 6 + 8 = 24 spoke tops, split 12 per edge. The center spokes carry the stems and the hanging loop instead.
Post sc follow the border gauge: 2 + 3 + 3 + 4 = 12 per edge. The two edges mirror each other exactly, so the ornament stays symmetrical.
Final Blocking
- Weave the starting tail up through the 4-ch tip stem to firm the point. Weave the final tail into the hanging loop base.
- Wet the ornament in cool water. For a stiffer finish, soak it in diluted fabric stiffener instead. Press out excess water in a towel.
- Lay it flat on the blocking mat with the tip pointing down.
- Pin the tip, then each fan’s center spoke, in a straight vertical line.
- Open each fan into a semi-circle. Pin the outer spoke tips level with the ring junction.
- Pin each ch-3 loop outward into a rounded scallop.
- Check widths: 1.3 in (3.3 cm), 1.5 in (3.8 cm), 1.7 in (4.3 cm), 1.9 in (4.8 cm). Check that the body is 3.5 in (8.9 cm) long.
- Let it dry completely before unpinning. Spray starch now if you skipped stiffener.
Final Quality-Control Checklist
- 4 fans with 5, 7, 7, and 9 spokes
- Fans increase in size from tip to top
- Every center spoke lines up on one vertical line
- 12 ch-3 loops on each edge, 24 total
- No spoke top skipped or doubled in the border
- Hanging loop is firm and centered over Fan 4
- Tip is tight and pointed
- Total length 4.5 in (11.4 cm), within ±0.1 in (0.3 cm)
- All tails woven in securely
Troubleshooting
Spokes crowd and won’t lie in a semi-circle: Your ring is too tight. Work the ring ch more loosely, or slide the spokes along the ring before closing the row.
Fan cups or ruffles: The ch spaces are too loose. Keep chains the same size as your stitch tops.
Next fan sits off-center: The travel row ended on the wrong spoke. Recount the sl sts: 5, 7, 7, 9.
Border loop count is off on one edge: Count the top sc on each half. It should be 2, 3, 3, 4 per edge.
Edge pulls in along spoke posts: Your post sc are too tight. Relax tension rather than adding stitches.
Tip is floppy: Weave the tail through the stem twice, or add a drop of stiffener to the tip.
Care
Hand wash in cool water and lay flat to dry, reshaping the fans. Re-stiffen after washing if you used fabric stiffener.

Final Notes
The measurement chain is simple. The fans measure 0.9 in (2.3 cm), 1.1 in (2.8 cm), 1.3 in (3.3 cm), and 1.5 in (3.8 cm) wide. The body reaches 3.3 in (8.4 cm) long before the border. The 0.2 in (0.5 cm) border brings the widths to 1.3 in (3.3 cm) through 1.9 in (4.8 cm) and the body to 3.5 in (8.9 cm). The hanging loop adds 1.0 in (2.5 cm), for 4.5 in (11.4 cm) overall.
Check each stage as you go, and the finished ornament will match.
Happy crocheting!