

The Frosted Halo Snowflake Wreath is a full, lacy holiday wreath made of small six-pointed snowflakes. It is joined into a ring around an open center. Crisp white cotton makes every picot and spoke stand out against a dark door. A red ribbon at the top finishes the look.
The style is classic thread-lace snowflake. Each motif is airy, with dc groups, chain spaces, and trefoil-tipped points. A second layer of small snowflakes is sewn on top, which gives the wreath its dimensional, densely packed look.
This pattern uses US crochet terms. The finished wreath measures about 22 in (55.9 cm) across, with a center opening of about 10.25 in (26.0 cm).
Construction is simple. You make two sizes of snowflake and join 12 large flakes point-to-point into a ring as you go. You then join 12 small flakes to the inside of the ring and sew 12 more small flakes on top. A short inner border ties the inside points together. Starch blocking finishes the wreath.
Finished Size and Construction
- Finished size: about 22 in (55.9 cm) outer diameter
- Center opening: about 10.25 in (26.0 cm) after border
- Skill level: Intermediate
- Terminology: US
- Yarn weight: #1 super fine (fingering) mercerized cotton
- Hook: 2.25 mm (B-1)
- Number of pieces: 36 snowflakes (12 Large, 24 Small)
- Layout: base ring of 12 Large; inner ring of 12 Small; top layer of 12 Small
- Piece size: Large 4.5 in (11.4 cm) and Small 3 in (7.6 cm), point to point
- Size before border: 22 in (55.9 cm) outer, with an opening of about 10.75 in (27.3 cm)
- Border depth: about 0.25 in (0.6 cm), worked on the inner edge only
Materials
Yarn: Use mercerized cotton in fingering weight, at about 340 m per 100 g. Mercerized cotton holds starch well and keeps the points sharp. Avoid acrylic, which won’t hold a stiff shape.
- White: 100 g (about 340 m)
Tools:
- 2.25 mm (B-1) crochet hook
- Tapestry needle
- Rust-proof pins
- Foam blocking boards
- Fabric stiffener or heavy spray starch
- Paper, a pencil, and string for a ring template
- Plastic wrap
- Red satin ribbon, 1.5 in (3.8 cm) wide by 36 in (91.4 cm) long
The quantities include a margin of about 50% for swatching, joining tails, and the border.
Abbreviations (US Terms)
- ch: chain
- sl st: slip stitch
- sc: single crochet
- dc: double crochet
- sp: space
- MR: magic ring
- st(s): stitch(es)
Special stitches
- Picot: ch 3, sl st in 3rd ch from hook.
- Trefoil (tref): ch 4, sl st in 4th ch from hook (1st picot), [ch 3, sl st in same ch] 2 times. This makes 3 picots. The middle picot is the joining picot.
- Joining trefoil: work as a trefoil, but replace the middle picot with: ch 1, sl st in the middle picot of the neighbor flake, ch 1, sl st in same ch.
- Spoke-6: ch 6, tref, sl st in each of the 6 ch back toward the flake.
- Spoke-4: ch 4, tref, sl st in each of the 4 ch back toward the flake.
Gauge and Checkpoints
Make one Small flake and one Large flake before anything else. Block both lightly and measure them.
- After Rnd 3 (both sizes): 1.5 in (3.8 cm) across
- Large after Rnd 4: 2.25 in (5.7 cm) across
- Large finished: 4.5 in (11.4 cm), point to point
- Small finished: 3 in (7.6 cm), point to point
- Chain/sc gauge: 8 ch or 8 sc = 1 in (2.5 cm)
If your flakes are too big, go down to a 2.0 mm hook. If they are too small, go up to a 2.5 mm hook.
Accuracy matters most on the Large flake. Twelve of them set the ring’s size: each flake that is 0.25 in (0.6 cm) too wide adds about 1 in (2.5 cm) to the wreath’s diameter.
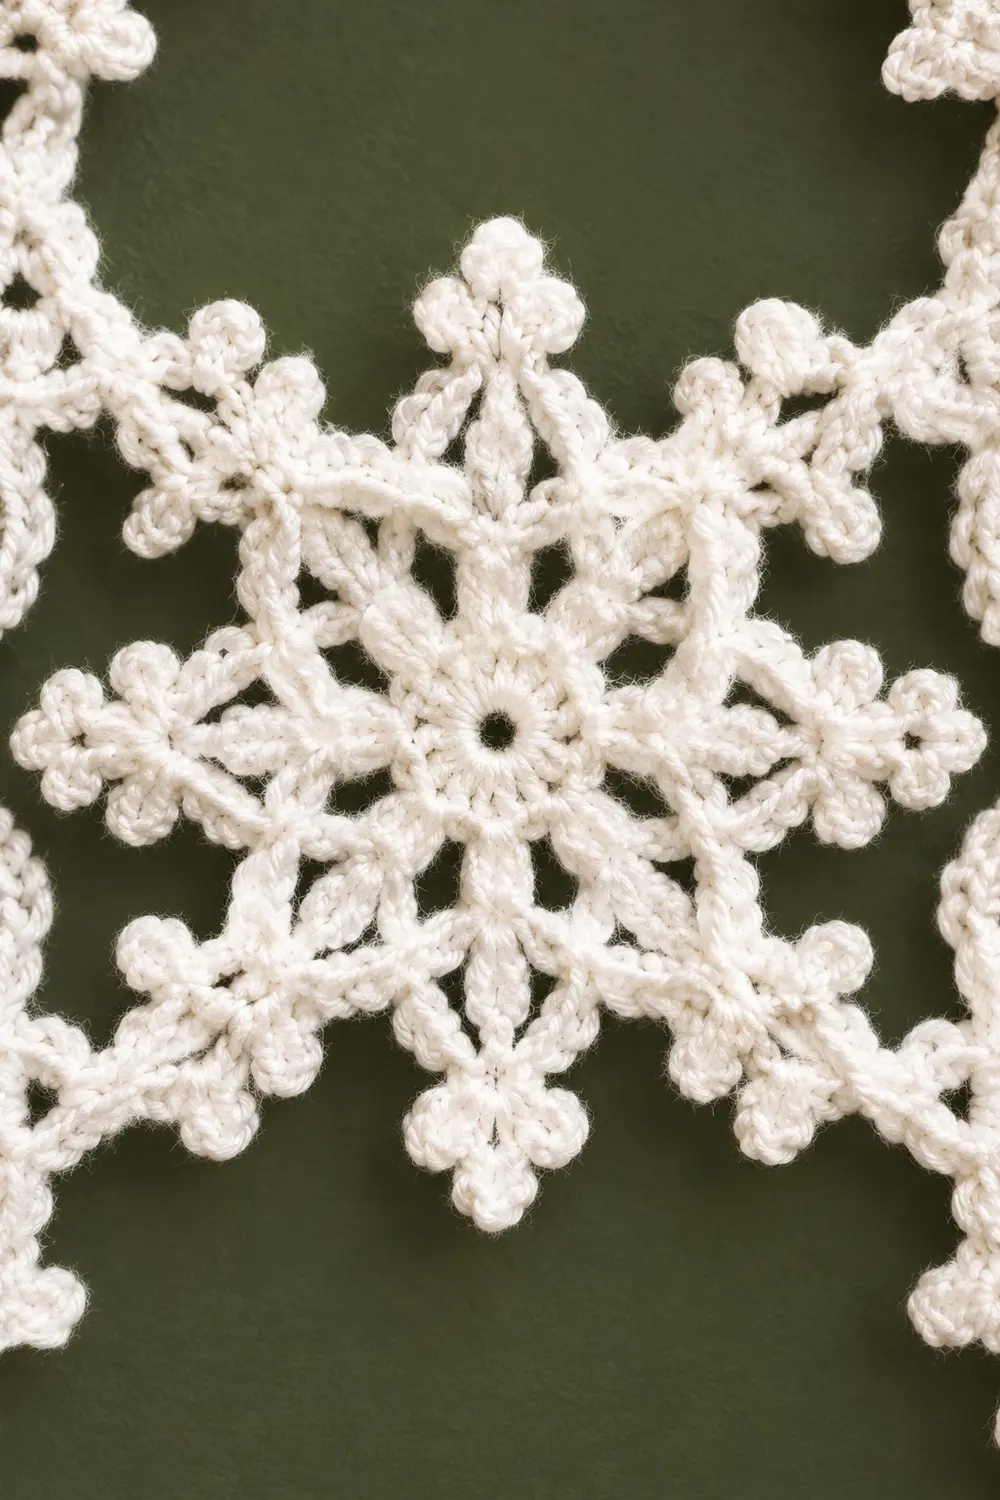
Snowflake Center (Rounds 1-3, Both Sizes)
Rnd 1: MR, ch 3 (counts as dc), 11 dc in ring, sl st to top of ch-3. (12 dc)
Rnd 2: Ch 1, sc in same st, ch 4, skip next st, sc in next st, ch 4, skip next st 5 times, sl st to first sc. (6 sc, 6 ch-4 sps)
Rnd 3: Sl st in first ch-4 sp, ch 3 (counts as dc), (dc, ch 2, 2 dc) in same sp, (2 dc, ch 2, 2 dc) in next ch-4 sp 5 times, sl st to top of ch-3. (24 dc, 6 ch-2 sps)
Check: 1.5 in (3.8 cm) across.
Small Snowflake
Work Rnds 1-3 of the Snowflake Center, then:
Rnd 4: Sl st in next dc and into ch-2 sp, ch 1.
(sc, Spoke-4, sc) in ch-2 sp, ch 2, sc in sp between the next two 2-dc groups, ch 2.
Repeat from * 5 more times, then sl st to first sc. (18 sc, 6 spokes, 12 ch-2 sps)
Fasten off, leaving a 10 in (25.4 cm) tail on the 12 top-layer flakes for sewing. Number the spokes 1-6 in working order.
Check: 3 in (7.6 cm), point to point.
Large Snowflake
Work Rnds 1-3 of the Snowflake Center, then:
Rnd 4: Sl st in next dc and into ch-2 sp, ch 3 (counts as dc), (dc, ch 3, 2 dc) in same sp, ch 3, sc in sp between groups, ch 3.
(2 dc, ch 3, 2 dc) in next ch-2 sp, ch 3, sc in sp between groups, ch 3.
Repeat from * 4 more times, then sl st to top of ch-3.
(24 dc, 6 sc, 6 tip ch-3 sps, 12 side ch-3 sps)
Check: 2.25 in (5.7 cm) across.
Rnd 5: Sl st in next dc and into tip ch-3 sp, ch 1.
(sc, Spoke-6, sc) in tip sp, 3 sc in next side sp, picot, 3 sc in next side sp.
Repeat from * 5 more times, then sl st to first sc. Skip the dc and sc of Rnd 4 throughout; work only into the spaces.
(48 sc, 6 spokes, 6 side picots)
Each repeat holds 2 + 3 + 3 = 8 sc, and 8 × 6 = 48.
Check: 4.5 in (11.4 cm), point to point. Number the spokes 1-6 in working order.
Make All Pieces
All pieces are White.
- Large flakes: 12. L1 is made complete; L2-L12 are joined as you go.
- Small flakes, inner ring: 12, joined as you go (S1-S12).
- Small flakes, top layer: 12, made complete with long tails (T1-T12).
Layout grid (clockwise from the top, with L1 at top center):
BASE RING:   L1  L2  L3  L4  L5  L6  L7  L8  L9  L10 L11 L12
JUNCTIONS:   L1/L2  L2/L3  L3/L4 ... L11/L12  L12/L1
INNER RING:  S1 under L1/L2, S2 under L2/L3 ... S12 under L12/L1
TOP LAYER:   T1 on L1, T2 on L2 ... T12 on L12
Joining
Method: Join as you go at the middle picot of each trefoil, during the last round of each flake.
Base ring (stitch-to-stitch logic):
- Make L1 complete.
- Work L2 through Rnd 5. On spoke 1, use a joining trefoil into L1’s spoke 4. Finish the round.
- Continue the same way: each new Large flake’s spoke 1 joins the previous flake’s spoke 4.
- On L12, join spoke 1 to L11’s spoke 4, and spoke 4 to L1’s spoke 1. This closes the ring.
Spokes 1 and 4 sit opposite each other. That leaves spokes 2-3 on the outside edge and spokes 5-6 on the inside.
Each flake adds 4.5 in (11.4 cm) of tip-to-tip length, so 12 × 4.5 in = 54 in (137.2 cm) of polygon perimeter. That sets the centerline diameter at about 17.4 in (44.2 cm). Adding half a Large flake on each side gives about 22 in (55.9 cm) overall.
The lace flexes about 15° at each junction to make the curve. Don’t force it flat yet; blocking sets the curve.
Inner ring:
- Work S1 through Rnd 4.
- On spoke 1, use a joining trefoil, working the sl st into the joined middle picot at the L1/L2 junction. The new picot shares that junction.
- Finish the round.
- Repeat for S2-S12 at each following junction.
Each Small flake hangs inward, with spoke 4 pointing at the wreath’s center.
Tension advice: Keep the join ch-1s loose. A tight join pulls the trefoil out of shape and puckers the ring. If a junction twists, undo just that trefoil and rework it.
Size checkpoint: Lay the joined piece flat. It should measure about 22 in (55.9 cm) outer and about 10.75 in (27.3 cm) between opposite inward spokes.
Top layer: Wait until after the border.
Border
The border runs only around the inner opening. It ties the 12 inward points into a smooth circle, so the Small flakes stay put. The outer edge stays open to show the snowflake points.
Border gauge: 8 sc = 1 in (2.5 cm).
Segment math: The inward points sit about 2.75 in (7.0 cm) apart, measured straight across. At 8 sts/in, 2.75 in × 8 = 22 sts per segment. There are 12 segments, one per Small flake, so 12 × 22 = 264 sts.
Rnd 1: Join yarn with sc into the middle picot of S1’s spoke 4, ch 21. Sc in middle picot of next Small flake’s spoke 4, ch 21. Repeat from * 10 more times, then sl st to first sc.
(12 sc + 12 ch-21 sps = 12 + 252 = 264 sts; 22 per segment)
Rnd 2 (conversion round): Ch 1, sc in next sc, 21 sc in next ch-21 sp (1 sc per chain). Repeat 11 more times, then sl st to first sc.
(12 sc worked into sc + 252 sc worked 1 per chain = 264 sc; 22 per segment)
No stitches are added in this round. It only turns the chains into a solid band.
Rnd 3 (picot trim): Ch 1, sc in next 11 sc, picot. Repeat 23 more times, then sl st to first sc. Fasten off.
(264 sc worked 1 per st + 24 picots; 2 picots per segment)
Why the math works: At 8 sts/in, 264 sts = 33 in (83.8 cm). That is just under the 33.5 in (85.1 cm) straight-line distance around the 12 inward points. The band is snug by design, so it pulls each point taut without cupping. Each segment’s 22 sts divide evenly into 2 picot repeats of 11, so the picots sit at the same spot in every segment.
Top layer: Place T1-T12 on the front, centered on each Large flake. Rotate each one 30° so its spokes fall between the Large flake’s spokes. Tack the center and each of the 6 trefoils with 2-3 small whipstitches.
Final Blocking
- Draw two circles on paper: 22 in (55.9 cm) and 10.25 in (26.0 cm) across. Mark 12 evenly spaced lines out from the center.
- Cover the template with plastic wrap and lay it over the foam boards.
- Soak the wreath in fabric stiffener, or in starch mixed per the label. Press out the excess with a towel.
- Lay the wreath face up. Line up each L junction with a marked line.
- Pin the outer spokes 2-3 of each Large flake to the 22 in (55.9 cm) circle, with one pin through each trefoil’s middle picot.
- Pin the inner border edge to the 10.25 in (26.0 cm) circle.
- Open every picot and side picot with a pin tip. Lift the top-layer flakes slightly for depth.
- Dry fully, for 24-48 hours, before unpinning.
- Thread the ribbon behind L1, around the base ring, and tie a loop for hanging.
Final Quality-Control Checklist
- 12 Large flakes, each 4.5 in (11.4 cm), with 48 sc, 6 spokes, and 6 side picots
- 24 Small flakes, each 3 in (7.6 cm), with 18 sc and 6 spokes
- 12 junctions, each with an inner Small flake attached
- Border of 264 sc with 24 picots, evenly spaced
- Outer diameter about 22 in (55.9 cm)
- Opening about 10.25 in (26.0 cm)
- Every trefoil open and pinned symmetrically
- Top-layer flakes tacked at the center and all 6 tips
- Wreath dry and stiff, and lies flat when hung
Troubleshooting
Ring won’t close flat: Your Large flakes vary in size. Measure them all and remake any that are off by more than 0.25 in (0.6 cm).
Ring ruffles: The flakes are too big. Use a smaller hook for any you remake, and block firmly to the template.
Border cups inward: Your chains are too tight. Rework Rnd 1 with a looser chain or a hook one size up.
Border waves: Your chains are too loose. Use a hook one size down for Rnd 1.
Spokes curl: Work the sl sts down the spoke into the back bump, and re-starch.
Top layer droops: Add tacking stitches at the tips and stiffen again.
Care
Spot clean with cool water only. Store flat in a box between seasons, and refresh the starch if the wreath softens.

Final Notes
Every measurement depends on the one before it:
- Rounds 1-3 measure 1.5 in (3.8 cm).
- The Large flake measures 4.5 in (11.4 cm), and the Small flake 3 in (7.6 cm).
- Twelve joined Large flakes give a 22 in (55.9 cm) ring.
- The inward points sit 2.75 in (7.0 cm) apart, which sets 22 border sts per segment and 264 total.
- Blocking sets the opening at 10.25 in (26.0 cm).
Check each stage before you move on, and the wreath will come out round, full, and crisp.
Happy crocheting!