

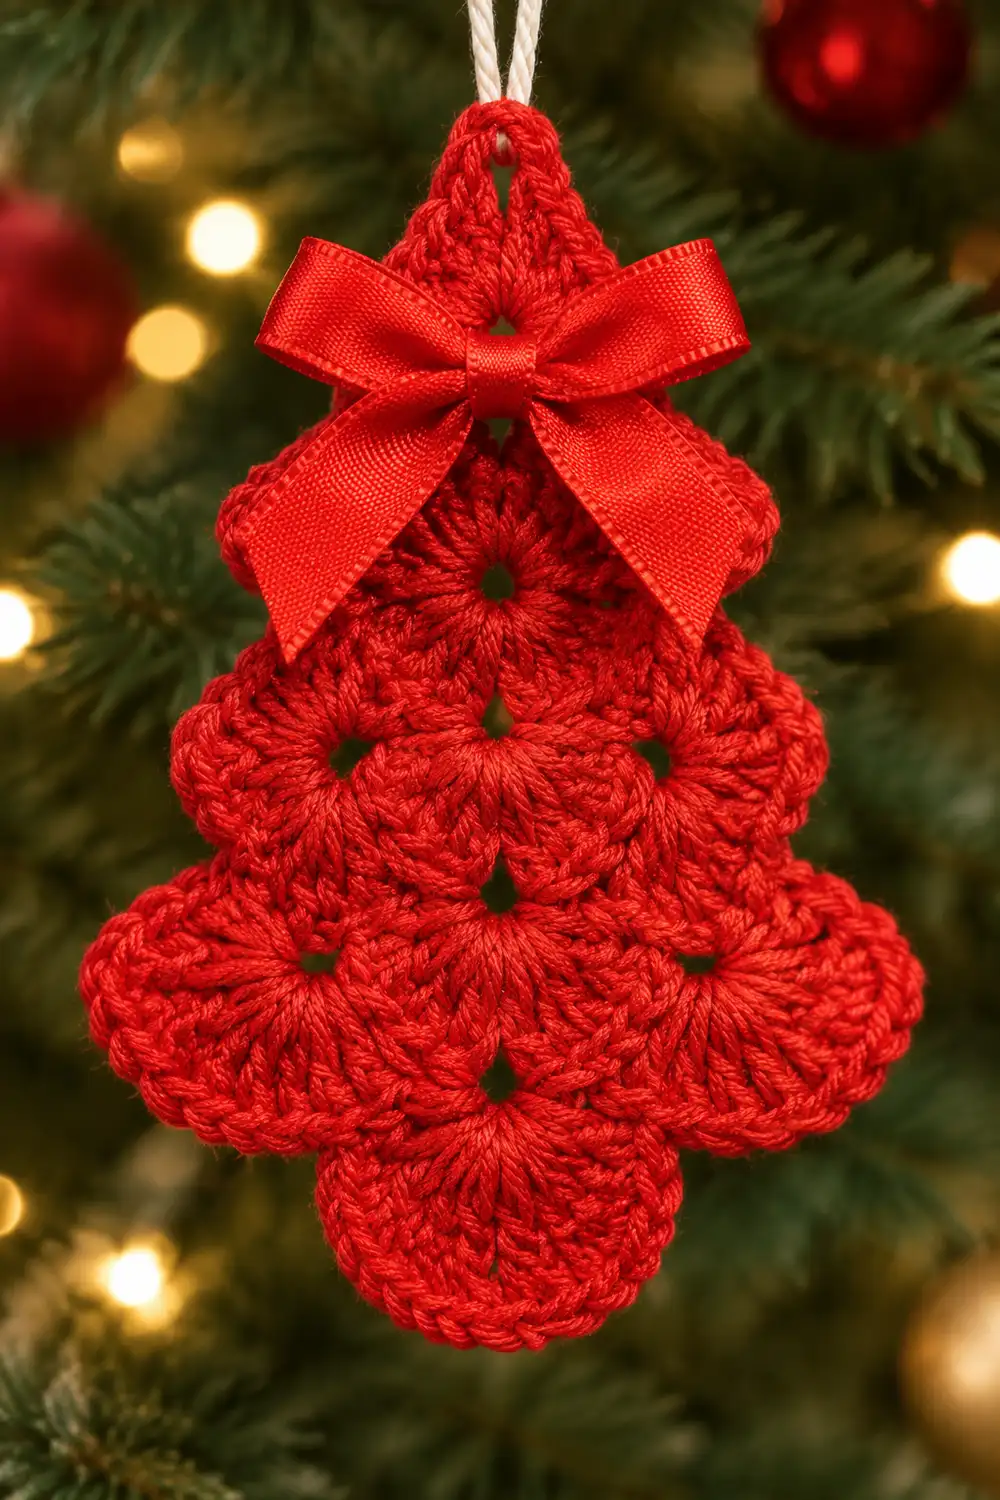
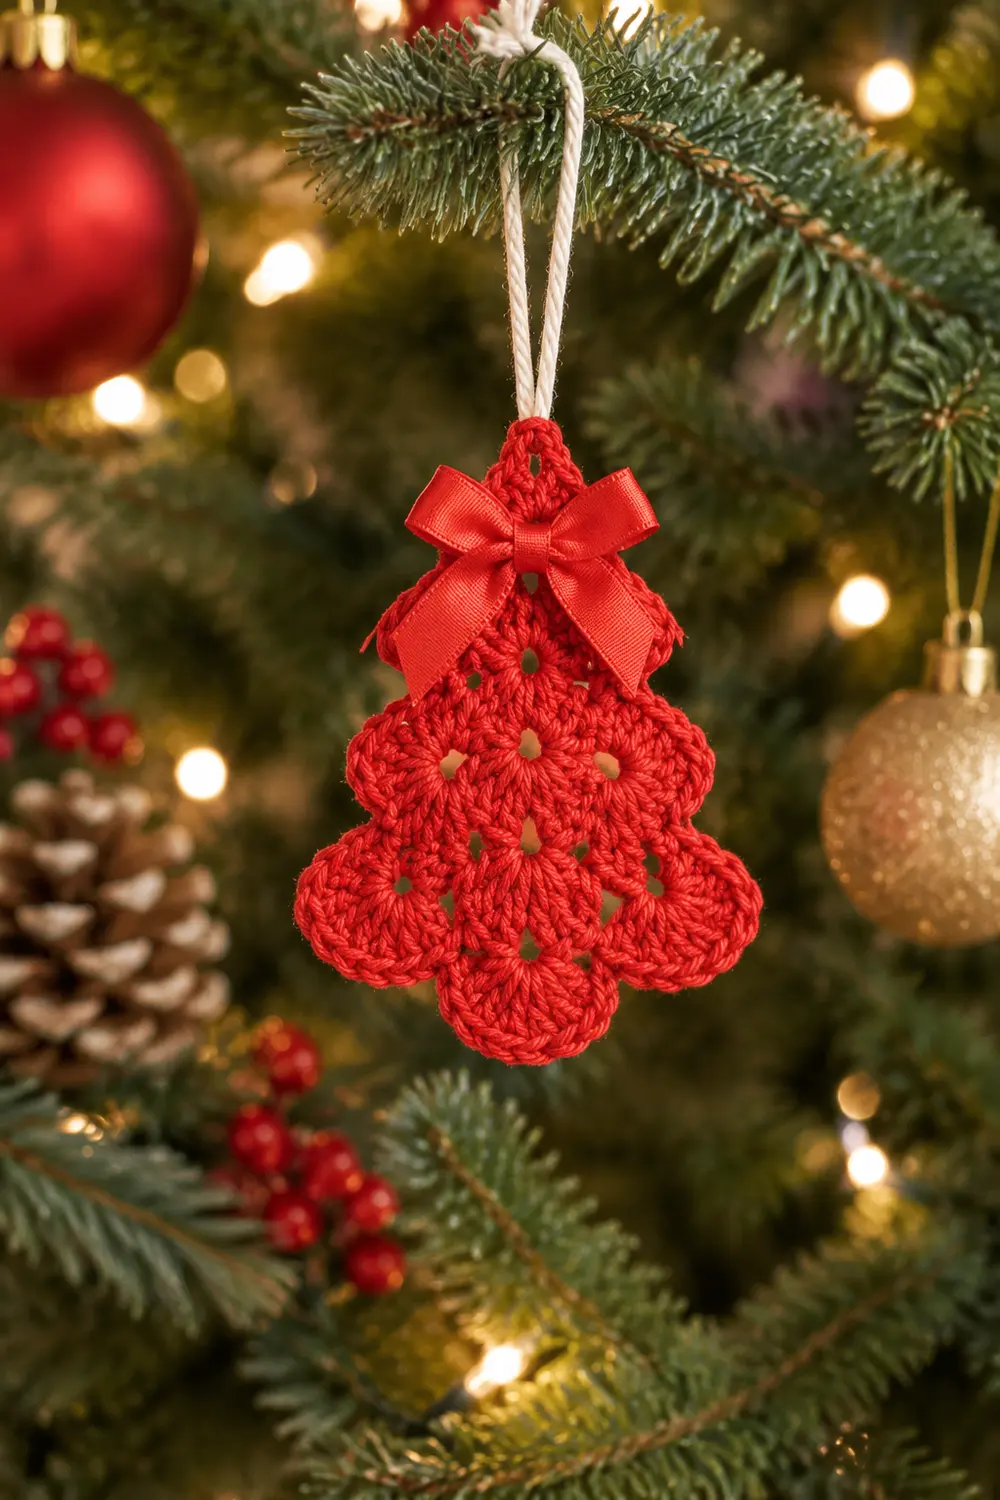
This little tree is a single flat crochet ornament worked entirely in bright red yarn. Rows of fan-shaped shells stack from a wide base to a narrow top, and each row steps inward so the edges form tiers like evergreen branches. A small pointed crown finishes the top.
A red satin ribbon bow sits at the crown, and a loop of white baker’s twine makes the hanger. It looks lovely on a tree, tied to a gift, or clipped to a card.
The pattern uses US crochet terms. The finished ornament measures about 3.5 in (8.9 cm) tall and 3.75 in (9.5 cm) wide after the border and blocking.
Construction is simple. You chain a foundation, work one row of single crochet, then work five shell rows. Each shell row has one fewer shell than the row below (5, 4, 3, 2, 1). A pointed crown row and one round of single crochet border finish the piece. Then you block it and add the twine hanger and bow.
Finished Size and Construction
- Finished size: 3.5 in (8.9 cm) tall x 3.75 in (9.5 cm) wide
- Skill level: Easy / advanced beginner
- Terminology: US crochet terms
- Yarn weight: DK (#3), worked firmly
- Hook: 3.0 mm
- Number of pieces: 1
- Layout: Single flat tree shape, worked in rows from the bottom up
- Piece size: Same as finished size, 3.5 in (8.9 cm) x 3.75 in (9.5 cm)
- Size before border: 3.25 in (8.3 cm) tall x 3.5 in (8.9 cm) wide
- Border depth: About 0.125 in (0.3 cm), one round of sc
Materials
Yarn: Choose a smooth DK yarn in bright red. Mercerized cotton or a cotton blend gives the crispest shells and holds its shape on a tree. Acrylic works too, but it may need light stiffening to stay flat. Avoid fuzzy or highly textured yarns because they blur the shell outlines.
- Red (DK): about 8 g (20 m)
Quantities include a margin for your gauge swatch (the first tree) and weaving in ends.
Tools and notions:
- 3.0 mm crochet hook
- Tapestry needle
- Scissors
- Red satin ribbon, 3/8 in (1.0 cm) wide, 10 in (25.4 cm) long
- White baker’s twine, 8 in (20.3 cm)
- Red sewing thread and a sharp needle (to secure the bow)
- Rustproof pins and a foam blocking mat
- Spray bottle with water
- Optional: fabric stiffener
Abbreviations (US Terms)
- ch – chain
- sl st – slip stitch
- sc – single crochet
- hdc – half double crochet
- dc – double crochet
- sk – skip
- sp – space
- st(s) – stitch(es)
- RS – right side
Special stitches:
- Shell: (2 dc, ch 2, 2 dc) all in the same stitch. Each shell contains 4 dc and 1 ch-2 sp.
- Crown group: (sc, hdc, dc, ch 2, dc, hdc, sc) all in the same ch-2 sp. It contains 6 stitches and 1 ch-2 tip.
Gauge and Checkpoints
Gauge: 6 sc = 1 in (2.5 cm) in the foundation row. One shell row = 0.5 in (1.3 cm) tall.
For an ornament this small, the first tree is your gauge swatch. Make one, measure it at each checkpoint, and adjust before making more.
Checkpoints:
- After Row 1: 21 sc measure 3.5 in (8.9 cm) wide and about 0.25 in (0.6 cm) tall.
- After Row 2: Total height is 0.75 in (1.9 cm). The width stays 3.5 in (8.9 cm).
- After Row 4: Total height is 1.75 in (4.4 cm).
- After Row 6: Total height is 2.75 in (7.0 cm).
- After Row 7 (crown): Total height is 3.25 in (8.3 cm). This is the size before the border.
- After border and blocking: 3.5 in (8.9 cm) tall x 3.75 in (9.5 cm) wide.
If your piece is too big: Go down to a 2.75 mm hook, or tighten your tension on the dc so the shells stand less tall.
If your piece is too small: Go up to a 3.25 mm hook.
Height can also drift if your dc are much taller or shorter than average. If the width is correct but the height is off by more than 0.25 in (0.6 cm), change only your dc tension (pull the first loop up less or more) rather than the hook.
Pattern
Foundation
Row 1: Ch 22. Sc in 2nd ch from hook and in each ch across, turn. (21 sc)
Check: 3.5 in (8.9 cm) wide.
Shell Rows
Each shell row skips 1 stitch on either side of each shell. Starting with Row 3, you slip stitch across the top of the first half-shell, so the row begins at the center of the first shell below. This step-in creates the tiered edge.
Row 2 (5 shells): Ch 1, sc in first st. Sk 1 st, shell in next st, sk 1 st, sc in next st. Repeat from * 4 more times, turn. (5 shells, 6 sc: 20 dc, 6 sc, 5 ch-2 sps)
Stitch check: 1 sc + (5 repeats x 4 sts used) = 21 sts used. This matches Row 1 exactly, so the last sc lands in the last stitch.
Row 3 (4 shells): Sl st in first sc, in each of next 2 dc, and into the first ch-2 sp. Ch 1, sc in same ch-2 sp. Shell in next sc (between shells), sc in next ch-2 sp. Repeat from * 3 more times, turn. (4 shells, 5 sc)
Leave the last 2 dc and the final sc of Row 2 unworked. They become the tier edge on that side.
Row 4 (3 shells): Sl st in first sc, in each of next 2 dc, and into the first ch-2 sp. Ch 1, sc in same sp. Shell in next sc, sc in next ch-2 sp. Repeat from * 2 more times, turn. (3 shells, 4 sc)
Check: total height 1.75 in (4.4 cm).
Row 5 (2 shells): Work as Row 4, repeating from * 1 more time. (2 shells, 3 sc)
Row 6 (1 shell): Sl st in first sc, in each of next 2 dc, and into the ch-2 sp. Ch 1, sc in same sp. Shell in next sc, sc in next ch-2 sp, turn. (1 shell, 2 sc)
Check: total height 2.75 in (7.0 cm).
Each row’s shells sit in the sc between the shells below. Every row is therefore centered, and its span shrinks by 2 stitches on each side.
Crown
Row 7: Sl st in first sc, in each of next 2 dc, and into the ch-2 sp. Ch 1, crown group in the same ch-2 sp. Fasten off. (6 sts + 1 ch-2 tip)
The rising sc–hdc–dc on each side and the ch-2 at the top form a pointed crown.
Check: 3.25 in (8.3 cm) tall x 3.5 in (8.9 cm) wide.
Weave in the starting tail along the foundation chain. Leave the crown tail for now, or weave it into the crown.
Border
The border is one round of sc that outlines the tree. It tidies the tier edges without hiding the shells.
Border gauge: 6 sc = 1 in (2.5 cm), the same as the foundation row. On the bottom edge, you work 1 sc per foundation chain. On the stepped sides, you work 5 sc per tier. Each tier edge measures about 0.85 in (2.2 cm): the outer dc post rises roughly 0.5 in (1.3 cm), and the two dc tops plus half the ch-2 sp run roughly 0.35 in (0.9 cm). At 6 sc per inch, 5 sc cover 0.83 in, so the border lies flat.
Choosing the RS: Pick the neater side as the RS and keep it facing you.
Where to work on the sides: Rows begin with slip stitches on one side. On that side, work border sc into the slip stitches that sit on top of the dc. On the other side, work directly into the unworked dc tops.
Border Round: Join yarn in the first unused loop of the foundation chain at the bottom right corner.
Bottom (25 sc): Ch 1, 3 sc in the first ch. Sc in each of the next 19 ch. 3 sc in the last ch.
Count: 21 sc worked 1 per foundation ch + 4 extra corner sc (2 extra at each corner) = 25 sc. The bottom corners belong to this count only.
First side, going up (25 sc):
- 1 sc in the side of Row 1.
- Rows 2–5: For each row, work 2 sc around the post of the outer dc, sc in each of the 2 outer dc tops, and sc in the ch-2 sp (where the next row’s first sc sits). That is 4 tiers x 5 sc = 20 sc.
- Row 6: 2 sc around the post of the outer dc, then sc in each of the 2 outer dc tops (4 sc). The Row 6 ch-2 sp holds the crown, so you move straight onto it.
Count: 1 + 20 + 4 = 25 sc.
Crown (8 sc + ch-2): Sc in the crown sc, sc in the hdc, and sc in the dc. In the ch-2 tip, work (sc, ch 2, sc). Sc in the next dc, hdc, and sc.
Count: 3 + 2 + 3 = 8 sc and 1 ch-2 tip.
Second side, going down (25 sc): Mirror the first side.
- Row 6: sc in each of the 2 outer dc tops, then 2 sc around the post.
- Rows 5–2: For each row, sc in the ch-2 sp, sc in each of the 2 outer dc tops, and 2 sc around the post (20 sc).
- 1 sc in the side of Row 1.
Count: 25 sc.
Sl st to the first sc to join. Fasten off and weave in the end.
Round total: 25 + 25 + 8 + 25 = 83 sc + 1 ch-2 tip.
Why the math works: The bottom uses exactly 1 sc per foundation chain, so it keeps the 3.5 in (8.9 cm) width. Only the 4 corner extras are added, and they turn the corners. Both sides follow the same 5 tiers, so they match stitch for stitch, and the tree stays symmetrical. The extra ch-2 at the crown keeps the tip sharp instead of rounding it off. The round adds about 0.125 in (0.3 cm) on every edge, which brings the tree to 3.5 in (8.9 cm) x 3.75 in (9.5 cm).
Final Blocking
- Wet the piece. Spray the tree until it is evenly damp, or dip it in cool water and press out the excess in a towel.
- Pin the base. Pin the bottom edge straight at 3.75 in (9.5 cm) wide, with one pin at each corner.
- Pin the tiers. Pin the outer corner of each tier on both sides. Measure across each tier to check that it matches its mirror tier.
- Pin the crown. Pin through the ch-2 tip so the tree measures 3.5 in (8.9 cm) from the bottom edge to the tip. Open each shell’s ch-2 sp gently with a fingertip.
- Dry. Let it dry completely, usually several hours. For a stiffer ornament, brush on diluted fabric stiffener before drying.
- Add the hanger. Fold the 8 in (20.3 cm) twine in half. Thread the folded end from front to back through the crown’s border ch-2 tip. Pull the tails through the fold and tighten, then knot the tails together about 3 in (7.6 cm) above the tip.
- Add the bow. Tie the 10 in (25.4 cm) ribbon into a bow about 1.25 in (3.2 cm) wide. Trim the tails at an angle. Place it at the base of the crown, over the twine join, and stitch through the knot center with red thread so it stays put.
Final Quality-Control Checklist
- Row stitch counts were correct: 21 sc, then 5 / 4 / 3 / 2 / 1 shells.
- Each shell row is centered over the row below.
- The tiers on the left and right match in size.
- The crown point is centered and sharp.
- Border counts are 25 sc bottom, 25 sc per side, and 8 sc + ch-2 at the crown.
- Finished size is 3.5 in (8.9 cm) tall x 3.75 in (9.5 cm) wide.
- The piece lies flat with no cupping or ruffling.
- All ends are woven in securely.
- The twine loop is about 3 in (7.6 cm) tall and firmly knotted.
- The bow is centered and stitched down.
Troubleshooting
The last shell doesn’t fit at the end of Row 2. Recount Row 1. You need exactly 21 sc.
A shell row is off-center. You probably skipped or added a slip stitch at the start. Each step-in is exactly 1 sc + 2 dc + the ch-2 sp.
The edges ruffle after the border. Your border is too loose. Go down a hook size for the border round only, or work 1 sc (not 2) around each post.
The edges cup or pull in. Your border is too tight. Go up a hook size for the border round only.
The tree is too squat. Your dc are short. Pull up the first loop of each dc slightly higher.
The crown is rounded. Make sure you worked the ch-2 in both the crown group and the border tip.
The tree won’t hang straight. Re-thread the twine so it sits exactly in the center of the tip, then re-block.
Care
Hand wash in cool water, press dry in a towel, and reshape flat to dry. Remove the bow before washing if it is not colorfast.
Final Notes
The measurement chain is short and reliable:
- The foundation row sets the width at 21 sc = 3.5 in (8.9 cm).
- Each of the five shell rows adds 0.5 in (1.3 cm) of height.
- The crown brings the piece to 3.25 in (8.3 cm) tall.
- One sc border round adds 0.125 in (0.3 cm) per edge, for a finished 3.5 in (8.9 cm) x 3.75 in (9.5 cm).
Check your numbers at each stage and the tree will come out symmetrical every time.
Optional: make several trees for a gift-tag set.
Happy crocheting!