

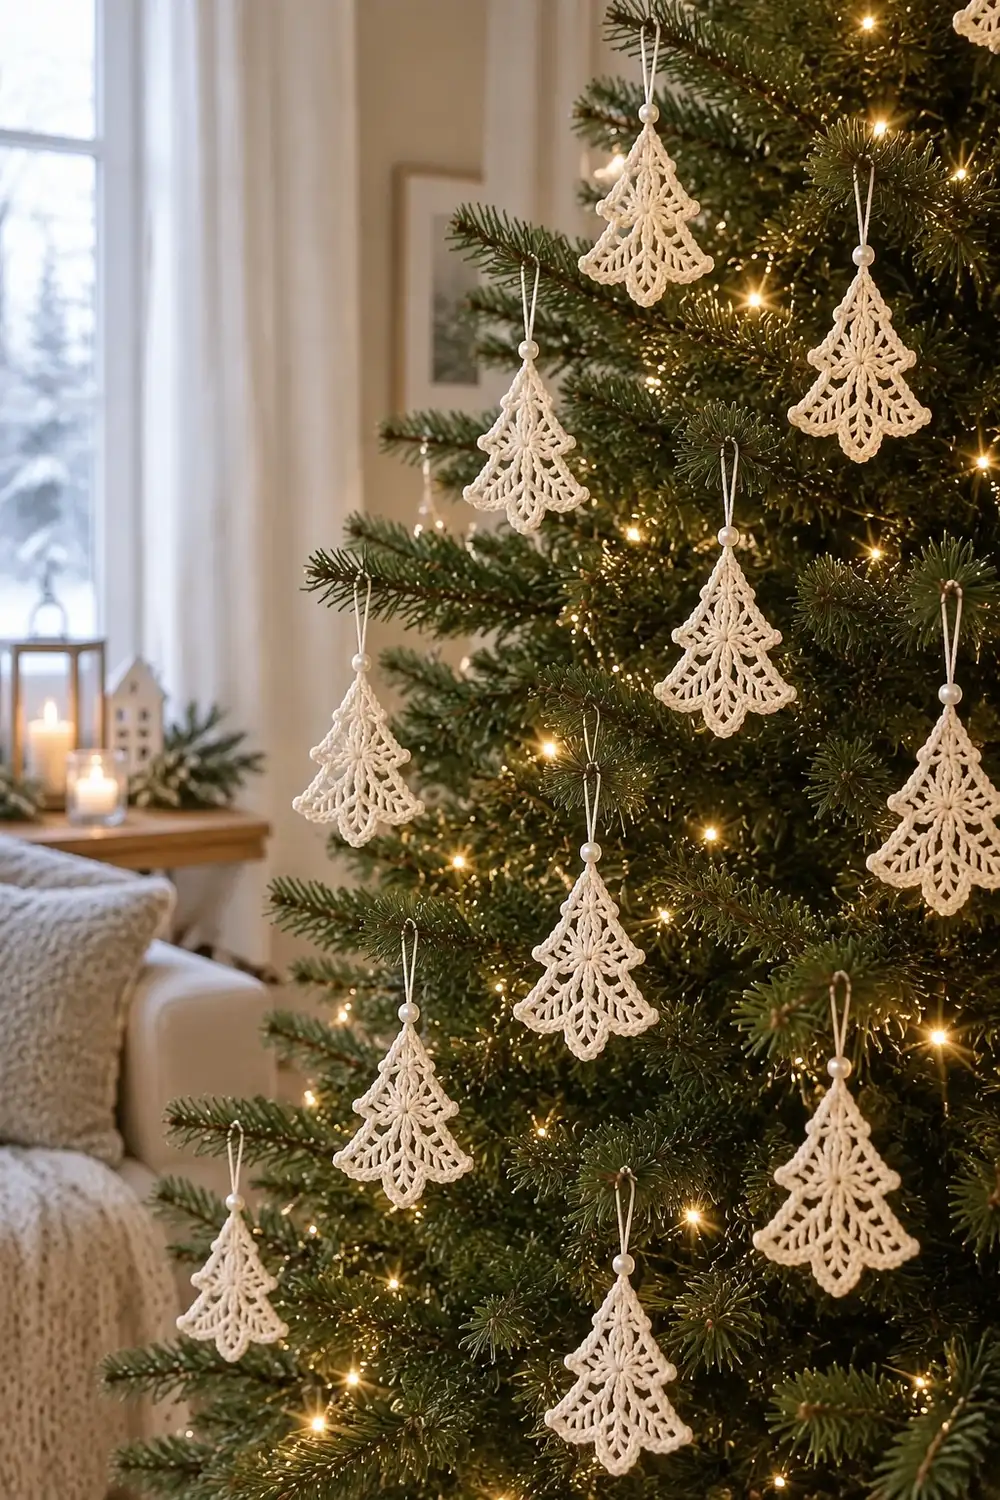
These little lace trees look like frost on a windowpane. Each ornament is a tall cream triangle with a pointed top, an open brick-mesh body, and a scalloped shell edge. Hung from a looped string with a small cream pearl bead, they catch the glow of warm tree lights beautifully.
The style is classic heirloom thread crochet, worked in one soft color: cream or off-white. Make a whole set and scatter them through the branches at different depths so the openwork shows from every angle.
This pattern uses US crochet terms. Each finished ornament measures about 3.75 in (9.5 cm) tall and 3.125 in (7.9 cm) wide at the base, not counting the hanging loop.
Each tree is one piece. You work a triangle from the tip down in rows of staggered dc mesh, which widens by 2 stitches every row. Then you work a single-crochet round and a shell round all the way around, add a looped string and bead, and starch it flat.
Finished Size and Construction
- Finished size (one ornament): 3.75 in (9.5 cm) tall x 3.125 in (7.9 cm) wide, plus hanging loop
- Skill level: Easy-intermediate (thread crochet)
- Terminology: US terms
- Yarn weight: Size 3 cotton crochet thread (Lace / 0)
- Hook: 2.25 mm (US B-1)
- Number of pieces: One piece per ornament; the photo shows a set of separate ornaments
- Layout: Ornaments hang individually; they are never joined to each other
- Piece size before border: 3.0 in (7.6 cm) tall x 2.375 in (6.0 cm) wide at the base
- Border depth: 0.375 in (1.0 cm), made of an sc round of 0.125 in (0.3 cm) and a shell round of 0.25 in (0.6 cm)
Materials
Yarn advice: Choose a mercerized cotton thread in size 3. It holds crisp stitch definition and takes starch well. Avoid fuzzy or acrylic threads, because the mesh will blur and won’t block as sharply.
Color: Cream / off-white
– One ornament: 4 g (about 5.5 m)
– Set of 12 ornaments, plus hanging strings: 50 g (about 70 m)
Tools:
– 2.25 mm (US B-1) crochet hook
– 12 cream pearl beads, 6 mm, with holes large enough for doubled thread
– Fine tapestry needle or beading needle
– Scissors
– Fabric stiffener or spray starch
– Blocking board or foam, plus rustproof pins
– Ruler or tape measure
All quantities include a margin of about 10% for swatching, tails, and the occasional frogged row.
Abbreviations (US Terms)
- ch – chain
- sl st – slip stitch
- sc – single crochet
- dc – double crochet
- sk – skip
- sp – space
- st(s) – stitch(es)
- RS – right side
- rep – repeat
Special stitch:
– Shell – 5 dc in the same stitch.
Counting note: In the mesh rows, both the dc and the ch-1 spaces count as stitches. A ch-4 turning chain counts as 1 dc plus 1 ch-1 sp, which is 2 sts.
Gauge and Checkpoints
Gauge in mesh pattern: 8 sts and 3 rows = 1 in (2.5 cm).
Make one complete ornament first, including the border and blocking, before starting a set. One tree is a true gauge swatch.
Checkpoints (measure unblocked, lying flat):
– After Row 3: 7 sts measure about 0.875 in (2.2 cm) wide and 1 in (2.5 cm) tall.
– After Row 6: 13 sts measure about 1.625 in (4.1 cm) wide and 2 in (5.1 cm) tall.
– After Row 9: 19 sts measure about 2.375 in (6.0 cm) wide and 3.0 in (7.6 cm) tall.
– After Border Rnd 1: The triangle lies flat with straight sides.
– After Border Rnd 2 and blocking: The tree measures 3.75 in (9.5 cm) x 3.125 in (7.9 cm).
If your tree is too big: Go down to a 2.0 mm hook, or tighten your dc loops.
If your tree is too small: Go up to a 2.5 mm hook.
Priority: Height matters more than width. If the rows are too short, the tree looks squat, so loosen your dc rather than adding rows.
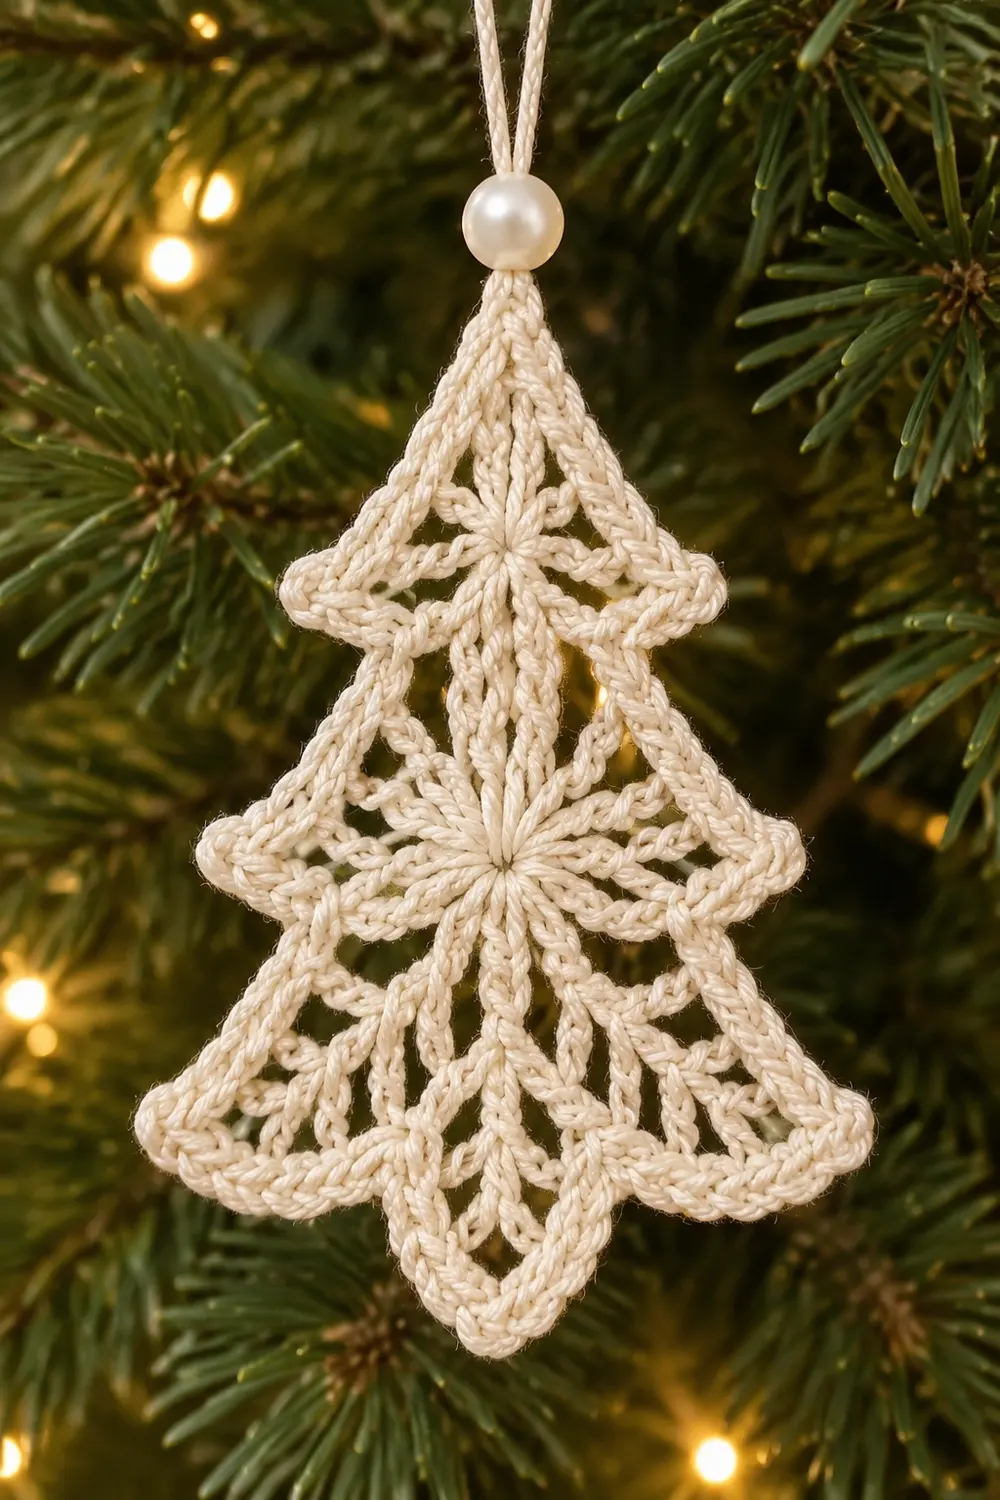
Tree Body (Worked from the Tip Down)
The body is a staggered brick mesh. Each new dc sits in a ch-1 sp of the row below, so the holes alternate like lacework. Every row gains 2 sts, which makes the even triangular taper.
Row 1: Ch 5. Dc in 5th ch from hook. The skipped 4 ch count as 1 dc + 1 ch-1 sp.
(2 dc, 1 ch-1 sp = 3 sts)
Row 2: Ch 4 (counts as dc + ch-1 sp), turn. Dc in next ch-1 sp, ch 1, dc in 4th ch of beginning ch.
(3 dc, 2 ch-1 sps = 5 sts)
Row 3: Ch 4 (counts as dc + ch-1 sp), turn. Dc in next ch-1 sp, ch 1; rep from * across to the turning ch. Dc in 3rd ch of turning ch.
(4 dc, 3 ch-1 sps = 7 sts)*
Rows 4–9: Rep Row 3. Each row adds 1 dc and 1 ch-1 sp.
| Row | dc | ch-1 sps | Total sts |
|---|---|---|---|
| 4 | 5 | 4 | 9 |
| 5 | 6 | 5 | 11 |
| 6 | 7 | 6 | 13 |
| 7 | 8 | 7 | 15 |
| 8 | 9 | 8 | 17 |
| 9 | 10 | 9 | 19 |
Why the counts work: Row n has n + 1 dc and n ch-1 sps, for a total of 2n + 1 sts. Row 9 has 19 sts. At 8 sts per inch, that is 2.375 in (6.0 cm) wide. Nine rows at 3 rows per inch give 3.0 in (7.6 cm) tall.
Do not fasten off. Check the Row 9 measurements now.
Make All Pieces
Each ornament is complete on its own, so “all pieces” simply means the full set.
- Set shown: 12 ornaments
- Color: Cream for all 12, about 4 g each, plus about 0.2 m of thread per hanging string
- Beads: 12 cream pearl beads, one per ornament
Weigh your first finished tree. If it weighs over 4.5 g, your tension is loose, so recheck your gauge before making the rest.
Placement grid (suggested, on the tree):
TIER 1 (top):    TREE  TREE
TIER 2:          TREE  TREE  TREE
TIER 3:          TREE  TREE  TREE
TIER 4 (bottom): TREE  TREE  TREE  TREE
Hang some ornaments on branch tips and others tucked deeper into the tree. Varying the depth shows off the openwork against the lights.
Joining: Hanging Loop and Bead
The ornaments are not joined to each other. The only attachment is the hanger, which goes through the ch-3 tip loop made in Border Rnd 2.
Method:
1. Cut 8 in (20.3 cm) of thread.
2. Thread it through the ch-3 tip loop from front to back and pull it through until the ends are even.
3. Hold both ends together and slide one bead down both strands until it sits snugly on the tip loop.
4. Hold both ends together and tie an overhand knot to make a loop about 3 in (7.6 cm) long.
5. Trim the tails to 0.25 in (0.6 cm). Add a dot of fabric glue to the knot if you like.
Stitch logic: The ch-3 loop sits exactly at the tip, between 2 sc. Hanging from that point keeps the tree vertical.
Tension advice: Snug the bead against the loop, but don’t cinch it. Pulling too hard distorts the point.
Size checkpoint: Hang the ornament from your finger. It should hang straight, and the hanger should measure about 3 in (7.6 cm) from the bead to the top of the loop.
Border
Border gauge: Work the sc at 8 sc per inch along the bottom edge, which matches the body. Along the slanted sides, work 2 sc into each dc row-end.
A dc row-end is about 0.33 in tall, which is room for a little more than 2 sc. So 2 sc per row-end is deliberately slightly snug. Round 2 spreads the edge, and starting snug keeps the shells from ruffling.
Rnd 1 (conversion round): Ch 1, turn. Work 3 sc in first dc (corner). Work 1 sc in each of the next 17 sts (dc and ch-1 sps). Work 3 sc in the 3rd ch of the turning ch (corner).
Rotate the piece. Work 2 sc in each of the 9 row-ends up the side. Work 1 sc in the Row 1 ch-1 sp (tip). Work 2 sc in each of the 9 row-ends down the other side. Join with sl st to first sc.
Rnd 1 count:
– Stitches worked into existing parts: 19 sts across the bottom + (9 row-ends x 2 sc) x 2 sides = 36 + 1 sc in the tip sp = 56 sc
– Extra stitches: 2 at each bottom corner = 4 sc
– Total: 60 sc
Per-side counts (including both corner sts):
– Bottom: corner + 1 + 17 + 1 + corner = 21 sc
– Each slanted side: bottom corner + 1 + 18 + tip = 21 sc
– Check: 21 x 3 = 63, minus 3 shared corners = 60 ✓
Rnd 2 (shell round): Sl st in next sc (bottom corner center). Ch 1, sc in same sc.
– Bottom: Sk 1, shell in next sc, sk 1, sc in next sc; rep from * 5 times. The last sc lands on the next corner.
– First side: Rep from * 4 more times. Then sk 1, shell in next sc, sk 1, and work (sc, ch 3, sc) in the tip sc.
– Second side:* Rep from * 4 times. Then sk 1, shell in next sc, sk 1. Join with sl st to first sc.
Fasten off and weave in the ends.
Rnd 2 count:
– 5 shells per side x 3 sides = 15 shells (75 dc)
– 16 sc: 1 starting + 5 bottom + 4 + 2 at the tip + 4 on the second side
– 1 ch-3 tip loop
Why the math works: Each shell repeat (sk, shell, sk, sc) uses 4 sts. Each side has 21 sts, which is 4 x 5 + 1. Five repeats run cleanly from corner sc to corner sc, so the scallops are symmetric on all three sides. The tip gets a ch-3 loop instead of a shell, so the point stays sharp.
Final Blocking
- Mix fabric stiffener according to the label, or prepare spray starch.
- Soak the ornament, then gently squeeze out the excess. Don’t wring it.
- Lay it RS up on your blocking board.
- Pin the tip, then the two bottom corners, so the base measures 3.125 in (7.9 cm) and the height measures 3.75 in (9.5 cm).
- Pin the center of each shell outward to open the scallops evenly.
- Use a pin tip to open the mesh holes so they look like neat bricks.
- Let it dry completely, usually 6–12 hours.
- Unpin the ornament and attach the hanger if you haven’t already.
Final Quality-Control Checklist
- Row 9 has 19 sts: 10 dc and 9 ch-1 sps.
- Rnd 1 has 60 sc, with 21 sc per side.
- Rnd 2 has 15 shells, 16 sc, and 1 ch-3 tip loop.
- Each side has 5 even scallops.
- The tip is sharp and centered.
- The blocked size is 3.75 in (9.5 cm) x 3.125 in (7.9 cm).
- The bead sits snugly at the tip, and the loop is about 3 in (7.6 cm).
- The ornament hangs straight.
- All ends are woven in invisibly.
Troubleshooting
Sides ruffle after Rnd 2: Your sc are too loose. Redo Rnd 1 with tighter tension, or use a hook 0.25 mm smaller for the border only.
Sides pull in or cup: Your tension on the row-end sc is too tight. Loosen up and work into the full row-end, not just a strand.
Tree looks squat: Your dc rows are too short. Pull up taller loops and recheck the Row 6 checkpoint.
Scallops are uneven: Recount Rnd 1. Each side needs exactly 21 sc.
Tip is blunt: Make sure the tip sc went into the Row 1 ch-1 sp. Pin the tip firmly while blocking.
Ornament hangs crooked: The hanger isn’t centered in the ch-3 loop. Re-thread it so both strands are even.
Mesh holes look lopsided: Re-wet the ornament and open the holes with a pin while blocking.
Care
Spot clean with cool water and a mild soap, then reshape and dry flat. Store flat in tissue so the starched points stay crisp.
Final Notes
The measurement chain is simple:
– 8 sts and 3 rows per inch give a 19-st, 9-row triangle that measures 2.375 in (6.0 cm) x 3.0 in (7.6 cm).
– Rnd 1 converts the edge into 60 sc, 21 per side.
– Rnd 2 divides each side into 5 shells and adds the tip loop.
– The result is a 3.75 in (9.5 cm) x 3.125 in (7.9 cm) lace tree.
Check your first ornament at each checkpoint, then make the rest with confidence.
Optional: The same tree, starched and stitched to a gift tag, makes a lovely keepsake topper.
Happy crocheting!