

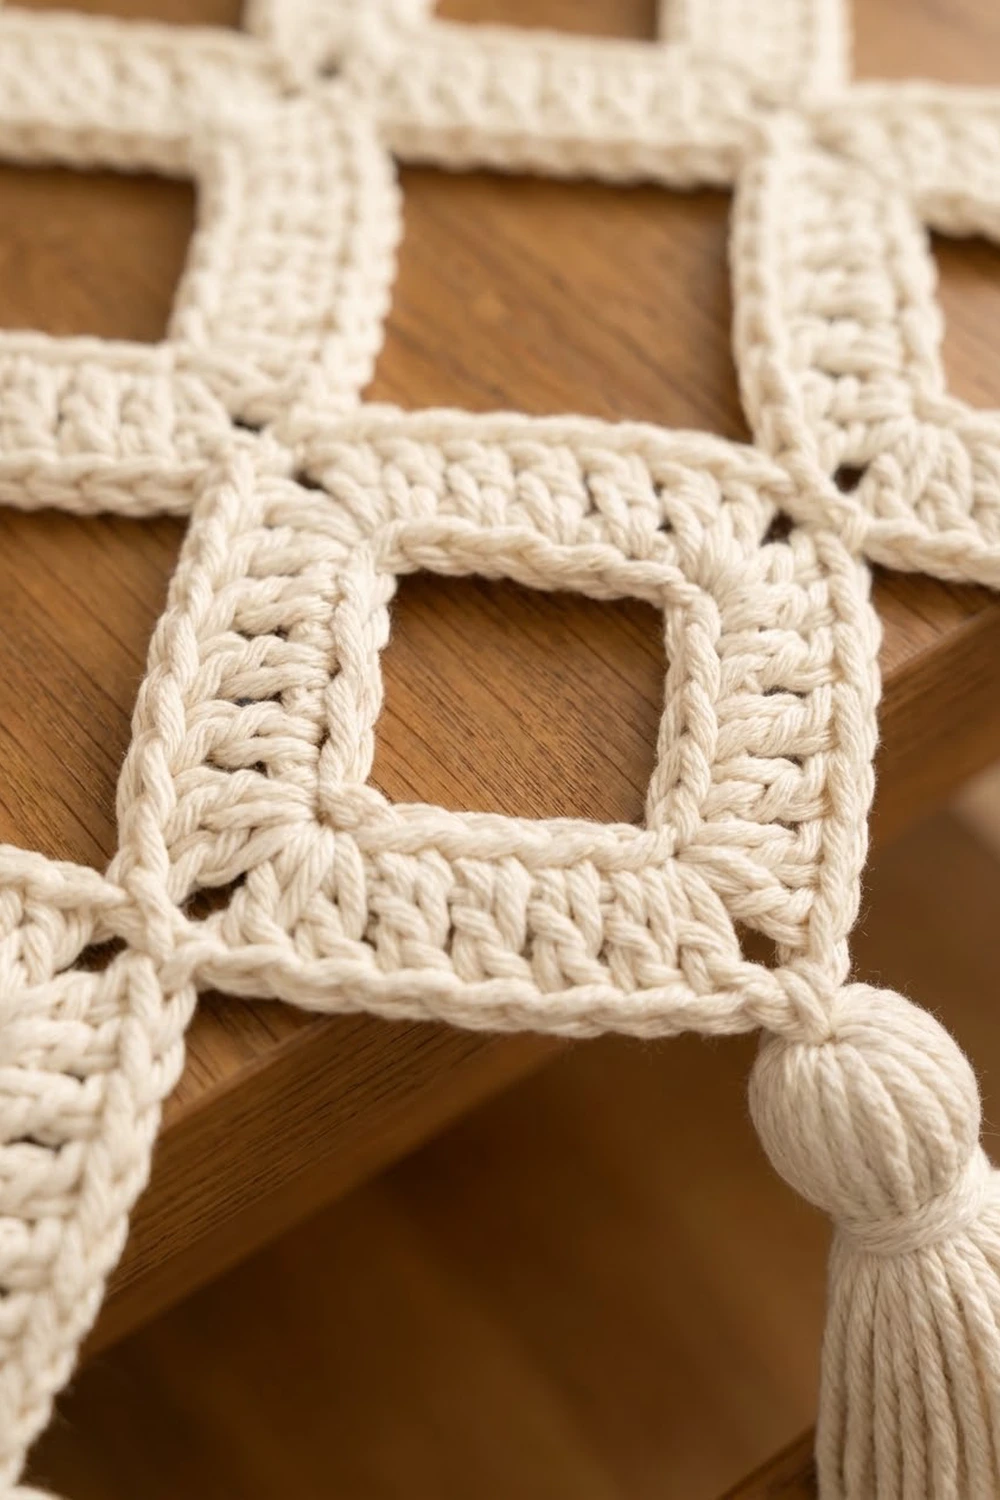
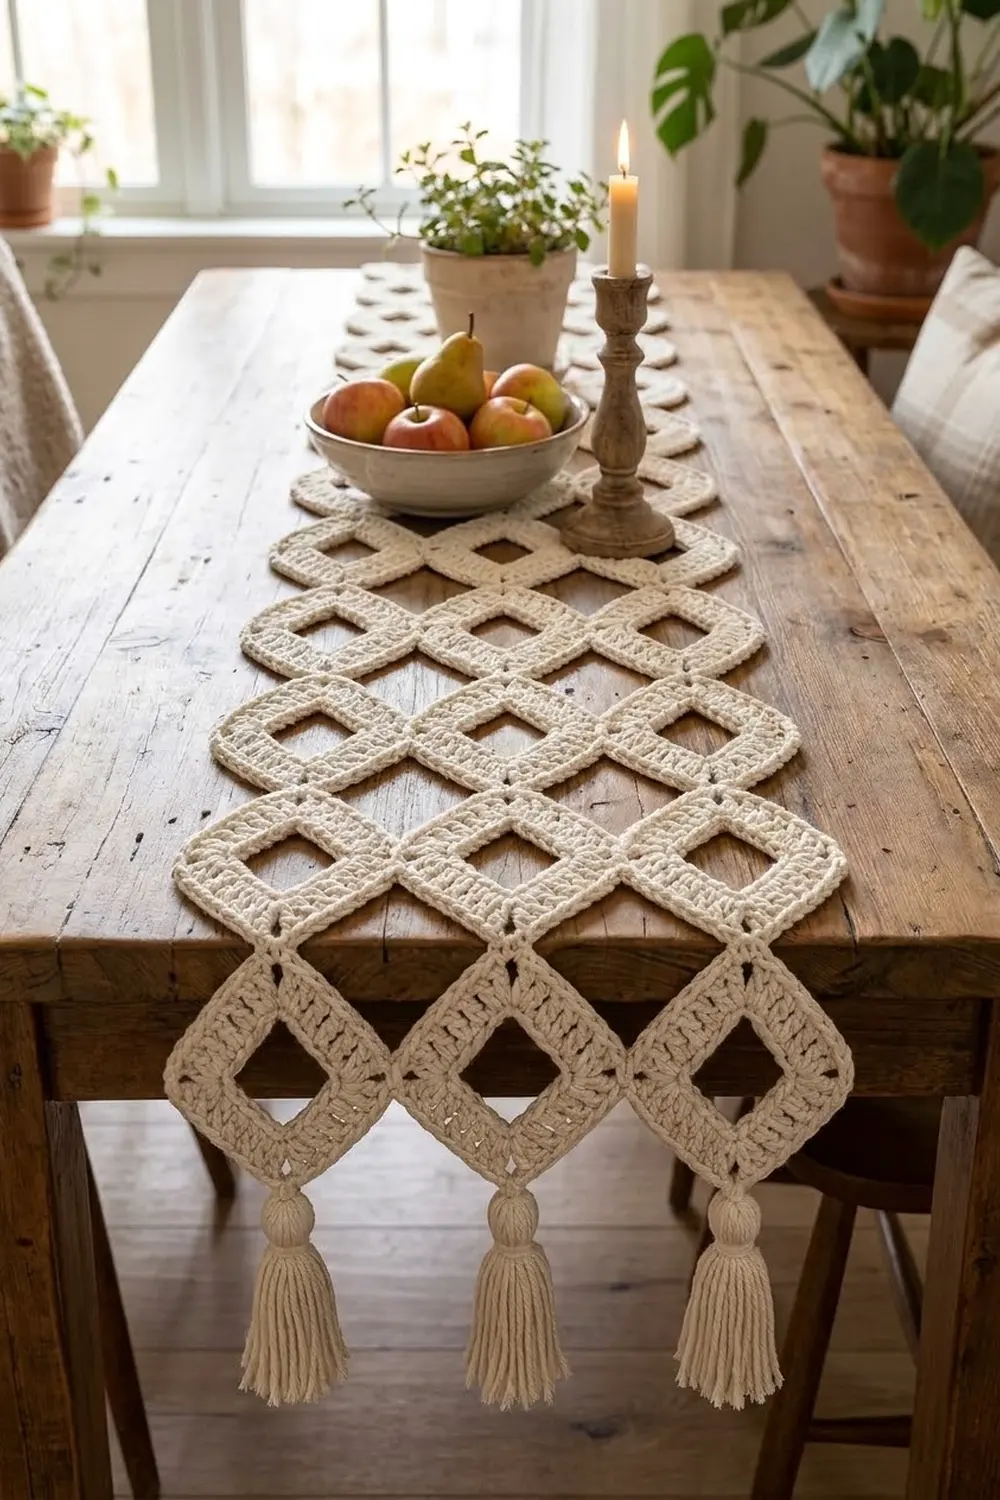
This table runner is built from small on-point diamond motifs. Each diamond has an open square center, and the motifs connect into a continuous lattice. The wood of the table shows through every opening, so the piece looks light and lacy while the solid frames keep it structured.
The whole runner is worked in one cream or off-white yarn. The top edge has a smooth single crochet border that follows the diamond points. The bottom edge has three cream tassels, evenly spaced, one hanging below each diamond in the bottom group of three. The tassels hang about 2.5 in (6.4 cm).
The pattern uses US crochet terms. The finished runner measures about 13.2 in (33.5 cm) wide and 40.4 in (102.6 cm) long, not counting the tassels.
For construction, you make 43 identical motifs in the round, block them, and sew them edge to edge in alternating rows of three and two diamonds. Then you work a short border across the top edge and add three tassels to the bottom points.
Finished Size and Construction
- Finished size: 13.2 in (33.5 cm) wide x 40.4 in (102.6 cm) long, plus 2.5 in (6.4 cm) tassels
- Skill level: Intermediate
- Terminology: US crochet terms
- Yarn weight: Worsted (#4), cotton or cotton blend
- Hook: 4.0 mm (G-6)
- Number of pieces: 43 diamond motifs and 3 tassels
- Layout: 17 rows, alternating 3 motifs (A rows) and 2 motifs (B rows), starting and ending with an A row
- Motif size: 3.1 in (7.9 cm) per side, 4.4 in (11.2 cm) point to point
- Size before border: 13.2 in (33.5 cm) x 39.6 in (100.6 cm)
- Border depth: 0.8 in (2.0 cm), top edge only
Materials
Yarn: Use a smooth worsted cotton with good stitch definition. Cotton holds the square openings crisply and survives washing. Avoid fuzzy or very splitty yarn, because it blurs the lattice.
- Cream: 250 g, about 475 m (520 yd)
This quantity includes a margin of roughly 15% for gauge differences, seaming, and tassels. Buy all skeins from one dye lot.
Tools:
– 4.0 mm (G-6) crochet hook
– Yarn needle
– Scissors
– 4 locking stitch markers
– Stiff cardboard, cut 2.75 in (7.0 cm) tall
– Tape measure
– Blocking mats and rust-proof pins
– Spray bottle or steamer
Abbreviations (US Terms)
- ch – chain
- sl st – slip stitch
- sc – single crochet
- dc – double crochet
- sp – space
- st(s) – stitch(es)
- sc2tog – single crochet 2 together
- sc3tog – single crochet 3 together
- BLO – back loop only
- rep – repeat
- RS / WS – right side / wrong side
Corner stitch: On the final motif round, each corner gets 3 sc. The middle sc of those 3 is the corner stitch. Every “per side” count in this pattern includes both corner stitches of that side.
Gauge and Checkpoints
Gauge: 18 sc and 20 rows = 4 in (10.2 cm). In dc, 18 sts = 4 in (10.2 cm).
Make and block one motif before committing to all 43. Measure at each stage:
- After Rnd 1: about 1.75 in (4.4 cm) per side
- After Rnd 2: about 2.6 in (6.6 cm) per side
- After Rnd 3 (finished, blocked): 3.1 in (7.9 cm) per side and 4.4 in (11.2 cm) point to point
- Open center: about 1 in (2.5 cm) square
If your motif is larger than 3.25 in (8.3 cm) per side, go down a hook size. Three motifs that are too big across will push the runner past 14 in.
If your motif is smaller than 3.0 in (7.6 cm) per side, go up a hook size.
Keep the foundation chain loose. A tight ring pinches the open center into a circle instead of a square.
Diamond Motif (Make 43)
Each motif is a square frame worked outward from a chain ring. You lay it on point during assembly to make the diamond.
Foundation: Ch 20. Sl st in the first ch to form a ring, taking care not to twist the chain. The ring gives 5 ch per side.
Rnd 1: Ch 3 (counts as dc). Dc in next 3 ch, then (dc, ch 2, dc) in next ch. Dc in next 4 ch, (dc, ch 2, dc) in next ch; rep from * 2 more times. Sl st to top of ch-3.
Count:* 24 dc (6 per side) and 4 ch-2 corner sps.
Rnd 2 (growth round): Ch 3 (counts as dc). Dc in next 4 dc, then (2 dc, ch 2, 2 dc) in ch-2 sp. Dc in next 6 dc, (2 dc, ch 2, 2 dc) in ch-2 sp; rep from * 2 more times. Dc in last dc and sl st to top of ch-3.
Count:* 40 dc (10 per side) and 4 ch-2 sps. Each side grew from 6 to 10 dc.
Rnd 3 (conversion round): Ch 1. Sc in same st as join and in next 6 dc. Work 3 sc in ch-2 sp. Sc in next 10 dc, 3 sc in ch-2 sp; rep from * 2 more times. Sc in last 3 dc and sl st to first sc.
Count: 40 sc worked 1 per existing dc, plus 12 sc added at corners (3 per corner), for 52 sc*.
Place a marker in each corner stitch. Each side from corner stitch to corner stitch is 14 sc: 10 sc over the dc, 1 flanking sc on each side, and both corner stitches. Check: 4 sides x 14 = 56, minus 4 shared corners = 52.
Fasten off, leaving an 8 in (20.3 cm) tail. Weave in the starting tail and keep the long tail for seaming.
Make All Pieces
- Cream motifs: 43 total
- A rows (3 motifs): 9 rows x 3 = 27 motifs
- B rows (2 motifs): 8 rows x 2 = 16 motifs
Lay every motif on point, with one corner up. In an A row, the three diamonds sit side by side, touching tip to tip. In a B row, the two diamonds nest into the notches between the A diamonds above and below.
ROW 1  (A):  CREAM  CREAM  CREAM   <- top edge, border here
ROW 2  (B):     CREAM  CREAM
ROW 3  (A):  CREAM  CREAM  CREAM
ROW 4  (B):     CREAM  CREAM
ROW 5  (A):  CREAM  CREAM  CREAM
ROW 6  (B):     CREAM  CREAM
ROW 7  (A):  CREAM  CREAM  CREAM
ROW 8  (B):     CREAM  CREAM
ROW 9  (A):  CREAM  CREAM  CREAM
ROW 10 (B):     CREAM  CREAM
ROW 11 (A):  CREAM  CREAM  CREAM
ROW 12 (B):     CREAM  CREAM
ROW 13 (A):  CREAM  CREAM  CREAM
ROW 14 (B):     CREAM  CREAM
ROW 15 (A):  CREAM  CREAM  CREAM
ROW 16 (B):     CREAM  CREAM
ROW 17 (A):  CREAM  CREAM  CREAM   <- bottom edge, tassels here
Lightly steam-block all 43 motifs to 3.1 in (7.9 cm) per side before joining. Matching motif sizes make the seams line up.
Joining
Method: Whipstitch through the back loops, with RS facing up and edges butted together. This gives a flat seam that disappears into the sc edge.
Seam logic: Each seam joins one 14-sc side to one 14-sc side, stitch to stitch. Start at a corner stitch, end at a corner stitch, and match all 14 pairs. If you end with an extra stitch, recount before continuing.
Order:
1. Join each B-row motif to the A row above it. The upper-left edge of a B motif meets the lower-right edge of the A motif above-left. Its upper-right edge meets the lower-left edge of the A motif above-right.
2. Join the next A row to the lower edges of that B row in the same way. The outer A motifs each join on one upper edge only. Their outer upper edges stay free and form the side notches.
3. Repeat down the layout.
Each B motif has 4 seams, so the runner has 16 x 4 = 64 seams in total.
At each point where four corners meet, add one extra tacking stitch through all the corner stitches to keep the junction tight.
Tension: Pull each stitch snug but not tight. The seam should match the motif’s own width. Puckering means you are pulling too hard. Gaps mean your stitches are too loose.
Checkpoint: The joined runner should measure 13.2 in (33.5 cm) wide, which is 3 x 4.4 in point to point. It should measure 39.6 in (100.6 cm) long, since 17 rows each add half a diagonal, 2.2 in (5.6 cm), plus one extra half diagonal.
Border
Top Edge Border
The border runs only across the top edge of Row 1. It follows the three diamond points in plain sc, which keeps the edge smooth and structured. It is worked at the same gauge as the motif edge: 18 sc and 20 rows = 4 in (10.2 cm).
Starting count: Row 1 shows 6 free motif sides (two upper sides per diamond) x 14 sc = 84. Subtract the 3 top-point corner stitches, because each one belongs to two sides of the same diamond. That gives 81 sts.
No stitches are added at the valleys. There, the right corner of one diamond and the left corner of the next are two separate stitches, and both are already in the 81.
Row 1: With RS facing, join yarn in the left corner stitch of the left diamond. Ch 1 and sc in same st. Sc across, working 3 sc in each top-point corner stitch. At each valley, sc2tog over the two touching corner stitches. End with sc in the right corner stitch of the right diamond. Turn.
Count: 81 + 6 (2 extra at each of 3 points) − 2 (1 removed at each of 2 valleys) = 85 sc.
Row 2: Ch 1. Sc across, working 3 sc in the center st of each point and sc3tog centered on each valley st. Turn.
Count: 85 + 6 − 4 = 87 sc.
Row 3: Repeat Row 2. Count: 89 sc.
Row 4: Repeat Row 2. Count: 91 sc. Fasten off.
Why the math works: Each row adds 2 sts at each convex point and removes 2 sts at each concave valley, giving a net change of +2 per row. The outer edge of a V shape is slightly longer than the inner edge, so the count rises slightly. The points stay sharp, the valleys stay crisp, and the band lies flat without ruffling or cupping.
Four rows at 20 rows per 4 in give a depth of 0.8 in (2.0 cm). The finished length becomes 39.6 + 0.8 = 40.4 in (102.6 cm).
Bottom Edge Tassels (Make 3)
- Wrap yarn 30 times around the 2.75 in (7.0 cm) cardboard.
- Slide a 6 in (15.2 cm) strand under the wraps at the top and tie it tightly.
- Cut the loops at the bottom and slide the bundle off the card.
- Wrap a second strand tightly 0.5 in (1.3 cm) below the top to form the head. Knot it and bury the ends inside the tassel.
- Trim the ends evenly to 2.5 in (6.4 cm) below the top.
Sew one tassel to the bottom corner stitch of each Row 17 diamond. This places one tassel centered below each diamond in the bottom group of three, evenly spaced across the edge.
Final Blocking
- Weave in all ends along the seams, not across the open centers.
- Lay the runner flat on blocking mats with RS up.
- Mist it evenly until damp, or hover steam over it without touching the cotton.
- Pin the outer edges to 13.2 in (33.5 cm) x 40.4 in (102.6 cm).
- Pin the corners of several open centers so they dry square.
- Pin each top border point and the three tassel points.
- Let it dry completely, usually 12–24 hours.
- Unpin the runner, then comb and retrim the tassels if needed.
Final Quality-Control Checklist
- All 43 motifs measure 3.1 in (7.9 cm) per side
- Every seam matches 14 sts to 14 sts
- All four-corner junctions are tacked
- Width is 13.2 in (33.5 cm) across
- Length is 40.4 in (102.6 cm) without tassels
- Border Row 4 has 91 sc
- The top border lies flat with sharp points
- The three tassels are 2.5 in (6.4 cm) long and evenly spaced
- No loose ends show in the open centers
Troubleshooting
Open center looks round: The foundation chain is too tight. Use a hook one size larger for the chain only.
Motif cups: Your dc rows are too short for the corner increases. Loosen your tension or block the motif harder.
Seams pucker: Your whipstitch is too tight. Re-sew with gentler tension.
Runner is wider than 14 in (35.6 cm): Your motifs are oversized. Remake them with a smaller hook.
Border ruffles: You skipped a valley decrease. Recount against the stated row total.
Border pulls in at the points: You missed a 3-sc point increase.
Tassels splay: Tighten the head wrap and steam the strands straight.
Care
Hand wash in cool water with mild detergent, then roll the runner in a towel to remove water. Lay it flat to dry, reshaping the open squares and tassels.
Final Notes
The measurement chain is simple. A motif with 14 sc per side measures 3.1 in (7.9 cm) per side and 4.4 in (11.2 cm) point to point. Three motifs across give 13.2 in (33.5 cm). Seventeen alternating rows give 39.6 in (100.6 cm), and the four-row top border brings the total to 40.4 in (102.6 cm). Check your first motif carefully, and every later measurement will fall into place.
Optional: for a longer table, add one B row and one A row (5 more motifs) to gain 4.4 in (11.2 cm) of length.
Happy crocheting!