

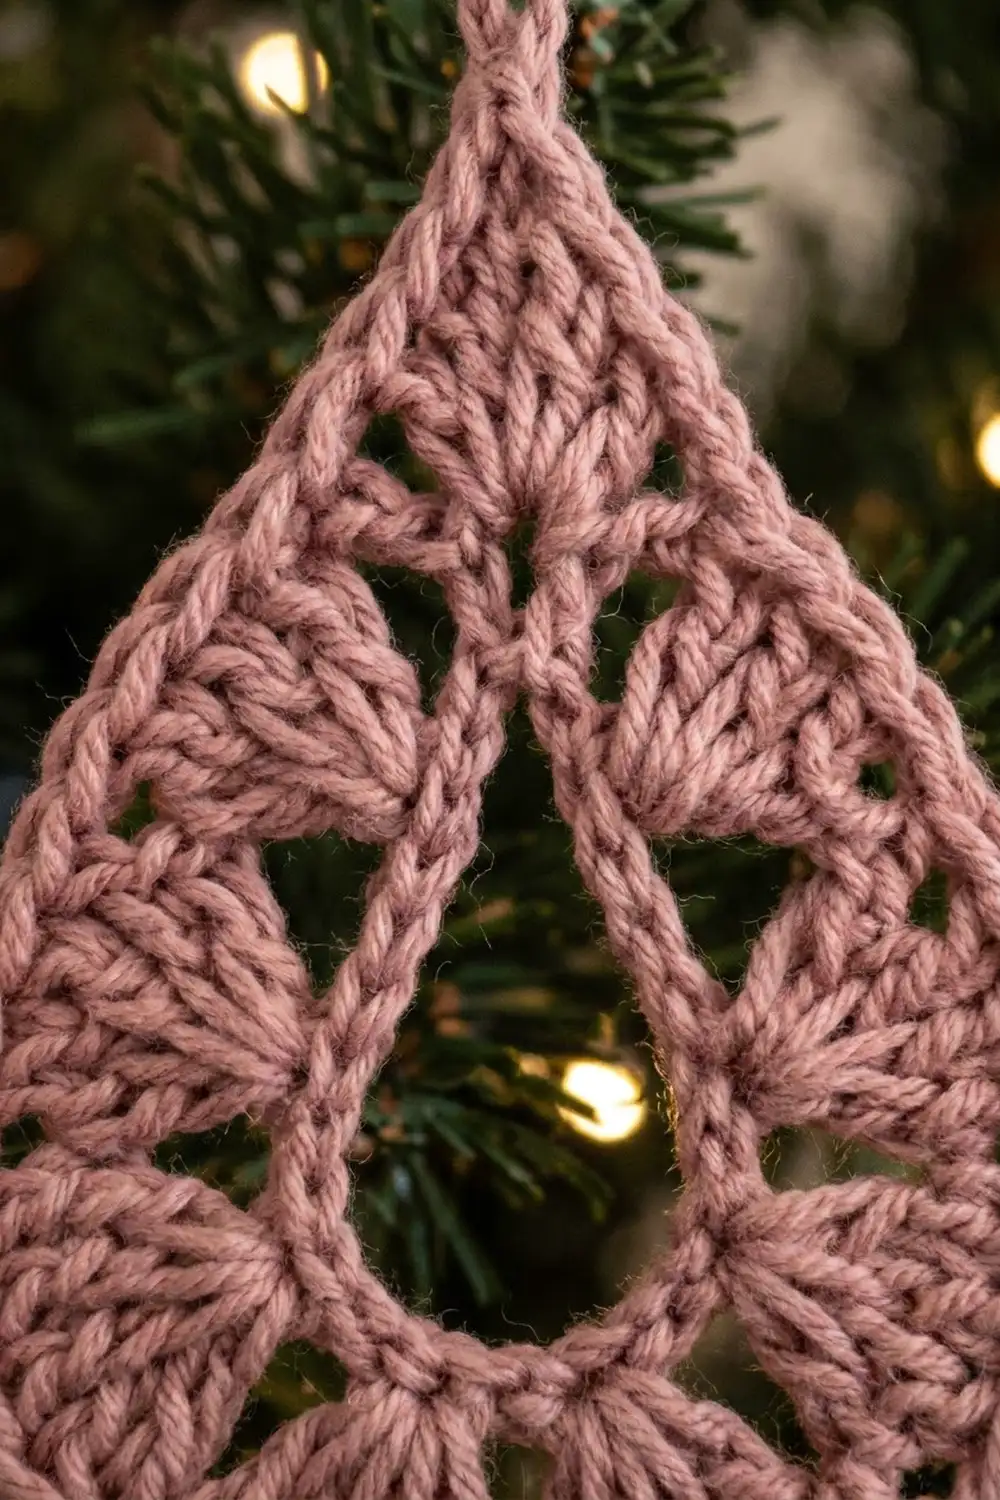
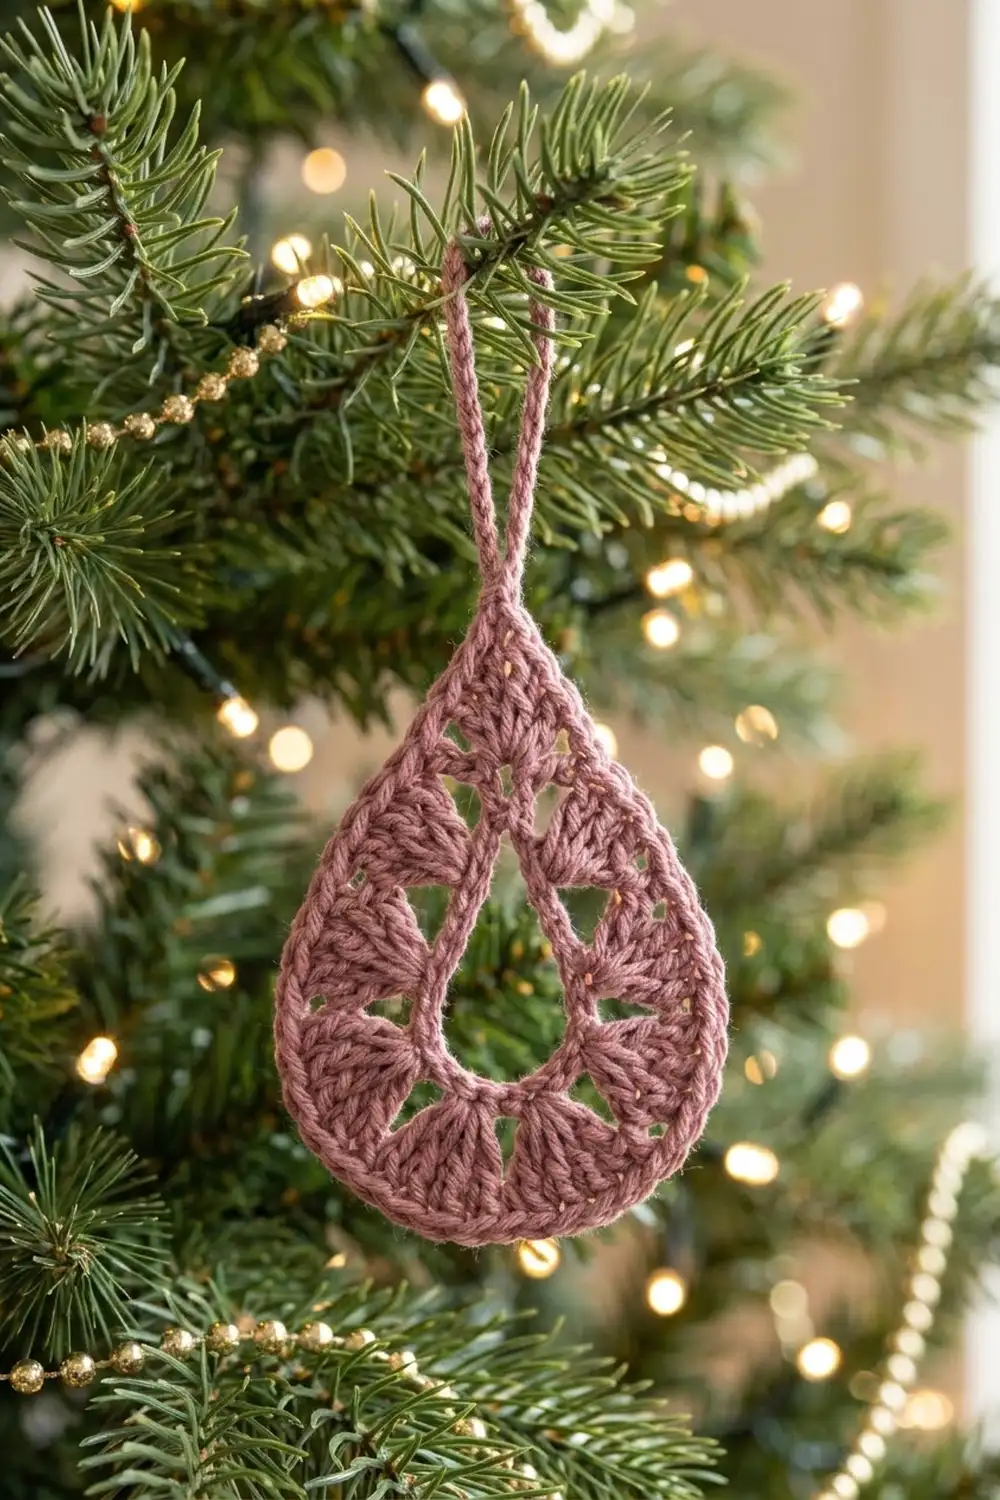
This little teardrop ornament has a vintage, lace-doily look. A teardrop-shaped opening sits at its center, framed by tall spokes and soft fans that create a delicate filigree effect. A twisted crochet cord in the same yarn forms the hanging loop at the top.
The sample is worked in a dusty mauve, or muted rose pink. It looks warm and quiet against evergreen branches and gold lights. Any soft, solid color works, but a smooth mercerized cotton shows the openwork most clearly.
The pattern is written in US crochet terms. The finished ornament measures 3 in (7.6 cm) long and 2.25 in (5.7 cm) wide, not including the hanging loop. The loop adds about 3 in (7.6 cm).
The ornament is worked as a single piece in four joined rounds, starting from a chain ring that becomes the central opening. Stitch heights grow from a point at the top to tall trebles at the bottom, which creates the teardrop shape. The hanging cord is chained directly from the point at the end, so there is nothing to sew on.
Finished Size and Construction
- Finished size: 3 in (7.6 cm) long x 2.25 in (5.7 cm) wide, without loop
- Hanging loop: about 3 in (7.6 cm) long when twisted
- Skill level: Easy-intermediate (basic stitches, working into chain spaces)
- Terminology: US crochet terms
- Yarn weight: Sport weight (#2), cotton or cotton blend
- Hook: 2.75 mm (C-2)
- Number of pieces: 1 (the cord is worked continuously from the point)
- Layout: Single teardrop motif
- Piece size: 3 in x 2.25 in (7.6 cm x 5.7 cm)
- Size before border: 2.75 in x 2 in (7.0 cm x 5.1 cm), after Round 3
- Border depth: about 1/8 in (0.3 cm) on each side (Round 4)
Materials
Yarn advice: Choose a smooth, tightly plied sport-weight cotton. Mercerized cotton holds crisp points and blocks well. Fuzzy or very soft acrylic will blur the spokes and fans.
- Dusty Mauve (muted rose pink): 5 g, about 16 m (17.5 yd)
Quantities include a margin for your gauge swatch and for weaving in ends. One ornament uses only about two-thirds of this amount.
Tools:
- 2.75 mm (C-2) crochet hook
- Tapestry needle
- 1 stitch marker
- Scissors
- Blocking mat or folded towel
- Rust-proof pins
- Spray starch or diluted fabric stiffener (optional, recommended)
Abbreviations (US Terms)
- ch – chain
- sl st – slip stitch
- sc – single crochet
- hdc – half double crochet
- dc – double crochet
- tr – treble crochet (yarn over twice)
- st(s) – stitch(es)
- sp – space
- rnd – round
Special technique – Twisted cord: Make a long chain, keeping the loop on your hook. Hold the chain taut and twist it with your fingers until it starts to kink back on itself. Fold the chain in half and let the two halves twist around each other. Then secure the end to the ornament.
Point: (sc, ch 2 or ch 3, sc) worked into one stitch or space. This creates the sharp tip of the teardrop.
Gauge and Checkpoints
Gauge: 12 sc = 2 in (5.1 cm) using a 2.75 mm hook. The exact gauge matters less than the checkpoints below.
Work one test ornament through Round 2 before committing. Measure flat, without stretching, and gently shape the opening into a teardrop with your fingers first.
| After | Length | Width |
|---|---|---|
| Round 1 (opening) | 1.25 in (3.2 cm) | 0.75 in (1.9 cm) |
| Round 2 | 2 in (5.1 cm) | 1.75 in (4.4 cm) |
| Round 3 | 2.75 in (7.0 cm) | 2 in (5.1 cm) |
| Round 4 | 3 in (7.6 cm) | 2.25 in (5.7 cm) |
Too big? Go down to a 2.5 mm hook, or tighten the chain ring.
Too small? Go up to a 3.0 mm hook.
Cupping (edges curl upward) means your tension is too tight on the tall stitches. Ruffling means the chains are too loose. Adjust before moving on.
Pattern
Round 1: Opening Ring
Ch 20. Sl st in the first ch to form a ring, making sure the chain is not twisted.
Rnd 1: Ch 1. Sc in the same ch as the join and in each ch around. Sl st to the first sc. (20 sc)
Place a marker in the first sc. This is st 1, the top point of the teardrop. Count the stitches clockwise from st 1 (or counterclockwise if you crochet left-handed), so st 11 sits at the bottom center.
Checkpoint: The ring should pinch into a teardrop about 1.25 in (3.2 cm) long and 0.75 in (1.9 cm) wide.
Round 2: Spokes
This round builds the openwork rays. Stitch heights increase from the point down to the bottom, which forms the teardrop shape. Chain lengths mirror on each side.
Rnd 2: Ch 1, (sc, ch 2, sc) in st 1 to make the point. Then work as follows:
- ch 1, skip st 2, hdc in st 3
- ch 2, skip st 4, dc in st 5
- ch 2, skip st 6, dc in st 7
- ch 3, skip st 8, tr in st 9
- ch 3, skip st 10, tr in st 11 (bottom center)
- ch 3, skip st 12, tr in st 13
- ch 3, skip st 14, dc in st 15
- ch 2, skip st 16, dc in st 17
- ch 2, skip st 18, hdc in st 19
- ch 1, skip st 20, sl st to the first sc
Stitch count: 11 sts total, made of 2 point sc, 2 hdc, 4 dc, and 3 tr. There are also 11 ch-sps: 1 point ch-2 sp, 2 ch-1 sps, 4 ch-2 sps, and 4 ch-3 sps.
Symmetry check: The spokes sit in odd-numbered stitches 3 through 19. Each one mirrors a matching spoke across st 11 (3↔19, 5↔17, 7↔15, 9↔13). The chain lengths read 1, 2, 2, 3, 3, 3, 3, 2, 2, 1, which is the same forward and backward.
Checkpoint: 2 in (5.1 cm) long x 1.75 in (4.4 cm) wide.
Round 3: Fans
Each chain space is filled with stitches sized to the space, and a sc sits on top of every spoke. The ch-3 spaces get full 5-dc shells, which round out the bottom.
Rnd 3: Sl st into the point ch-2 sp. Ch 1, (sc, ch 3, sc) in the same sp. Skip the next sc. Then work as follows:
- 2 sc in the ch-1 sp, sc in the hdc
- (hdc, 2 dc, hdc) in the ch-2 sp, sc in the dc
- (hdc, 2 dc, hdc) in the ch-2 sp, sc in the dc
- 5 dc in the ch-3 sp, sc in the tr
- 5 dc in the ch-3 sp, sc in the center tr
- 5 dc in the ch-3 sp, sc in the tr
- 5 dc in the ch-3 sp, sc in the dc
- (hdc, 2 dc, hdc) in the ch-2 sp, sc in the dc
- (hdc, 2 dc, hdc) in the ch-2 sp, sc in the hdc
- 2 sc in the ch-1 sp
- skip the first sc of Rnd 2, sl st to the first sc of Rnd 3
Stitch count: 51 sts, plus 1 point ch-3 sp. This round is a complete count of its own, built from:
- 2 point sc
- 4 sc (two 2-sc groups in the ch-1 sps)
- 9 sc (one on each spoke)
- 16 sts (four 4-st fans)
- 20 dc (four 5-dc shells)
2 + 4 + 9 + 16 + 20 = 51.
Checkpoint: 2.75 in (7.0 cm) long x 2 in (5.1 cm) wide. This is your size before the border.
Border
Border Gauge
Round 4 is a plain, smooth sc edging. It sits at about 7 sc per 1 in (2.5 cm) along the curved outer edge. That is slightly denser than the 6 sc per inch base gauge, because the edging is worked firmly to hold the outline. It adds about 1/8 in (0.3 cm) on each side.
Round 4: Edging
This is a conversion round. You work 1 sc into each existing stitch from Round 3, then add a few extra stitches where the outline needs them.
Rnd 4: Sl st into the point ch-3 sp. Ch 1, sc in the same sp. Sc in each st around, but work 2 sc in the center (3rd) dc of each 5-dc shell. When you return to the point, sc in the point ch-3 sp, ch 2, and sl st to the first sc. Do not fasten off.
Stitch count: 57 sc, plus 1 point ch-2. This is calculated as follows:
- 51 sc worked one into each existing Round 3 stitch
- 4 extra sc from the shell increases
- 2 extra sc worked into the point ch-3 sp
51 + 4 + 2 = 57.
Count per side: Count from the point down to the bottom center sc.
- Left side (28 sc): 1 sc in the point sp + 1 + 2 + 1 + 4 + 1 + 4 + 1 + 6 (shell with increase) + 1 + 6 (shell with increase).
- Bottom center: 1 sc, worked on the sc that sits above the center tr.
- Right side (28 sc): a mirror of the left side.
28 + 1 + 28 = 57.
Why the math works: Each side of Round 3 holds 25 stitches (1 point sc plus 24 more), with 1 shared center sc. That gives 25 + 25 + 1 = 51. Adding 1 point-sp sc and 2 shell increases to each side brings each side to 28. Because the increases sit only in the bottom shells, the curve flattens without widening the narrow top. That keeps the teardrop profile.
Hanging Cord
With the loop still on your hook, ch 48. The chain should measure about 8 in (20.3 cm).
Twist the chain until it kinks, then fold it in half. Let it twist on itself into a two-strand cord. Insert your hook into the point ch-2 sp and sl st to secure the cord. Fasten off, leaving a 6 in (15.2 cm) tail.
Use the tail to stitch through the base of the cord once or twice so it cannot untwist. Weave in all ends along the back of the sc edging.
Checkpoint: The loop is about 3 in (7.6 cm) long.
Final Blocking
- Soak the ornament in cool water for 5 minutes. Gently press out the water in a towel without wringing.
- Lay it face up on a blocking mat. Pin the top point first, then the bottom center, setting the length to 3 in (7.6 cm).
- Pin the widest part of the sides to 2.25 in (5.7 cm).
- Pin the top of each 5-dc shell to round out the scalloped curve. Keep the edge smooth.
- Shape the center opening into a teardrop. Use 2 pins: one at the top of the opening and one at its bottom. The opening should be about 1.25 in (3.2 cm) long.
- Straighten each spoke so the open spaces between them look even.
- Spray with starch or brush on diluted stiffener, if using.
- Let it dry completely, at least 12 hours, before unpinning.
- Pinch the top point between your fingers to sharpen it. Hang the ornament by the cord to check that it sits straight.
Final Quality-Control Checklist
- Round 1 has 20 sc, and st 1 sits at the top point.
- Round 2 has 9 spokes, and the chain lengths mirror on both sides.
- Round 3 has 51 sts plus a point ch-3 sp.
- Round 4 has 57 sc: 28 per side plus 1 bottom center sc, with a ch-2 point.
- The finished size is 3 in x 2.25 in (7.6 cm x 5.7 cm).
- The center opening is a clear teardrop, not a circle.
- The ornament lies flat, with no cupping or ruffling.
- The cord is evenly twisted, secured at the base, and about 3 in (7.6 cm) long.
- All ends are woven in invisibly on the back.
Troubleshooting
The opening stays round. Make sure the point stitches sit directly in st 1. Pin the opening into a teardrop during blocking, and use stiffener.
The ornament is lopsided. Count the chains in Round 2. The sequence must read 1, 2, 2, 3, 3, 3, 3, 2, 2, 1.
The edges cup. Your trebles are probably too tight. Loosen your yarn-overs, or go up 0.25 mm in hook size.
The edges ruffle. Your chains are too loose. Tighten them, or drop the shell increases in Round 4. If you skip the increases, your total becomes 53 sc (26 per side plus the center).
The point is blunt. Pull the point chains snug, and pinch the point while it is still damp.
The cord untwists. Add a few more stitches through the base with the yarn tail. Stiffen the cord lightly.
The ornament is too small or too big. Check it against the gauge table and change your hook size.
Care
Hand wash in cool water and lay flat to dry, re-pinning the shape if needed. Store flat or hanging, away from heavy ornaments that could crush the lace.
Final Notes
The measurement chain is simple. The 20-sc ring forms a 1.25 in (3.2 cm) opening. The spokes in Round 2 bring the piece to 2 in (5.1 cm) long, and the fans in Round 3 bring it to 2.75 in (7.0 cm). The 57-sc edging finishes the ornament at 3 in x 2.25 in (7.6 cm x 5.7 cm), topped by a 3 in (7.6 cm) twisted loop.
Optional: Once you are comfortable with the pattern, these work up quickly in a small batch for gift toppers.
Happy crocheting!