

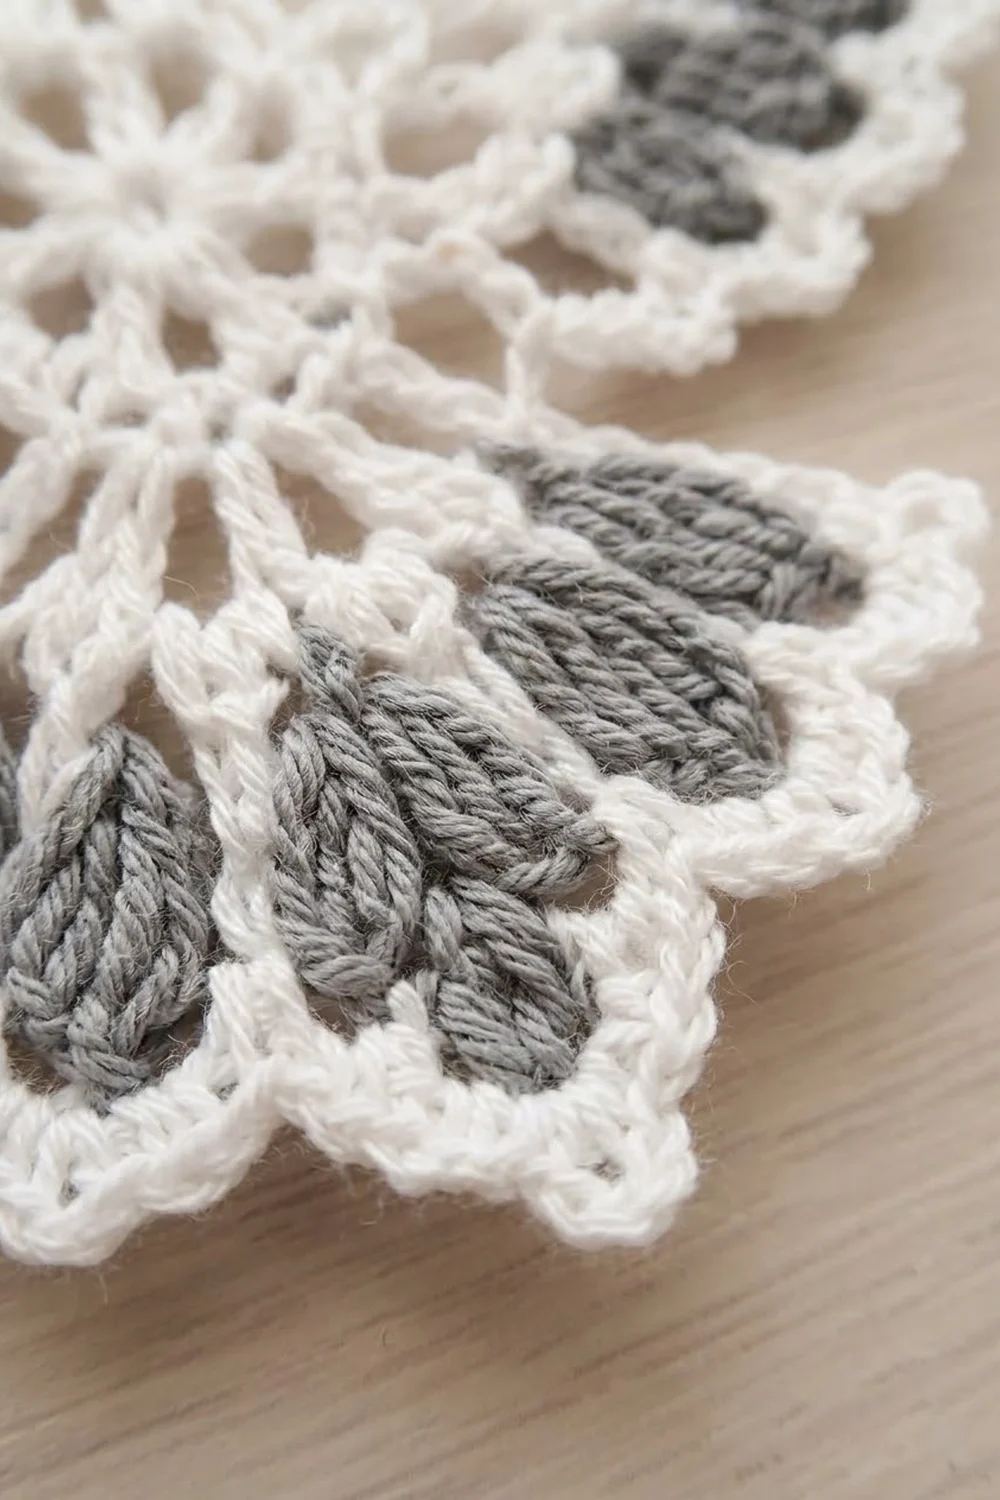
The Winter Angel is a small, lacy ornament built around a white circular medallion. Four wings radiate from the center in a cross arrangement, two angled up and two angled down. Each wing is filled with soft gray fan “feathers” outlined in white, and the whole piece is finished with a scalloped picot trim and a small hanging loop at the top.
The palette is two colors: crisp white for the medallion, outlines, and trim, and a muted gray for the feathers. The style is airy and openwork. Chain spokes in the center and chain arches between the wings let light through, while the shells give each wing a fan-like texture.
This pattern uses US crochet terms. The finished ornament measures 4.5 in (11.4 cm) wide and 4.5 in (11.4 cm) tall, not counting the hanging loop.
Construction is worked in one piece. You crochet the center medallion in the round, then work each wing in short turned rows directly off the medallion’s edge, changing colors between rows. A single border round in white then travels around everything, adding the picot scallops, the chain arches, and the hanging loop.
Finished Size and Construction
- Finished size: 4.5 in x 4.5 in (11.4 cm x 11.4 cm), plus a 1 in (2.5 cm) hanging loop
- Skill level: Intermediate
- Terminology: US crochet terms
- Yarn weight: Fingering (#1 Super Fine) mercerized cotton
- Hook: 2.25 mm (US B-1)
- Number of pieces: 1
- Layout: Center medallion with 4 wings in a cross (X) arrangement and the hanging loop at the top
- Piece size: Center medallion 1.9 in (4.8 cm) across
- Size before border: 4 in x 4 in (10.2 cm x 10.2 cm)
- Border depth: 0.25 in (0.6 cm) on each edge
Materials
Choose a smooth, mercerized cotton in fingering weight. It gives crisp stitch definition, holds starch well, and makes the picots stand up clearly. Avoid fuzzy or brushed yarns, which blur the lace.
- White: 10 g (about 38 m)
- Gray: 4 g (about 15 m)
Quantities include a margin for your gauge swatch and weaving in ends. One ornament uses less than this.
Tools:
– 2.25 mm (US B-1) crochet hook
– Tapestry needle
– 4 locking stitch markers
– Scissors
– Blocking board or foam mat and rustproof pins
– Spray starch
– Ruler or tape measure
Abbreviations (US Terms)
- ch – chain
- sl st – slip stitch
- sc – single crochet
- dc – double crochet
- MR – magic ring
- sk – skip
- st(s) – stitch(es)
- sp – space
- RS / WS – right side / wrong side
Special stitches:
- Shell: 5 dc in the same st.
- Long sc (lsc): Insert hook into the white Row 1 st directly below the current st. This is the st that Row 2’s sc was worked into. Draw up a loop to the height of the working row, yo, and pull through both loops. This makes a white vertical line between two gray fans.
- Scallop: In the same st, work (2 dc, ch 3, sl st in 3rd ch from hook [picot], 2 dc).
Gauge and Checkpoints
Gauge: 8 sc and 9 rows = 1 in (2.5 cm) in sc with a 2.25 mm hook.
To check, chain 17, then work 16 sc per row for 18 rows. The swatch should measure 2 in x 2 in (5.1 cm x 5.1 cm).
Since this is a single piece, the ornament itself works as your test. Measure at each checkpoint below before moving on.
Checkpoints:
– After Round 1: 0.8 in (2.0 cm) across
– After Round 2: 1.6 in (4.1 cm) across
– After Round 3: 1.9 in (4.8 cm) across
– After all four wings: 4 in (10.2 cm) across, measured horizontally between the outer wing tips
– After the border and blocking: 4.5 in (11.4 cm) across
If your piece is too big: Go down to a 2.0 mm hook and restart the center.
If your piece is too small: Go up to a 2.5 mm hook.
Small differences of about 0.1 in (0.3 cm) at Round 3 can be corrected during blocking. Larger differences will add up through the wings.
Center Medallion (White)
Work in joined rounds with the RS facing. Do not turn.
Round 1: Make a MR. Ch 3 (counts as dc), then work 15 dc into the ring. Pull the ring closed and join with a sl st to the top of the ch-3. (16 dc)
Round 2: Ch 5 (counts as dc + ch 2). Dc in the next dc, ch 2. Repeat from * 14 more times. Join with a sl st to the 3rd ch of the beginning ch-5. (16 dc, 16 ch-2 sps)
This round creates the openwork spokes of the medallion.
Round 3: Sl st into the first ch-2 sp. Ch 1, then work 3 sc in each ch-2 sp around. Join with a sl st to the first sc. (48 sc)
This is a conversion round. You work 3 sc into each of the 16 ch-2 spaces (16 x 3 = 48). Nothing is worked into the dc tops. Fasten off.
Measure now. The medallion should be 1.9 in (4.8 cm) across.
Mark the Wing Sections
The 48 sc of Round 3 are divided into 4 gaps of 3 sc and 4 wing sections of 9 sc. Going clockwise from the top:
- Top gap: 3 sc
- Upper-right wing: 9 sc
- Right gap: 3 sc
- Lower-right wing: 9 sc
- Bottom gap: 3 sc
- Lower-left wing: 9 sc
- Left gap: 3 sc
- Upper-left wing: 9 sc
That gives 4 x 3 + 4 x 9 = 12 + 36 = 48 sc. Place a marker in the first sc of each wing section.
Wings (Make 4, Worked Directly onto the Medallion)
Each wing is worked in turned rows over its own 9 sc. Every wing is identical.
To change color, work the last yo of the final st of the row with the new color. Cut the old color, leaving a 6 in (15.2 cm) tail.
Row 1 (RS, white): Join white with a sl st in the marked first sc of the wing section. Ch 1, sc in the same st. 2 sc in the next st, sc in the next st. Repeat from * 3 more times. Change to gray in the last sc. (13 sc)
You used all 9 base sts and added 4 increases (9 + 4 = 13).
Row 2 (WS, gray): Ch 1, turn. Sc in the first sc. Sk 1, shell in the next st, sk 1, sc in the next st. Repeat from * 2 more times. (4 sc + 3 shells = 19 sts)
Each repeat uses 4 sts, so 1 + (3 x 4) = 13. That is all of Row 1.
Row 3 (RS, gray): Ch 1, turn. Sc in the first sc. Sk 1 dc, 2 dc in each of the next 3 dc, sk 1 dc, sc in the next sc. Repeat from * 2 more times. Change to white in the last sc. (4 sc + 18 dc = 22 sts)
This is a growth row. Each fan widens from 5 dc to 6 dc, which creates the flared feather shape.
Row 4 (WS, white): Ch 1, turn. Sc in the first sc. Sc in each of the next 6 dc, lsc in the next sc. Repeat from * 1 more time. Sc in each of the next 6 dc, then sc in the last sc. (22 sts)
This is a conversion row. You work 1 st into each existing st, so the count stays at 22: 1 + 7 + 7 + 6 + 1 = 22. The 2 lsc fall between the fans and draw white lines down through the gray. Fasten off.
Repeat Rows 1–4 on the remaining 3 wing sections. Weave in the color-change tails along the wing edges, where the border will cover them.
Checkpoint: Each wing should extend about 0.8 in (2.0 cm) from the medallion. The outer edge of Row 4 measures about 2.75 in (7.0 cm) when you follow its curve. Across the whole piece, the wing tips should span 4 in (10.2 cm).
Border (White)
The border is worked in one RS round at the same gauge as the body. One sc goes into each st or row end. Each scallop spans 3 sts, or about 3/8 in (1.0 cm).
Border Round: With the RS facing, join white with a sl st in the first sc of the top gap.
Top gap:
1. Ch 1, sc in the same st.
2. Sc in the 2nd gap sc. Ch 22, then sl st in the top of that sc to form the loop.
3. Work 22 sc over the ch-22 loop, then sl st in the same sc.
4. Sc in the 3rd gap sc.
Upper-right wing:
1. Work 4 sc along the wing’s side edge, 1 sc in each row end.
2. Along Row 4: sc in the first st. Sk 1, scallop in the next st, sc in the next st. Repeat from * 6 more times.
3. Work 4 sc down the other side edge, 1 sc in each row end.
Right gap: Sc in the first gap sc, ch 3, sk 1, sc in the 3rd gap sc.
Lower-right wing: Work as for the upper-right wing.
Bottom gap: Work as for the right gap.
Lower-left wing: Work as for the upper-right wing.
Left gap: Work as for the right gap.
Upper-left wing: Work as for the upper-right wing.
Join with a sl st to the first sc. Fasten off and weave in the end.
Counts per section:
– Each wing: 4 side sc + 8 edge sc + 7 scallops + 4 side sc = 16 sc + 7 scallops
– Top gap: 3 sc + hanging loop (22 sc over ch-22)
– Right, bottom, and left gaps: 2 sc + 1 ch-3 arch each
– Round total: 64 wing sc + 9 gap sc = 73 sc, plus 28 scallops, 3 ch-3 arches, and 1 loop
Why the math works: Row 4 has 22 sts. That equals 1 starting sc plus 7 repeats of 3 sts (1 + 21 = 22). So every wing edge begins and ends with a plain sc, and the scallops sit symmetrically.
The side edges get 1 sc per row end, so they lie flat without stretching or ruffling. Each gap uses exactly its 3 Round 3 sc. The arches skip only the center sc, which keeps the openwork without pulling the medallion out of shape.
Final Blocking
- Soak the ornament in cool water for 5 minutes. Press out the water in a towel without wringing.
- Lay it RS up on your blocking mat.
- Pin the center medallion into a circle 1.9 in (4.8 cm) across.
- Pin each wing at a 45° angle from the center. Check that opposite wings line up.
- Pin every picot point. This sharpens the scallops.
- Pin the ch-3 arches open into neat curves.
- Check the overall size: 4.5 in x 4.5 in (11.4 cm x 11.4 cm).
- Spray evenly with starch and let dry completely, about 6–8 hours.
- Unpin. Shape the hanging loop with your fingers and give it a light second spray of starch.
Final Quality-Control Checklist
- Medallion lies flat with 16 even spokes
- Round 3 has 48 sc, split into 4 gaps of 3 and 4 wings of 9
- Each wing has 3 gray fans separated by 2 white lsc lines
- Each wing’s Row 4 has 22 sts
- Each wing has 7 scallops with distinct picots
- 3 ch-3 arches sit at the right, bottom, and left gaps
- Hanging loop is centered in the top gap and fully covered in sc
- Finished size is 4.5 in x 4.5 in (11.4 cm x 11.4 cm)
- All ends are woven in and invisible from the RS
Troubleshooting
Medallion cups: Your Round 2 chains are too tight. Loosen your ch-2s or go up a hook size for that round only.
Medallion ruffles: Your tension is too loose. Go down 0.25 mm and redo the center.
Fans crowd or overlap: Check that you skipped 1 st on each side of every shell in Row 2. Your count should be 19 sts.
Lsc puckers the wing: Draw the loop up fully to the height of the row before finishing the stitch.
Wings curl toward the front: Starch and pin firmly. Turned rows usually flatten completely after blocking.
Scallops look uneven: Count Row 4 again. It must have exactly 22 sts.
Gray shows through the white border: Weave the gray tails into the gray fans, not along the edge stitches.
Loop twists: Pin it flat while the starch dries.
Care
Hand wash gently in cool water and lay flat to dry. Re-block with starch to restore crisp picots. Store flat between sheets of tissue paper.

Final Notes
The measurement chain is simple. The medallion measures 1.9 in (4.8 cm). The four wings bring the piece to 4 in (10.2 cm). The border adds 0.25 in (0.6 cm) on each edge, for a finished size of 4.5 in (11.4 cm).
If each checkpoint matches, the finished ornament will too. Optional: make several in different colorways to hang together on a tree.
Happy crocheting!