

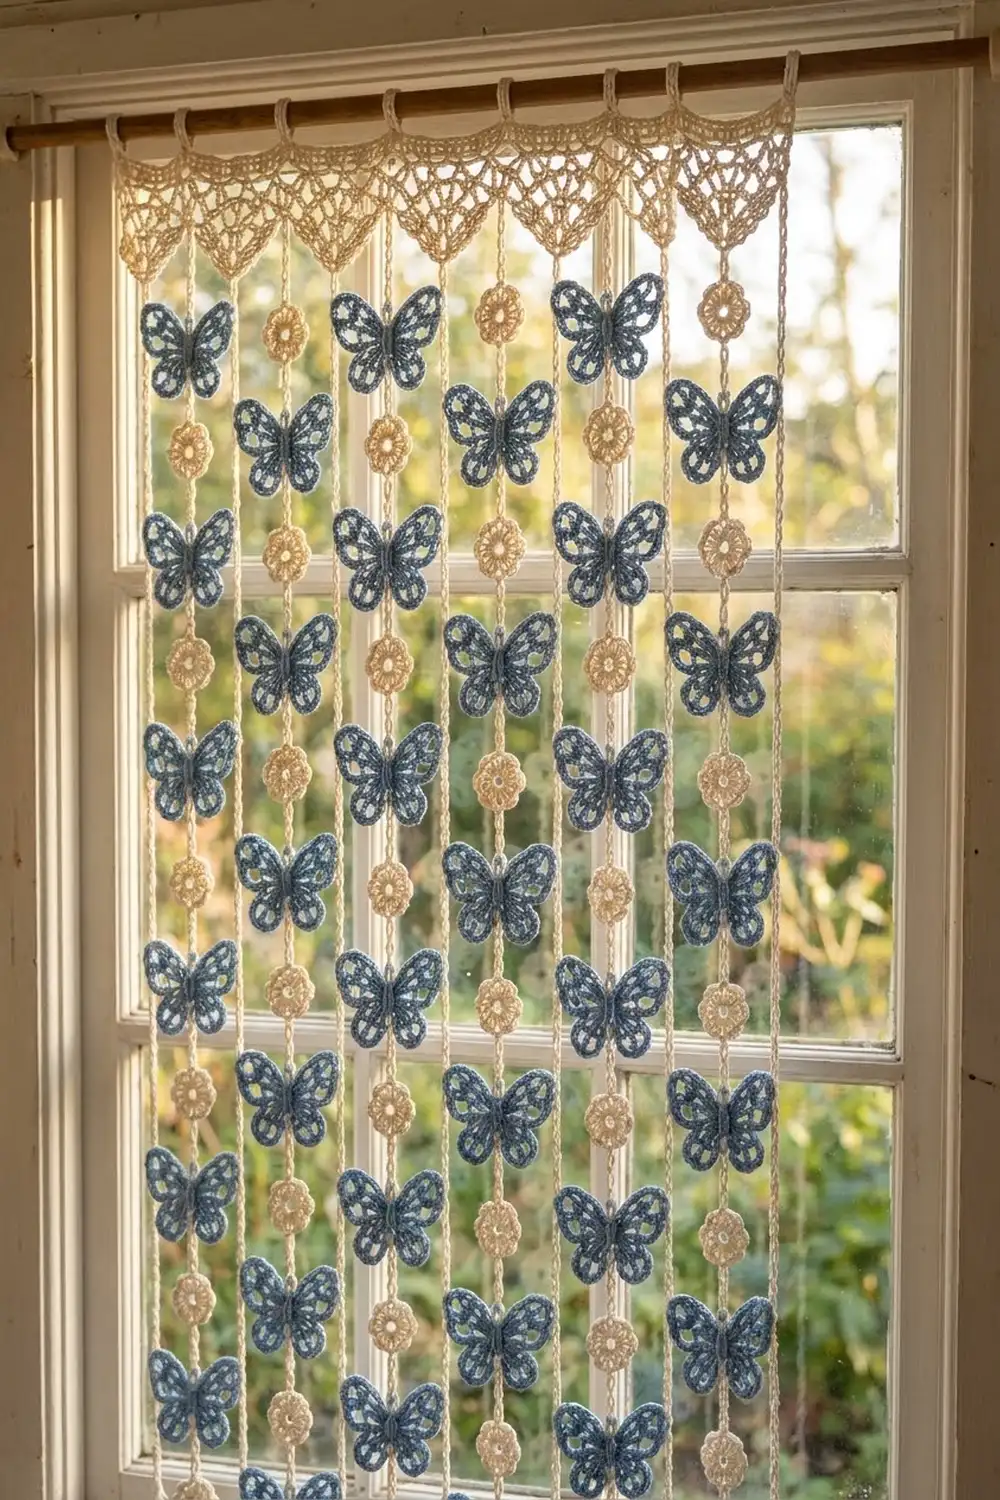
This curtain wall hanging has soft blue butterflies and small cream flowers on long cream chains. The strands hang from a deep lace header with triangular points. Gold metallic thread at each butterfly’s body catches the light, so it looks lovely in front of warm fairy lights.
The palette is simple: blue for the four-winged butterflies, cream for the flowers, chains, and header, and a touch of metallic gold. The style is light, airy, and cottage-romantic.
This pattern uses US crochet terms. The finished hanging measures 27 in (68.6 cm) wide and 16 in (40.6 cm) long, not including the rod loops.
You make 20 butterflies and 20 flowers first. Then you chain them into nine vertical strands. Finally, you crochet the lace header and attach each strand to a triangle tip. The finished curtain slides onto a wooden rod through ten crocheted loops.
Finished Size and Construction
- Finished size: 27 in (68.6 cm) wide x 16 in (40.6 cm) long
- Skill level: Intermediate
- Terminology: US crochet terms
- Yarn weight: DK (weight 3) cotton
- Hook: 3.5 mm (E-4)
- Number of pieces: 41 (20 butterflies, 20 flowers, 1 header)
- Layout: 9 strands, alternating butterfly and flower strands, spaced 3 in (7.6 cm) apart
- Piece size: butterfly 2.75 in (7.0 cm) wide x 2.25 in (5.7 cm) tall; flower 1.5 in (3.8 cm) across
- Size before border: each strand hangs 13 in (33.0 cm)
- Border (header) depth: 3 in (7.6 cm), made of a 0.75 in (1.9 cm) band and 2.25 in (5.7 cm) triangles
Materials
Use a smooth mercerized DK cotton. It shows stitch detail clearly and holds the shape of the wings and points well. Avoid fuzzy or very stretchy yarns, because the strands could lengthen over time.
- Cream: 100 g / 230 m (header, flowers, strands, rod loops)
- Blue: 80 g / 184 m (butterflies)
- Metallic gold thread (embroidery or size 10 crochet thread): 5 g / 20 m
Quantities include a margin of about 25% for swatching and joining.
Tools:
- 3.5 mm (E-4) hook
- Tapestry needle
- Scissors
- Rust-proof pins and a blocking mat
- Spray bottle
- Measuring tape
- Wooden rod, 32 in (81.3 cm) long and 0.5–0.75 in (1.3–1.9 cm) in diameter
Abbreviations (US Terms)
- ch – chain
- sl st – slip stitch
- sc – single crochet
- hdc – half double crochet
- dc – double crochet
- tr – treble crochet
- sk – skip
- sp – space
- st(s) – stitch(es)
- RS – right side
- rep – repeat
Special stitch:
- sc3tog (single crochet 3 together): [Insert hook in next st, yo, pull up a loop] 3 times, yo, pull through all 4 loops on hook.
Gauge and Checkpoints
Make one butterfly and one flower before anything else. Measure them flat and unblocked.
- Stitch gauge: 20 sc = 4 in (10.2 cm), so 5 sc = 1 in (2.5 cm).
- Chain gauge: 6 ch = 1 in (2.5 cm), hanging lightly stretched.
Checkpoints:
- Butterfly Rnd 1: the ring is about 0.5 in (1.3 cm) across.
- Butterfly Rnd 2: the upper wing loops span about 2 in (5.1 cm) tip to tip.
- Butterfly Rnd 4: 2.75 in (7.0 cm) wide x 2.25 in (5.7 cm) tall.
- Flower Rnd 2: 1 in (2.5 cm) across.
- Flower Rnd 3: 1.5 in (3.8 cm) across.
- Header Row 1: 27 in (68.6 cm) wide.
If your pieces are too big, go down 0.25–0.5 mm in hook size. If they are too small, go up 0.25–0.5 mm. Re-test one motif before making all 40.
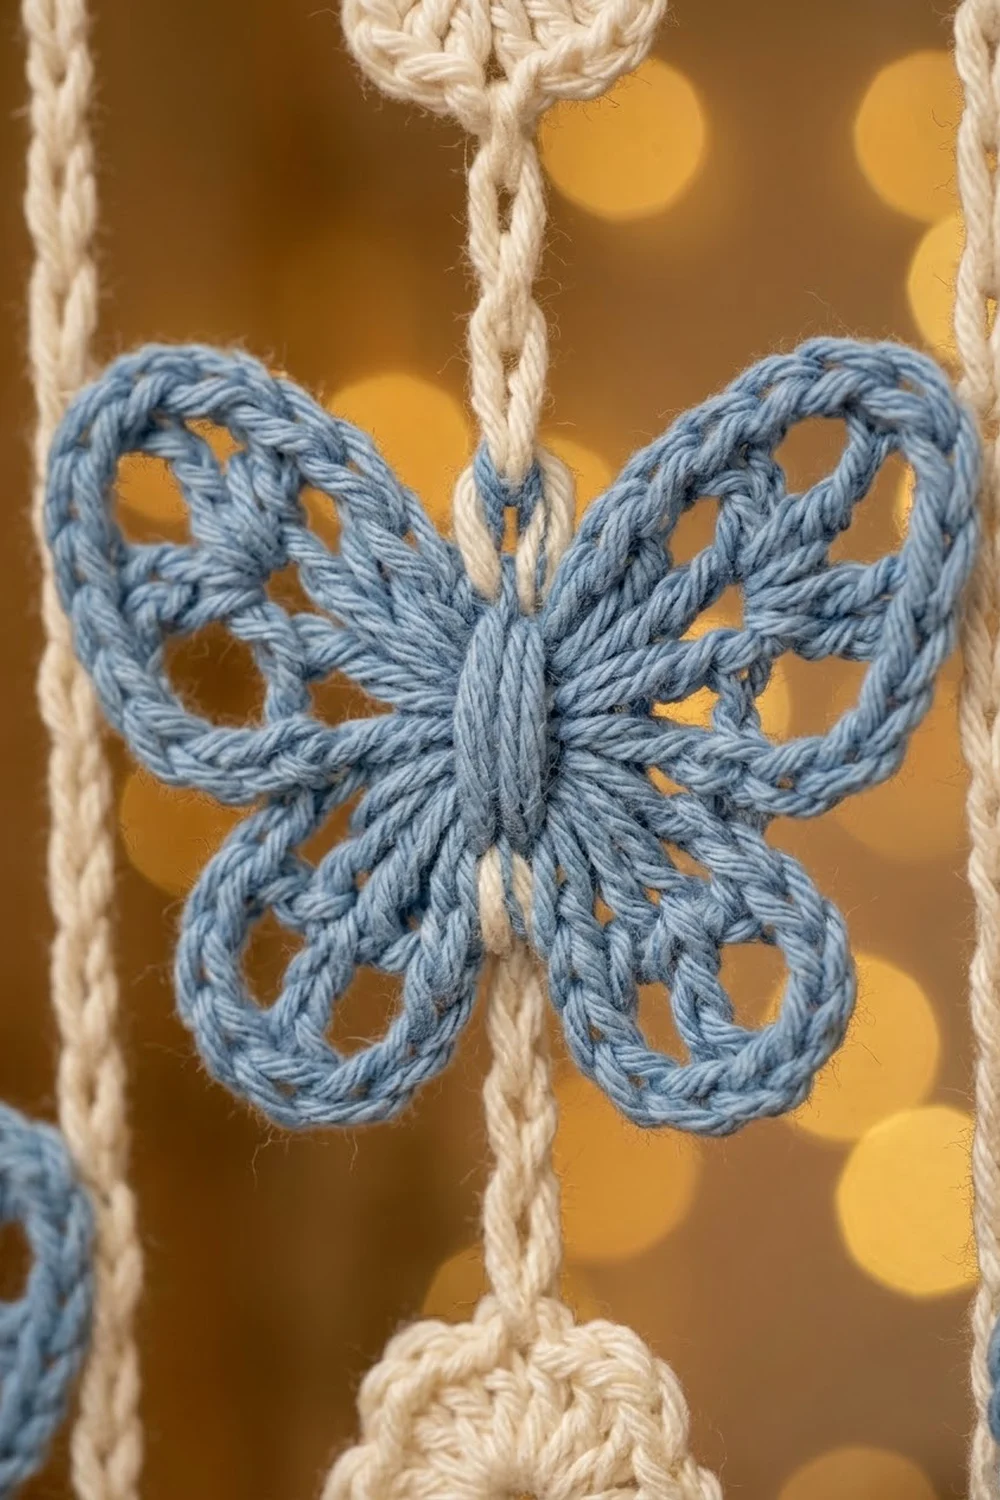
Butterfly (Make 20, Blue)
Rnd 1: Ch 4, sl st to first ch to form a ring. Ch 1, 8 sc in ring, sl st to first sc. (8 sc)
Number the stitches 1–8, with the joining sc as sc 1.
Rnd 2 (wing frames): Ch 9, sk sc 2, sl st in sc 3 (upper wing). Ch 6, sk sc 4, sl st in sc 5 (lower wing). Ch 6, sk sc 6, sl st in sc 7 (lower wing). Ch 9, sk sc 8, sl st in sc 1 (upper wing). (2 ch-9 loops, 2 ch-6 loops)
The sl st at sc 1 is the top junction. The sl st at sc 5 is the bottom junction.
Rnd 3 (lace wings):
- Each ch-9 loop: work sc, hdc, 2 dc, [tr, ch 2] 3 times, tr, 2 dc, hdc, sc. (12 sts, 3 ch-2 sps)
- Each ch-6 loop: work sc, hdc, [dc, ch 2] twice, dc, hdc, sc. (7 sts, 2 ch-2 sps)
Work each loop in order, and sl st into each junction sl st between loops. Join at the top junction. (38 sts, 10 ch-2 sps)
Rnd 4 (wing edge): This is a trim round. Work 1 sc in each st and 3 sc in each ch-2 sp. Sl st in each junction between wings.
- Upper wings: 12 + 9 = 21 sc each
- Lower wings: 7 + 6 = 13 sc each
- Total: 68 sc (plus 4 junction sl sts)
Fasten off and weave in the ends. The holes between the tr and dc stay open under the sc edge, which gives the lacy look.
Gold accents:
- Wrap gold thread vertically over the center ring 8 times, from the top junction to the bottom junction, to form the body. Knot it on the back.
- Thread two gold strands through the top junction and knot them.
- Trim the strands to 0.5 in (1.3 cm) to make the antennae.
Flower Medallion (Make 20, Cream)
Rnd 1: Ch 4, sl st to form a ring. Ch 1, 10 sc in ring, sl st to first sc. (10 sc)
Rnd 2: Ch 3 (counts as dc), dc in same st, 2 dc in each remaining sc, sl st to top of ch-3. (20 dc)
Rnd 3: Ch 1, sc in next st, (hdc, dc, hdc) in next st; rep from * 10 times total, sl st to first sc. (10 petals, 40 sts)
Fasten off and weave in the ends. The dc at the center of petal 1 is the top tip. The dc of petal 6 is the bottom tip, directly opposite.
Make All Pieces
- Blue: 20 butterflies (5 strands x 4)
- Cream: 20 flowers (4 strands x 5)
- Cream: 1 header (made in the Border section)
Layout grid (left to right, one strand per triangle tip):
TIPS 1-9:  BUTTERFLY FLOWER BUTTERFLY FLOWER BUTTERFLY FLOWER BUTTERFLY FLOWER BUTTERFLY

BUTTERFLY STRAND (top to bottom):
  ch 6 / BUTTERFLY / ch 6 / BUTTERFLY / ch 6 / BUTTERFLY / ch 6 / BUTTERFLY

FLOWER STRAND (top to bottom):
  ch 9 / FLOWER / ch 6 / FLOWER / ch 6 / FLOWER / ch 6 / FLOWER / ch 6 / FLOWER
Joining: Building the Strands
Each strand is chained from the bottom up with cream yarn. The chain passes behind each motif. You join it at the motif’s bottom point and again at its top point, so the chain is hidden and the motif hangs flat.
Butterfly strand (make 5):
- Make a slip knot. Sl st into the bottom junction of a butterfly.
- Ch 3 behind the body and sl st into the top junction.
- Ch 6, sl st into the bottom junction of the next butterfly, ch 3 behind the body, sl st into its top junction. Rep from * 2 more times.
- Ch 6. Leave a 6 in (15.2 cm) tail.
Strand length: 4 butterflies x 2.25 in (5.7 cm) = 9 in (22.9 cm), plus 4 ch-6 segments x 1 in (2.5 cm) = 4 in (10.2 cm). Total: 13 in (33.0 cm).
Flower strand (make 4):
- Make a slip knot. Sl st into the bottom tip of a flower.
- Ch 9 behind the flower and sl st into the top tip.
- Ch 6, sl st into the bottom tip of the next flower, ch 9 behind it, sl st into its top tip. Rep from * 3 more times.
- Ch 9. Leave a 6 in (15.2 cm) tail.
Strand length: 5 flowers x 1.5 in (3.8 cm) = 7.5 in, plus 4 ch-6 segments = 4 in, plus the top ch-9 at 1.5 in (3.8 cm). Total: 13 in (33.0 cm).
Why the hidden chains fit:
- The butterfly ring is about 0.5 in (1.3 cm) tall, which matches 3 ch.
- The flower is 1.5 in (3.8 cm) across, which matches 9 ch.
Tension: Chain evenly at your normal tension. If the back chains are too tight, the motifs will cup. If they are too loose, the motifs will droop forward.
Checkpoint: Hang each strand from its tail. It should measure 13 in (33.0 cm), and all nine strands should match within 0.25 in (0.6 cm).
Border: Lace Header
Border gauge:
- Same as the motifs: 20 sc = 4 in (10.2 cm).
- Row gauge: one mesh row plus one sc row = 0.6 in (1.5 cm).
Row 1: Ch 136, sc in 2nd ch from hook and in each ch across. Turn. (135 sc = 27 in / 68.6 cm)
Row 2 (mesh): Ch 4 (counts as dc + ch 1), sk next sc, dc in next sc, ch 1, sk next sc, dc in next sc; rep from * across. Turn. (68 dc, 67 ch-1 sps = 135 sts)
Row 3: Ch 1, sc in each dc and each ch-1 sp across, ending with sc in 3rd ch of turning ch. Fasten off. (135 sc)
The band (Rows 1–3) measures 0.75 in (1.9 cm).
Triangles (make 9): Divide Row 3 into 9 sections of 15 sts each. Work each triangle separately, with RS facing.
- T1: Join with sl st in sc 1 of the section, sl st in sc 2, ch 3 (counts as dc), ch 1, sk next sc, dc in next sc; rep from * 6 times. Turn. (13 sts)
- T2: Ch 1, sk first dc, sc in each st across, stopping before the turning ch. Turn. (11 sc)
- T3: Sl st in first 2 sc, ch 3 (counts as dc), ch 1, sk next sc, dc in next sc; rep from * 4 times. Turn. (9 sts)
- T4: Work as T2. (7 sc)
- T5: Sl st in first 2 sc, ch 3, ch 1, sk next sc, dc in next sc; rep from * twice. Turn. (5 sts)
- T6: Work as T2. (3 sc)
- T7: Ch 1, sc3tog. Fasten off. (1 st)
Rows T1–T6 measure about 1.8 in (4.6 cm).
Edging: With RS facing, join cream in sc 1 of the first section and work 1 sc there. Then, for each triangle:
- Work down the first edge: 2 sc in each mesh row end (T1, T3, T5) and 1 sc in each sc row end (T2, T4, T6). (9 sc)
- At the tip, work (sc, ch 3, sc) in the sc3tog.
- Work back up the second edge the same way. (9 sc)
- At each valley, work sc2tog over sc 15 of the current section and sc 1 of the next.
End with 1 sc in the last sc of Row 3.
- Each triangle: 9 + 2 + 9 = 20 sc, plus 1 ch-3 tip loop
- Total: 9 x 20 = 180 sc, plus 8 sc2tog, plus 2 end sc = 190 sts and 9 ch-3 loops
The finished triangles measure 2.25 in (5.7 cm) deep.
Why the math works:
- 135 = 9 x 15, so each triangle gets an equal 3 in (7.6 cm) section.
- Each row drops 1 st per side: 15, 13, 11, 9, 7, 5, 3, 1.
- Every mesh row lands on an odd count, so it always starts and ends with a dc.
- Each tip sits at the center of its section. The strands therefore fall exactly 3 in (7.6 cm) apart.
Attach the strands: Thread each strand’s tail through a ch-3 tip loop, following the layout grid. Sl st it in place with your hook or sew it, then weave in the tail.
Rod loops: Join cream at the top edge in foundation ch 1. Work a loop at foundation chs 1, 15, 30, 45, 60, 75, 90, 105, 120, and 135 (10 loops):
- Ch 15, sl st in the same st.
- Ch 1, work 20 sc into the loop, sl st in the same st.
- Sl st across the foundation to the next loop position.
These loops fit a rod up to 0.75 in (1.9 cm) in diameter.
Final size: 27 in (68.6 cm) x 16 in (40.6 cm).
Final Blocking
- Lay the curtain flat on a blocking mat and spray it evenly until damp.
- Pin the header to 27 in (68.6 cm) wide x 3 in (7.6 cm) deep. Pin each tip to a sharp point.
- Straighten each strand to 13 in (33.0 cm), with the strands 3 in (7.6 cm) apart.
- Pin each butterfly’s wings open and flat. Pin each flower round.
- Let it dry completely before unpinning.
- Slide the rod through the loops.
Final Quality-Control Checklist
- [ ] Header is 27 in (68.6 cm) wide with 9 even triangles.
- [ ] All 9 tips carry one strand, in B-F alternating order.
- [ ] Every strand hangs 13 in (33.0 cm).
- [ ] Butterflies measure 2.75 in (7.0 cm) x 2.25 in (5.7 cm); flowers measure 1.5 in (3.8 cm).
- [ ] Every butterfly has a gold body wrap and antennae.
- [ ] No back chains show from the front.
- [ ] All 10 rod loops are evenly spaced and secure.
- [ ] All ends are woven in.
Troubleshooting
- Butterflies cup: Rnd 4 is too tight. Rework it with a 3.75 mm hook.
- Flowers ruffle: Rnd 2 is too loose. Go down one hook size.
- Strands differ in length: Chain tension has drifted. Count the chains again and redo the short segments.
- Motifs flip forward: The back chain is too long. Use ch 2 behind the butterflies or ch 8 behind the flowers.
- Triangles lean: You skipped or added a row-end st. The edging needs exactly 9 sc per side.
- Header too narrow: Recheck your gauge on Row 1 before continuing.
- Gold thread splits: Use a blunt needle and shorter lengths.
Care
Hand wash in cool water and lay flat to dry, pinning lightly if needed. Avoid direct heat on the metallic thread.
Final Notes
The measurement chain is simple:
- 5 sc per inch gives a 135-st, 27 in (68.6 cm) header.
- Nine 15-st sections give nine 3 in (7.6 cm) triangles.
- Each triangle tip holds a 13 in (33.0 cm) strand.
- The 3 in (7.6 cm) header plus the 13 in strands gives a 16 in (40.6 cm) curtain.
Check each stage, and the finished piece will hang straight and even. Optional: for a longer hanging, add one motif and one ch-6 segment to every strand.
Happy crocheting!