

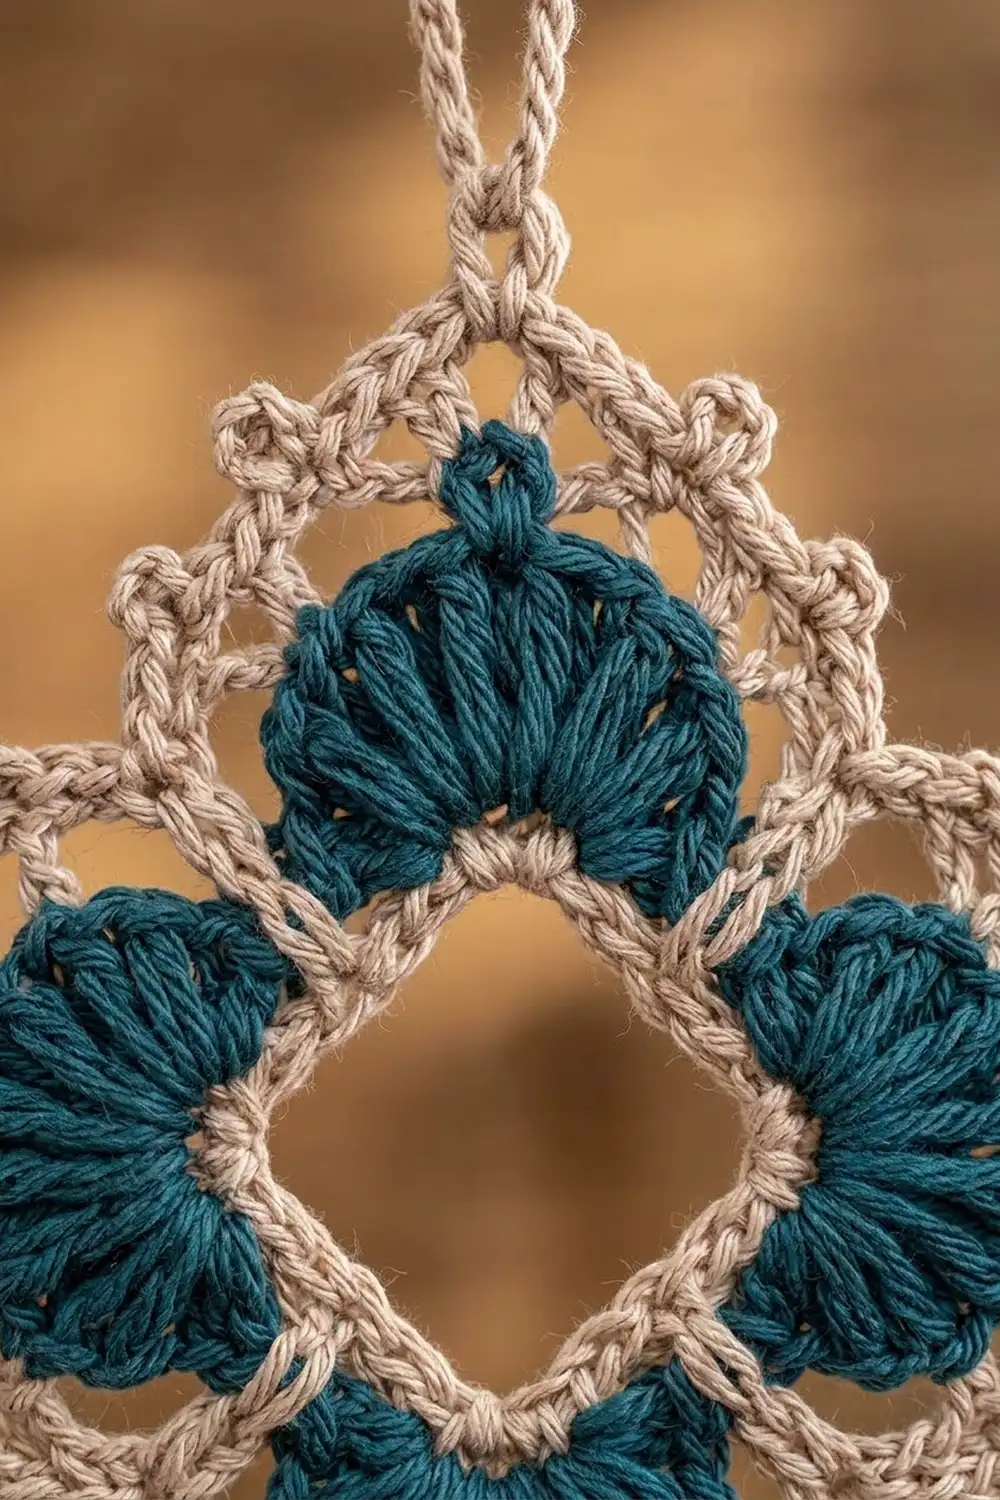
This ornament is a single crocheted motif with a four-pointed diamond silhouette. Four dark teal fan shells sit at the four cardinal points around an open diamond-shaped center. A beige lacy frame with a scalloped picot edge surrounds them.
The two-color palette is calm and wintry: warm beige for the base and border, deep teal for the fans. It looks like a tiny snowflake-meets-tile motif. It hangs on point from a twisted chain loop, so it reads as a diamond on the tree.
This pattern uses US crochet terms. The finished ornament measures 3.5 in (8.9 cm) from point to point, both vertically and horizontally. The hanging loop adds 2 in (5.1 cm).
Construction is simple and worked entirely in the round. A beige chain ring forms the open center. One beige round builds four corner spaces, and one teal round places a fan in each corner. Two beige rounds then frame the fans and finish the scalloped edge. A twisted chain loop is added at the top point.
Finished Size and Construction
- Finished size: 3.5 x 3.5 in (8.9 x 8.9 cm), point to point
- Skill level: Easy-intermediate (treble crochet, picots, color changes)
- Terminology: US crochet terms
- Yarn weight: Sport weight (#2) mercerized cotton
- Hook: 2.75 mm (US C/2)
- Number of pieces: 1 (single motif)
- Layout: One motif, hung on point from a corner
- Piece size: 3.5 in (8.9 cm) point to point
- Size before border: 2.25 in (5.7 cm) point to point after the teal fan round
- Border depth: About 5/8 in (1.6 cm) at each point (2 beige rounds)
- Hanging loop: 2 in (5.1 cm) long, twisted chain
Materials
Yarn advice: Choose a smooth, mercerized sport-weight cotton. Cotton holds the picots crisply and blocks flat. Avoid fuzzy or very stretchy yarns because the open center and lacy border will lose definition.
- Beige (Color A): 6 g, about 19 m
- Teal (Color B): 4 g, about 12 m
These quantities include a margin for your swatch, joining tails and weaving in. One ornament uses less than this, so leftover yarn will make several more.
Tools:
- 2.75 mm (US C/2) crochet hook
- Tapestry needle
- Small scissors
- 1 stitch marker
- Blocking mat or folded towel
- Rust-proof pins
- Spray bottle with water
- Optional: fabric stiffener or diluted craft glue
Abbreviations (US Terms)
- ch – chain
- sl st – slip stitch
- sc – single crochet
- hdc – half double crochet
- dc – double crochet
- tr – treble crochet (yarn over twice, insert hook, pull up a loop, [yarn over, pull through 2 loops] 3 times)
- sk – skip
- sp(s) – space(s)
- rep – repeat
- rnd(s) – round(s)
Special stitch – Picot: Ch 3, sl st in 3rd ch from hook. The picot is worked on top of the stitch just made and is not counted as a stitch.
Gauge and Checkpoints
Base gauge: 6 sc = 1 in (2.5 cm) with a 2.75 mm hook. One tr stands about 0.5 in (1.3 cm) tall.
Gauge matters here because the finished size depends on fan height and border depth. Work the center and the fan round (Rnds 1–2) as your test. Measure before you continue to the border.
Measurement checkpoints (point to point, laid flat, unstretched):
- After Rnd 1: 1.25 in (3.2 cm). The center hole is about 0.75 in (1.9 cm) across.
- After Rnd 2: 2.25 in (5.7 cm). Each fan is about 0.5 in (1.3 cm) tall.
- After Rnd 3: 2.75 in (7.0 cm).
- After Rnd 4: 3.5 in (8.9 cm).
A tolerance of 1/8 in (0.3 cm) at any checkpoint is fine. Blocking will even out small differences.
If your piece is too big: Change to a 2.5 mm hook and restart. Also check that your tr stitches are not loose. Tall stitches tend to grow if you pull the first loop up high.
If your piece is too small: Change to a 3.0 mm hook. Also make sure the starting ring is not tight. A tight ring shrinks the center hole and cups the fans.
Center and Fans
Starting Ring (Beige)
With beige, ch 16, sl st in first ch to form a ring. Take care not to twist the chain. Place a marker in the joining sl st.
Rnd 1 (Beige) – Diamond Frame
Ch 1. [Sc in next 3 ch, (sc, ch 3, sc) in next ch] 4 times. Join with sl st to first sc. Fasten off beige.
Count: 20 sc and 4 corner ch-3 sps. Each side has 5 sc between corner spaces: the sc after one corner, the 3 sc, and the sc before the next corner.
Check: 4 repeats x (3 + 2) sc = 20 sc. The 16 foundation chains are used as 4 x (3 + 1) = 16 ch.
Checkpoint: 1.25 in (3.2 cm) point to point. The center opening should be a clear diamond about 0.75 in (1.9 cm) across.
Rnd 2 (Teal) – Four Fans
Each fan is worked into a corner ch-3 sp, so it grows outward toward one of the four points. A sl st anchors the middle of each side, which creates the valleys between fans.
Join teal with sl st in any corner ch-3 sp.
- Ch 4 (counts as first tr). Work 4 tr in same sp, picot, 5 tr in same sp. This is the first fan.
- Sk next 2 sc, sl st in next sc (the middle sc of the side), sk next 2 sc.
- In next corner ch-3 sp work (5 tr, picot, 5 tr). Sk next 2 sc, sl st in next sc, sk next 2 sc. Rep from * to * 2 more times.
- Join with sl st to top of beginning ch-4. Fasten off teal.
Count: 4 fans of 10 tr each, for 40 tr total. Each fan has 5 tr on each side of its picot. You also have 4 picots (one at each fan tip) and 4 valley sl sts.
Check against Rnd 1: each side uses 2 skipped sc + 1 sl st + 2 skipped sc = 5 sc. That matches the 5 sc per side from Rnd 1.
Checkpoint: 2.25 in (5.7 cm) point to point, measured from fan picot to fan picot. The fans should lie flat. If they ruffle, see Troubleshooting.
Border
The border is 2 beige rounds. Rnd 3 is an open lace frame that squares off the silhouette. Rnd 4 adds the scalloped picot edge.
Border gauge: The border uses the same 6 sc = 1 in (2.5 cm) gauge as the rest of the motif. A ch-3 should span about 0.5 in (1.3 cm) when relaxed. Do not tighten up for the border. Tight chains will pull the sides inward and distort the diamond.
Rnd 3 (Beige) – Lace Frame
Each side of the frame runs from one fan picot to the next. Along the way it passes over 5 tr from the first fan, then the valley sl st, then 5 tr from the next fan.
Join beige with sl st in any fan picot (work into the ch-3 loop of the picot).
- Ch 1. Work (sc, ch 3, sc) in same picot. This is the first corner.
- Work one side: ch 3, sk 2 tr, sc in next tr, ch 3, sk 2 tr. Tr in valley sl st, ch 3. Sk 2 tr, sc in next tr, ch 3, sk 2 tr.
- Work (sc, ch 3, sc) in next fan picot for the corner. Work the side as in step 2. Rep from * to * 2 more times.
- Join with sl st to first sc. Do not fasten off.
For the valley tr, work under both loops of the teal sl st. If it is hard to find, work into the Rnd 1 sc directly beneath it.
Count per side (between corner spaces): 4 ch-3 sps and 3 anchor stitches (1 sc, 1 tr, 1 sc).
Count per corner: 2 sc and 1 ch-3 sp.
Round total: 16 sc (8 at corners + 8 on sides), 4 tr, and 20 ch-3 sps (4 corner + 16 side).
Why the math works: Each half-fan has 5 tr. Rnd 3 handles them as 2 skipped + 1 anchored sc + 2 skipped = 5. Each fan has two halves, so each fan is fully accounted for: 2 anchors + 8 skipped = 10 tr. The valley tr is about the same height as a fan, at 0.5 in (1.3 cm). It fills the dip between fans, so the side becomes nearly straight.
Checkpoint: 2.75 in (7.0 cm) point to point.
Rnd 4 (Beige) – Scalloped Picot Edge
Sl st into the next corner ch-3 sp.
- Ch 1. In same corner sp work (sc, hdc, dc, picot, dc, hdc, sc).
- Work (sc, hdc, picot, hdc, sc) in each of next 4 side ch-3 sps.
- In next corner ch-3 sp work (sc, hdc, dc, picot, dc, hdc, sc). Work the side as in step 2. Rep from ** to ** 2 more times.
- Join with sl st to first sc. Fasten off and weave in ends.
Count per side (between corners): 4 scallops x 4 stitches = 16 stitches and 4 picots.
Count per corner: 6 stitches and 1 picot.
Round total: (4 sides x 16) + (4 corners x 6) = 64 + 24 = 88 stitches. Picots: (4 x 4) + 4 = 20.
Why the math works: Every ch-3 sp from Rnd 3 receives exactly one scallop. There are 16 side spaces and 4 corner spaces, so you work 20 scallops and 20 picots in total. The corner scallops use dc at their peak, which makes them taller than the side scallops. This lifts the four points and keeps the diamond shape crisp.
Checkpoint: 3.5 in (8.9 cm) point to point, both directions.
Twisted Chain Hanging Loop (Beige)
Choose one corner picot as the top. The fan below it will point straight up when the ornament hangs.
- Join beige with sl st in the top corner picot.
- Ch 24 loosely.
- Keep the hook in the last loop. Rotate the hook clockwise 4 full turns so the chain twists into a cord.
- Sl st in the same corner picot to close the loop.
- Fasten off. Weave the tail down into the corner scallop, then back up through the base of the loop to lock the twist.
Checkpoint: The loop measures about 2 in (5.1 cm) long when hanging. The total hanging height, including the ornament, is about 5.5 in (14.0 cm).
Final Blocking
- Weave in all ends before blocking. Keep teal tails inside the teal fans and beige tails inside beige stitches so nothing shows through.
- Mist the ornament until it is evenly damp. You can also soak it briefly and press out the water in a towel.
- Lay it on point on the blocking mat.
- Pin the 4 corner picots to form a 3.5 x 3.5 in (8.9 x 8.9 cm) diamond. Measure point to point both ways.
- Pin each fan picot so the fans point straight to the corners.
- Pin open the center hole into a clean diamond about 0.75 in (1.9 cm) across.
- Pin each side picot outward slightly so the scallops sit evenly along straight sides.
- Optional: brush on fabric stiffener while pinned, keeping it away from the loop so the loop stays flexible.
- Let the ornament dry completely, then unpin it. Dab the twisted loop with water and hang it under a little weight to set the twist.
Final Quality-Control Checklist
- The ornament is a single motif measuring 3.5 in (8.9 cm) point to point in both directions.
- The center hole is open and diamond-shaped, about 0.75 in (1.9 cm) across.
- There are 4 teal fans, each with 10 tr and a picot at the tip.
- Each fan points to one of the 4 outer corners.
- Rnd 3 has 20 ch-3 sps (4 at the corners, 4 on each side).
- Rnd 4 has 20 scallops and 20 picots, with taller dc scallops at the corners.
- The sides look straight after blocking, not bowed inward.
- The hanging loop is about 2 in (5.1 cm), twisted, and attached at a corner picot.
- All ends are woven in and invisible from both sides.
Troubleshooting
Fans ruffle or wave: Your tr stitches are too loose, or the Rnd 1 corner spaces are too small. Use a smaller hook for Rnd 2, or loosen your ch 3 at the Rnd 1 corners.
Fans cup inward: Your starting ring or Rnd 1 is too tight. Redo the ring with a looser ch 16.
Center hole closes up: The ring was pulled tight when joining. Make the joining sl st gently, and pin the hole open during blocking.
Sides bow inward after Rnd 3: The ch-3 sps are too tight, or the valley tr is too short. Loosen the chains, or use a slightly longer first loop on the valley tr.
Scallops crowd or flip: Your ch-3 sps are too small for 4–6 stitches. Loosen the Rnd 3 chains slightly.
Picots are uneven: Always sl st into the 3rd ch from the hook, and pull each picot snug before continuing.
Loop untwists: Lock the tail through the loop base and set the twist with damp blocking.
Color shows through at joins: Join new colors in a corner space or picot, where the join is hidden by the next stitches.
Care
Hand wash in cool water, press out the water gently, and reshape. Dry flat or pinned. If you stiffened the ornament, dust it only and do not soak it.

Final Notes
The measurement chain is simple to follow. The ornament measures 1.25 in (3.2 cm) after the diamond frame and 2.25 in (5.7 cm) after the teal fans. It reaches 2.75 in (7.0 cm) after the lace frame and 3.5 in (8.9 cm) after the scalloped picot edge. The twisted loop then adds 2 in (5.1 cm).
Check each stage before moving on, and the finished ornament will match from point to point. Optional: make several in the same colors and hang them together on a branch for a coordinated display.
Happy crocheting!