

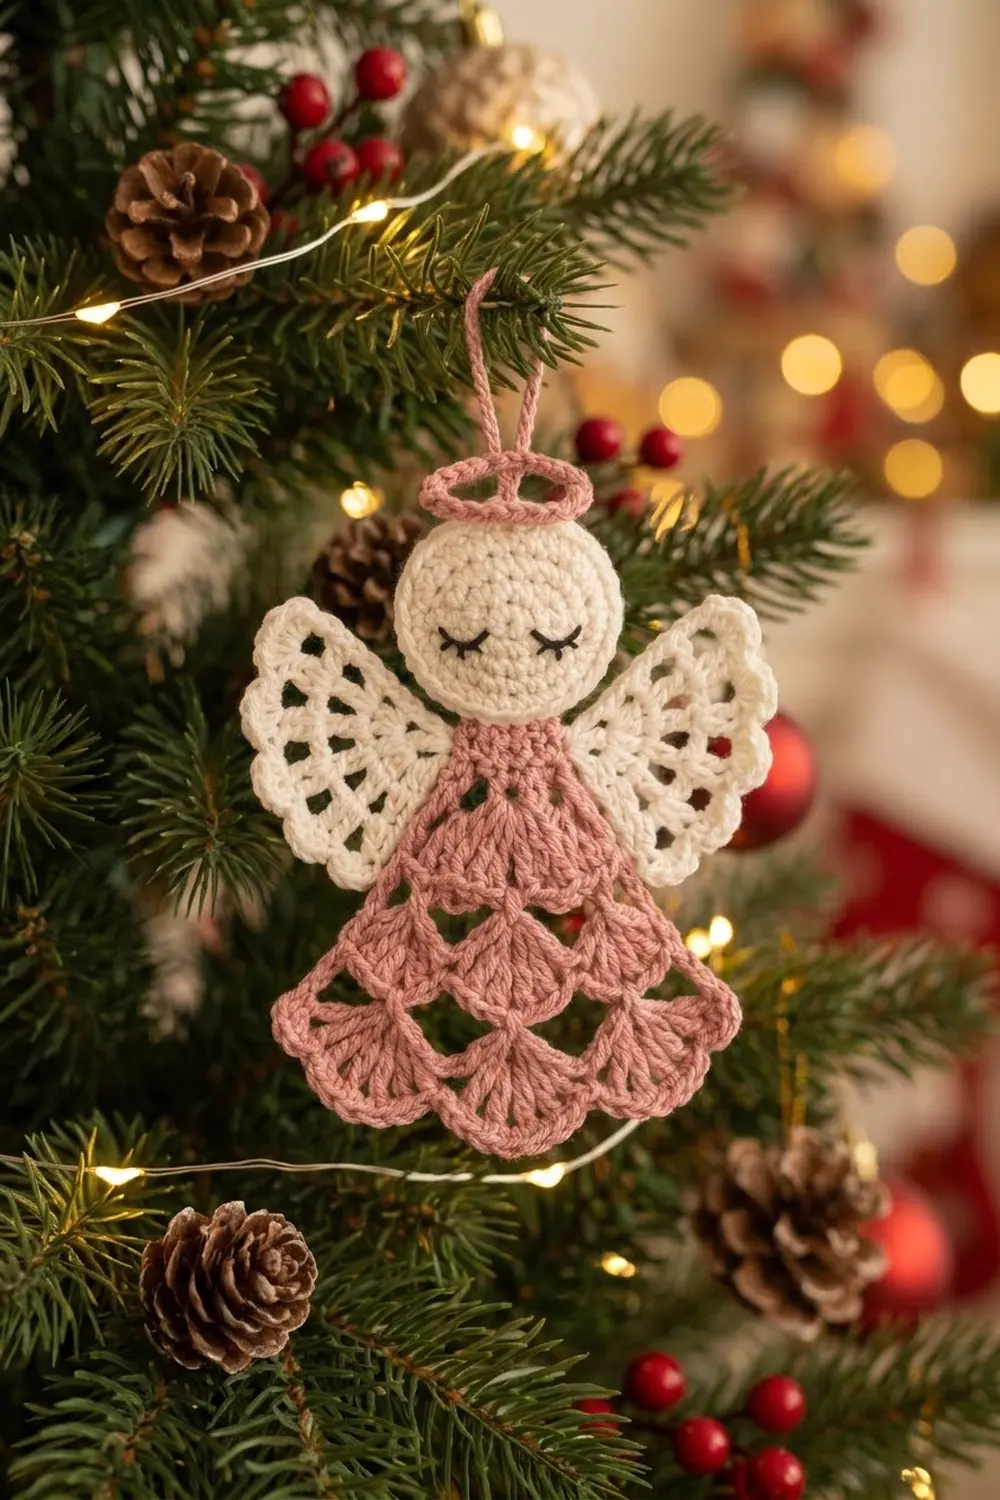
This little angel is a calm, sleepy-faced ornament made for the tree. She has a cream stuffed head with embroidered closed eyes, a dusty rose textured torso, two cream lace wings, and a rose rope-textured hanging loop. Her dress cascades in three scalloped shell tiers that alternate cream, rose, and cream.
The style is soft and vintage. The torso uses a bumpy sc/dc texture, the wings combine open V-stitches with a shell edge, and every dress tier ends in rounded fans. All instructions use US crochet terms.
The finished angel measures about 4.5 in (11.4 cm) from the top of the head to the hem. The hanging loop adds about 1.25 in (3.2 cm). The hem is about 3 in (7.6 cm) across.
She is built from five pieces. You make a stuffed amigurumi head, a body worked top-down in the round from neck to hem, two fan-shaped wings, and a crocheted cord loop. Then you sew everything together.
Finished Size and Construction
- Finished size: 4.5 in (11.4 cm) tall, head to hem, plus a 1.25 in (3.2 cm) loop
- Skill level: Advanced beginner
- Terminology: US crochet terms
- Yarn weight: DK / light (#3) cotton
- Hook: 3.25 mm (US D/3)
- Number of pieces: 5 (head, body/dress, 2 wings, loop)
- Layout: Vertical stack. The loop sits on the head, the head sits on the torso, the wings sit on the torso back, and the dress tiers hang below.
- Piece sizes: Head 1.5 in (3.8 cm) across. Body 3 in (7.6 cm) tall. Each wing 2 in (5.1 cm) across the scallops and 1.25 in (3.2 cm) deep.
- Size before border: Body is 2.25 in (5.7 cm) tall after Tier 2.
- Border depth: The hem tier (Tier 3) adds 0.75 in (1.9 cm).
Materials
Use a smooth, tightly plied DK cotton or cotton blend. Cotton holds the shell shapes crisply and blocks well. Avoid fuzzy yarns, because they hide the lace openings.
- Cream: 12 g (about 30 m) for the head, wings, Tier 1, and Tier 3
- Dusty rose: 8 g (about 20 m) for the torso, Tier 2, and the loop
- Black: 12 in (30.5 cm) of embroidery floss or fingering yarn for the eyes
These quantities include a small safety margin.
Tools:
- 3.25 mm (US D/3) crochet hook
- Tapestry needle
- Stitch markers
- Small amount of polyester fiberfill
- Rust-proof pins and a foam board
- Spray bottle
- Optional: fabric stiffener or starch
- Optional: a paper cone about 3 in (7.6 cm) tall for shaping
Abbreviations (US Terms)
- ch – chain
- sl st – slip stitch
- sc – single crochet
- dc – double crochet
- MR – magic ring
- inc – 2 sc in the same stitch
- dec – invisible sc decrease (insert in the front loop of the next 2 sts, yarn over, pull through both loops, finish as sc)
- st(s) – stitch(es)
- sp(s) – space(s)
- RS – right side
Special stitches:
- Standing sc: Start with a slip knot on the hook. Insert the hook in the stitch, pull up a loop, and finish as a normal sc.
- Shell: The stated number of dc worked into one space (5, 7, or 9).
- V-st: (dc, ch 2, dc) in the same space.
Gauge and Checkpoints
Gauge: 6 sc and 6 sc rounds = 1 in (2.5 cm), worked tightly in amigurumi style.
Make the head first. It works as your gauge test.
Checkpoints:
- Head, Round 5: The flat circle measures about 1.5 in (3.8 cm) across.
- Stuffed head: Measures 1.5 in (3.8 cm) in diameter.
- Torso after Round 6: Measures 1 in (2.5 cm) tall and about 4 in (10.2 cm) around.
- Body after Tier 1: Measures 1.6 in (4.1 cm) tall.
- Body after Tier 2: Measures 2.25 in (5.7 cm) tall.
- Body after Tier 3: Measures 3 in (7.6 cm) tall.
- Wing: Measures 1.25 in (3.2 cm) from ring to scallop tip.
Adjusting gauge:
- If your head is larger than 1.6 in (4.1 cm), go down to a 3.0 mm hook.
- If it is smaller than 1.4 in (3.6 cm), go up to a 3.5 mm hook.
- Fiberfill should never show through the stitches. If it does, go down a hook size even if the size is correct.
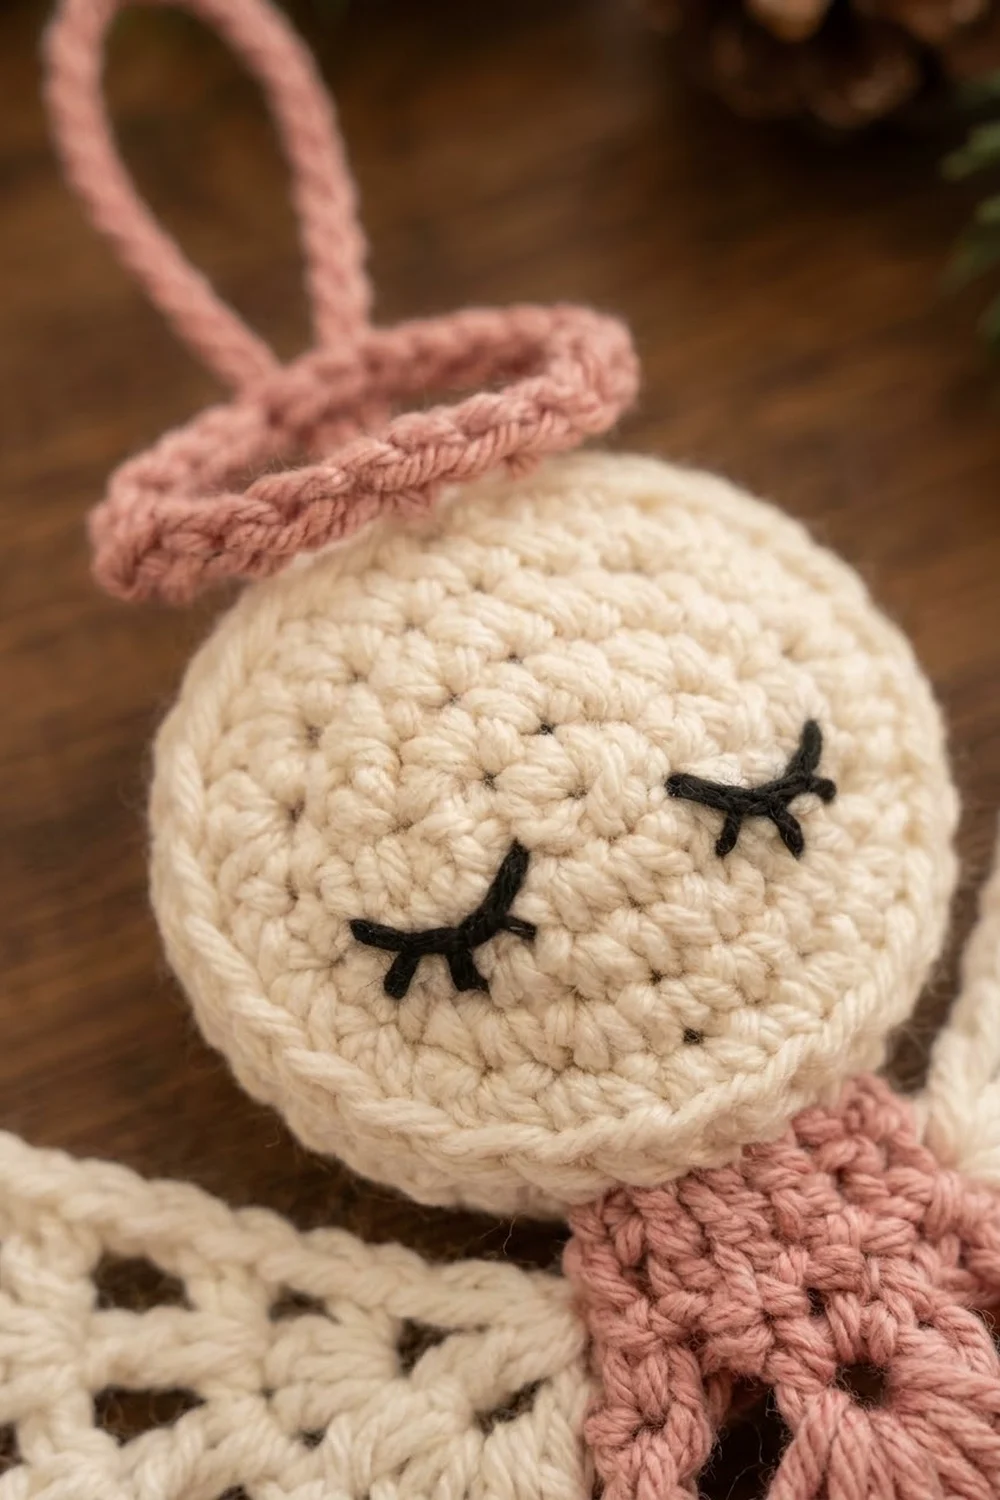
Head (Cream)
Work in continuous spirals. Do not join rounds. Mark the first stitch of each round.
- Round 1: 6 sc in MR. (6)
- Round 2: Inc in each st. (12)
- Round 3: Sc, inc 6 times. (18)
- Round 4: Sc in next 2, inc 6 times. (24)
- Round 5: Sc in next 3, inc 6 times. (30)
- Rounds 6–9: Sc in each st. (30 each round)
- Round 10: Sc in next 3, dec 6 times. (24)
- Round 11: Sc in next 2, dec 6 times. (18)
Embroider the eyes now. Find the front of the head and work between Rounds 7 and 8, with the eyes 5 sts apart. For each eye, stitch a downward curve about 3 sts wide. Add 3 short lashes below each curve. Secure the ends inside.
- Round 12: Sc, dec 6 times. (12)
Stuff the head firmly into a round shape.
- Round 13: Dec 6 times. (6)
Fasten off. Weave the tail through the front loops of the last 6 sts, pull closed, and hide the end. The 12 sts of Round 12 now form a ring around the closure. This ring is where the head attaches to the neck.
Body and Dress (Rose, Then Alternating Tiers)
Work in joined rounds with the RS facing. Do not turn. The beginning ch 1 never counts as a stitch. The beginning ch 3 counts as the first dc.
Torso (Rose)
- Round 1: Ch 12 and sl st to the first ch to form a ring, without twisting it. Ch 1, then sc in each ch. Join. (12 sc)
- Round 2: Ch 1, sc in next, inc 6 times. Join. (18)
- Round 3: Ch 1, sc in next, dc in next 9 times. Join. (18: 9 sc, 9 dc)
- Round 4: Ch 1, sc in next, dc in next, (sc, dc) in next 6 times. Join. (24)
Each repeat uses 3 sts and makes 4. That gives 6 × 4 = 24.
- Round 5: Ch 1, sc in next dc, dc in next sc 12 times. Join. (24)
- Round 6: Repeat Round 5. Join. (24)
Fasten off the rose yarn.
The increases in Rounds 2 and 4 form a rounded shoulder dome. The alternating sc and dc create the textured surface. Checkpoint: The torso is 1 in (2.5 cm) tall.
Tier 1 (Cream)
- Round 7: Standing sc in any st. Ch 2, skip 1, sc in next 11 times. Ch 2, skip 1, and join to the first sc.
This is a conversion round, not a growth round. The 24 sts become 12 sc and 12 ch-2 sps, and each repeat uses 2 sts.
- Round 8: Sl st into the first ch-2 sp. Ch 3, then 4 dc in the same sp. Sc in the next sp. 5 dc in the next sp, sc in the next sp 5 times. Join to the top of the ch 3.
This round has 6 shells and 6 sc, for 30 dc + 6 sc = 36 sts.
Fasten off. Checkpoint: The body is 1.6 in (4.1 cm) tall.
Tier 2 (Rose)
- Round 9: Standing sc in the 3rd dc of any shell. Ch 4, sc in the next sc, ch 4. Sc in the 3rd dc of the next shell, ch 4, sc in the next sc, ch 4 5 times. Join.
This round has 12 sc and 12 ch-4 sps. Each shell gives 2 spaces.
- Round 10: Sl st into the first ch-4 sp. Ch 3, then 6 dc in the same sp. Sc in the next sp. 7 dc in the next sp, sc in the next sp 5 times. Join.
This round has 6 shells, for 42 dc + 6 sc = 48 sts.
Fasten off. The Tier 2 shells sit half a repeat offset from Tier 1, which creates the cascading brick look. Checkpoint: The body is 2.25 in (5.7 cm) tall.
Wings (Make 2, Cream)
Work in rows. Turn at the end of each row.
- Row 1 (RS): In the MR, ch 3 (counts as dc), then ch 2, dc 3 times. Pull the ring snug. Turn.
This row has 4 dc and 3 ch-2 sps.
- Row 2: Ch 3 (counts as dc). V-st in each of the 3 ch-2 sps. Dc in the top of the beginning ch 3. Turn.
This row has 8 dc and 3 ch-2 sps. The gaps between the V-sts form the lace openings.
- Row 3: Ch 1, sc in the first dc. 5 dc in the next ch-2 sp. Sc in the gap between the next 2 V-sts. 5 dc in the next ch-2 sp. Sc in the next gap. 5 dc in the next ch-2 sp. Sc in the top of the turning ch.
This row has 15 dc + 4 sc = 19 sts.
Fasten off, leaving a 10 in (25.4 cm) tail. Checkpoint: Each wing measures 2 in (5.1 cm) across the scallops and 1.25 in (3.2 cm) deep.
Hanging Loop (Rose)
- Ch 22.
- Sl st in the back bump of the 2nd ch from the hook and in each ch across. (21 sl st)
- Fasten off, leaving both tails 6 in (15.2 cm) long.
The back-bump slip stitches give the cord a rope-like ridge. The cord measures about 3 in (7.6 cm).
Make All Pieces
Cream:
- 1 head
- 2 wings
- Tier 1 and Tier 3 of the body
Rose:
- 1 torso (Rounds 1–6)
- Tier 2 of the body
- 1 hanging loop
Assembly layout:
TOP:   LOOP (ROSE)
ROW 1: HEAD (CREAM)
ROW 2: WING (CREAM)  TORSO (ROSE)  WING (CREAM)
ROW 3: TIER 1 (CREAM)
ROW 4: TIER 2 (ROSE)
ROW 5: TIER 3 HEM (CREAM)
Joining
Use a tapestry needle and a whipstitch throughout.
Head to neck: The neck edge has 12 sts (the free loops of the Round 1 foundation chain). The head’s Round 12 also has 12 sts. Match them 1 to 1 and whipstitch each neck st to one head st. Because the counts match, the head sits centered with no puckering.
Wings to back:
- Lay the body face down.
- Place each wing’s ring on Round 4, 3 sts to the left or right of center back.
- Angle the scalloped edge up and outward.
- Sew through the ring, then along the inner row edge: the Row 1 dc and the Row 2 turning ch. That makes a seam about 0.5 in (1.3 cm) long.
- Leave the rest of the wing free so it stands slightly away from the body.
Loop to head:
- Thread both loop tails down through the top of the head at the magic ring and out at the neck.
- Pull until the loop stands 1.25 in (3.2 cm) above the head. About 0.25 in (0.6 cm) of each leg sinks into the head.
- Twist the two legs around each other 2 times for the twisted rope look.
- Knot the tails and bury them inside the head.
Tension: Pull each stitch snug, but not tight enough to dent the head or bunch the torso.
Checkpoint: The figure is now 3.75 in (9.5 cm) from head top to hem, before the final tier. The wingspan is about 3.5 in (8.9 cm) tip to tip.
Border (Tier 3 Hem, Cream)
The hem tier is the border. It is worked at the same gauge as the rest of the dress. Each 9-dc shell plus its sc spans about 1.5 in (3.8 cm) along the hem.
- Round 11: Standing sc in the 4th dc of any Tier 2 shell. Ch 5, sc in the next sc, ch 5. Sc in the 4th dc of the next shell, ch 5, sc in the next sc, ch 5 5 times. Join.
This round has 12 sc and 12 ch-5 sps, which is 2 sc and 2 spaces per repeat.
- Round 12: Sl st into the first ch-5 sp. Ch 3, then 8 dc in the same sp. Sc in the next sp. 9 dc in the next sp, sc in the next sp 5 times. Join.
This round has 6 shells. Each repeat is 9 dc + 1 sc = 10 sts, and 6 × 10 = 60 sts in total.
Fasten off and weave in all ends.
Why the math works:
- The repeat count stays at 6 from Tier 1 through Tier 3.
- Each net round turns 6 shells into 12 spaces: one at each shell center and one at each sc between shells.
- Each shell round fills every other space, which brings the count back to 6 shells, offset by half a repeat.
- Each tier adds 2 dc per shell (5, then 7, then 9) and 1 ch per net loop (ch 2, then ch 4, then ch 5). That is what makes the skirt flare.
- At the hem, 6 repeats × 1.5 in = 9 in (22.9 cm) around, or about 3 in (7.6 cm) across.
Final Blocking
- Lightly mist the wings and dress until they are damp, not soaked.
- Pin each wing flat on the foam board. Shape the 3 scallops evenly and open the V-st gaps.
- Slip the paper cone inside the dress, or roll paper into a 3 in (7.6 cm) cone.
- Shape each tier so the shells fan evenly and point down. Pin the hem scallops out to 3 in (7.6 cm) across.
- Optional: Brush diluted fabric stiffener onto the dress and wings only. Keep it off the head.
- Let everything dry completely, about 12–24 hours.
- Remove the cone. Re-check the height: 4.5 in (11.4 cm).
Final Quality-Control Checklist
- Head is 1.5 in (3.8 cm) across, firm, and round, with no stuffing showing.
- Eyes are level, 5 sts apart, and lashes point down.
- Head is centered on the neck with 12 sts matched to 12.
- Torso rounds alternate sc and dc cleanly.
- Tiers read cream, rose, cream from top to bottom.
- Each tier has exactly 6 shells: 5, 7, and 9 dc.
- Hem is 3 in (7.6 cm) across, and the body is 3 in (7.6 cm) tall.
- Wings are symmetric, 2 in (5.1 cm) wide, and attached at Round 4.
- Loop stands 1.25 in (3.2 cm) high and is twisted twice.
- All ends are woven in and hidden.
Troubleshooting
Head looks lumpy. Use smaller tufts of fiberfill and roll the head between your palms before closing it.
Torso twists sideways. Check that each round starts in the same column and that the ch 1 isn’t counted as a stitch.
Shells are crowded or cupping. Check your net chain counts. Ch 4 and ch 5 loops give the larger shells room to spread.
Shells don’t stagger. Make sure every net round places a sc in both the shell center and the between-shell sc. That keeps 12 spaces.
Wings curl. Block them flat and pinned, and add stiffener if needed.
Hem is narrower than 3 in (7.6 cm). Your dc may be tight. Rework Tier 3 with a 3.5 mm hook.
Loop flops forward. Sink the legs deeper into the head and add a stitch through the back of the head.
Care
Spot clean with cool water and mild soap, then reshape and air dry. Store the ornament flat or hanging so the tiers keep their shape.
Final Notes
Your measurement chain is simple:
- Head: 1.5 in (3.8 cm)
- Torso: 1 in (2.5 cm)
- After Tier 1: 1.6 in (4.1 cm)
- After Tier 2: 2.25 in (5.7 cm)
- After Tier 3: 3 in (7.6 cm)
- Total figure: 4.5 in (11.4 cm), with a 3 in (7.6 cm) hem and a 1.25 in (3.2 cm) loop
Check each stage as you go, and your angel will come out balanced and serene.
Optional idea: make several angels in different color pairs for a matching set on the tree.
Happy crocheting!