

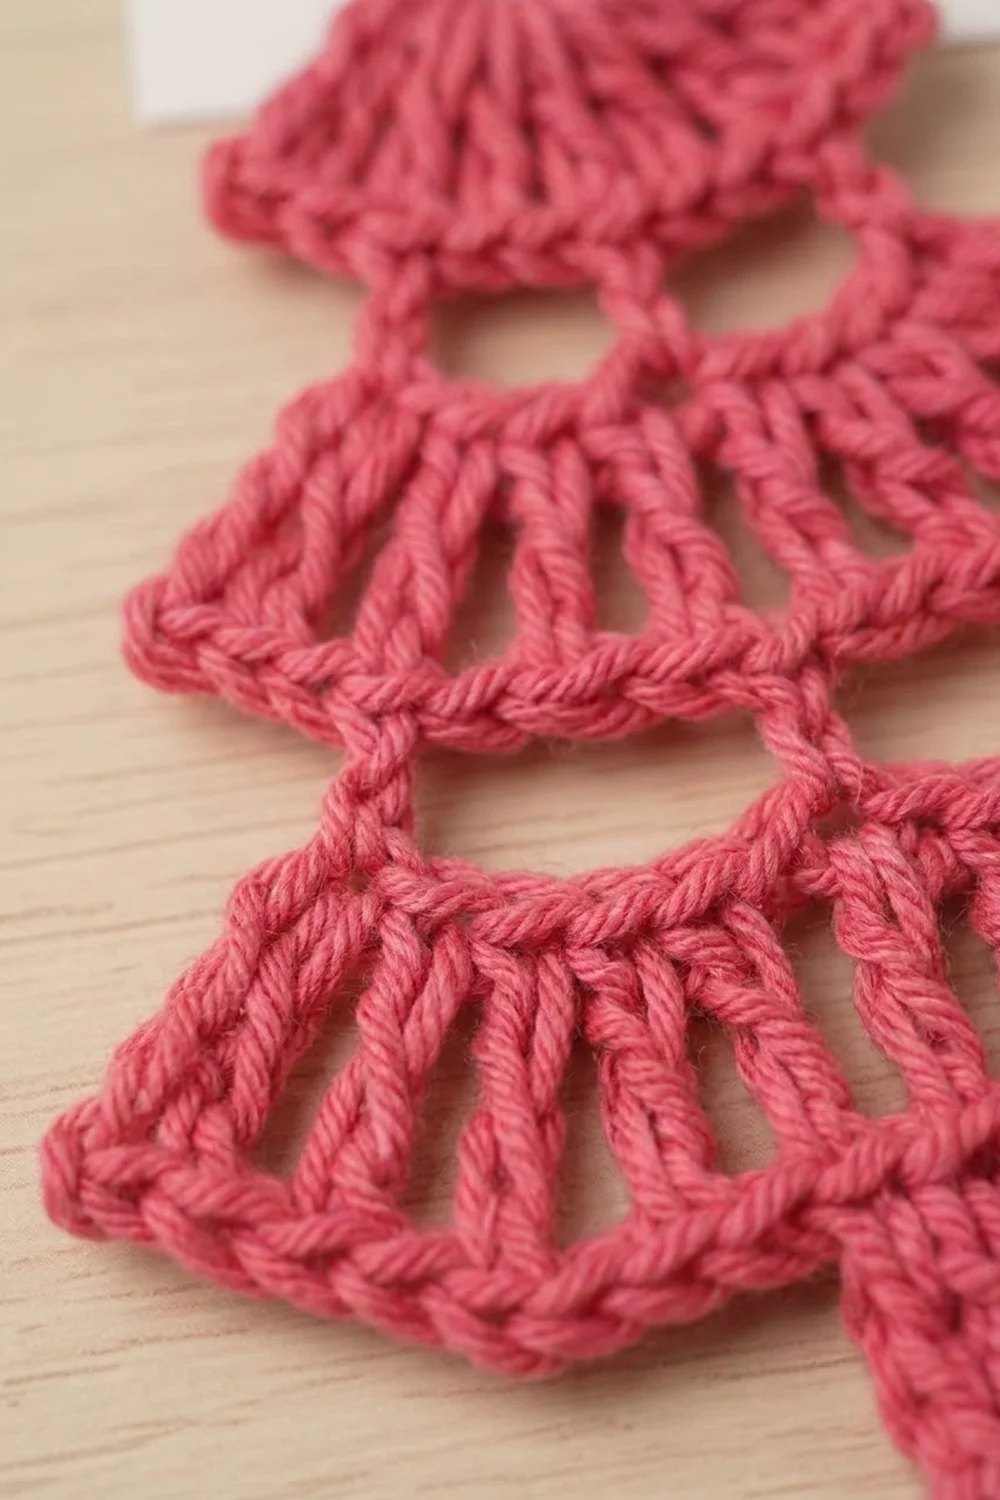
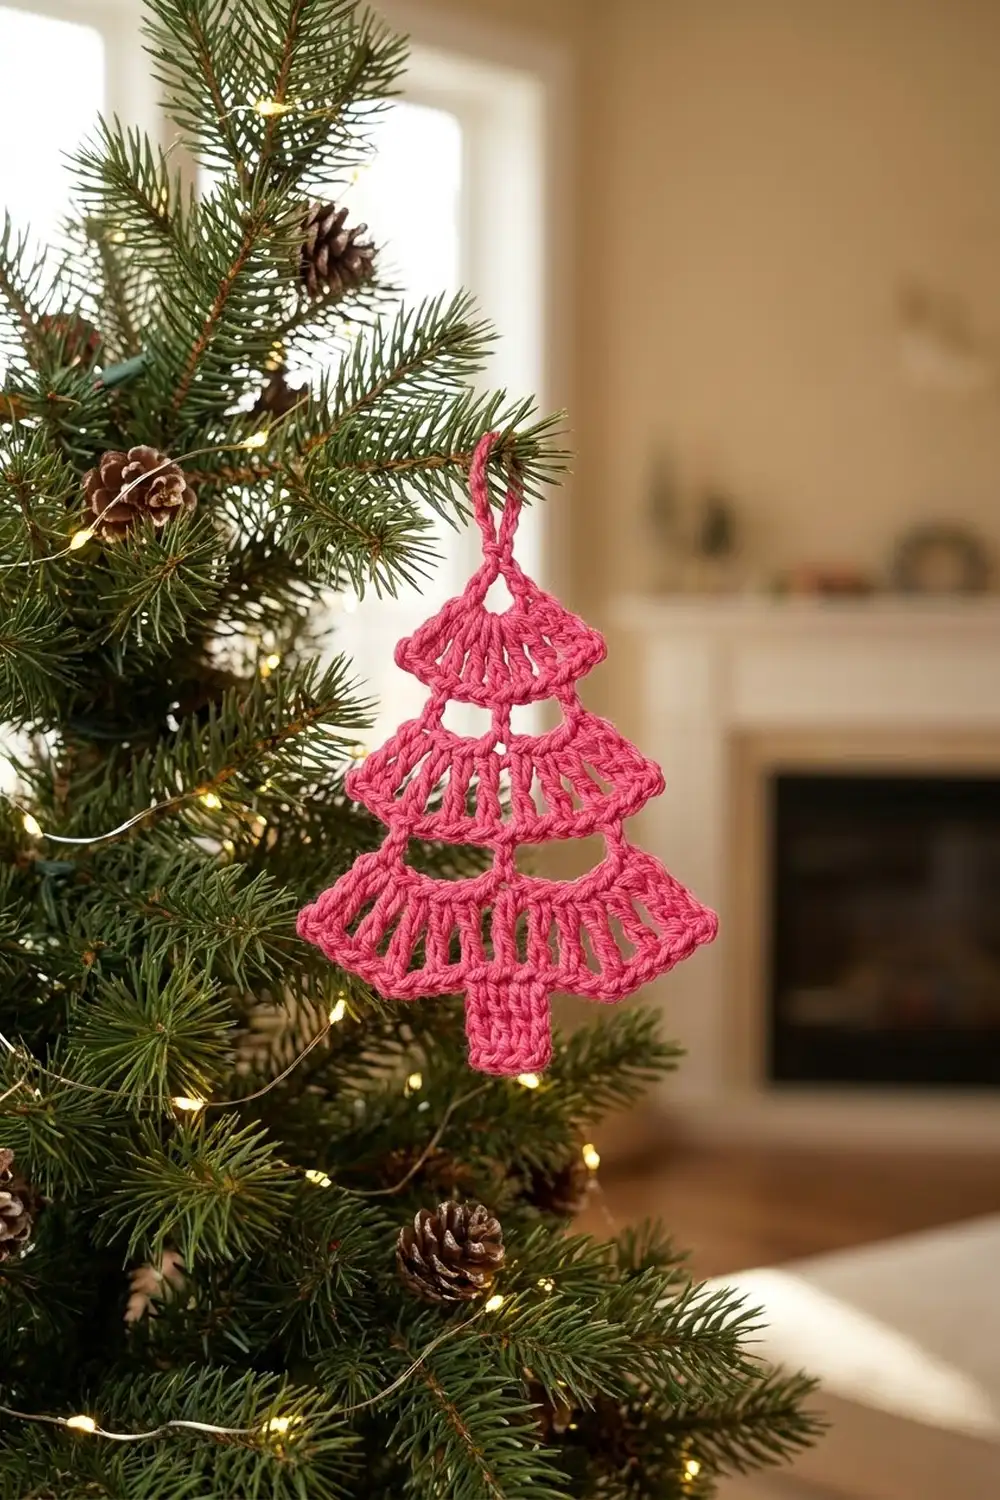
This little tree ornament is made from three fan-shaped tiers stacked from small to large, with a short rectangular trunk at the base. Open dc spokes give each tier a light, airy look, and a scalloped shell edge finishes the lower edge of every tier. A twisted chain loop at the top makes it ready to hang.
The sample is worked in a single bright hot pink. Any solid color works, but a smooth cotton shows the spokes and shells best. The style is flat, crisp, and graphic, so it reads clearly on a tree, a gift tag, or a card.
The pattern uses US crochet terms. The finished tree measures 3.4 in (8.6 cm) tall from the top edge to the bottom of the trunk and 3.5 in (8.9 cm) wide across the bottom tier. With the hanging loop, it is about 4.0 in (10.2 cm) tall.
Construction is simple. You crochet four separate pieces in rows: three tiers and one trunk. You then sew each lower piece behind the edge of the piece above it. Finally, you work the shell border along the lower edge of each tier and add the hanging loop.
Finished Size and Construction
- Finished size: 3.4 in (8.6 cm) tall × 3.5 in (8.9 cm) wide; about 4.0 in (10.2 cm) tall including loop
- Skill level: Easy
- Terminology: US crochet terms
- Yarn weight: DK / light (#3), cotton recommended
- Hook: 3.5 mm (E-4)
- Number of pieces: 4 (top tier, middle tier, bottom tier, trunk)
- Layout: Vertical stack, each piece centered under the one above
- Piece sizes (before border):
- Top tier: 1.8 in (4.6 cm) wide × 0.8 in (2.0 cm) tall
- Middle tier: 2.6 in (6.6 cm) wide × 0.8 in (2.0 cm) tall
- Bottom tier: 3.4 in (8.6 cm) wide × 0.8 in (2.0 cm) tall
- Trunk: 1.0 in (2.5 cm) wide × 1.0 in (2.5 cm) tall
- Size before border: 3.4 in (8.6 cm) tall × 3.4 in (8.6 cm) wide
- Border depth: 0.4 in (1.0 cm) shell edge below each tier
Materials
Yarn: Choose a smooth, tightly plied DK cotton or cotton blend. Cotton holds the spokes straight and keeps the shell points sharp after blocking. Avoid fuzzy or very stretchy yarn, which blurs the open spaces.
- Hot pink DK cotton: 6 g, about 14 m (15 yd)
Tools:
- 3.5 mm (E-4) crochet hook
- Tapestry needle
- Scissors
- Rust-proof pins and a small foam blocking mat
- Ruler or tape measure
- Optional: spray starch
The yarn quantity includes a margin for your gauge swatch and seaming tails.
Abbreviations (US Terms)
- ch – chain
- sc – single crochet
- dc – double crochet
- sl st – slip stitch
- sk – skip
- st(s) – stitch(es)
- sp – space
- RS / WS – right side / wrong side
- RS loop – the top loop of a stitch nearest the RS of the piece
- WS loop – the top loop of a stitch nearest the WS of the piece
Special stitch – Shell: (2 dc, ch 1, 2 dc) in the same stitch.
Gauge and Checkpoints
Gauge: 5 sc and 5 sc rows = 1 in (2.5 cm). One row of dc = 0.4 in (1.0 cm) tall.
The pieces are too small for a standard swatch, so make the top tier first and use it as your test piece.
Checkpoints:
- Top tier, after Row 1: 1.0 in (2.5 cm) wide.
- Top tier, after Row 3: 1.8 in (4.6 cm) wide at the lower edge, 0.8 in (2.0 cm) tall.
- Middle tier, after Row 3: 2.6 in (6.6 cm) wide, 0.8 in (2.0 cm) tall.
- Bottom tier, after Row 3: 3.4 in (8.6 cm) wide, 0.8 in (2.0 cm) tall.
- Trunk: 1.0 in (2.5 cm) square.
- After joining: 3.4 in (8.6 cm) tall.
- After border: 3.5 in (8.9 cm) wide.
Too big? Switch to a 3.0 mm hook and remake the top tier.
Too small? Switch to a 4.0 mm hook.
A difference of 0.1 in (0.3 cm) on the top tier grows to roughly 0.2 in (0.5 cm) on the bottom tier, so correct it early.
Tiers (Make 1 of Each Size)
All three tiers use the same three rows. Only the starting chain changes.
| Tier | Starting ch | Row 1 (sc) | Row 2 (dc) | Row 2 (ch-1 sps) | Row 3 (sc) |
|---|---|---|---|---|---|
| Top | 6 | 5 | 5 | 4 | 9 |
| Middle | 8 | 7 | 7 | 6 | 13 |
| Bottom | 10 | 9 | 9 | 8 | 17 |
Tails: For the top tier, leave a 6 in (15.2 cm) starting tail. For the middle and bottom tiers, leave an 8 in (20.3 cm) starting tail. You will use these longer tails to sew each tier to the one above it.
The foundation chain becomes the top edge of the tier. You work downward, and Row 3 becomes the lower edge.
Top Tier
Foundation: Ch 6.
Row 1 (WS): Sc in 2nd ch from hook and in each ch across. Turn. (5 sc)
Row 2 (RS): Ch 4 (counts as dc and ch 1), dc in next sc, [ch 1, dc in next sc] 3 times. Turn. (5 dc, 4 ch-1 sps)
The dc posts should lean outward like the spokes of a fan. The lower edge is now wider than the top edge.
Row 3 (WS): Ch 1, sc in first dc, [sc in next ch-1 sp, sc in next dc] 3 times, sc in next ch-1 sp, sc in 3rd ch of turning ch-4. Fasten off with a 6 in (15.2 cm) tail. (9 sc)
Count check: 5 dc + 4 ch-1 sps = 9 sc.
Checkpoint: 1.8 in (4.6 cm) wide at Row 3, 0.8 in (2.0 cm) tall.
Middle Tier
Foundation: Ch 8.
Row 1 (WS): Sc in 2nd ch from hook and in each ch across. Turn. (7 sc)
Row 2 (RS): Ch 4 (counts as dc and ch 1), dc in next sc, [ch 1, dc in next sc] 5 times. Turn. (7 dc, 6 ch-1 sps)
Row 3 (WS): Ch 1, sc in first dc, [sc in next ch-1 sp, sc in next dc] 5 times, sc in next ch-1 sp, sc in 3rd ch of turning ch-4. Fasten off. (13 sc)
Checkpoint: 2.6 in (6.6 cm) wide, 0.8 in (2.0 cm) tall.
Bottom Tier
Foundation: Ch 10.
Row 1 (WS): Sc in 2nd ch from hook and in each ch across. Turn. (9 sc)
Row 2 (RS): Ch 4 (counts as dc and ch 1), dc in next sc, [ch 1, dc in next sc] 7 times. Turn. (9 dc, 8 ch-1 sps)
Row 3 (WS): Ch 1, sc in first dc, [sc in next ch-1 sp, sc in next dc] 7 times, sc in next ch-1 sp, sc in 3rd ch of turning ch-4. Fasten off. (17 sc)
Checkpoint: 3.4 in (8.6 cm) wide, 0.8 in (2.0 cm) tall.
Why the counts work: Every tier has N sc in Row 1. Row 2 makes N dc with N − 1 spaces between them. Row 3 places 1 sc in each, so the total is 2N − 1. That gives 9, 13, and 17 sc for N = 5, 7, and 9.
Trunk
Leave an 8 in (20.3 cm) starting tail.
Foundation: Ch 6.
Row 1: Sc in 2nd ch from hook and in each ch across. Turn. (5 sc)
Rows 2–5: Ch 1, sc in each sc across. Turn. (5 sc)
Fasten off after Row 5 and weave in the ending tail. The foundation edge, with its long tail, is the top of the trunk.
Checkpoint: 1.0 in (2.5 cm) wide × 1.0 in (2.5 cm) tall.
Make All Pieces
Hot pink: 1 top tier, 1 middle tier, 1 bottom tier, 1 trunk (4 pieces total)
Layout (top to bottom, all pieces centered):
ROW 1: TOP TIER (PINK)
ROW 2: MIDDLE TIER (PINK)
ROW 3: BOTTOM TIER (PINK)
ROW 4: TRUNK (PINK)
Before joining, block each piece lightly so the edges lie flat. The full blocking steps are in the Final Blocking section below.
Joining
Method: Whipstitch with the long starting tail of each lower piece.
Placement: Each lower piece hangs from the lower edge of the piece above it. Its foundation edge sits behind the upper piece’s Row 3, on the WS.
You sew only through the WS loops of Row 3. This leaves the RS loops free for the shell border.
Stitch-to-stitch matching: Join one foundation ch to one Row 3 WS loop, centered as follows:
- Middle tier to top tier: Middle tier’s 7 foundation chs go to sts 2–8 of the top tier’s 9 sts. This leaves 1 st free on each side.
- Bottom tier to middle tier: Bottom tier’s 9 foundation chs go to sts 3–11 of the middle tier’s 13 sts. This leaves 2 sts free on each side.
- Trunk to bottom tier: Trunk’s 5 foundation chs go to sts 7–11 of the bottom tier’s 17 sts. This leaves 6 sts free on each side.
How to sew:
- Lay both pieces RS up, with the lower piece tucked behind the upper one.
- Thread the lower piece’s tail onto the needle.
- Pass the needle through 1 foundation ch, then through the matching WS loop.
- Repeat for each ch across, working one stitch per pair.
Tension: Pull each stitch just snug enough to close the gap. If you pull harder, the upper edge puckers or the lower piece tilts. Check from the RS often. No pink seam yarn should show above the lower edge.
Knot each tail on the WS and weave it into the lower piece.
Checkpoint: Each piece hangs 0.8 in (2.0 cm) below the top of the one above it.
- Middle tier begins at 0.8 in (2.0 cm).
- Bottom tier begins at 1.6 in (4.1 cm).
- Trunk begins at 2.4 in (6.1 cm) and ends at 3.4 in (8.6 cm).
The total height should be 3.4 in (8.6 cm).
Border: Scalloped Shell Edge
The border is worked separately along the lower edge (Row 3) of each tier, into the free RS loops only.
Border gauge: One repeat covers 4 Row 3 sts, which is 0.8 in (2.0 cm) wide. Each shell is 0.4 in (1.0 cm) deep. The final sc adds 1 st, or 0.2 in (0.5 cm).
Border row (all tiers): With RS facing, join yarn with a sl st in the RS loop of the first Row 3 st. Ch 1, sc in the same st. Then work sk 1, shell in next st, sk 1, sc in next st across. Fasten off and weave in the ends.
Fold the lower piece back out of the way while you work.
Counts per tier (lower edge only):
- Top tier: 9 sts → 2 shells + 3 sc
- Middle tier: 13 sts → 3 shells + 4 sc
- Bottom tier: 17 sts → 4 shells + 5 sc
The trunk gets no border. Its plain sc edges stay smooth.
Why the math works: The repeat uses 4 sts, plus 1 sc to start. Each edge must therefore have 4k + 1 sts.
- 9 = 4 × 2 + 1
- 13 = 4 × 3 + 1
- 17 = 4 × 4 + 1
Every tier begins and ends on an sc, so each scallop row is symmetrical. On the bottom tier, 4 repeats × 0.8 in plus 0.2 in equals 3.4 in (8.6 cm), so the border keeps the tier’s width. The dc shells flare slightly, which brings the finished width to about 3.5 in (8.9 cm).
The shells hang over the top of the next tier down. The lower dc spokes stay visible between and below the scallops.
Hanging loop:
- Join yarn with a sl st in the 3rd (center) foundation ch of the top tier.
- Ch 8, then sl st in the same ch.
- Fasten off and weave the tail through the base of the loop twice to reinforce it.
The loop rises about 0.6 in (1.5 cm), for a total height of about 4.0 in (10.2 cm).
Final Blocking
- Lightly mist the ornament with water, or spray it with starch for a firmer finish.
- Lay it RS up on the mat.
- Pin the trunk straight and centered.
- Pin each tier’s top edge, then fan the dc spokes evenly so the spaces match.
- Pin each shell at its ch-1 point so the scallops open fully.
- Measure: 3.4 in (8.6 cm) tall and 3.5 in (8.9 cm) wide.
- Let it dry completely before unpinning.
Final Quality-Control Checklist
- Row 3 counts: 9, 13, and 17 sc
- Each tier’s shell count: 2, 3, and 4
- Every piece is centered under the one above it
- No seam yarn is visible from the RS
- Spokes are evenly spaced on all three tiers
- The trunk is 1.0 in (2.5 cm) wide and square at the base
- The hanging loop is firmly anchored at the center
- All ends are woven in on the WS
Troubleshooting
Spokes don’t fan out: Your Row 1 is too loose. Tighten it, or go down a hook size for Row 1 only.
Shells ruffle: Check that you skipped 1 st on each side of every shell. Blocking will also flatten a slight wave.
Shells look flat: Make sure the shells are worked into the RS loops and that the ch-1 point is not pulled tight.
Tier tilts sideways: The seam is off-center. Recount the matched sts and resew.
Seam shows on front: You stitched through both loops. Resew through the WS loops only.
Ornament is too tall: Check the trunk row count and your sc row gauge.
Care
Spot clean with cool water and mild soap, then reshape and pin flat to dry. Store the ornament flat so the shells keep their shape.
Final Notes
The measurement chain is short and predictable:
- Each tier is 0.8 in (2.0 cm) tall before the border.
- Each lower piece hangs from the tier above at 0.8 in (2.0 cm) intervals.
- The trunk adds 1.0 in (2.5 cm), for a total of 3.4 in (8.6 cm).
- The Row 3 counts of 9, 13, and 17 fit the 4k + 1 shell repeat exactly.
- The bottom tier blocks to 3.5 in (8.9 cm) wide.
Check your top tier first, and the rest of the tree follows.
Happy crocheting!