

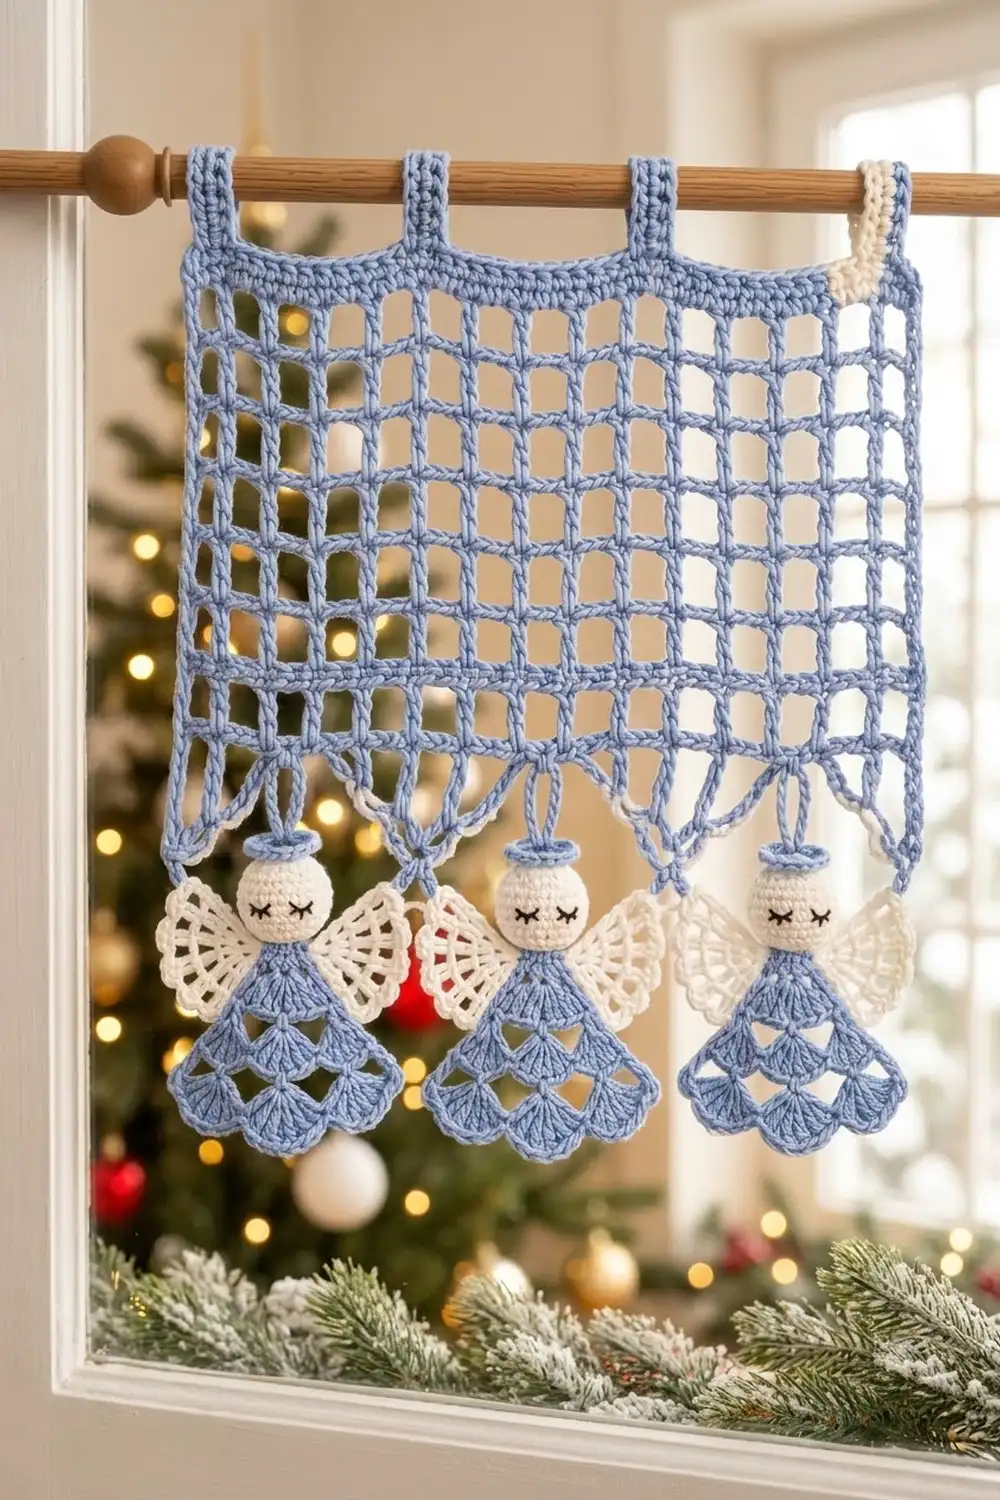
This little valance hangs from a wooden rod on three single crochet tabs. The body is an open filet mesh in light periwinkle blue. Rows of double crochets and chain spaces form a lattice of small squares, so light comes through the whole panel.
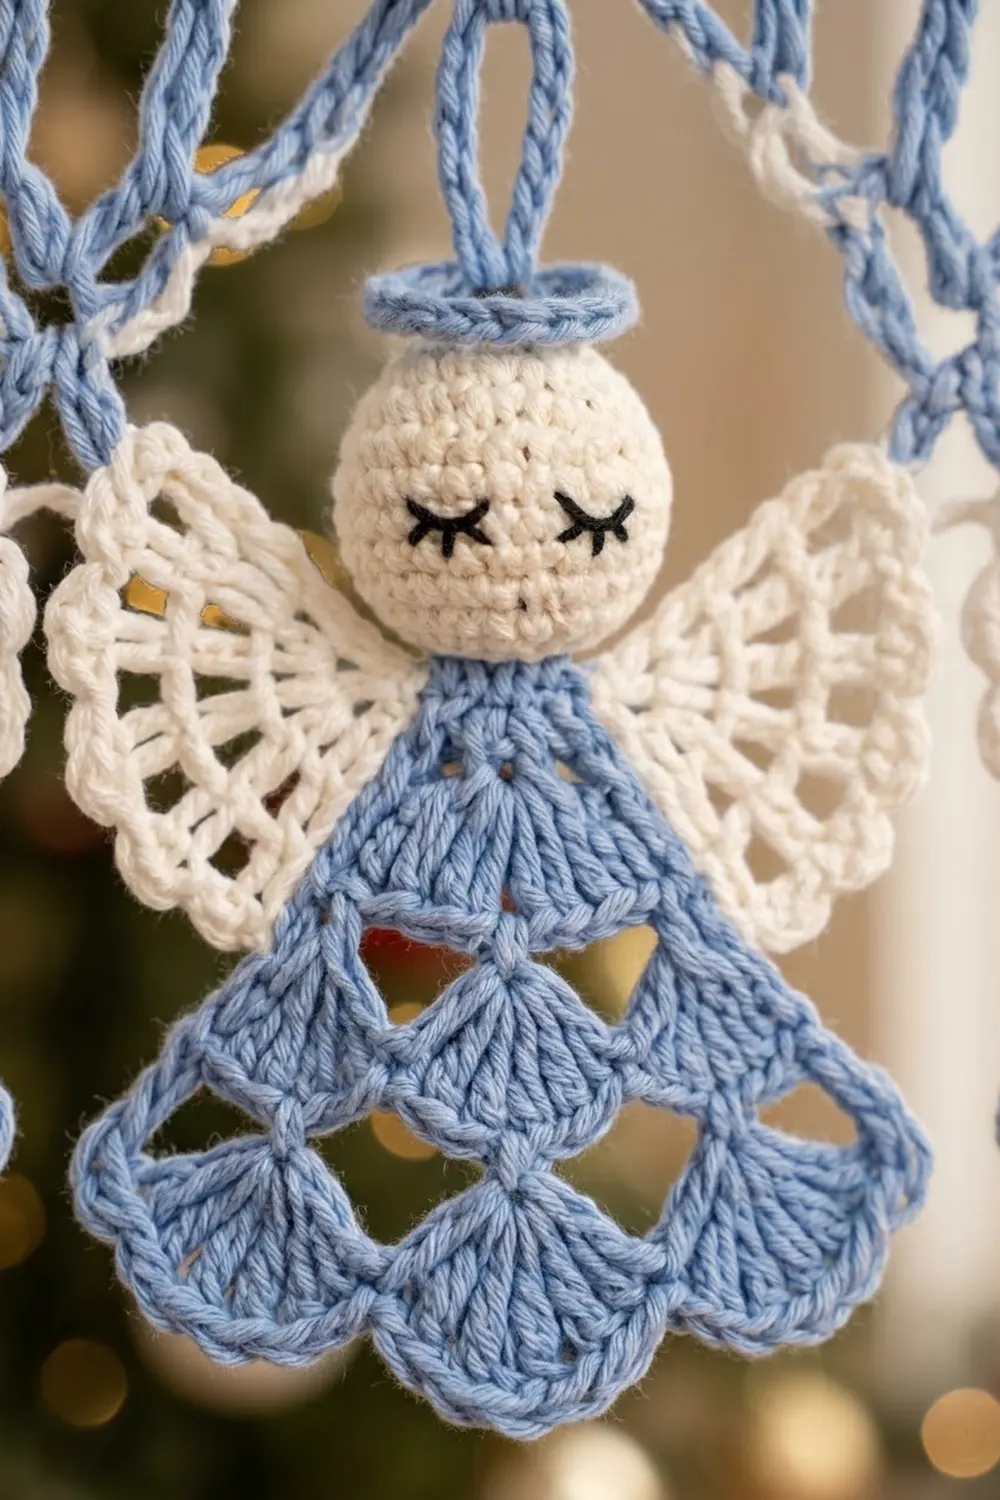
The bottom edge ends in a row of connected shell scallops in the same blue, which gives the hem a soft wavy line. Three small angel ornaments hang from the scallops on blue chains. Each angel has a cream crocheted ball head with embroidered closed eyes, white lacy mesh-fan wings, and a blue bell-shaped dress with a scalloped hem.
The pattern uses US crochet terms. The finished panel is 13.5 in (34.3 cm) wide and 11 in (27.9 cm) tall, measured from the top edge to the scallop tips. The folded tabs add 1.5 in (3.8 cm) above the panel, and the angels hang below the hem.
You work the panel top-down in one piece: a solid single crochet band, then mesh rows, then a two-tier shell border. The tabs go into the foundation chain. The angels are made separately and hung from the border last.
Finished Size and Construction
- Finished size: 13.5 in x 11 in (34.3 cm x 27.9 cm), not counting tabs and angels
- Skill level: Intermediate
- Terminology: US crochet terms
- Yarn weight: Worsted (#4) cotton
- Hooks: 5.0 mm (H-8) for the panel; 4.0 mm (G-6) for the angels
- Number of pieces: 1 valance panel, plus 3 small angel ornaments hung from its hem
- Layout: 18 mesh squares across, 10 mesh rows tall, under a 6-row sc band
- Piece size: 1 panel
- Size before border: 13.5 in x 9 in (34.3 cm x 22.9 cm)
- Border depth: 2 in (5.1 cm), bottom edge only
- Tabs: 3 tabs, each 1.25 in (3.2 cm) wide, folding into 1.5 in (3.8 cm) loops
- Angels: about 3.25 in (8.3 cm) tall, each hanging on a 2 in (5.1 cm) chain
Materials
Use a smooth, mercerized or matte worsted-weight cotton. Cotton gives crisp mesh lines, holds the shells’ shape, and doesn’t fuzz in sunlight the way acrylic can. All three colors should come from the same weight and fiber family.
- Light periwinkle blue: 110 g / approx. 170 m (panel, tabs, border, dresses, hanging chains)
- Cream: 15 g / approx. 23 m (heads)
- White: 15 g / approx. 23 m (wings)
- Black embroidery floss: about 1 m (closed eyes)
These quantities include a margin of about 15% for swatching and small differences in tension.
Tools:
– 5.0 mm (H-8) and 4.0 mm (G-6) crochet hooks
– Tapestry needle
– Small handful of polyester fiberfill
– Stitch markers (at least 6)
– Rustproof pins, blocking mat, spray bottle
– Measuring tape
– Wooden rod up to 0.75 in (1.9 cm) in diameter
Abbreviations (US Terms)
- ch – chain
- sl st – slip stitch
- sc – single crochet
- dc – double crochet
- tr – treble crochet
- sk – skip
- sp – space
- st(s) – stitch(es)
- MR – magic ring
- inc – 2 sc in the same st
- dec – sc2tog (invisible decrease is fine)
- RS – right side
Special stitches:
– Mesh: ch 2, sk 2 sts (or one ch-2 sp), dc in the next st. One mesh square is 3 sts wide.
– Shell: 5 dc in the same st.
– Large shell: 7 tr in the same st.
Gauge and Checkpoints
Panel gauge (5.0 mm hook):
– 16 sc = 4 in (10.2 cm); 4 sc rows = 1 in (2.5 cm)
– 4 mesh squares wide x 4 mesh rows tall = 3 in (7.6 cm) square
– Each mesh square is 0.75 in (1.9 cm)
Gauge swatch: Ch 14. Sc in the 2nd ch from hook and across (13 sc). Work 3 more sc rows. Then work 4 mesh rows (5 dc and 4 ch-2 sp per row). The 12 st intervals across should measure 3 in (7.6 cm), and the 4 mesh rows should be 3 in (7.6 cm) tall.
Test one angel first. Make one complete angel before starting the panel. The head should be about 1.25 in (3.2 cm) across and the dress about 2 in (5.1 cm) tall.
Checkpoints:
– After Row 6 (sc band): 13.5 in (34.3 cm) wide, 1.5 in (3.8 cm) tall
– After Row 16 (last mesh row): 9 in (22.9 cm) tall
– After Border Row 1: 9.25 in (23.5 cm) tall
– After Border Row 3: 11 in (27.9 cm) tall
If your piece is too big, go down 0.5 mm in hook size. If it is too small, go up 0.5 mm. Don’t add or remove mesh squares. The 55-st count is what makes the border scallops line up.
Main Panel
With blue and the 5.0 mm hook.
Row 1 (RS): Ch 56. Sc in the 2nd ch from hook and in each ch across. Turn. (55 sc)
Rows 2–6: Ch 1, sc in each st across. Turn. (55 sc per row)
Checkpoint: the band is 13.5 in (34.3 cm) wide and 1.5 in (3.8 cm) tall.
Row 7 (first mesh row): Ch 3 (counts as dc). Ch 2, sk 2 sts, dc in next st. Repeat from * 17 more times. Turn. (19 dc, 18 ch-2 sp = 18 mesh squares)
Check the math: 1 starting st + (18 repeats x 3 sts) = 55 sts used, so it ends exactly in the last sc.
Rows 8–16: Ch 3 (counts as dc). Ch 2, dc in next dc. Repeat from * across, working the last dc into the top of the turning ch-3. Turn. (19 dc, 18 ch-2 sp per row)
That makes 10 mesh rows in total. Keep the dc posts straight and stacked so the squares stay square. Each row stacks dc on dc, which gives the lattice its square-within-square look.
Checkpoint: the panel is 13.5 in x 9 in (34.3 cm x 22.9 cm). Don’t fasten off. Go straight to the Border.
Hanging Tabs
Work these after the border so the panel can be checked flat first. They go into the free loops on the other side of the foundation chain (Row 1). There are 55 free loops, matching the 55 sc.
Count the loops from the right edge and mark these positions:
– Tab A: loops 1–5
– Tab B: loops 26–30 (centered over st 28, the panel’s center st)
– Tab C: loops 51–55
That leaves 20 loops between Tab A and Tab B (loops 6–25) and 20 between Tab B and Tab C (loops 31–50), so the spacing is even.
Each tab:
– Row 1: Join blue in the first loop of the tab position. Ch 1, sc in the same loop and in the next 4 loops. Turn. (5 sc)
– Rows 2–12: Ch 1, sc in each st across. Turn. (5 sc)
The strip is 3 in (7.6 cm) long. Fasten off and leave a 10 in (25.4 cm) tail. Fold the strip to the back and whipstitch the last row to the back of Row 1. This makes a 1.5 in (3.8 cm) loop.
Angel Ornaments (Make 3)
Use the 4.0 mm hook. Work the head and dress in continuous rounds or joined rounds as noted.
Head (Cream)
- Rnd 1: 6 sc in MR. (6)
- Rnd 2: Inc in each st. (12)
- Rnd 3: Sc, inc 6 times. (18)
- Rnds 4–7: Sc in each st. (18)
- Rnd 8: Sc, dec 6 times. (12) Stuff firmly.
- Rnd 9: Dec 6 times. (6) Add a little more stuffing, then fasten off and leave a 12 in (30.5 cm) tail.
The MR is the top of the head. Using black floss, embroider two closed eyes between Rnds 5 and 6, with 4 sts between them. Make each eye a shallow downward curve 3 sts wide with 3 tiny lashes underneath.
Dress (Blue)
The dress is a small bell worked from the neck down in joined rounds.
- Rnd 1: Ch 1, 8 sc in MR. Join with a sl st to the first sc. (8)
- Rnd 2: Ch 1, sc, inc 4 times. Join. (12)
- Rnd 3: Ch 3 (counts as dc), dc in the same st, dc in next st. 2 dc in next st, dc in next st 5 times. Join. (18 dc)
- Rnd 4: Ch 3 (counts as dc), dc in next st, 2 dc in next st. Dc in next 2 sts, 2 dc in next st 5 times. Join. (24 dc)
- Rnd 5 (scalloped hem): Ch 1, sc in the first st. Sk 1, shell in next st, sk 1, sc in next st, repeating from * 5 more times and skipping the final sc of the last repeat. Join to the first sc. (6 shells, 6 sc = 36 sts)
Each repeat uses 4 sts, and 6 x 4 = 24, so the 6 scallops fit evenly. Fasten off. The dress is 2 in (5.1 cm) tall.
Wings (White, make 2 per angel)
- Row 1: Ch 3 (counts as dc), 6 dc in MR. Pull the ring snug. Turn. (7 dc)
- Row 2: Ch 4 (counts as dc + ch 1), dc in the same st. Ch 1, dc in next dc, ch 1, dc in the same dc 6 times. Turn. (14 dc, 13 ch-1 sp)
- Row 3: Ch 1, sc in the first dc. Ch 3, sk ch-1 sp, sc in next dc 13 times. (14 sc, 13 ch-3 loops)
Fasten off. Each wing is a 1.5 in (3.8 cm) mesh fan.
Assemble Each Angel
- Sew the closed bottom of the head (Rnd 9) to the dress’s Rnd 1 ring.
- Sew the MR point of each wing to the back of the dress at Rnds 2–3, one on each side, with the fans angled outward.
- Weave in all ends except the hanging chain.
Border
The border is worked across the bottom edge only. The sides stay as the plain mesh edge. It uses the 5.0 mm hook and continues from Row 16.
Border gauge: 16 sc = 4 in (10.2 cm). This matches the panel’s sc gauge, so the edge stays flat.
Border Row 1 (conversion row): Ch 1, turn. Sc in the first dc. 2 sc in the next ch-2 sp, sc in the next dc. Repeat from * across. Turn.
Count: 19 sc (1 per existing dc) + 36 sc (2 per ch-2 sp x 18 sp) = 55 sc. This row doesn’t grow the piece. It just turns the mesh back into a solid 55-st edge, matching the 55 sts of the sc band at the top.
Border Row 2 (shells): Ch 1, sc in the first sc. Sk 2, shell in next st, sk 2, sc in next st. Repeat from * 8 more times. Turn.
Count: 9 shells (45 dc) + 10 sc = 55 sts. Each repeat uses 6 sts: 1 + (9 x 6) = 55.
Border Row 3 (large shells): Ch 1, sc in the first sc. Sk 2 dc, large shell in the center (3rd) dc of the shell, sk 2 dc, sc in next sc. Repeat from * 8 more times. Fasten off.
Count: 9 large shells (63 tr) + 10 sc = 73 sts. This is a growth row. Each repeat adds 2 sts (7 tr where there were 5 dc), so the hem fans into a scalloped edge.
Why the math works: The panel is 18 squares x 3 sts + 1 = 55 sts. The 54 st intervals split into 9 shell repeats of 6 sts each. Nine is an odd number, so the 5th large shell sits exactly over st 28, the center of the panel. That puts the middle angel dead center. Shells 2 and 8 sit 18 sts (4.5 in / 11.4 cm) to either side of it.
Border depth: Row 1 adds 0.25 in (0.6 cm), Row 2 adds 0.75 in (1.9 cm), and Row 3 adds 1 in (2.5 cm), for 2 in (5.1 cm) in total.
Final Blocking
- Weave in all panel ends except the tab tails, which you need for sewing.
- Pin the panel flat to 13.5 in x 11 in (34.3 cm x 27.9 cm), RS up.
- Pin each mesh column straight. A long ruler helps line up the dc posts.
- Pin each of the 9 large shells into an even fan, with the tips touching a straight line.
- Spray until damp, not soaked. Let it dry completely, which takes about 6–8 hours.
- Unpin it, then fold and sew the 3 tabs (see Hanging Tabs).
- Hang the angels: With blue, sl st through the top of a head at its MR. Ch 10, which is 2 in (5.1 cm). Sl st into the 4th (center) tr of large shell 2. Repeat for shell 5 and shell 8. Fasten off and weave in the ends.
- Shape the angels by hand only. Don’t wet the stuffed heads.
Final Quality-Control Checklist
- Panel is 13.5 in (34.3 cm) wide and 11 in (27.9 cm) tall
- 18 mesh squares across and 10 mesh rows tall, all roughly 0.75 in (1.9 cm) square
- Sc band is 6 rows and 1.5 in (3.8 cm) tall
- 3 tabs at loops 1–5, 26–30, and 51–55, each forming a 1.5 in (3.8 cm) loop
- 9 large shells along the hem, each fanned evenly
- Angels hang from shells 2, 5, and 8, with the middle angel centered
- Each angel has a firm round head, matching closed eyes, two wings, and a dress with 6 scallops
- All chains are 2 in (5.1 cm) long, so the angels hang level
- All ends are woven in securely
Troubleshooting
Mesh squares are taller than they are wide: Your dc are loose. Pull up a shorter loop, or go down one hook size for the mesh rows only.
Panel slants to one side: You probably missed the last dc in the turning chain. Count 19 dc every row.
Hem ruffles too much: Change Border Row 3 to 6 tr per large shell. The count becomes 54 + 10 = 64 sts, and the shells still sit centered.
Hem pulls inward: Your Border Row 1 is too tight. Rework it with a 5.5 mm hook.
Stuffing shows through the head: Go down to a 3.5 mm hook, or use a matching-color stuffing.
Angels hang at different heights: Rework the hanging chains so each is exactly 10 ch.
Tabs are too tight for the rod: Add 2 rows to each tab. Every 2 rows adds 0.25 in (0.6 cm) to the loop height.
Care
Spot clean the panel with cool water and mild soap, then lay it flat to dry. Don’t machine wash it, because that can loosen the hanging chains and squash the angel heads.
Final Notes
The measurement chain is simple: 16 sc = 4 in (10.2 cm), so the 55-st band is 13.5 in (34.3 cm) wide. Eighteen 0.75 in (1.9 cm) mesh squares match that width. Six sc rows plus 10 mesh rows give 9 in (22.9 cm). The 2 in (5.1 cm) shell border brings the panel to 11 in (27.9 cm), and the 55 sts divide into 9 shells so the three angels hang symmetrically.
Optional: for a wider window, you can make two panels and hang them side by side on the same rod.
Happy crocheting!