

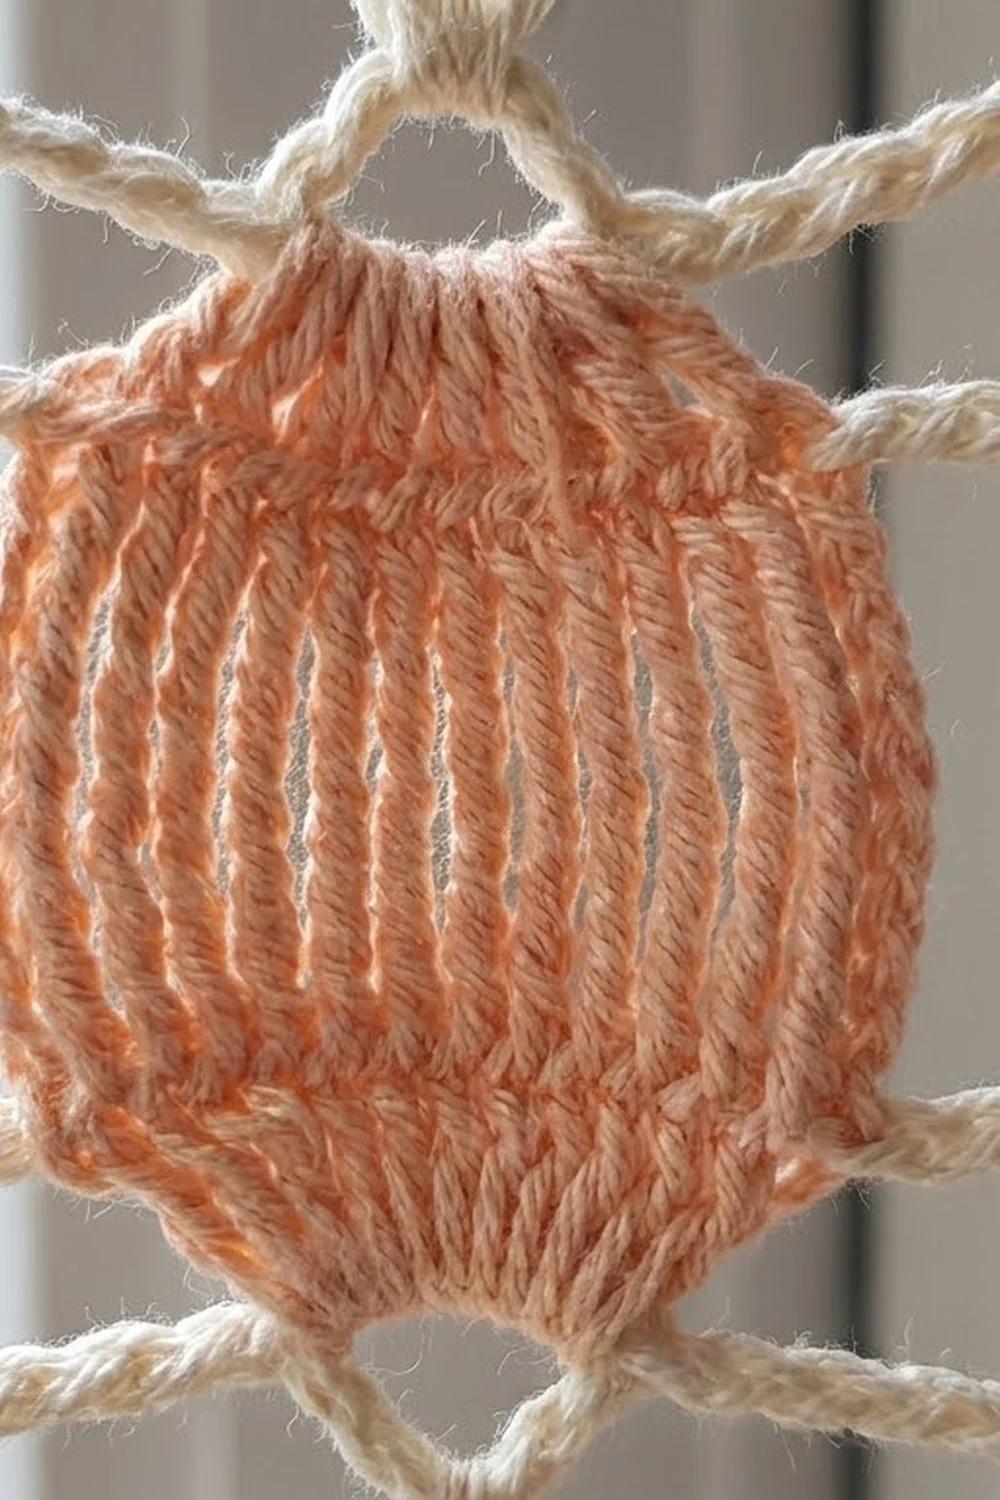
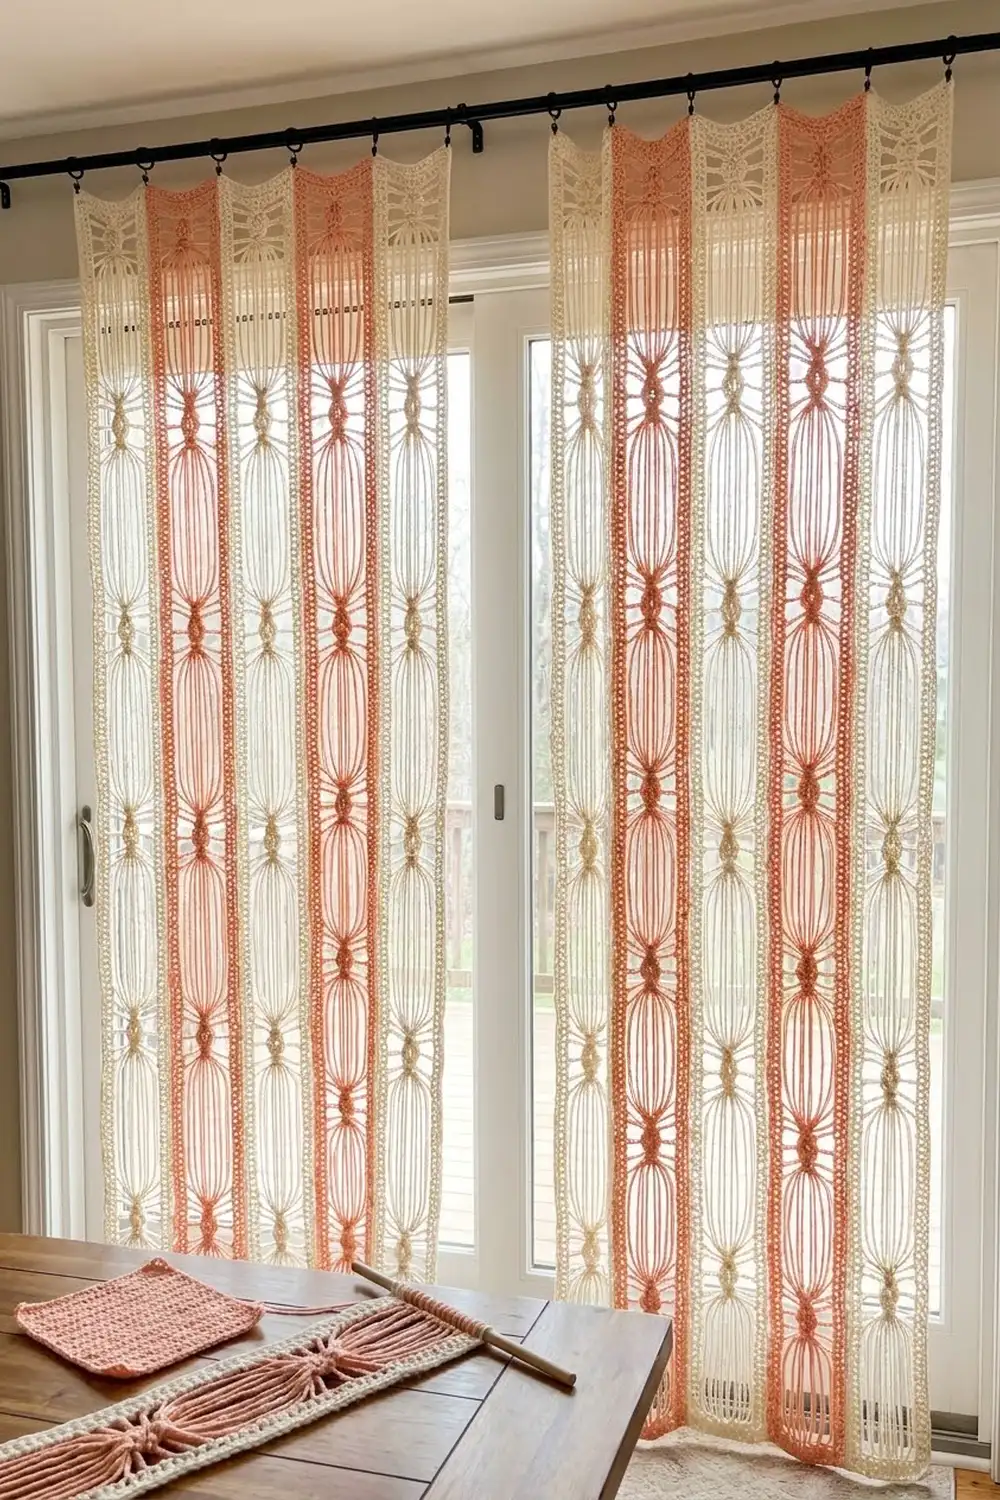
This curtain is made of 10 tall, open strips of long-loop “lantern” lace that hang side by side from a rod. Each strip is a simple ladder: rope-like rails on both edges, short chain bars across, and a stack of oval lanterns gathered into small knots.
The color plan is soft peach and warm cream. Each of the two panels alternates cream, peach, cream, peach, cream. Light passes through the long loops, so the curtain glows on a sunny doorway without blocking the view.
The pattern uses US crochet terms. Each strip measures 4.25 in (10.8 cm) wide and 81.25 in (206.4 cm) long from the top of the hanging tab to the bottom edge. Five strips hung edge to edge make a panel 21.25 in (54.0 cm) wide, and two panels give 42.5 in (108.0 cm) of coverage.
Construction is worked from the bottom up in rows. Every lantern is one broomstick-style pair of rows: a loop row pulled up over a 3 in (7.6 cm) gauge, then a work-off row that gathers the loops. The strips are not sewn together. Each one gets its own sewn tab and slides onto the rod separately.
Finished Size and Construction
- Finished strip size: 4.25 in (10.8 cm) wide × 81.25 in (206.4 cm) long, tab included
- Skill level: Intermediate (basic broomstick-style long loops)
- Terminology: US crochet terms
- Yarn weight: Worsted (#4) cotton
- Hook: 5.0 mm (H-8)
- Number of pieces: 10 strips (6 cream, 4 peach)
- Layout: 2 panels of 5 strips each, hung separately and not joined
- Piece size before border: 4.25 in (10.8 cm) × 79.25 in (201.3 cm) body
- Border: built-in rails 0.75 in (1.9 cm) wide on each long edge, plus a bottom crab-stitch edge 0.25 in (0.6 cm) deep
- Lantern repeat: 3.25 in (8.3 cm) tall; 24 repeats per strip
Materials
Choose a smooth, mercerized or combed worsted cotton, about 190 m per 100 g (208 yd per 3.5 oz). Cotton holds the long loops crisply and blocks well. Avoid fuzzy or very stretchy yarns, because the lanterns will droop.
- Cream: 350 g (665 m / 727 yd), enough for 6 strips
- Peach: 250 g (475 m / 519 yd), enough for 4 strips
Each strip uses about 84 m (92 yd). The quantities above allow about 100 m per strip plus a margin for the gauge test and tails.
Tools:
– 5.0 mm (H-8) crochet hook
– Loop gauge: a stiff cardboard strip 3 in × 12 in (7.6 cm × 30.5 cm), or a flat ruler of the same width
– Tapestry needle
– Stitch markers
– Rust-proof pins and a long blocking surface
– Spray bottle; spray starch is optional
– Curtain rod up to 1.25 in (3.2 cm) in diameter
Abbreviations (US Terms)
- ch – chain
- sc – single crochet
- sl st – slip stitch
- st(s) – stitch(es)
- sk – skip
- sp – space
- yo – yarn over
- rev sc – reverse single crochet (crab stitch)
- RS – right side
Special stitches
Long loop (LL): Insert the hook in the stitch, yo, and pull up a loop. Stretch it up to the top edge of the gauge and slip it onto the gauge. The loop stays open.
Group sc: Insert the hook through the whole group of loops held together, yo, pull up a loop, yo, and draw through 2 loops on the hook.
Gauge and Checkpoints
Base gauge: 16 sc and 16 rows = 4 in (10.2 cm) in sc with a 5.0 mm hook. One sc row is 0.25 in (0.6 cm) tall.
Lantern gauge: one repeat (loop row plus work-off row) = 3.25 in (8.3 cm) tall when you use the 3 in (7.6 cm) gauge.
Treat your first strip as the test piece. Stop and measure at each checkpoint:
- After Row 1: width 4.25 in (10.8 cm).
- After 2 lantern repeats: total height 7 in (17.8 cm).
- After 6 repeats: 20 in (50.8 cm).
- After 12 repeats: 39.5 in (100.3 cm).
- After 24 repeats: 78.5 in (199.4 cm).
- After Row 53: 79.25 in (201.3 cm).
Too wide: if Row 1 is wider than 4.5 in (11.4 cm), go down to a 4.5 mm hook. Too narrow: if it is under 4 in (10.2 cm), go up to a 5.5 mm hook.
Repeats too tall: if one repeat is taller than 3.5 in (8.9 cm), you are probably lifting the loops above the gauge. Keep them snug, or switch to a 2.75 in (7.0 cm) gauge. Repeats too short: use a 3.25 in (8.3 cm) gauge. Use the same gauge for all 10 strips.
Strip Pattern (Make 10)
Each strip has 17 stitches across. The rails are 3 stitches each, the open center is 11 stitches, and the knot sits on the middle 3 of those 11.
Base Rows
Foundation: Ch 18.
Row 1 (RS): Sc in 2nd ch from hook and in each ch across. Turn. (17 sc)
Row 2 (set-up row): Ch 1. Sc in first 3 sts, ch 4, sk 4 sts, sc in next 3 sts, ch 4, sk 4 sts, sc in last 3 sts. Do not turn. (9 sc + 2 ch-4 sps = 17 sts)
Row 2 sets up the ladder. The ch-4 spaces become the first horizontal bars, and the center 3 sc become the first knot.
Lantern Repeat
Row 3 (loop row, do not turn): Hold the gauge just above the work. Work back across Row 2 in the opposite direction.
- Lengthen the loop already on your hook and slip it onto the gauge. It counts as the first rail loop.
- Work 1 LL in each of the next 2 sc. (3 rail loops)
- Sk the ch-4 sp.
- Work 4 LL in the next sc, 3 LL in the next sc, and 4 LL in the next sc. (11 lantern loops) Slide these loops along the gauge so they spread across the 11-stitch open center.
- Sk the ch-4 sp.
- Work 1 LL in each of the last 3 sc. (3 rail loops)
Total: 17 loops on the gauge.
Row 4 (work-off row, do not turn): Start with the group nearest your hook.
- Insert the hook through the first 3 loops and slide them off the gauge. Yo, draw through all loops on the hook, then ch 1. Work 2 group sc in the same group. (3 sc, rail top)
- Ch 4.
- Insert the hook through the next 11 loops together, slide them off, and work 3 group sc through the group. (3 sc, knot)
- Ch 4.
- Work 3 group sc through the last 3 loops, starting the same way as the first group. (3 sc, rail top)
Row 4 total: 9 sc + 2 ch-4 sps = 17 sts. This matches Row 2 exactly, so the repeat can continue straight away.
The 11 loops leave from 3 sc at the bottom and are gathered into 3 sc at the top. That narrow start and finish is what makes each lantern an oval. The next loop row pulls its lantern loops from those same 3 knot stitches, so each knot pinches two lanterns together. The ch-4 bars become the horizontal rungs at every knot.
Rows 5–50: Repeat Rows 3–4 another 23 times, for 24 lanterns in total. Place a marker every 6 repeats and check the measurements against the gauge checkpoints.
Top Rows
Row 51 (conversion row): Ch 1, turn. Sc in each of the first 3 sc, 4 sc in the ch-4 sp, sc in the next 3 sc, 4 sc in the ch-4 sp, and sc in the last 3 sc. Turn. (9 sc worked one per stitch + 8 sc worked in the spaces = 17 sc)
Rows 52–53: Ch 1, sc in each st across. Turn. (17 sc)
At this point the body measures 79.25 in (201.3 cm).
Hanging Tab
Tab Row 1: Do not turn. Fasten off, then rejoin the yarn in the 7th st of Row 53. Ch 1 and sc in sts 7–11. (5 sc)
Tab Rows 2–16: Ch 1, turn, sc in each st across. (5 sc) The tab is 1.25 in (3.2 cm) wide and 4 in (10.2 cm) long.
Fasten off and leave a 12 in (30.5 cm) tail. Fold the tab to the wrong side. Sew its last row to the back of Row 51 over sts 7–11. The finished loop rises about 1.75 in (4.4 cm) above Row 53 and fits rods up to 1.25 in (3.2 cm) in diameter.
Make All Pieces
- Cream: 6 strips
- Peach: 4 strips
Use exactly the same row count for every strip: Rows 1–53, the 16 tab rows, and the bottom edge. That keeps every knot level across the curtain.
Layout (viewed from the room side):
PANEL 1: CREAM  PEACH  CREAM  PEACH  CREAM
PANEL 2: CREAM  PEACH  CREAM  PEACH  CREAM
Joining (Hanging the Strips)
The strips are not crocheted or sewn to one another. Each one hangs independently from its own tab, which lets the lanterns move freely and catch the light.
Method: Slide the strips onto the rod in layout order, rails touching. Each panel then measures 21.25 in (54.0 cm) wide: 5 strips × 4.25 in (10.8 cm).
Stitch-to-stitch logic: Every strip has 24 repeats and the same base and top rows. Knot 1 on one strip therefore sits level with knot 1 on its neighbor, and so on for all 24 knots. If a knot sits more than 0.25 in (0.6 cm) off its neighbor, re-check your loop height on that strip.
Optional tacking: For high-traffic doorways, tack neighboring rails together at every 6th knot level with a single cream sl st, so 4 tacks per seam. Keep the tacks loose so the rails don’t pucker.
Size checkpoint: Measure each panel on the rod. It should be 21.25 in (54.0 cm) wide and 81.25 in (206.4 cm) long from the top of the tab to the bottom edge.
Border
The long-edge border is built in. Each 3-loop rail, with its 3 sc caps, forms a firm edge 0.75 in (1.9 cm) wide on both long sides of every strip. The only added border is a crab-stitch edge at the bottom.
Border gauge: 4 rev sc per 1 in (2.5 cm), the same as the base sc gauge.
Bottom edge (one row, RS facing): Join the yarn at the right-hand corner of the foundation chain. Ch 1, then work 1 rev sc in each foundation ch across. Fasten off. (17 rev sc)
- Bottom side: 17 sts
- Long sides: 0 added sts (the rails already form the border)
- Top side: 0 added sts (the tab finishes the top)
Why the math works: The foundation has 17 working chains and the border places one rev sc in each, so the width stays at 4.25 in (10.8 cm). The edge adds 0.25 in (0.6 cm) of length, which brings the body to 79.5 in (201.9 cm). Adding the 1.75 in (4.4 cm) tab loop gives the full length of 81.25 in (206.4 cm).
Final Blocking
- Weave in all ends along the rails, never through the lantern loops.
- Soak each strip in cool water for 15 minutes, then press out the water in a towel. Do not wring.
- Lay the strip flat and pin the rails straight to 4.25 in (10.8 cm) apart.
- Pin the knots on the strip’s center line, 3.25 in (8.3 cm) apart.
- Ease each lantern open until it is 2.25 in (5.7 cm) wide at its widest point. Spread the 11 loops evenly.
- Mist with spray starch if you like, then let the strip dry completely.
- Unpin it and hang it for 24 hours before the final check.
Final Quality-Control Checklist
- [ ] All 10 strips are 4.25 in (10.8 cm) wide.
- [ ] Each body measures 79.5 in (201.9 cm) including the bottom edge.
- [ ] Each strip has exactly 24 lanterns.
- [ ] Every lantern has 11 loops; every rail has 3 loops per repeat.
- [ ] The knots line up across neighboring strips.
- [ ] The tabs are centered over sts 7–11 and sewn securely.
- [ ] Colors follow the layout: C P C P C in each panel.
- [ ] No loose ends show inside the lanterns.
Troubleshooting
Lanterns lean to one side: The loops were bunched on the gauge. Spread them evenly across the open center before working off.
Loops have different lengths: Keep the gauge at the same height for the whole row, and pull each loop flush to its top edge.
Strip narrows toward the top: The ch-4 bars are too tight. Chain more loosely, or use a hook one size up just for the chains.
Knots look loose: Pull the 3 group sc snug, and check that all 11 loops went onto the hook.
Strip grows longer after hanging: This is normal for cotton. Block it again, or hang it for 48 hours before trimming any rod height.
Rails twist: Work the first group sc firmly. If needed, steam-block the rails straight.
Care
Hand wash in cool water with a mild detergent, press out the water in a towel, and dry the strips flat, re-pinning the lanterns. Do not tumble dry, because the long loops can snag.
Final Notes
The measurement chain is short and predictable:
- Row 1 sets the width at 4.25 in (10.8 cm).
- The base rows add 0.5 in (1.3 cm).
- 24 lantern repeats at 3.25 in (8.3 cm) each bring the height to 78.5 in (199.4 cm).
- Rows 51–53 add 0.75 in (1.9 cm), for 79.25 in (201.3 cm).
- The crab edge adds 0.25 in (0.6 cm), for 79.5 in (201.9 cm).
- The tab loop adds 1.75 in (4.4 cm), for 81.25 in (206.4 cm).
Make 10 identical strips, hang them in the cream-and-peach order, and you have two glowing lace panels.
Happy crocheting!