

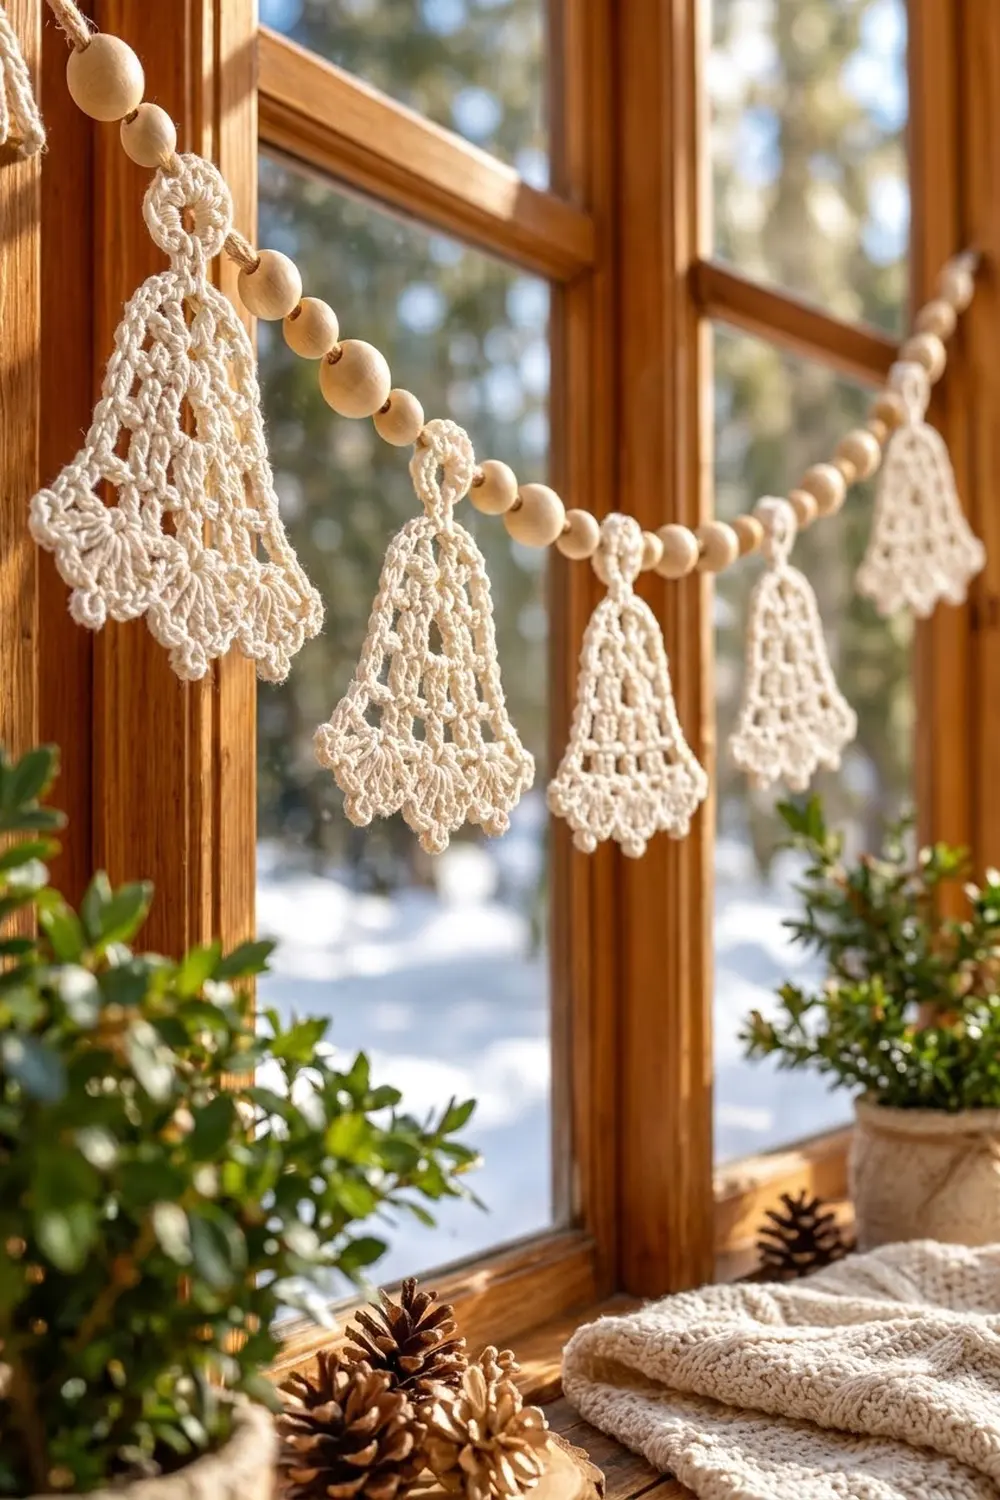
The Winter Lace Bell Garland is a soft, simple holiday decoration. It has six small lace bells in ivory cotton, strung on a natural cord with round wooden beads between them. It looks lovely across a window, a mantel, or a bookshelf, and it has a calm, natural, Scandinavian feel.
Each bell is worked flat from the top down. A narrow solid crown opens into an airy mesh body, and the hem finishes with four fan-shaped shells tipped with picots. A single crochet edge outlines the sides and top, and a sturdy sc-covered ring at the top center lets the bell slide onto the cord.
Each finished bell measures 3.75 in (9.5 cm) wide at the hem and 4 in (10.2 cm) tall including the ring. The beaded section of the garland is 27.75 in (70.5 cm) long, with cord tails for tying.
This pattern uses US crochet terms. You will make six identical bells, then string them on the cord with six beads between bells and at each end. You don’t need to sew or crochet the bells together.
Finished Size and Construction
- Finished bell size: 3.75 in (9.5 cm) wide x 4 in (10.2 cm) tall, ring included
- Finished garland: 27.75 in (70.5 cm) beaded section, plus 12 in (30.5 cm) tie tails at each end
- Skill level: Easy to Intermediate
- Terminology: US crochet terms
- Yarn weight: DK / light (#3) cotton
- Hook: 3.5 mm (E-4)
- Number of pieces: 6 identical bells
- Layout: 1 row of 6 bells on a beaded cord
- Piece size before border: 3.75 in (9.5 cm) wide x 3 in (7.6 cm) tall
- Piece size after border: 3.75 in (9.5 cm) wide x 3.25 in (8.3 cm) tall, plus a 0.75 in (1.9 cm) ring
- Border depth: 0.25 in (0.6 cm), one round of sc
Materials
Choose a smooth mercerized or combed cotton in DK weight. Cotton holds the lace shape well, shows the mesh clearly, and takes light starch. Avoid fuzzy or very soft acrylic, which blurs the openings and lets the shells droop.
Yarn:
– Ivory/cream DK cotton: 30 g, about 66 m
One bell uses about 3 g (about 7 m). The amount above covers all six bells, including your test bell, plus a margin for swatching and tails.
Tools and notions:
– 3.5 mm (E-4) crochet hook
– Tapestry needle
– Scissors
– Stitch marker
– 42 round wooden beads, 5/8 in (1.6 cm), with holes large enough for the cord
– Natural cotton or jute cord, 54 in (137.2 cm)
– Rust-proof pins and a foam blocking mat
– Spray starch or fabric stiffener (optional)
– Ruler or tape measure
Abbreviations (US Terms)
- ch: chain
- sl st: slip stitch
- sc: single crochet
- dc: double crochet
- sk: skip
- st(s): stitch(es)
- sp: space
- RS: right side
- rep: repeat
Special stitches:
– Picot: ch 3, sl st in 3rd ch from hook.
– Shell: (3 dc, picot, 3 dc) all in the same st.
Counting note: In the mesh rows, every dc and every ch-1 sp counts as 1 st. A beginning ch-4 counts as 1 dc plus 1 ch-1 sp.
Gauge and Checkpoints
Gauge: 5 dc = 1 in (2.5 cm); 1 dc row = 0.4 in (1.0 cm). In the mesh, each dc or ch-1 sp measures about 0.2 in (0.5 cm).
Make one complete bell before making the rest. It is both your gauge swatch and your test piece. Measure it at each checkpoint:
- After Row 2: 1.8 in (4.6 cm) wide, 0.8 in (2.0 cm) tall
- After Row 4: 2.6 in (6.6 cm) wide, 1.6 in (4.1 cm) tall
- After Row 6: 3.4 in (8.6 cm) wide, 2.4 in (6.1 cm) tall
- After Row 7: 3.75 in (9.5 cm) wide at the shells, 3 in (7.6 cm) tall
- After the border: 3.75 in (9.5 cm) wide, 3.25 in (8.3 cm) tall, 4 in (10.2 cm) with ring
If your bell is too big: Go down to a 3.25 mm hook, or check that your chains are not loose.
If your bell is too small: Go up to a 3.75 mm hook. Tight chains in the mesh rows are the most common cause.
A difference of 0.25 in (0.6 cm) is fine for a garland, as long as all six bells match each other.
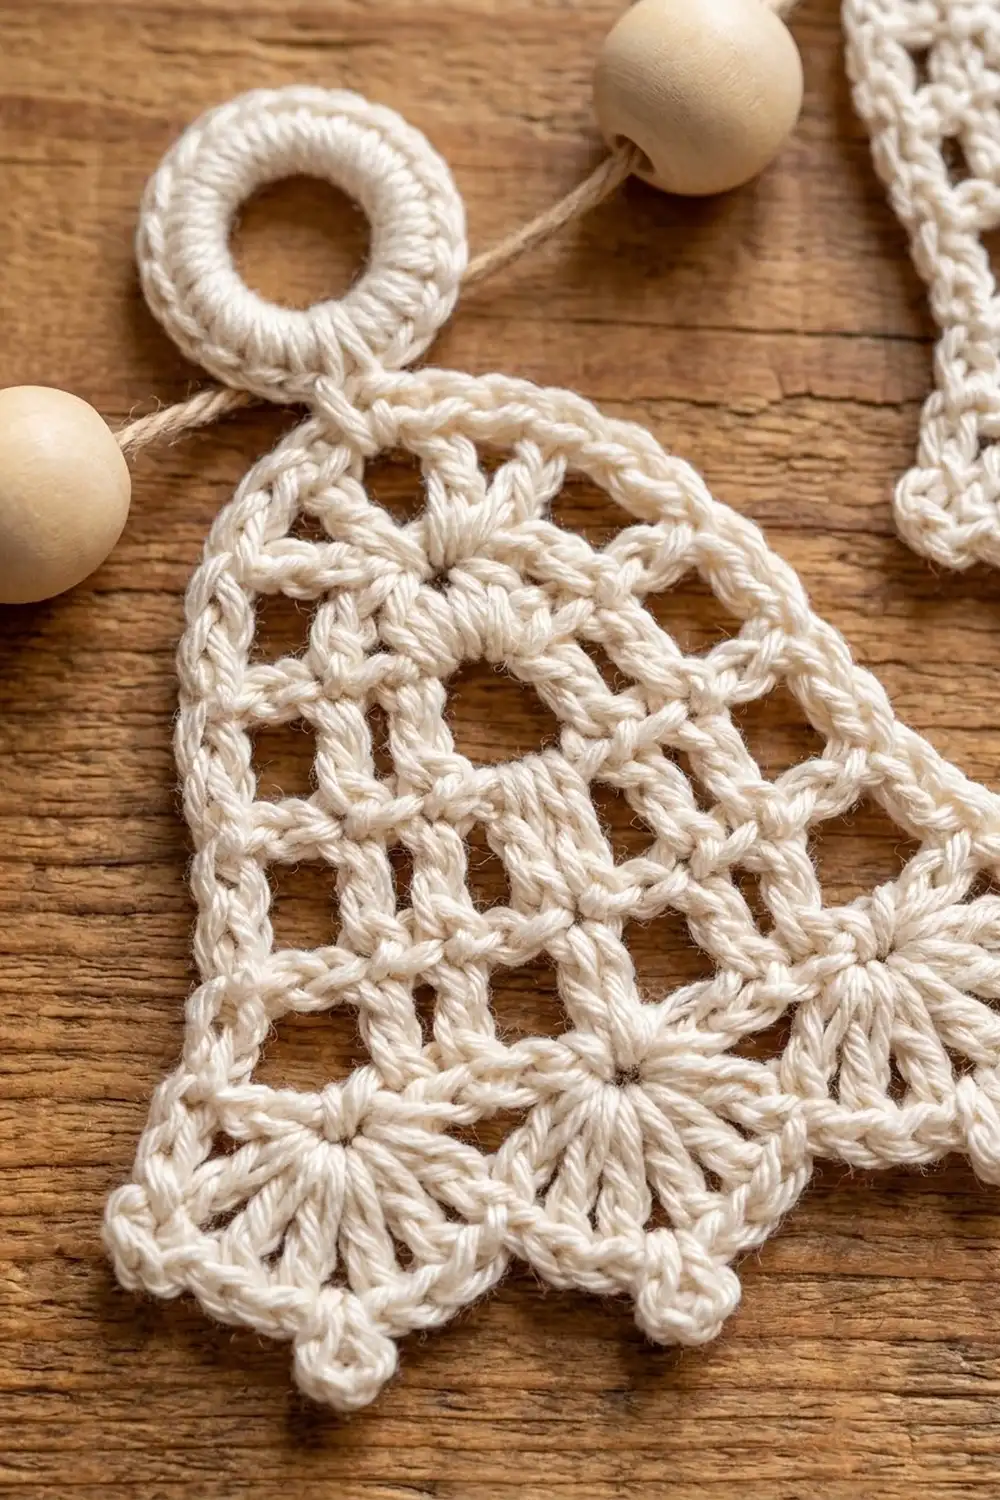
Bell Pattern
The bell is worked flat in rows from the crown down to the hem. Row 1 is the RS. Turn at the end of every row.
Crown (Rows 1–2)
Row 1 (RS): Ch 9, dc in 4th ch from hook (skipped 3 ch count as 1 dc), dc in each of next 5 ch. (7 dc)
Row 1 measures 1.4 in (3.6 cm) wide.
Row 2: Ch 3 (counts as dc), turn, dc in first st, dc in each of next 5 sts, 2 dc in top of turning ch. (9 dc)
The crown is now solid and 1.8 in (4.6 cm) wide.
Mesh Body (Rows 3–6)
Row 3: Ch 4 (counts as dc + ch 1), turn, sk next st, dc in next st, ch 1, sk next st, dc in next st; rep from * 2 more times, working the last dc in top of turning ch. (5 dc + 4 ch-1 sps = 9 sts)*
This row keeps the same width and opens the first mesh holes.
Row 4 (increase): Ch 4 (counts as dc + ch 1), turn, dc in first dc (at the base of the ch-4), ch 1, dc in next dc; rep from * 2 more times, ch 1, (dc, ch 1, dc) in 3rd ch of turning ch. (7 dc + 6 ch-1 sps = 13 sts)*
Each end gains one mesh, so the bell widens by 0.4 in (1.0 cm) on each side.
Row 5: Ch 4 (counts as dc + ch 1), turn, sk ch-1 sp, dc in next dc, ch 1, dc in next dc; rep from * 4 more times, working the last dc in 3rd ch of turning ch. (7 dc + 6 ch-1 sps = 13 sts)*
Row 6 (increase): Ch 4 (counts as dc + ch 1), turn, dc in first dc, ch 1, dc in next dc; rep from * 4 more times, ch 1, (dc, ch 1, dc) in 3rd ch of turning ch. (9 dc + 8 ch-1 sps = 17 sts)*
The body is now 3.4 in (8.6 cm) wide and 2.4 in (6.1 cm) tall. Alternating plain rows and increase rows gives the bell its stepped, flaring sides.
Shell Hem (Row 7)
Row 7 (RS): Ch 1, turn, sc in first dc, sk ch-1 sp, shell in next dc, sk ch-1 sp, sc in next dc; rep from * 3 more times, working the last sc in 3rd ch of turning ch. (4 shells, 5 sc)*
The 9 dc of Row 6 are used in this order: sc, shell, sc, shell, sc, shell, sc, shell, sc. Each shell has 6 dc, so the row holds 24 dc, 4 picots, and 5 sc.
The shells fan outward past the mesh, bringing the hem to 3.75 in (9.5 cm). Do not fasten off.
Make All Pieces
Make 6 bells in total, all in ivory/cream:
- Ivory/cream: 6 bells (your test bell counts as bell 1)
Garland layout, left to right:
ROW 1: BEADS x6 | BELL | BEADS x6 | BELL | BEADS x6 | BELL | BEADS x6 | BELL | BEADS x6 | BELL | BEADS x6 | BELL | BEADS x6
That is 6 bells and 7 groups of 6 beads, for 42 beads in total.
Work the border (below) on each bell before stringing, because the ring is part of the border round.
Joining (Stringing the Garland)
The bells are not crocheted together. Instead, you thread each bell’s ring onto the cord, with beads acting as spacers.
Method:
- Wrap 0.5 in (1.3 cm) of tape around one cord end to make a stiff tip.
- Measure 12 in (30.5 cm) from the other end and tie a loose overhand knot as a temporary stop.
- Thread 6 beads, then pass the cord through the ring of bell 1 from front to back.
- Repeat: 6 beads, then the next bell, until all 6 bells are on.
- Finish with 6 beads.
Spacing logic: Each group of 6 beads is 3.75 in (9.5 cm) long, the same as a bell’s width. Each ring takes up about 0.25 in (0.6 cm) of cord. That puts the bells 4 in (10.2 cm) apart, center to center, with a 0.25 in (0.6 cm) gap between the widest points of neighboring hems.
Math check: 42 beads x 5/8 in = 26.25 in (66.7 cm). Add 6 rings x 0.25 in = 1.5 in (3.8 cm), for a total of 27.75 in (70.5 cm).
Tension advice: Push the beads together snugly, but do not crush the rings. Each ring should sit upright between the beads, with the bell hanging straight down.
Size checkpoint: Lay the garland flat. The beaded section should measure 27.75 in (70.5 cm). Tie a firm overhand knot right after the last bead, then retie the temporary knot snugly against the first bead. Leave the 12 in (30.5 cm) tails for hanging.
Border
The border is one round of sc worked up one side, across the crown, and down the other side. You make the hanging ring in the middle of the crown. The shell hem gets no border.
Border gauge: 2 sc per dc row end = 0.4 in (1.0 cm); 1 sc per crown st = 0.2 in (0.5 cm).
Round 1 (RS): Continue from the last sc of Row 7. Do not turn.
- First side: Work up the side edge, putting 2 sc in each row end of Rows 6, 5, 4, 3, 2, and 1. (12 sc)
- Crown: Work across the opposite side of the foundation ch, treating it as 7 sts, one under each Row 1 st. Work 3 sc in st 1, then sc in sts 2, 3, and 4. Ch 10 and sl st in st 4 again to form the ring. Work 16 sc into the ch-10 ring, then sl st in st 4 once more. Finish with sc in sts 5 and 6, and 3 sc in st 7. (11 sc + ring of 16 sc)
- Second side: Work down the other edge, putting 2 sc in each row end of Rows 1 through 6. (12 sc)
- Sl st in first sc of Row 7. Fasten off.
Border total: 12 + 11 + 12 = 35 sc, plus 16 sc on the ring.
Corner note: The two 3-sc corner groups are counted in the crown, not the sides. Each side is exactly 12 sc.
Why the math works:
– A dc row is 0.4 in (1.0 cm) tall and an sc is 0.2 in (0.5 cm) wide, so 2 sc per row end lie flat along the side.
– The crown has 7 sts at 0.2 in (0.5 cm) each, so 1 sc per st matches its 1.4 in (3.6 cm) width.
– The 2 extra sc at each corner turn the 90-degree angle without pulling.
The border adds 0.25 in (0.6 cm) at the top and the ring adds 0.75 in (1.9 cm). Together they bring the bell to 4 in (10.2 cm) tall.
Final Blocking
- Weave in all ends along the sc border or inside dc posts.
- Soak each bell in cool water for 5 minutes, then press out the water in a towel. Do not wring.
- Pin the bell on a foam mat, RS up, to 3.75 in (9.5 cm) wide and 3.25 in (8.3 cm) tall.
- Pin each mesh row straight across, keeping the two sides even.
- Pin out each shell in a fan shape, with one pin through each picot.
- Pin the ring into a round shape.
- Spray lightly with starch for a crisp finish, if you like.
- Let the bell dry completely, at least 12 hours, before unpinning.
- Block all six bells to the same measurements.
Final Quality-Control Checklist
- Each bell has 4 shells and 4 picots on the hem.
- Each side has 12 border sc, and the crown has 11 sc plus the ring.
- All bells measure 3.75 in (9.5 cm) wide and 4 in (10.2 cm) tall with the ring.
- The mesh holes are open and square, with no twisted chains.
- All ends are woven in and trimmed.
- There are 6 beads between each pair of bells and 6 at each end.
- The beaded section measures 27.75 in (70.5 cm).
- The end knots are firm.
Troubleshooting
The bell is lopsided. Check that both ends of Rows 4 and 6 have a (dc, ch 1, dc) increase.
The mesh holes are uneven. Make all ch-1 sps the same size, and don’t pull the last dc of a row tight.
The shells curl up. Block with a pin in every picot, or work the dc in Row 7 more loosely.
The side edge ruffles. Use 2 sc per row end, not 3.
The side edge pulls in. Check that you didn’t work only 1 sc into some row ends.
The ring is floppy. Pack the 16 sc tightly, or add 1 or 2 more sc.
The bells overlap on the cord. Add a seventh bead between bells.
Care
Hand wash in cool water with mild soap, press dry in a towel, and reshape flat. Store the garland flat or loosely coiled in a box.
Final Notes
The measurement chain is simple:
– Gauge is 5 dc = 1 in (2.5 cm), and one dc row is 0.4 in (1.0 cm).
– The crown starts at 1.4 in (3.6 cm) wide, and the mesh grows to 3.4 in (8.6 cm).
– The shell hem reaches 3.75 in (9.5 cm) wide at 3 in (7.6 cm) tall.
– The border and ring bring each bell to 4 in (10.2 cm) tall.
– Six bells and 42 beads make a 27.75 in (70.5 cm) beaded garland.
Once your test bell matches the checkpoints, the other five are quick and relaxing to make.
Happy crocheting!