

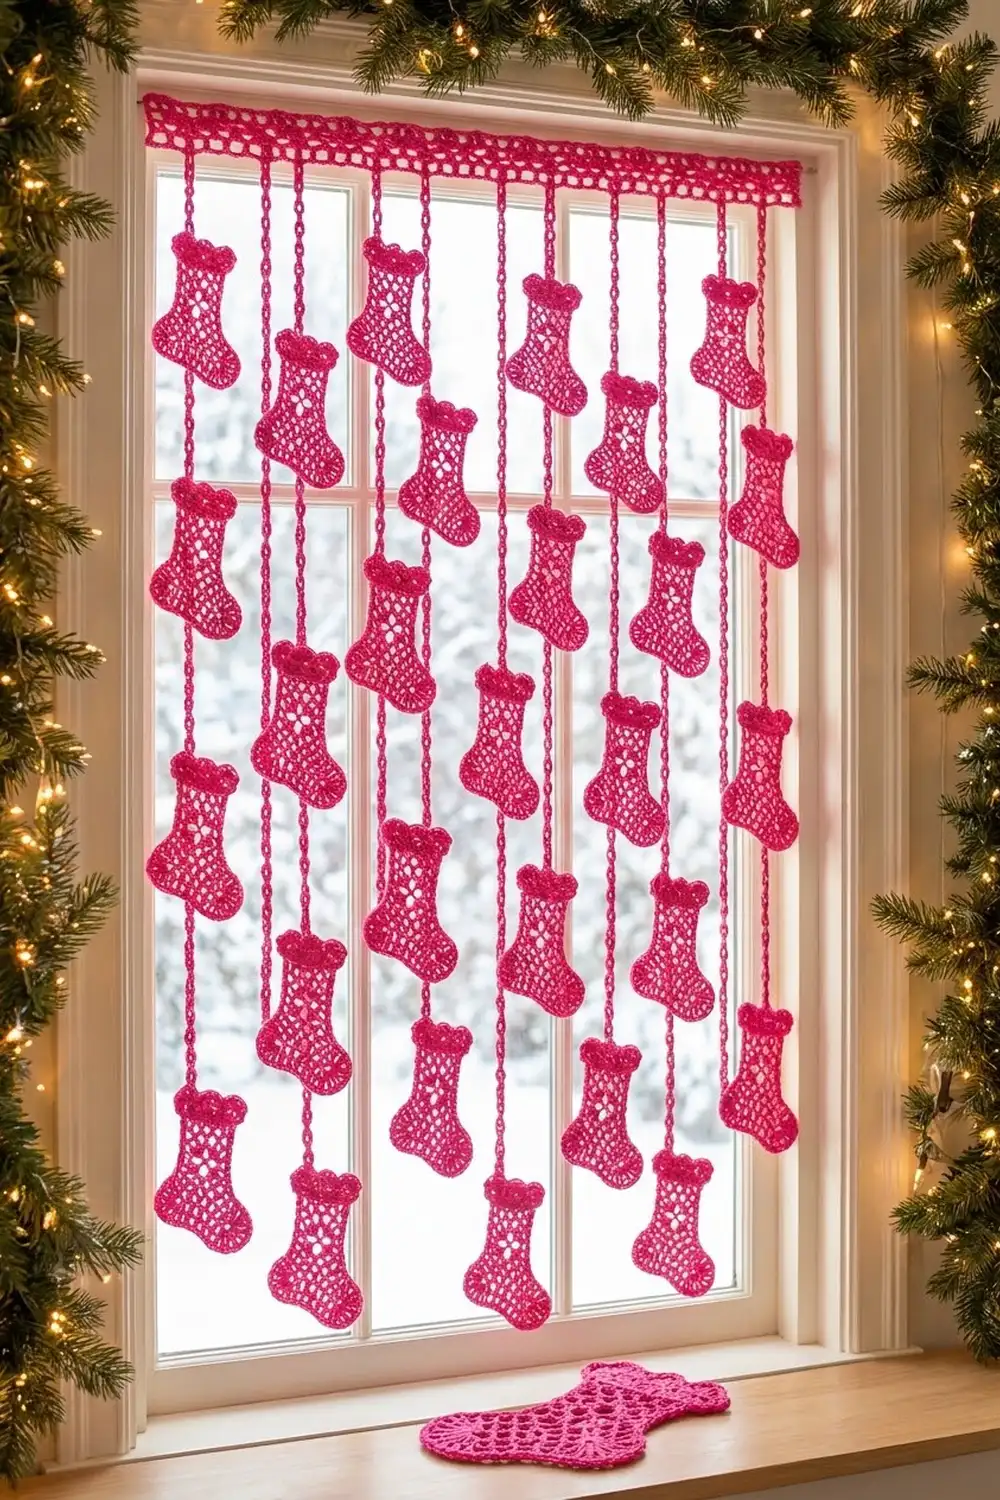
This hot pink curtain hangs a cascade of lacy little stockings in a window. Each stocking has an airy filet-mesh body, a tiny flower-like block in the center of the leg, fanned heel and toe corners, and a scalloped cuff. When daylight comes through the window, the mesh glows.
Everything is worked in one bright fuchsia cotton, so the curtain reads as a single graphic shape: a lattice header at the top with eight staggered strands of stockings below it. The style is light, festive, and a little vintage, like a lace sweater turned into a window decoration.
The pattern uses US crochet terms throughout. The finished curtain measures about 40.5 in (102.9 cm) wide and 37 in (94.0 cm) long. Each stocking is 4 in (10.2 cm) wide and 4.25 in (10.8 cm) tall.
The construction is modular. You crochet 36 flat stockings in rows from the sole up. Short sl-st-backed chains link the stockings into 8 strands. Then you work a mesh header band and hang the strands from exact stitches along its bottom edge.
Finished Size and Construction
- Finished size: 40.5 in (102.9 cm) wide × 37 in (94.0 cm) long
- Skill level: Intermediate
- Terminology: US crochet terms
- Yarn weight: Sport (#2 fine) mercerized cotton
- Hook: 3.25 mm (US D/3)
- Number of pieces: 36 stockings, 1 header band, 8 strands
- Layout: 8 strands, 5 in (12.7 cm) apart. The odd strands carry 5 stockings and the even strands carry 4, offset 3 in (7.6 cm) lower.
- Piece size: 4 in × 4.25 in (10.2 × 10.8 cm) per stocking
- Size before border: Header body 40.17 in × 1.33 in (102.0 × 3.4 cm). The longest strand is 35.25 in (89.5 cm).
- Border depth: The header’s sc edging adds 0.17 in (0.4 cm) per edge, so the finished header is 1.67 in (4.2 cm) deep.
Materials
Use a smooth, mercerized sport-weight cotton with roughly 155 m per 50 g. Mercerized cotton shows off the mesh, holds a blocked shape, and doesn’t fuzz in sunlight. Avoid acrylic, because it relaxes and the strands stretch over time.
- Fuchsia / Hot Pink: 250 g, about 775 m (848 yd)
The estimate covers 36 stockings (about 4 g each), the header (about 30 g), and the strands (about 4 g). These quantities include a margin of roughly 70 g for your gauge swatch and tails.
Tools:
– 3.25 mm (US D/3) hook
– Tapestry needle
– Scissors
– 10 locking stitch markers
– Measuring tape
– Blocking mats, rust-proof pins, and a spray bottle
– Optional: spray starch
– 9 clip curtain rings and a curtain rod for hanging
Abbreviations (US Terms)
- ch – chain
- sl st – slip stitch
- sc – single crochet
- dc – double crochet
- sk – skip
- sp – space
- st(s) – stitch(es)
- RS / WS – right side / wrong side
Special stitches:
– Mesh: dc, ch 2, sk 2 sts (or one ch-2 sp), dc in next dc. Each mesh is 3 sts wide and shares its end posts with its neighbors.
– Block: dc, 2 dc in the ch-2 sp, dc in next dc. It is the same width as a mesh, but solid.
– Shell: 7 dc in one stitch.
– Fan: [dc, ch 1] 6 times, dc, all in one corner. That makes 7 radiating dc.
– Backed chain: Chain the stated number, then turn and sl st in the back bump of each chain.
Gauge and Checkpoints
Gauge: 24 dc and 12 rows = 4 in (10.2 cm), so 6 sts and 3 rows = 1 in (2.5 cm).
Chain gauge: 8 backed ch = 1 in (2.5 cm).
Make one complete stocking before anything else. It is your gauge swatch.
Checkpoints:
– After Row 1: 22 dc = 3.67 in (9.3 cm) wide.
– After Row 3: The foot is 1 in (2.5 cm) tall.
– After Row 10: The leg is 16 sts = 2.67 in (6.8 cm) wide.
– After Row 11: The body is 3.67 in (9.3 cm) tall.
– After Row 12: The stocking is about 4.1 in (10.4 cm) tall. The cuff row adds about 0.4 in (1.0 cm).
– After the edging: 4 in (10.2 cm) wide at the foot × 4.25 in (10.8 cm) tall.
If your stocking is too big, go down 0.25 mm in hook size. If it’s too small, go up 0.25 mm. Don’t change any stitch counts, because the header spacing and strand positions depend on them.
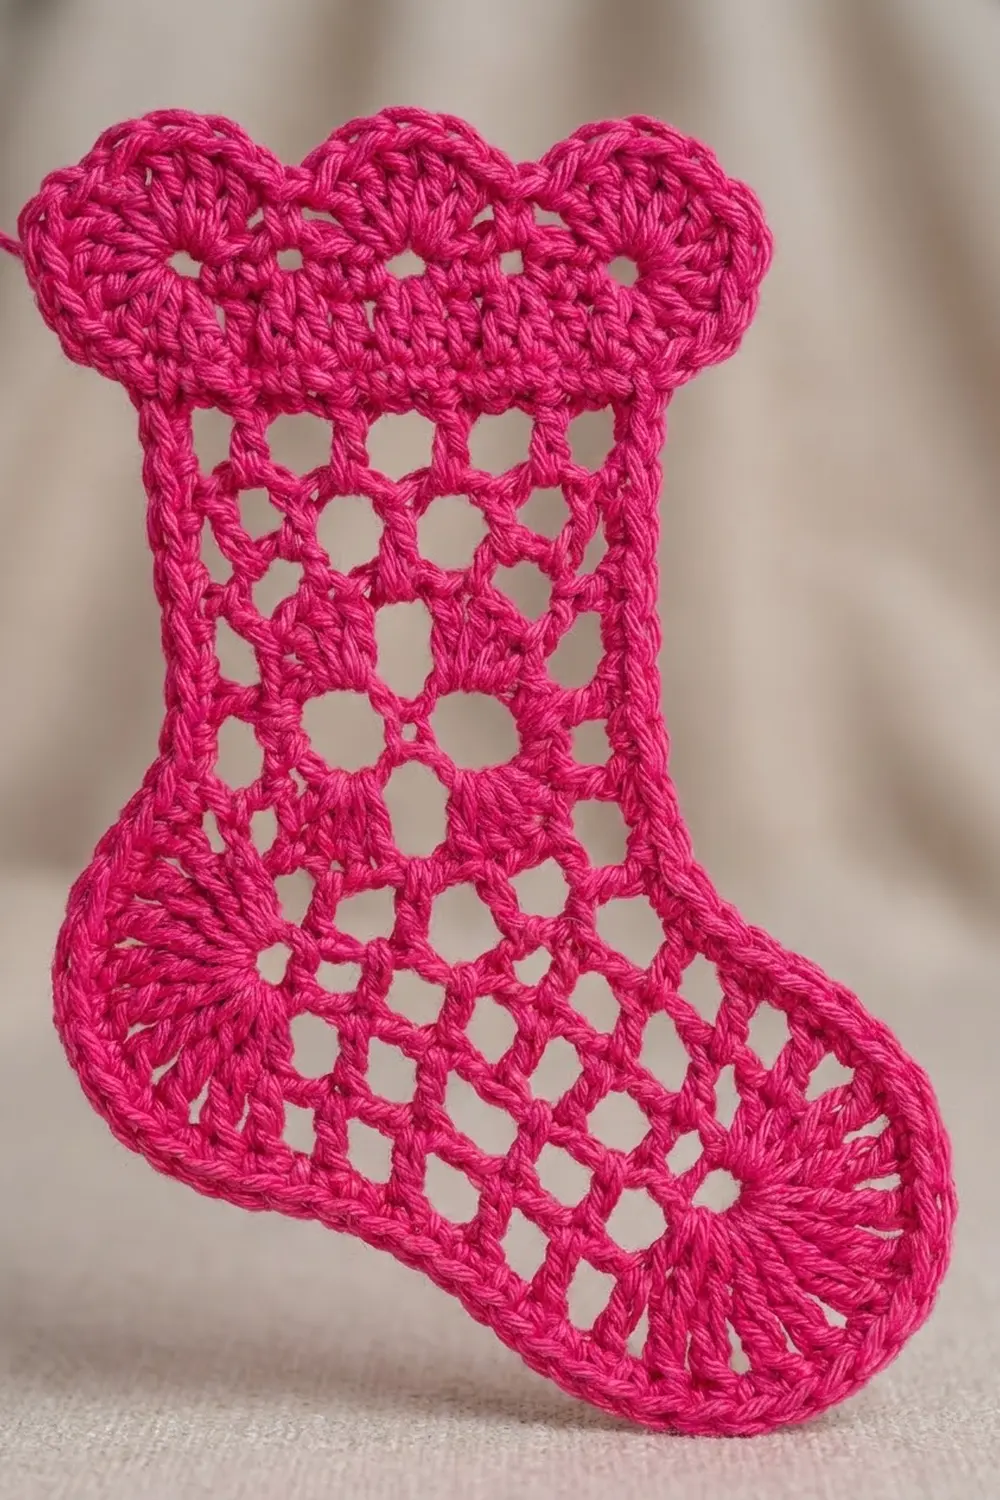
Stocking Pattern (Make 36)
With RS facing, the heel is on the left and the toe points right.
Foot
Foundation: Ch 24.
Row 1 (RS): Dc in 4th ch from hook and in each ch across. Turn. (22 dc; the turning ch counts as a dc.)
Row 2 (WS): Ch 5 (counts as dc + ch 2), sk next 2 dc, dc in next dc. Then work ch 2, sk 2 dc, dc in next dc 6 times, working the last dc in the top of the turning ch. Turn. (7 meshes: 8 dc + 14 ch = 22 sts.)
Row 3 (RS): Ch 5, dc in next dc. Then work ch 2, dc in next dc 6 times, working the last dc in the 3rd ch of the turning ch-5. Turn. (7 meshes, 22 sts.)
This row ends at the heel.
Leg
Row 4 (WS): Ch 5, dc in next dc. Then work ch 2, dc in next dc 4 times. Turn, leaving the last 2 meshes unworked. (5 meshes, 16 sts.)
The 2 unworked meshes form the top of the toe.
Rows 5–6: Ch 5, dc in next dc. Then work ch 2, dc in next dc 3 times, ch 2, dc in 3rd ch of turning ch. Turn. (5 meshes, 16 sts.)
Row 7 (center row): Ch 5, dc in next dc, ch 2, dc in next dc, 2 dc in next ch-2 sp, dc in next dc, ch 2, dc in next dc, ch 2, dc in 3rd ch of turning ch. Turn. (4 meshes + 1 center block, 16 sts.)
The solid block is framed above, below, and at the sides by open meshes, which forms the leg’s small flower.
Rows 8–10: Repeat Row 5. (5 meshes, 16 sts.)
Cuff
Row 11 (RS, conversion row): Ch 3 (counts as dc). Work 3 dc in next ch-2 sp, dc in next dc, 2 dc in next sp, dc in next dc, 3 dc in next sp, dc in next dc, 2 dc in next sp, dc in next dc, 3 dc in last sp, and dc in 3rd ch of turning ch. Turn.
Count: 16 (1 dc per existing st) + 3 (extra dc in meshes 1, 3, and 5) = 19 dc.
Row 12 (WS): Ch 1, sc in first dc. Then work sk 2 dc, shell in next dc, sk 2 dc, sc in next dc 3 times. The last sc goes in the top of the turning ch. Fasten off. (3 shells, 4 sc.)
19 = 3 × 6 + 1, so the 3 scallops fit exactly. The middle shell sits on st 10, the exact center.
Edging
With RS facing, join with sc in the heel-side row-end of Row 11.
- Heel side: Work 2 sc in each row-end down to Row 2. (10 row-ends × 2 = 20 sc)
- Heel fan: Work a fan around the end post of Row 1. (7 dc)
- Sole: Sk the heel-corner foundation ch, then sc in each of the next 20 foundation ch. Stop before the toe-corner ch, which is the base of the turning ch. (20 sc)
- Toe fan: Work a fan around the turning ch of Row 1. (7 dc)
- Toe end: Work 2 sc in the row-end of Row 2 and 2 sc in the row-end of Row 3. (4 sc)
- Toe top: Sc in the top of Row 3’s end post, 2 sc in the ch-2 sp, sc in the next dc, and 2 sc in the next ch-2 sp. (6 sc)
- Inner corner: Sk the leg-edge post of Row 3 so the corner stays crisp.
- Toe-side leg: Work 2 sc in each row-end from Row 4 to Row 11. (8 × 2 = 16 sc) Fasten off.
Edging total: 66 sc + 14 dc + 12 ch-1 sps.
2 sc per dc row-end matches 6 sc per in against 3 rows per in, so the edges lie flat.
Make All Pieces
- Fuchsia stockings: 36
- Strand segments: 28 short segments between stockings and 8 top segments (worked in the Border section)
- Header band: 1
Layout grid. “X” is a stocking and “·” is an empty strand position. Strands are numbered left to right. Each row gives the depth of the cuff top below the header’s bottom edge.
ROW 1 (6 in / 15.2 cm):      X · X · X · X ·
ROW 2 (9 in / 22.9 cm):      · X · X · X · X
ROW 3 (12.25 in / 31.1 cm):  X · X · X · X ·
ROW 4 (15.25 in / 38.7 cm):  · X · X · X · X
ROW 5 (18.5 in / 47.0 cm):   X · X · X · X ·
ROW 6 (21.5 in / 54.6 cm):   · X · X · X · X
ROW 7 (24.75 in / 62.9 cm):  X · X · X · X ·
ROW 8 (27.75 in / 70.5 cm):  · X · X · X · X
ROW 9 (31 in / 78.7 cm):     X · X · X · X ·
Odd strands: 5 stockings × 4 strands = 20. Even strands: 4 × 4 = 16. 20 + 16 = 36.
Joining
Use the backed-chain method to link the stockings vertically. Lay each strand’s stockings in a column with RS up, all toes pointing right.
Between-segment (work 28):
1. Join with sl st between sole sc 7 and 8 of the upper stocking, counting from the heel. This point sits directly below the middle leg mesh, so the stocking hangs straight.
2. Ch 16, then sl st into the 4th dc of the middle shell of the next stocking.
3. Turn and sl st in the back bump of each of the 16 ch.
4. Sl st into the starting point and fasten off.
Each segment is 2 in (5.1 cm). The pitch from one stocking to the next is 4.25 + 2 = 6.25 in (15.9 cm).
Tension: Chain at your normal tension. Work the sl sts loosely so the segment doesn’t shorten. If 16 backed ch measure under 2 in (5.1 cm), work the sl sts with a hook one size up.
Checkpoint: Measure from the cuff top of the first stocking to the sole of the last. It should be 29.25 in (74.3 cm) on an odd strand and 23 in (58.4 cm) on an even strand.
Border: Header Band
Border gauge: 6 sts per in (2.5 cm) along the rows. Work 2 sc per dc row-end.
Foundation: Ch 243. If you prefer, you can work 241 foundation dc instead.
Row 1 (RS): Dc in 4th ch from hook and in each ch across. Turn. (241 dc)
Row 2 (WS): Ch 5, sk 2 dc, dc in next dc. Then work ch 2, sk 2 dc, dc in next dc across. Turn. (80 meshes: 81 dc + 160 ch = 241 sts)
Row 3: Ch 5, dc in next dc. Then work ch 2, dc in next dc across. Turn. (80 meshes, 241 sts)
Row 4 (conversion row): Ch 3, then work 2 dc in next ch-2 sp, dc in next dc across. Turn.
Count: 81 (1 dc per existing dc post) + 160 (2 dc in each of 80 sps) = 241 dc.
Round 5 (edging, RS): Ch 1. Work:
– Top edge: sc in each st across (241 sc), ch 1
– End: 2 sc in each of 4 row-ends (8 sc), ch 1
– Bottom edge: sc in each foundation ch (241 sc), ch 1
– Other end: 8 sc, ch 1
Sl st to the first sc and fasten off. Total: 498 sc. The corner ch-1s are not counted, and each per-side count already includes its end stitches.
Why the math works: Each of the 8 strands gets a 30-st bay, which is 5 in (12.7 cm). 8 × 30 = 240, plus 1 closing post = 241. That +1 is the only stitch added, and it isn’t added per seam.
241 = 3 × 80 + 1, so the mesh closes perfectly with 10 meshes per bay. The strands attach at bottom sc 16, 46, 76, 106, 136, 166, 196, and 226 (16 + 30k). Every one of those lands directly under a dc post. There are 15 sts of margin at each end (241 + 1 − 226 = 16), so the layout is symmetric.
Top segments:
1. With RS facing, join with sl st in the assigned bottom sc.
2. Ch 48 for odd strands, which is 6 in (15.2 cm). Ch 72 for even strands, which is 9 in (22.9 cm).
3. Sl st into the 4th dc of the top stocking’s middle shell.
4. Turn and work a backed sl st up each ch.
5. Sl st into the same header sc and fasten off.
Checkpoint: Odd strands hang 35.25 in (89.5 cm) and even strands 32 in (81.3 cm) below the header. The header itself should measure 40.5 in (102.9 cm) wide.
Final Blocking
- Weave in all ends along the sc edgings. Weave the strand ends into the backed chain.
- Spritz the stockings until damp. Pin each one to 4 in × 4.25 in (10.2 × 10.8 cm). Open every mesh square and pin each fan into a smooth curve.
- Pin each cuff scallop into a round arch.
- Pin the header flat to 40.5 in × 1.67 in (102.9 × 4.2 cm), with every mesh square.
- If you want crisp lace, apply light spray starch.
- Let everything dry completely before unpinning.
- Hang the curtain on 9 clip rings at top sc 1, 31, 61, 91, 121, 151, 181, 211, and 241. That puts them 5 in (12.7 cm) apart.
Final Quality-Control Checklist
- 36 stockings, each 4 in × 4.25 in (10.2 × 10.8 cm)
- Every cuff has 3 even scallops, and every leg has a centered block
- All toes point right
- 28 between-segments of 2 in (5.1 cm) each
- Top segments are 6 in (15.2 cm) on odd strands and 9 in (22.9 cm) on even strands
- Strands attach at bottom sc 16 + 30k
- The header is 241 sts and 40.5 in (102.9 cm) wide
- No stocking twists when the curtain hangs
Troubleshooting
- Cuff ruffles: The shells are too full. Go down one hook size for Row 12 only.
- Fans cup: Work the ch-1s more loosely, or reduce to [dc, ch 1] 5 times, dc.
- Toe curls upward: You worked into Row 3’s leg post at the inner corner. Skip it.
- Stocking hangs crooked: Re-join exactly between sole sc 7 and 8.
- Strands stretch: Use cotton, not acrylic, and keep the backed sl sts snug.
- Header too long: Check the chain gauge. Re-work the header at 6 sts per in.
Care
Hand wash in cool water with mild soap. Press out the water in a towel, then re-pin each stocking flat to dry.
Final Notes
Here is the measurement chain:
– 6 sts and 3 rows per in give a stocking body of 3.67 in (9.3 cm).
– The edging brings each stocking to 4 in × 4.25 in (10.2 × 10.8 cm).
– 2 in (5.1 cm) segments set a pitch of 6.25 in (15.9 cm).
– 30-st bays space the strands 5 in (12.7 cm) apart.
– The 241-st header finishes at 40.5 in (102.9 cm), for a curtain 37 in (94.0 cm) long.
Check each link of that chain as you go, and the curtain will hang straight and even.
Happy crocheting!