

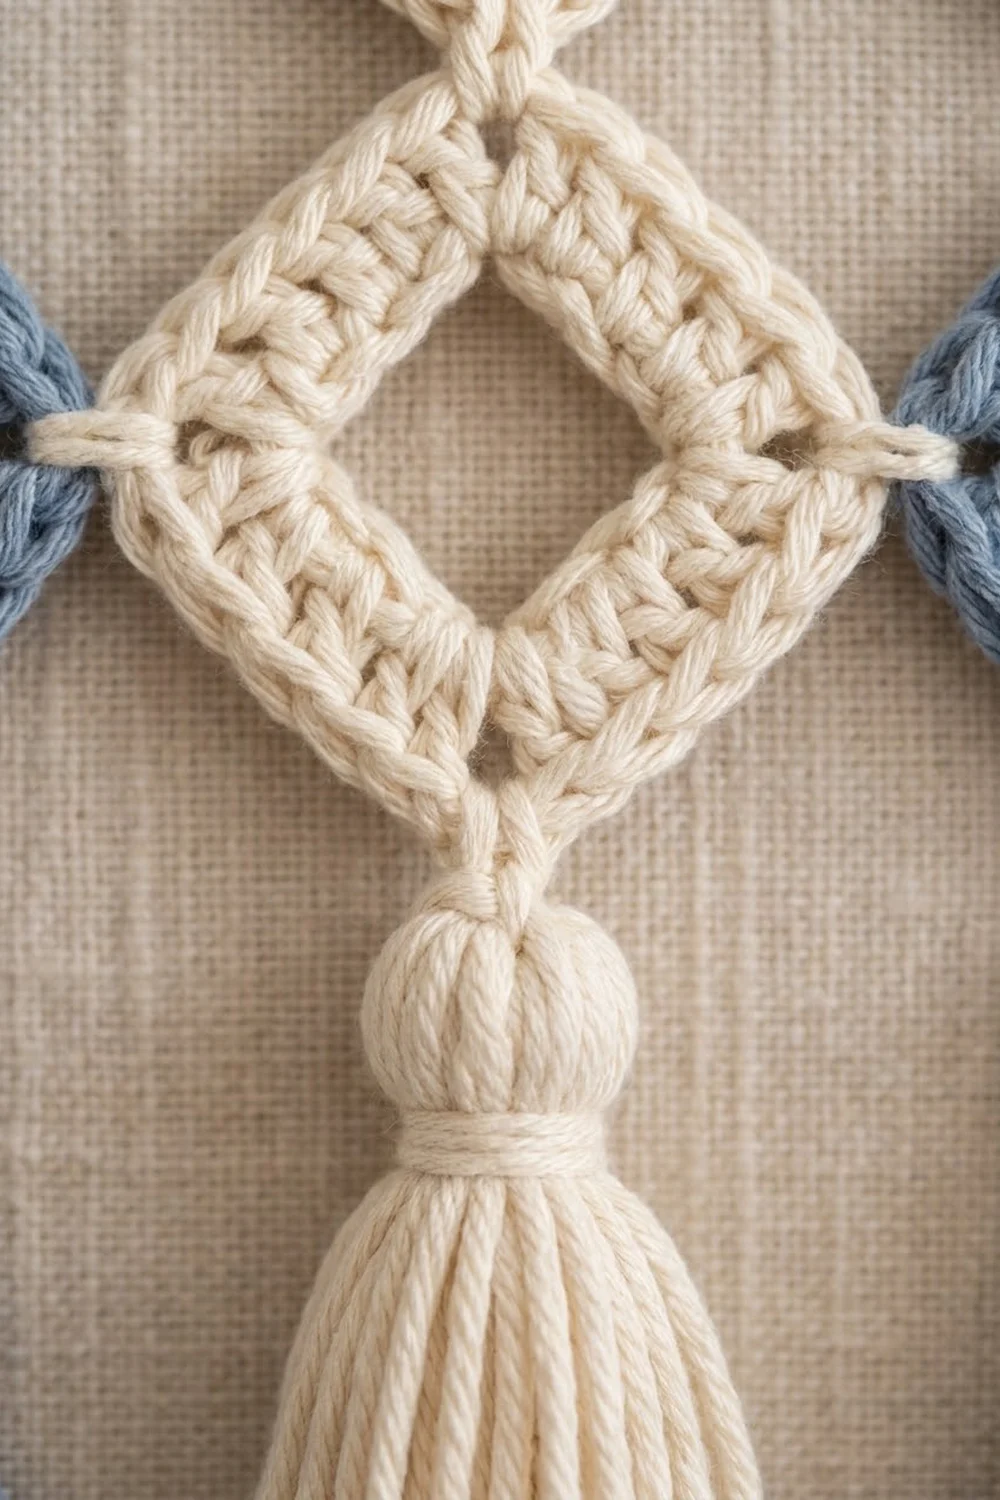
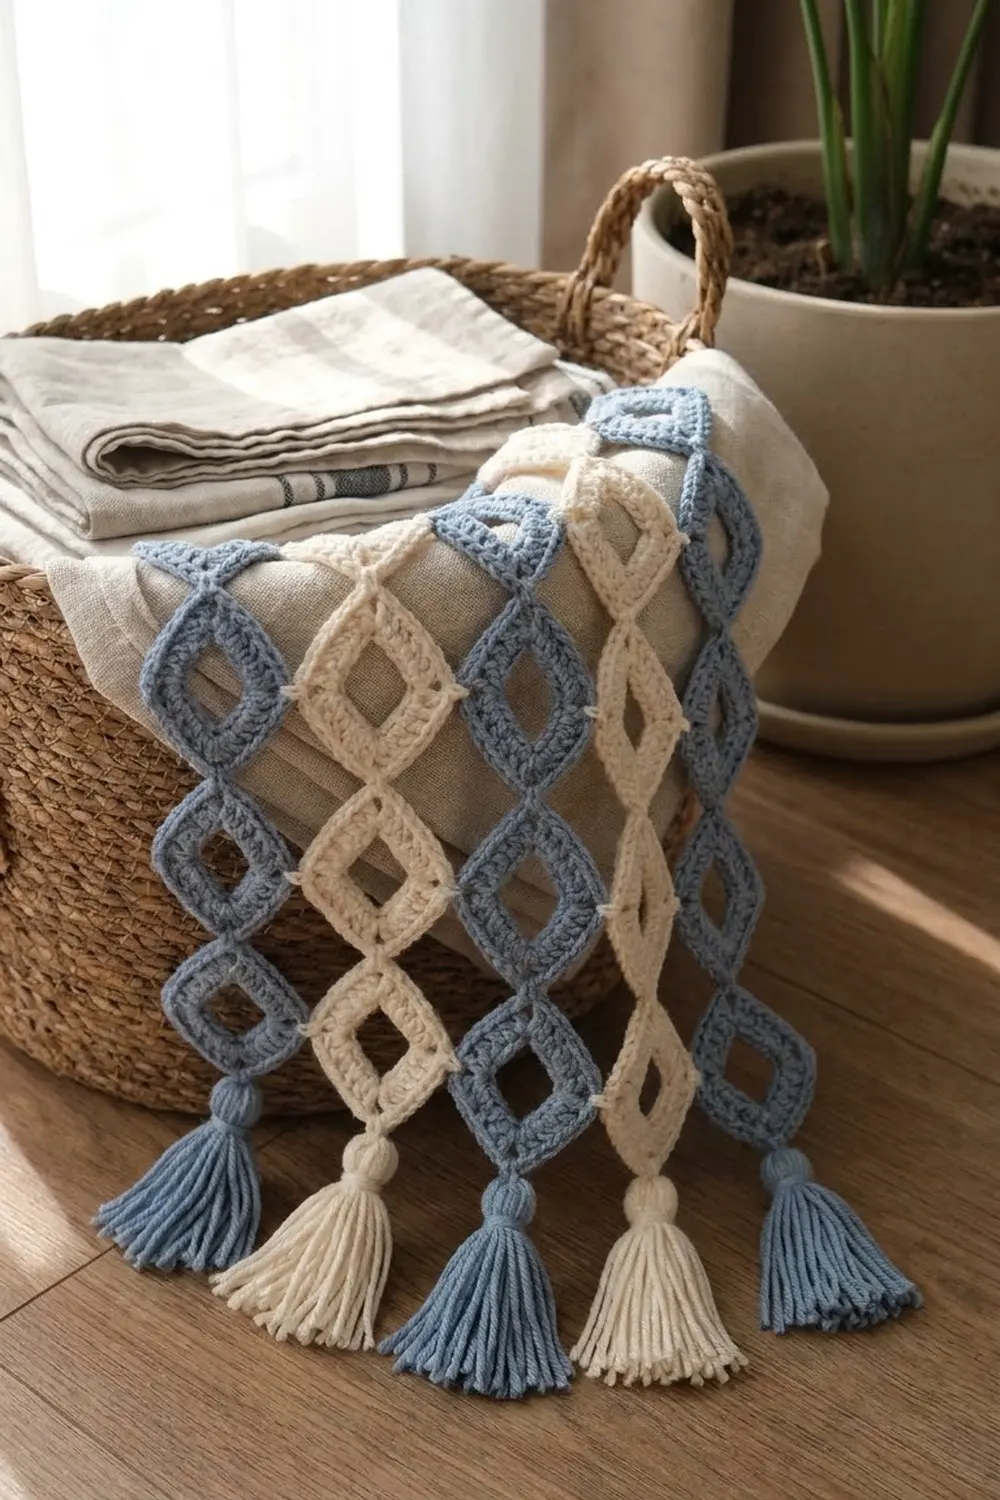
This small openwork panel is made from twenty diamond motifs in cream and light blue. Each diamond has an open center. A raised border of radiating stitches frames the hole. The motifs meet at their tips and form a light, airy lattice.
The two colors alternate in a checkerboard across a 5-column by 4-row grid. Five yarn tassels hang from the lowest diamond tips along the bottom edge. They alternate cream and blue and make a soft fringe. The look is calm and modern, with a slightly coastal feel.
The finished panel measures about 9.5 in (24.1 cm) wide by 6.0 in (15.2 cm) tall, not counting the tassels. With tassels it is about 8.0 in (20.3 cm) tall. This pattern uses US crochet terms throughout.
Each diamond starts as a tiny two-round square worked around an open chain ring. You then turn it 45° so its corners point up, down, left and right. You make the first motif on its own. The other 19 are joined as you go on their last round: tip to tip vertically, and with short chain bridges sideways. The tassels go on last.
Finished Size and Construction
- Finished size: 9.5 in (24.1 cm) wide x 6.0 in (15.2 cm) tall, excluding tassels
- Height with tassels: about 8.0 in (20.3 cm)
- Skill level: Easy
- Terminology: US crochet terms
- Yarn weight: Sport (#2), cotton or cotton blend
- Hook: 3.0 mm
- Number of pieces: 20 diamond motifs (10 cream, 10 light blue) + 5 tassels (3 cream, 2 blue)
- Layout: 5 columns x 4 rows, checkerboard
- Piece size: each diamond is 1.5 in (3.8 cm) tip to tip in both directions and 1.06 in (2.7 cm) per side
- Size before border: 9.5 in x 6.0 in (24.1 cm x 15.2 cm)
- Border depth: 0 in (0 cm). There is no crocheted border. The motifs’ last round is the finished edge, and the tassels are the only trim.
Materials
Yarn. Choose a smooth, firm sport weight cotton or cotton blend. It shows the radiating stitches clearly and keeps the open centers in shape. Avoid fuzzy or very stretchy yarns, because they blur the lattice and let the diamonds sag.
- Cream: 15 g / about 45 m (49 yd)
- Light blue: 15 g / about 45 m (49 yd)
Each color covers 10 motifs (about 16 m) plus its tassels (about 2.6 m per tassel). These amounts include a generous margin for swatching, tails and trimming the tassels.
Tools:
- 3.0 mm crochet hook
- Tapestry needle
- Sharp scissors
- Stiff card 2.25 in (5.7 cm) wide, for wrapping tassels
- Rustproof pins and a blocking mat or folded towel
- Spray bottle with water
- Ruler or tape measure
Abbreviations (US Terms)
- ch: chain
- sl st: slip stitch
- sc: single crochet
- dc: double crochet
- sp: space
- BLO: back loop only
- st(s): stitch(es)
- [ ]: repeat the instructions inside as directed
Special techniques:
- Tip join (vertical): Work in the corner ch-2 sp of the current motif. Sc, ch 1, sl st in the ch-2 sp at the bottom tip of the motif above, ch 1, then sc in the same sp of the current motif. This replaces (sc, ch 2, sc).
- Bridge join (horizontal): Work in the corner ch-2 sp of the current motif. Sc, ch 3, sl st in the ch-2 sp at the right tip of the motif to the left, ch 3, then sc in the same sp of the current motif. This replaces (sc, ch 2, sc).
Gauge and Checkpoints
Gauge: 6 sc = 1 in (2.5 cm) with sport weight yarn and a 3.0 mm hook.
Gauge matters here because twenty small errors add up across the grid. Make one complete motif first and measure it before you go on.
Checkpoints for one motif:
- After Rnd 1: the square is about 0.75 in (1.9 cm) per side. The open center is about 0.35 in (0.9 cm) across.
- After Rnd 2: the square is 1.06 in (2.7 cm) per side. Turned as a diamond, that is 1.5 in (3.8 cm) tip to tip.
If your motif is too big (over 1.6 in / 4.1 cm tip to tip), go down to a 2.75 mm hook or crochet a little tighter. If it is too small (under 1.4 in / 3.6 cm), go up to a 3.25 mm hook.
An error of 0.1 in (0.3 cm) per motif becomes 0.5 in (1.3 cm) across five columns. Fix your gauge before you make more motifs.
Diamond Motif (make 20)
Make 10 motifs in cream and 10 in light blue. Work Motif 1 in full as written below. Every other motif uses the same Rnd 1 and the joining version of Rnd 2 (see Joining).
Ring: Ch 8, sl st in first ch to form a ring. Keep this ring open, because it becomes the hollow center.
Rnd 1 (radiating stitches): Ch 3 (counts as dc), 2 dc in ring, ch 2, [3 dc in ring, ch 2] 3 times; join with sl st to top of beginning ch-3.
(12 dc, 4 ch-2 corner sps; 3 dc per side)
Spread the dc evenly around the ring so they fan out like spokes. This fan of posts makes the radiating lines in the frame.
Rnd 2 (raised frame): Sl st in next 2 dc and into the corner ch-2 sp. Ch 1, (sc, ch 2, sc) in same sp, sc in BLO of next 3 dc, [(sc, ch 2, sc) in next ch-2 sp, sc in BLO of next 3 dc] 3 times; join with sl st to first sc. Fasten off.
(20 sc, 4 ch-2 corner sps)
Rnd 2 is a conversion round, not a growth round. It places 1 sc in each of the 12 dc and adds 2 sc at each of the 4 corners (8 sc), so 12 + 8 = 20 sc.
Per side: 5 sc = 3 sc worked into the dc + 1 corner sc at each end. 5 sc x 4 sides = 20 sc. Neighboring sides don’t share their corner sc, because a ch-2 sp sits between them.
Working the side sc in BLO leaves the front loops of Rnd 1 as a ridge around the inner edge. The ridge and the dc posts together give the raised, textured look.
Orientation: Turn the finished square 45° so one ch-2 corner points up. The four corners are now the top, right, bottom and left tips.
Weave in the tails of Motif 1 now. On joined motifs, weave in the tails as you go.
Make All Pieces
Quantities:
- Cream motifs: 10
- Light blue motifs: 10
- Cream tassels: 3
- Light blue tassels: 2
Layout grid (seen from the front, Row 1 at the top):
ROW 1:   BLUE   CREAM  BLUE   CREAM  BLUE
ROW 2:   CREAM  BLUE   CREAM  BLUE   CREAM
ROW 3:   BLUE   CREAM  BLUE   CREAM  BLUE
ROW 4:   CREAM  BLUE   CREAM  BLUE   CREAM
TASSELS: CREAM  BLUE   CREAM  BLUE   CREAM
Check: Rows 1 and 3 each have 2 cream + 3 blue. Rows 2 and 4 each have 3 cream + 2 blue. That makes 10 cream and 10 blue. Each tassel matches the diamond directly above it.
Joining
Method: Join as you go on Rnd 2. Work row by row from left to right, starting with Motif 1 at the top left of Row 1.
Stitch-to-stitch logic: Motifs join only at their tips, never along their sides. A join just replaces the ch-2 in one corner, so each motif still has 20 sc, 5 per side.
- Row 1, column 1: Motif 1, no joins.
- Row 1, columns 2-5: Rnd 2 with a bridge join at the left tip, into the right tip of the motif to the left.
- Rows 2-4, column 1: Rnd 2 with a tip join at the top tip, into the bottom tip of the motif above.
- Rows 2-4, columns 2-5: Rnd 2 with a tip join at the top tip and a bridge join at the left tip.
At a corner that needs joining, work the join instead of (sc, ch 2, sc). Work all other corners as normal.
Join totals: Horizontal bridges: 4 per row x 4 rows = 16. Vertical tip joins: 3 per column x 5 columns = 15. Total: 31 joins.
Tension advice: Keep the sl st in each join snug but not tight. A tight sl st pulls the tips inward and puckers the lattice. Lay the work flat after each motif. Check that the bridges are straight and the tips line up vertically.
Size checkpoints:
- Row 1 complete: 5 x 1.5 in + 4 bridges x 0.5 in = 9.5 in (24.1 cm) wide, and 1.5 in (3.8 cm) tall.
- Row 2 complete: 3.0 in (7.6 cm) tall.
- All 4 rows complete: 4 x 1.5 in = 6.0 in (15.2 cm) tall.
If a bridge is shorter than 0.5 in (1.3 cm) between tips, work ch 4 instead of ch 3 on both sides of the sl st for the remaining bridges.
Border: Tassel Fringe Trim
This panel has no crocheted border. The edge is each motif’s own Rnd 2, so the border gauge is the motif gauge: 6 sc = 1 in (2.5 cm). A border would fill in the open outline of the lattice.
Edge counts per side:
- Top edge: 5 free top tips (ch-2 sps), one per column
- Bottom edge: 5 free bottom tips (ch-2 sps), one per column, each holding a tassel
- Left edge: 4 free left tips, one per row
- Right edge: 4 free right tips, one per row
Make 5 tassels (3 cream, 2 blue):
- Wrap yarn 20 times around the 2.25 in (5.7 cm) card.
- Slide a 12 in (30.5 cm) tie strand under the wraps at one edge and knot it tightly. Leave both ends long.
- Cut the wraps along the opposite edge.
- Wrap a separate strand 4 times around the bundle 0.4 in (1.0 cm) below the top to form the head. Knot it, then thread the ends down into the tassel.
- Trim the strands evenly to 2.0 in (5.1 cm) below the head.
Attach: Thread both tie-strand ends from front to back through the bottom-tip ch-2 sp of a Row 4 motif. Knot them on the back so the tassel head sits just under the tip. Weave the ends into the motif.
Why the math works: 5 columns give exactly 5 bottom tips, so each column gets one tassel. The tassel colors follow Row 4 (CREAM, BLUE, CREAM, BLUE, CREAM), so every tassel matches its own diamond.
Final Blocking
- Weave in all remaining ends before blocking.
- Lay the panel face up on a blocking mat or folded towel.
- Mist it evenly with water until it is damp but not soaked.
- Pin the four outer corners first: 9.5 in (24.1 cm) apart across and 6.0 in (15.2 cm) apart from top to bottom.
- Pin every top tip and every bottom tip so each column runs straight.
- Pin the left and right tips of the outer columns so each row runs straight.
- Check that each diamond is 1.5 in (3.8 cm) tip to tip and each bridge is 0.5 in (1.3 cm).
- Gently open each center hole with a fingertip so it sits square.
- Comb the tassels straight. Let everything dry completely before you unpin it.
- Trim any tassel strands that dried uneven.
Final Quality-Control Checklist
- 20 motifs: 10 cream and 10 light blue, in a true checkerboard
- Each motif: 12 dc in Rnd 1, 20 sc in Rnd 2, 5 sc per side
- Every diamond is 1.5 in (3.8 cm) tip to tip
- 31 joins total: 16 bridges and 15 tip joins
- Panel is 9.5 in (24.1 cm) x 6.0 in (15.2 cm), excluding tassels
- 5 tassels, each 2.0 in (5.1 cm) long and matching the diamond above
- Every center hole is open and clear
- All ends are woven in and none show on the front
Troubleshooting
Center hole closes up. The ring was pulled too tight or the chain was too short. Keep the ch-8 ring loose and spread the dc around it.
Motif curls or cups. Rnd 2 is too tight. Loosen your tension, or work Rnd 2 alone with a 3.25 mm hook.
Motif ruffles at the edges. Rnd 2 is too loose. Go down one hook size for Rnd 2.
Rows slope or drift. One bridge join is shorter or longer than the others. Recount the ch 3 on each side of the sl st.
Columns don’t line up. A tip join went into the wrong corner. Check that each tip join connects a top tip to the bottom tip directly above it.
Tassels look thin. Wrap 24 times instead of 20, and remake the thin tassels so they all match.
Tassel head slides. Tighten the head wrap and add a second knot before you hide the ends.
Care
Hand wash in cool water with mild soap. Press out the water in a towel, then dry flat, re-pinning the tips if needed and combing the tassels straight while damp.
Final Notes
The measurement chain is short and easy to check. Rnd 1 makes a square 0.75 in (1.9 cm) per side. Rnd 2 brings it to 1.06 in (2.7 cm) per side, which is a 1.5 in (3.8 cm) diamond. Five diamonds plus four 0.5 in (1.3 cm) bridges make 9.5 in (24.1 cm) across. Four diamonds stacked tip to tip make 6.0 in (15.2 cm) tall. Five 2.0 in (5.1 cm) tassels bring the total height to about 8.0 in (20.3 cm).
Get the first motif right and the rest of the panel follows.
Optional: for a wider panel, add columns two at a time so the checkerboard stays balanced, with one tassel for each new column.
Happy crocheting!