

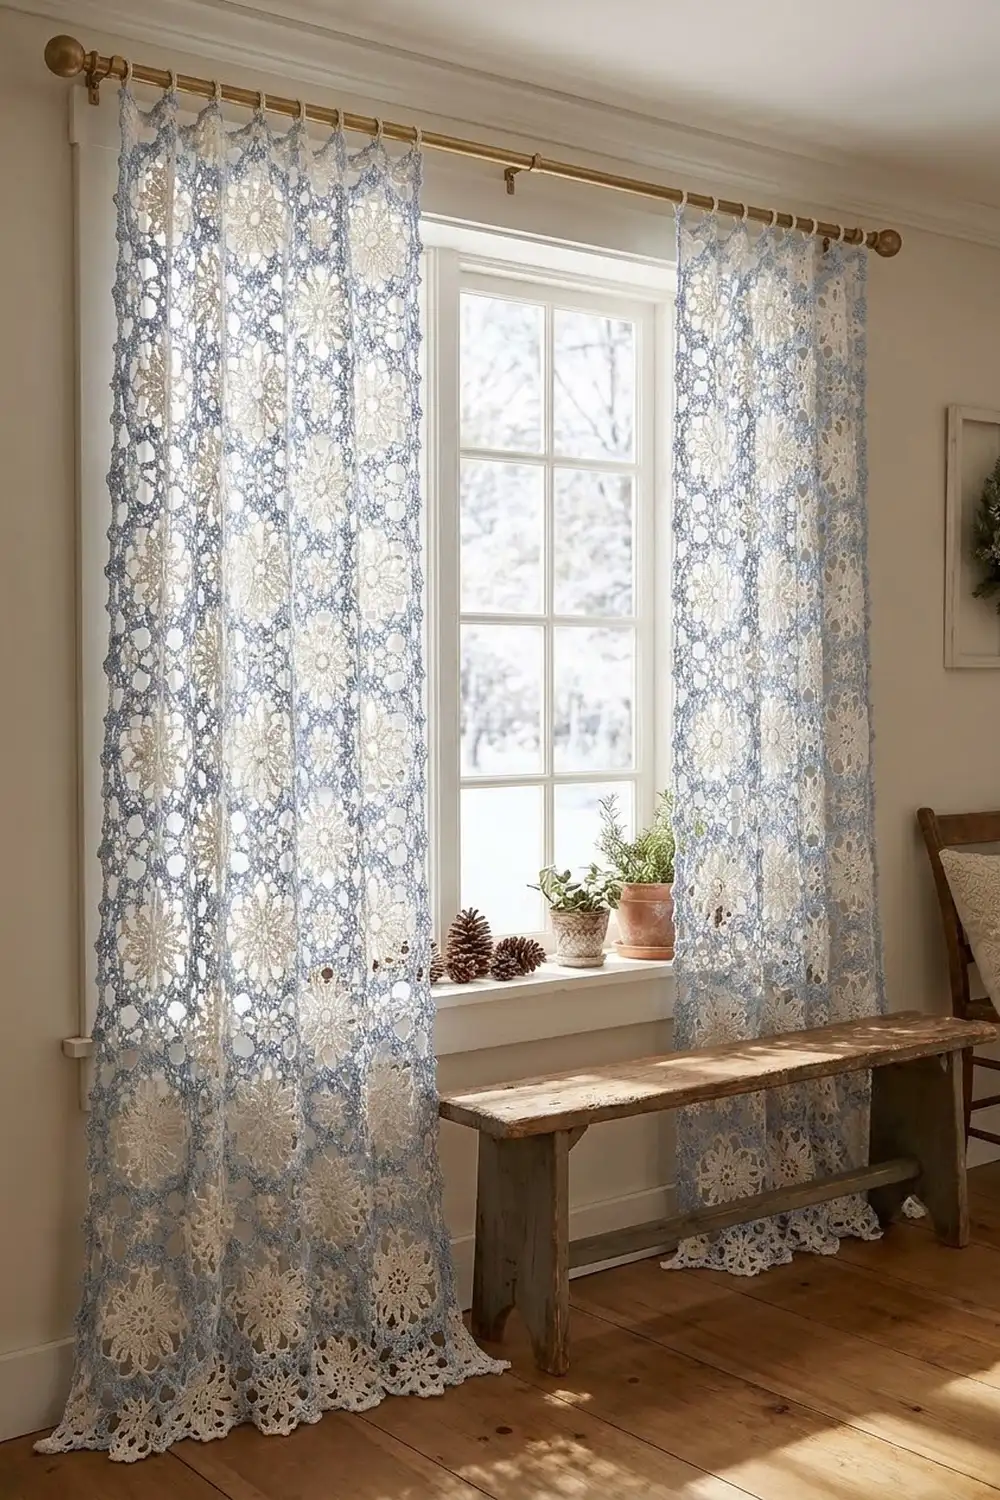
These two lace curtain panels hang side by side on one rod. Each panel is a tall rectangle of filet mesh with circular snowflake motifs set in rows down its length. When light comes through the window, it shines through the open mesh, while the denser motifs keep the window from being fully see-through.
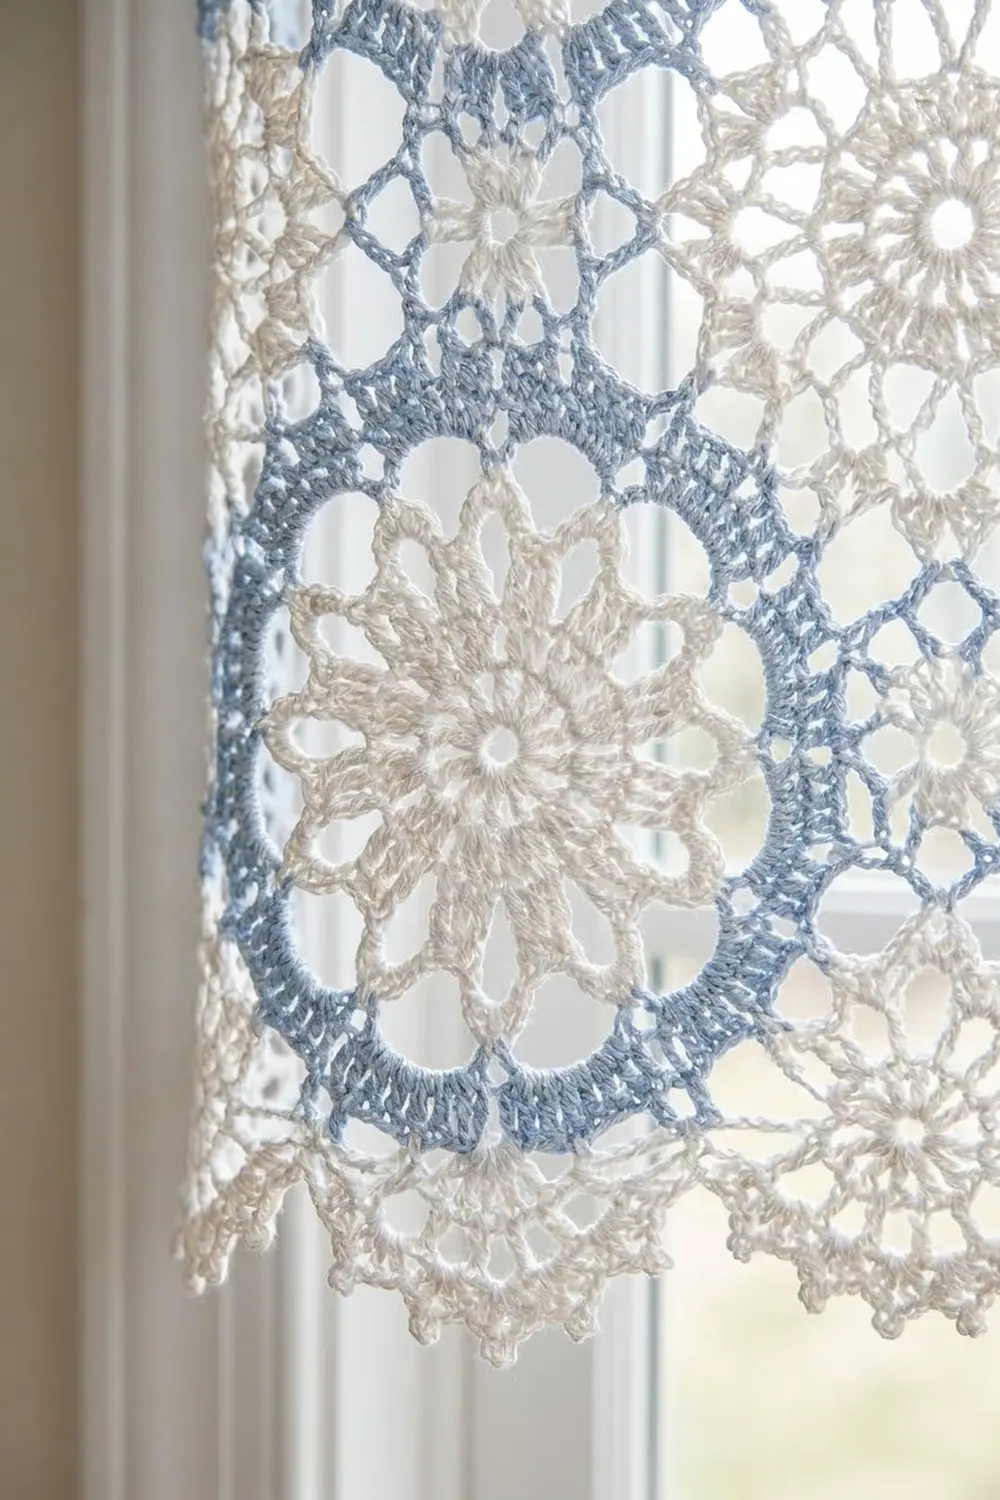
The colors are white and pale blue. The open mesh lattice is pale blue. Each motif is a white square of filet with a solid-block ring and a six-armed snowflake inside it. The bottom edge of each panel has a white scalloped hem with a small picot on every scallop. Pale blue tabs at the top hold the panels on the rod.
The pattern uses US crochet terms. Each finished panel measures 41 in × 92.75 in (104.1 cm × 235.6 cm), not counting the tabs. The pair together spans 82 in (208.3 cm) when hung flat.
You make each panel in one piece, working rows from the bottom up in filet crochet. The white motifs are worked with intarsia bobbins. After the body is done, you add two rounds of single crochet around the edge, a shell-and-picot hem along the bottom, and ten tabs along the top.
Finished Size and Construction
- Finished size (each panel): 41 in × 92.75 in (104.1 × 235.6 cm), plus tabs
- Skill level: Experienced (intarsia filet, long project)
- Terminology: US
- Yarn weight: Sport (#2) mercerized cotton
- Hook: 3.25 mm (US D-3)
- Number of pieces: 2 panels, each worked in one piece
- Layout: 4 motifs across × 9 motif bands per panel
- Motif size: 16 × 16 squares = 8 in (20.3 cm); repeat with spacing = 10 in (25.4 cm)
- Size before border: 40 in × 91 in (101.6 × 231.1 cm)
- Border depth: 0.5 in (1.3 cm) on top and sides; 1.25 in (3.2 cm) on the bottom
Materials
Yarn: Use a sport-weight mercerized cotton with roughly 155 m per 50 g. Mercerized cotton keeps clear stitch definition, hangs without stretching, and stands up to sunlight better than acrylic. Buy all your yarn from a single dye lot, because a color shift shows up clearly on a sunny window.
- White: 1,550 g (about 4,805 m), which is 31 balls of 50 g
- Pale Blue: 850 g (about 2,635 m), which is 17 balls of 50 g
These amounts cover both panels and include a margin of about 10%.
Tools:
– 3.25 mm (D-3) crochet hook
– 16 yarn bobbins (8 in use at a time, 8 wound and ready)
– Tapestry needle
– Stitch markers
– Rust-proof pins and blocking mats, or a clean sheet on carpet
– Measuring tape
– Spray bottle
Abbreviations (US Terms)
- ch: chain
- sl st: slip stitch
- sc: single crochet
- dc: double crochet
- sp: space
- st(s): stitch(es)
- RS / WS: right side / wrong side
- M (mesh square): ch 2, skip 2 sts (or the ch-2 sp), dc in next st
- B (block square): over a block, dc in next 3 sts; over a mesh, 2 dc in ch-2 sp, then dc in next dc
- Picot: ch 3, sl st in 3rd ch from hook
Each square is 3 sts wide. Neighboring squares share their edge dc. A row of N squares therefore has 3N + 1 sts, with every chain counted as a stitch.
Color changes: Switch to the new color on the final yarn-over of the last dc before the new color area. Leave the old color hanging on the WS so it is ready for the next row.
Gauge and Checkpoints
Gauge: 10 squares × 10 rows = 5 in (12.7 cm) in filet mesh, measured after blocking. That works out to 6 sts per inch and 2 rows per inch.
Test one motif first. Ch 63, then dc in the 4th ch from hook and in each ch across. That gives 61 sts, or 20 squares. Work 2 mesh rows, the 16 chart rows below (in one color is fine), and 2 more mesh rows. Block the swatch. It should measure 10 in × 10.5 in (25.4 × 26.7 cm), and the motif should measure 8 in (20.3 cm).
Checkpoints:
– After Row 1, the panel is 40 in (101.6 cm) wide.
– After Row 21 (first repeat done), it is 10.5 in (26.7 cm) tall.
– After Row 91, it is 45.5 in (115.6 cm) tall.
– After Row 182 (body done), it is 40 × 91 in (101.6 × 231.1 cm).
– After the border, it is 41 × 92.75 in (104.1 × 235.6 cm).
If your fabric is too big, go down 0.25 mm in hook size. If it is too small, go up 0.25 mm. Over 182 rows, an error of 0.1 in per 5 in adds up to almost 2 in (5.1 cm), so fix your gauge before you start.
The Motif Chart
The motif area is 16 squares × 16 rows, all worked in White. “B” means a block square and “M” means a mesh square. Every row reads the same in both directions, and the chart is symmetrical top to bottom, so you can work it from either edge.
- Chart Row 1: 5M, 6B, 5M
- Chart Row 2: 3M, 3B, 4M, 3B, 3M
- Chart Row 3: 2M, 2B, 3M, 2B, 3M, 2B, 2M
- Chart Row 4: 1M, 2B, 2M, 1B, 1M, 2B, 1M, 1B, 2M, 2B, 1M
- Chart Row 5: 1M, 1B, 2M, 1B, 2M, 2B, 2M, 1B, 2M, 1B, 1M
- Chart Row 6: 2B, 3M, 1B, 1M, 2B, 1M, 1B, 3M, 2B
- Chart Row 7: 1B, 5M, 4B, 5M, 1B
- Chart Row 8: 1B, 1M, 5B, 2M, 5B, 1M, 1B
- Chart Rows 9–16: Work Chart Rows 8 back to 1, in that order.
Each chart row adds up to 16 squares. The outer blocks form the ring, and the center blocks form the snowflake arms around a 2-square opening in the middle.
Panel Body
Row 1 (Pale Blue, solid row): Ch 243. Dc in 4th ch from hook and in each ch across. The skipped ch-3 counts as a dc. Turn. (241 sts = 80 block squares)
Rows 2–181: Work the 20-row repeat below 9 times in total.
Repeat Rows 1–2 (Pale Blue, mesh): Ch 5 (counts as dc + ch 2). Skip the next 2 sts and dc in the next st. Ch 2, skip 2, dc in next st; repeat from * across, working the last dc in the top of the turning ch. Turn. (80 M = 241 sts)
Repeat Rows 3–18 (motif band): Before the first band row, wind 4 White bobbins of about 60 m each and 4 Pale Blue bobbins of about 12 m each. The main Pale Blue ball works the first edge margin.
Work each band row like this:
1. 2M in Pale Blue
2. Chart row in White (bobbin 1)
3. 4M in Pale Blue (bobbin)
4. Chart row in White (bobbin 2)
5. 4M in Pale Blue
6. Chart row in White (bobbin 3)
7. 4M in Pale Blue
8. Chart row in White (bobbin 4)
9. 2M in Pale Blue (bobbin)
Band Row 1 uses Chart Row 1, Band Row 2 uses Chart Row 2, and so on through Chart Row 16. Every row has 2 + 16 + 4 + 16 + 4 + 16 + 4 + 16 + 2 = 80 squares, or 241 sts.
The band has 16 rows, an even number, so you finish at the same edge where you started, with the main ball ready to go. Cut the 7 bobbins, leaving 15 cm (6 in) tails.
Repeat Rows 19–20 (Pale Blue, mesh): Work the same as Repeat Rows 1–2.
Row 182 (Pale Blue, solid row): Ch 3 (counts as dc). 2 dc in ch-2 sp, dc in next dc; repeat across. (241 sts) Fasten off.
Weave in the bobbin tails vertically along the dc posts of the same color, so they stay hidden when light comes through.
Checkpoint: The body measures 40 × 91 in (101.6 × 231.1 cm) and has 9 bands of 4 motifs each, with 4-square Pale Blue channels between the motifs.
Make Both Panels
The two panels are identical, so you can hang either one on either side.
- Per panel: 36 White motifs, 61 scallops, 10 tabs. About 775 g White and 425 g Pale Blue.
- Both panels: 72 motifs, 122 scallops, 20 tabs.
Rod layout:
ROD: LEFT PANEL | WINDOW | RIGHT PANEL
Each panel, top to bottom:
TOP:        10 TABS (BLUE)
ROW 182:    SOLID BLUE
BANDS 9-1:  BLUE(2) WHITE(16) BLUE(4) WHITE(16) BLUE(4) WHITE(16) BLUE(4) WHITE(16) BLUE(2)
            (4 blue mesh rows between bands; 2 above band 9 and below band 1)
ROW 1:      SOLID BLUE
BOTTOM:     WHITE SCALLOPS (61)
Joining (Hanging the Pair)
The two panels are never sewn to each other. They hang separately, one on each side of the window. The only joining in this pattern is sewing each tab to its own panel.
Method: Fold each tab to the WS. Whipstitch its last row to the WS of the panel along the top of border Round 1, one stitch per stitch. The tab has 9 sc, so you make 9 whipstitches into the 9 border sts directly behind the tab.
Tension: Sew firmly, but keep the seam as flexible as the fabric. A seam pulled too tight puckers the top edge. Use a 30 cm (12 in) tail and go through each stitch twice.
Size checkpoint: Lay the two panels on top of each other. The widths and lengths should match within 0.5 in (1.3 cm). If one is longer, block it to match the other before you hang them.
Border
Border gauge: 6 sc per inch in both directions, which matches the body’s 6 sts per inch.
Round 1 (Pale Blue, RS): Join at the top right corner. Work all four sides:
– Top: 1 sc in each st of Row 182 = 241 sc
– Each side: 3 sc in each row-end = 182 × 3 = 546 sc
– Bottom: 1 sc in each foundation ch = 241 sc
– Each corner: ch 2. Corner chains are not counted in the side totals.
Join with a sl st. (1,574 sc + 4 ch-2 corner sps)
Round 2: This round converts the edge rather than growing it. Work sc in each sc, and (sc, ch 2, sc) in each corner sp. Each side gets its existing sc plus 2 corner sc:
– Top and bottom: 241 + 2 = 243 sc each
– Each side: 546 + 2 = 548 sc
Join. (1,582 sc) Fasten off.
Row 3 (White, bottom edge only, RS): Join in the bottom-right corner sp. Sc in that sp. Skip 1 sc, 5 dc in next sc, skip 1 sc, sc in next st; repeat from * across. The last sc lands in the bottom-left corner sp. (61 scallops) Turn.
Row 4 (picot row, WS): Sl st in first sc. Sc in next 2 dc, (sc, picot, sc) in center dc, sc in next 2 dc, sl st in next sc; repeat from * across. (61 picots, 366 sc) Fasten off.
Tabs (Pale Blue, top edge, RS): Join in the first sc of the top edge.
– Tab: Sc in same st and next 8 sc (9 sc). Work 23 more rows of 9 sc, for 24 rows total, 6 in (15.2 cm). Fasten off, leaving a 30 cm (12 in) tail.
– Next tab: Skip 17 sc and join in the next sc.
Make 10 tabs. Sew each one as described in Joining. The folded loop is 3 in (7.6 cm) tall and fits rods up to 1.5 in (3.8 cm) in diameter.
Why the math works:
– 241 = 3 × 80 + 1, and 241 sts at 6 per inch is 40 in.
– Each dc row is 0.5 in tall, and 3 sc per row-end at 6 sc per inch fills exactly 0.5 in. That is why the sides don’t ripple or pull in.
– The bottom has 243 sc plus 2 corner sps = 245 positions = 4 × 61 + 1, so the shells come out even at both ends.
– The top has 10 tabs × 9 sc + 9 gaps × 17 sc = 90 + 153 = 243 sc.
Final Blocking
- Soak one panel in cool water with a little wool wash for 15 minutes.
- Press the water out gently. Don’t wring it. Roll it in towels.
- Lay it flat on mats or a sheet. If you’re short on space, work in sections about 30 in (76.2 cm) long.
- Pin the sides straight to 41 in (104.1 cm) apart, with a pin every 4 in (10.2 cm).
- Pin the length to 92.75 in (235.6 cm), not counting the tabs.
- Pin each scallop at its picot so the points are even.
- Square up the motifs. Every motif should measure 8 in (20.3 cm).
- Let it dry completely, then do the second panel and block it to the same pins.
Final Quality-Control Checklist
- Every row has 241 sts, or 80 squares.
- Each panel has 9 bands of 4 motifs, all lined up in columns.
- The Pale Blue channels are 4 squares, 2 in (5.1 cm) wide, between motifs.
- Border Round 2 counts are 243 / 548 / 243 / 548.
- Each panel has 61 scallops, each with one picot.
- Each panel has 10 tabs, evenly spaced with 17 sc gaps.
- Both panels measure 41 × 92.75 in (104.1 × 235.6 cm).
- All tails are woven in vertically, and none show against the light.
Troubleshooting
- The motif looks skewed: You probably counted a chart row wrong. Check that the row totals 16 squares before you move on.
- Blue shows through the White: Change color on the last yarn-over, and keep the dropped color on the WS.
- The bobbins tangle: Turn clockwise on one row and counterclockwise on the next.
- The sides wave: You worked more than 3 sc per row-end. Take out Round 1 and redo it.
- The sides pull in: You worked fewer than 3 sc per row-end.
- The scallops come out uneven at the ends: Recount Round 2. The bottom must have exactly 243 sc.
- The panel grows longer while it hangs: Re-block it, then let it hang for 24 hours before you hem the rod position.
Care
Hand wash in cool water and dry flat, reshaping to the blocked size. Don’t hang the panels wet, because the weight of the water stretches the length.
Final Notes
Here is how the measurements build on each other:
– The gauge is 2 squares per inch.
– One motif is 8 in (20.3 cm), and a full repeat is 10 in (25.4 cm).
– 80 squares make the 40 in (101.6 cm) width, and 182 rows make the 91 in (231.1 cm) length.
– The border adds 0.5 in (1.3 cm) on top and sides and 1.25 in (3.2 cm) at the hem, bringing each panel to 41 × 92.75 in (104.1 × 235.6 cm).
Check your gauge on the test motif, count each row against the 241 total, and both panels will come out the same size.
Happy crocheting!