

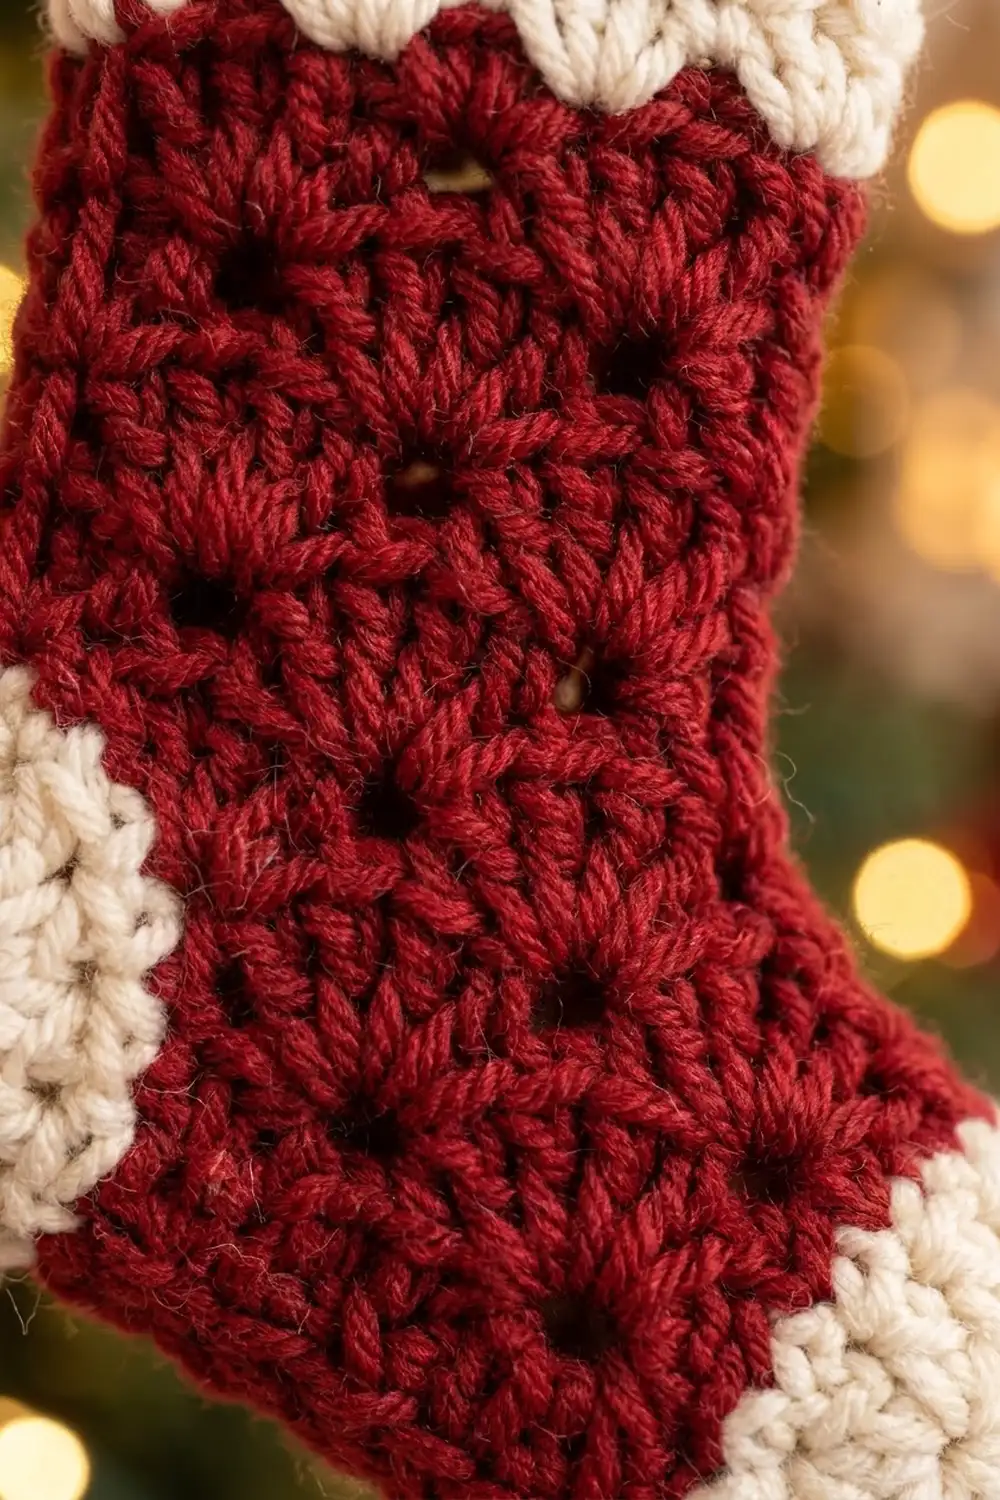
This little stocking is the classic Christmas shape in miniature. The deep burgundy-red body is covered in raised popcorn stitches. The cream cuff, heel, and toe give it the traditional colorblock look. A cream loop at the top of the cuff lets it hang straight on the tree.
The style is cozy and old-fashioned: smooth vertical ribs on the cuff, a rounded heel patch, a rounded toe, and bumpy popcorn texture in between. It works as a tree ornament, a gift tag, or a tiny place-setting favor.
The pattern uses US crochet terms. The finished stocking measures 4 in (10.2 cm) tall from the top of the cuff to the bottom of the heel, 2.75 in (7.0 cm) from the back of the heel to the tip of the toe, and 2 in (5.1 cm) across the leg.
The stocking is crocheted as one integrated piece. You work top-down in joined rounds: the ribbed cuff, the popcorn leg, a chain gap for the heel, the popcorn foot, and a rounded toe. Then you work the heel directly into the gap, finish the top edge with a sc border, and add the hanging loop. Nothing is sewn or appliquéd on.
Finished Size and Construction
- Finished size: 4 in (10.2 cm) tall x 2.75 in (7.0 cm) heel to toe; leg 2 in (5.1 cm) wide when flat
- Skill level: Easy-intermediate (popcorns, post stitches, working in rounds)
- Terminology: US crochet terms
- Yarn weight: Worsted weight (#4)
- Hook: 3.5 mm (E-4)
- Number of pieces: 1
- Layout: Single stocking, worked top-down in joined rounds, heel worked into a chain gap
- Piece size: 20 sts around (10 sts per flat side)
- Size before border: 3.8 in (9.7 cm) tall
- Border depth: 0.2 in (0.5 cm), one round of sc, plus the hanging loop
Materials
Choose a smooth worsted yarn with good stitch definition. Acrylic, wool blends, or cotton blends all work. Avoid fuzzy or splitty yarn, because the popcorns and post stitches need to read clearly at this small size.
- Color A (burgundy red): 8 g, about 15 m
- Color B (cream): 6 g, about 11 m
Quantities include a margin of about 30% over what one stocking uses, so you have room for a gauge restart and tails.
Tools:
- 3.5 mm (E-4) crochet hook
- Tapestry needle
- 1 stitch marker
- Scissors
- Pins and a flat foam board for blocking
- Ruler or tape measure
Abbreviations (US Terms)
- ch: chain
- sl st: slip stitch
- sc: single crochet
- dc: double crochet
- sc2tog: single crochet 2 together (decrease)
- FPdc: front post double crochet
- BPdc: back post double crochet
- pc: popcorn (see below)
- st(s): stitch(es)
- rnd(s): round(s)
- RS: right side
Special stitch – Popcorn (pc): Work 4 dc in the same st. Remove the hook from the loop. Insert the hook from front to back through the top of the first dc of the group, pick up the dropped loop, and pull it through. One pc counts as 1 st. The popcorn pops toward you, so always work it with the RS (outside of the stocking) facing.
Joined rounds: Every rnd begins with ch 1 (or ch 2 for post-stitch rnds), which does not count as a st, and ends with a sl st into the first st. Do not turn.
Gauge and Checkpoints
Gauge: 20 sts and 20 rnds = 4 in (10.2 cm) in the leg pattern (alternating popcorn and sc rnds). That is 5 sts and 5 rnds per inch.
Because this is a single piece, your test is the stocking itself. Work the cuff and Rnds 4–8 of the leg, then stop and measure before continuing.
Checkpoints:
- After Rnd 3 (cuff): the tube lies flat at 2 in (5.1 cm) wide and 1 in (2.5 cm) tall.
- After Rnd 12 (leg): 2.8 in (7.1 cm) from the foundation edge, still 2 in (5.1 cm) wide.
- After Rnd 22 (toe): the straight tube measures 4.8 in (12.2 cm) from the foundation edge to the toe tip.
- After the heel: the L-shaped stocking is 3.8 in (9.7 cm) tall and 2.75 in (7.0 cm) heel to toe.
- After the border: 4 in (10.2 cm) tall.
If your tube is too wide (over 2.2 in / 5.6 cm flat), go down one hook size to 3.25 mm. If it is too narrow (under 1.8 in / 4.6 cm flat), go up to 3.75 mm. Rip back and restart. At 20 sts it only takes minutes, and every later measurement depends on this width.
Pattern
Cuff (Color B, cream)
Foundation: With B, ch 20. Sl st into the first ch to form a ring, making sure the chain is not twisted. Place a marker at the join. The marker side is the front fold (shin side) of the stocking.
Rnd 1: Ch 1, sc in the back bump of each ch around, sl st to first sc. (20 sts)
Leave the front loops of the foundation ch unworked; the border goes there later.
Rnd 2: Ch 2, FPdc around next st, BPdc around next st; rep from * 9 more times, sl st to first FPdc. (20 sts: 10 FPdc, 10 BPdc)*
Rnd 3: Ch 2, FPdc around the FPdc, BPdc around the BPdc; rep from * 9 more times, sl st to first FPdc. (20 sts)*
The FPdc columns now stack into smooth vertical ribs. Checkpoint 1: 2 in (5.1 cm) wide, 1 in (2.5 cm) tall.
Leg (Color A, burgundy red)
Change to A with the final sl st of Rnd 3. Cut B, leaving a 4 in (10.2 cm) tail.
Rnd 4: Ch 1, sc in each st around, sl st to first sc. (20 sts)
Rnd 5 (popcorn rnd A): Ch 1, sc in next 3 sts, pc in next st; rep from * 4 more times, sl st to first sc. (20 sts: 15 sc, 5 pc)*
Rnd 6: Ch 1, sc in each st around, working 1 sc into the top of each pc, sl st to first sc. (20 sts)
Rnd 7 (popcorn rnd B): Ch 1, sc in next st, pc in next st, sc in next 3 sts, pc in next st; rep from * 3 more times, sc in last 2 sts, sl st to first sc. (20 sts: 15 sc, 5 pc)*
Check: 1 + 1 + (4 x 4) + 2 = 20. The Rnd 7 popcorns sit at sts 2, 6, 10, 14, and 18, exactly between the Rnd 5 popcorns at sts 4, 8, 12, 16, and 20. This offset creates the staggered texture.
Rnd 8: Rep Rnd 6. (20 sts)
Rnds 9–12: Rep Rnds 5–8 once. (20 sts)
Checkpoint 2: 2.8 in (7.1 cm) from the foundation edge.
Heel Gap (Color A)
Flatten the tube so the marker sits on one fold. That fold is the front; the opposite fold is the back. The heel stitches are the 10 sts centered on the back fold (sts 6–15).
Rnd 13: Ch 1, sc in next 5 sts, ch 10, skip next 10 sts, sc in last 5 sts, sl st to first sc. (10 sc + 10 ch = 20 sts)
Rnd 14: Ch 1, sc in next 5 sts, sc in the back bump of each of the 10 ch, sc in last 5 sts, sl st to first sc. (20 sts)
Leave the front loops of the ch-10 free for the heel.
Foot (Color A)
Rnd 15: Rep Rnd 5. (20 sts)
Rnd 16: Rep Rnd 6. (20 sts)
Rnd 17: Rep Rnd 7. (20 sts)
Rnd 18: Rep Rnd 6. (20 sts)
Toe (Color B, cream)
Change to B with the final sl st of Rnd 18. Cut A, leaving a 4 in (10.2 cm) tail.
Rnd 19: Ch 1, sc in each st around, sl st to first sc. (20 sts)
Rnd 20: Ch 1, sc in next 2 sts, sc2tog; rep from * 4 more times, sl st to first sc. (15 sts)*
Rnd 21: Ch 1, sc in next st, sc2tog; rep from * 4 more times, sl st to first sc. (10 sts)*
Rnd 22: Ch 1, sc2tog 5 times, sl st to first st. (5 sts)
Fasten off with a 6 in (15.2 cm) tail. Thread it through the front loops of the last 5 sts, pull snug, and weave in. The five evenly spaced decrease points give a rounded dome toe, not a point.
Checkpoint 3: the straight tube is 4.8 in (12.2 cm) long.
Heel (Color B, cream)
The heel is worked in rounds directly into the gap, so the stocking bends into its L shape without any seam.
Hold the stocking with the toe pointing away from you. Join B in the first skipped st of Rnd 12 at the right-hand corner of the gap.
Rnd 1 (conversion rnd): Ch 1, sc in each of the 10 skipped sts of Rnd 12, 1 sc in the corner gap, sc in the free front loop of each of the 10 ch, 1 sc in the second corner gap, sl st to first sc. (20 sts worked 1-per-st + 2 corner sts = 22 sts)
The two corner sc close the small holes where the chain meets the leg.
Rnd 2: Ch 1, sc in next 9 sts, sc2tog; rep from * once, sl st to first sc. (20 sts)*
Place each sc2tog over a corner st and its neighbor so the corners stay smooth.
Rnd 3: Ch 1, sc in next 2 sts, sc2tog; rep from * 4 more times, sl st to first sc. (15 sts)*
Rnd 4: Ch 1, sc in next st, sc2tog; rep from * 4 more times, sl st to first sc. (10 sts)*
Rnd 5: Ch 1, sc2tog 5 times, sl st to first st. (5 sts)
Fasten off and cinch closed the same way as the toe. The heel forms a rounded cream cup that shows as a round cream patch on each flat side.
Checkpoint 4: 3.8 in (9.7 cm) tall, 2.75 in (7.0 cm) heel to toe.
Border
Border gauge: 5 sc per inch, the same as the body.
The border is one round of sc worked into the free front loops of the foundation chain at the top of the cuff. The hanging loop is worked at the back fold, above the heel.
With RS facing, join B at the marker (front fold) in the free loop of the foundation ch.
Border Rnd: Ch 1, sc in the free loop of each of the next 10 ch (first flat side). You are now at the back fold. Ch 12, sl st into the last sc made (hanging loop). Sc in the free loop of each of the remaining 10 ch (second flat side), sl st to first sc. (20 sc: 10 per flat side, plus the ch-12 loop, which does not count as sts)
Fasten off and weave in.
Why the math works: The foundation has 20 ch, and the border places exactly 1 sc in each one, with no increases or decreases. That gives 10 sc per flat side. At 5 sc per inch, 10 sc = 2 in (5.1 cm), which matches the cuff and leg width exactly, so the top edge lies flat without flaring or pulling in. The border adds one sc rnd of height, 0.2 in (0.5 cm), bringing the stocking from 3.8 in (9.7 cm) to 4 in (10.2 cm). The ch-12 loop folds to about 1 in (2.5 cm) above the cuff.
Final Blocking
- Weave in all tails along same-color stitches on the inside of the stocking.
- Lightly mist the stocking with water, or hover a steam iron 1 in (2.5 cm) above it. Never press down; that flattens the popcorns.
- Flatten the stocking so the front and back folds form the side edges, with the heel at the back and the toe pointing forward.
- Pin it to your foam board at 2 in (5.1 cm) wide across the leg and cuff and 4 in (10.2 cm) tall.
- Gently round the heel and toe with your fingers so the cream patches look even on both sides.
- Straighten the cuff ribs so they run vertically.
- Let it dry completely, then unpin.
Final Quality-Control Checklist
- Total height is 4 in (10.2 cm); heel to toe is 2.75 in (7.0 cm).
- Leg and cuff measure 2 in (5.1 cm) wide when flat.
- Each popcorn rnd has 5 pc, and the popcorn rows are offset.
- All popcorns pop outward on the RS.
- Cuff ribs are straight and smooth.
- Heel corners have no holes.
- Toe and heel are cinched closed with no gap.
- Hanging loop sits at the back fold, above the heel.
- Color changes are clean, with no stray red in the cream sections.
- All tails are woven in on the inside.
Troubleshooting
Popcorns push inside the stocking. You are working with the wrong side facing. Keep the outside of the tube toward you on every rnd.
Popcorns look flat or loose. Pull the dropped loop firmly through the first dc to close each popcorn.
The cuff flares. Your post stitches are too loose. Use firmer tension on Rnds 2–3, or work the cuff with a 3.25 mm hook.
Holes at the heel corners. Check that you worked both corner sc in Heel Rnd 1. Close any remaining gap with the yarn tail.
The stocking twists. The foundation ring was twisted. Restart and check the chain before the first sl st.
Stitch count drifts in popcorn rnds. You are skipping the pc top or working into it twice. Each pc counts as 1 st; work exactly 1 sc into it.
Heel looks lopsided. The gap was not centered on the back fold. Recount Rnd 13: 5 sc, ch 10, 5 sc.
Care
Hand wash in cool water with mild soap, press out excess water in a towel, and dry flat in shape. Store flat or hanging, away from heat, so the popcorns keep their shape.

Final Notes
The whole stocking depends on one measurement: 20 sts around at 5 sts per inch, or 2 in (5.1 cm) per flat side. The cuff reaches 1 in (2.5 cm), the leg brings it to 2.8 in (7.1 cm), and the straight tube finishes at 4.8 in (12.2 cm). The heel bends it into an L at 3.8 in (9.7 cm) tall and 2.75 in (7.0 cm) long, and the border adds 0.2 in (0.5 cm) for a final 4 in (10.2 cm).
Check the width after the cuff, and the rest falls into place. Optional: make several in the same colors and hang them together on a ribbon.
Happy crocheting!